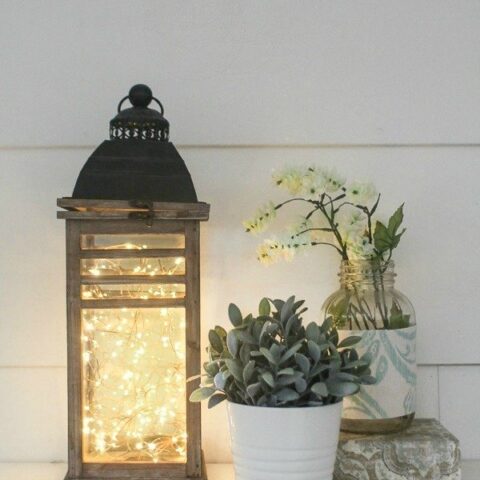
I have the absolute cutest fairy light lantern to share with you all today. It’s a super easy 5-minute project and it makes a gorgeous lamp or night light!

Recently, I was looking through my stash for a small lamp for one of our bedrooms and couldn’t find anything that would work.
But I did find quite a few candle lanterns I wasn’t using and the wheels in my head started turning.
A few years ago I came up with an idea to transform a simple candle lantern into a farmhouse style lamp and now it’s one of my favorite lamps in our home. (It was also featured this month in Country Sampler’s special Farmhouse Style edition!)
This time I came up with a whole new idea for turning a lantern into a lamp using fairy lights and I love it just as much as the first one.
This post contains affiliate links which means if you make a purchase after clicking a link I will earn a small commission but it won’t cost you a penny more. Click here to see my full disclosure policy.
Materials for DIY Fairy Light Lantern
- Lantern – there are so many cute styles of lanterns out there these days. The best lanterns for this project will have glass on all the sides.
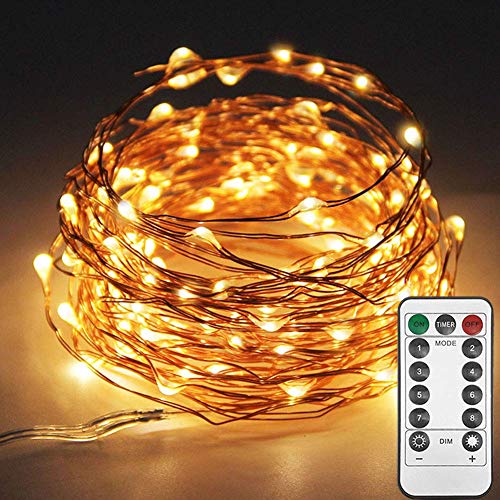
- Fairy lights – LED fairy lights work great for this. Pay attention to the color of the wire for your lights since this will be very visible whenever the lights aren’t switched on.
And that’s it! Really, only two supplies!
How to make a DIY Fairy Light Lantern
Seriously, this is so, so easy. You really need zero DIY skills and only about 5 minutes!
Choosing the best fairy lights
There are, however, a few quick things to consider when buying your fairy lights. (Sometimes they are also called wire lights or string lights. They are basically teeny tiny lights that are attached to a long thin wire. Not the kind you would put on a Christmas tree; literally, these just look like a long piece of wire but they light up.)
You can buy fairy lights that are battery-powered or that plug in. You can also buy fairy lights that come with a remote control.
I chose a set that plugs in for my light because I plan to use these a lot and don’t want to be replacing batteries all the time.
I do kind of wish I had gotten a set with a remote control though so I could turn my light on and off without having to unplug it.
Also, you can buy fairy lights made with different colored wires. I chose copper wire for mine because I think copper is beautiful and looks less utilitarian than other wires.
There are also different lengths available. I used a 40 ft long string of lights and I think it worked perfectly for my tall lantern.

Choosing the right lantern
As far as the lantern, you can use absolutely any lantern. I always find fantastic lanterns for a good price at HomeGoods, Marshalls, and At Home.
Prepping the lantern
I used a lantern that had an attached LED candle and it was super easy; I simply unscrewed the candle and removed it.
This left a round hole in the bottom of my lantern that I threaded my lights through. Then I used a small piece of painter’s tape to secure the cord.

If your lantern doesn’t have an LED candle, simply look at the bottom to see if there is any small crack or hole you can use to thread the wire through. Some lanterns have a small space below the glass sides.
If your lantern has no holes of any kind and is wooden, you can always use a drill to make a small hole in the bottom.

Adding the lights
Then you simply thread your fairy lights through the hole into the lantern, letting them curl up as you go.
This is definitely not a project that requires precision of any sort, but if your lights look bunchy and uneven, you can just reach in through the doors or top and adjust them.
Then plug it in (or turn on your light) and you’re done!

One thing I really wasn’t sure about was how bright the light would end up being. I would say this is similar to a good nightlight.
When it is on at night, you can see everything in the room dimly, but it is much dimmer than an actual lamp.
It is nowhere near bright enough to read by, but it gives a beautiful soft glow.

This little lantern looks so beautiful and magical all lit up. But I also think that cloud of copper is pretty even without the lights turned on.

I am 95% sure I am going to be using this in our nursery, but it would also be beautiful left on in a hallway or bathroom at night or as a bit of ambiance on a mantel or table.
Really anywhere – isn’t that why we all love these lanterns, to begin with, because they look fabulous everywhere?
I’d love for you to pin this post on Pinterest!

Here are a few more posts you’re going to love!
- How to turn a lantern into a lamp – another lantern conversion using an Edison bulb
- How to make easy DIY wood signs
- 5 Gorgeous Paint Finishes to Transform your DIYs and Crafts
How to make a fairy light lantern in 5 minutes
Make the most adorable DIY fairy light to use as a night light or lamp. And it only takes 5 minutes to make!
Materials
- Lantern
- Fairy Lights
Instructions
- If your lantern has an attached LED candle, unscrew the candle and remove it.
- Thread your lights through the round hold on the bottom of the lantern. If your lantern did not have an LED candle, find a gap to thread the lights through.
- Use a small piece of painter’s tape to secure the cord to the bottom of the lantern.
Recommended Products
As an Amazon Associate and member of other affiliate programs, I earn from qualifying purchases.


Carolyn says
LOVE this!! Just did it and it really did take only five minutes..Second fave part was deciding not to worry about the wire getting tangled as I put it into the lantern..LOL! It looks better tangled in there anyway! Fave part is seeing it all done! I always liked my lantern..but now I LOVE this!! Wish all DIY projects were this easy!! ;)
And PS..you can reuse the old LED candle and its batteries somewhere else! Wanted to add pics but not sure how ;)
Carrie says
Thanks Carolyn! I do love a super easy project – and especially one that I don’t need to get all perfectionist about!
Brooklyn Johnson says
I never knew you could make a fairy light lantern in only 5 minutes! My daughter has been wanting these lanterns to hang in her room. I’m going to surprise her and make her these lanterns using your directions and tips!
Carrie says
I bet she will love it!