The Secret to Making Gorgeous Marbled Ornaments
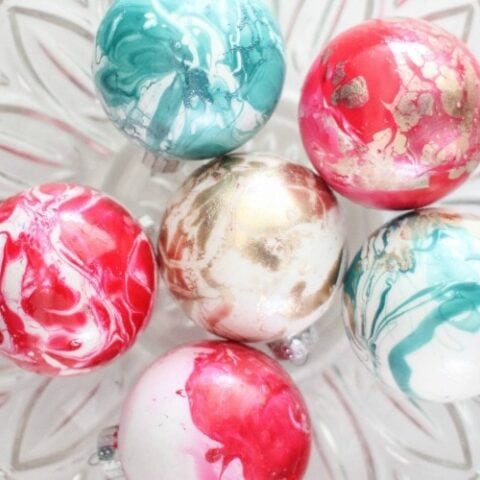
These gorgeous marbled Christmas ornaments are super easy to make in any colors you need using nail polish. I’m sharing everything you need to know to create beautiful ornaments.
I’ve seen a few tutorials floating around recently for creating beautiful marbled mugs using nail polish. The mugs are spectacular and being that it is Christmas time and I have an ornament-making addiction, I knew I had just found the inspiration for my next DIY – marbleized ornaments.
(Yep, this is the third set of ornaments I’ve made this year, but in my opinion there is always more room on the tree for great handmade ornaments!)

These ornaments look so beautiful, but there was a bit of a learning curve with this project.
The thing that makes these ornaments so pretty is that the nail polish does its own thing – it may look sort of like paint, but it behaves nothing like paint in this project.
Yes, you could just swirl some paint around an ornament but it definitely isn’t going to look like this.
And while this wasn’t quite as simple as I had been led to believe, with a bit of trial and error and a few tweaks, I ended up with some really beautiful ornaments. Once I knew what I was doing, it really wasn’t difficult at all.

Materials for Nail Polish Marbleized Ornaments

- White ornaments – I used porcelain stars and balls. You could use clear glass ornaments as well.
- Nail polish in your chosen colors – just make sure it’s not instant dry or quick dry!
- Clear nailpolish/basecoat – You may notice this is not in the picture. I didn’t figure out that I needed this until I had already messed up several ornaments. Whomp, whomp.
- Disposable container – plastic bowls from the dollar store work well.
- Water
- Toothpicks
How to make Marbleized Ornaments with Nail Polish
Before you begin, you need some sort of container to hold water. It needs to be something that is disposable because it will get ruined in this process.
I ended up using an old tupperware bowl that had seen better days.
Your container also needs to be bigger than you might think at first. It should be at least as deep as the object you are marbling and quite a bit bigger around.
Fill the container about halfway with hot water – you don’t want it to splash out when you dip your ornament in.
Add several drops of clear nailpolish – enough to create a slight film on top of the water.
(Adding this clear polish allows some white to show through on your finished ornament.)

The color you see around the rim and at the bottom of the bowl are residue from previous ornaments I had already completed at this point.
Add a few drops of colored nail polish to the container and then swirl them around with a toothpick.


Less swirling makes more a of a watercolor type look, more swirling makes a marbled look.

Then comes the magical part.
The nail polish all sticks together in a layer floating on top of the water. Carefully dip your ornament into the water and then pull it out smoothly.

If you want to be really neat, you can hold the top of your ornament with needle nose pliers, but I just pinched the top of the ornament between two fingers because I had more control that way.
When you pull the ornament out, the swirly nail polish will all have transferred to its surface.

Now you just need to set it somewhere to dry.
(I set my ball ornaments back in the compartmented box they came in and rested my stars on top of plastic cups.)
Lastly, this is very important! You need to clear any remaining nail polish from the water before doing the next ornament, especially if you are changing colors.
This is super simple to do.
Dip a toothpick in the polish and swirl it around.
The remaining polish will wrap around the toothpick in a cocoon-looking thing and then you can just throw it away.

After doing several ornaments, just toss the water and begin again with fresh hot water.
Note: do not pour the leftover water down the drain. Even though you cleared it, there will still be tiny bits of nail polish in it and you do NOT want to be wasting time cleaning nail polish off your drain.
Trust me on this. After learning this lesson, I tossed the rest of my water outside.


More Tips for Beautiful Marbled Ornaments
As I mentioned before, there are a few things you can do that will help you get better results.
Don’t use fast drying polish.
The gold nail polish I used did not work nearly as well as the other two colors I used. The color was beautiful, but it became stiff very quickly and did not swirl around the way the other colors did.
I believe this is because it is a fast drying polish, but the sparkles in it could have also thrown things off.

One or two colors looks best.
Originally I envisioned using all three colors together on the ornaments, but I found that using too many colors started looking busy and messy very quickly.
I would recommend sticking with one, two at the most.

Clear nail polish is key.
The picture below is an example of an ornament I did without using clear polish at all. As you can see, there is no white showing.
The red polish created a film that entirely coated the ornament and the gold just swirled with it a bit. While it was still pretty, this was not the look I was after. If this is the look you are going for, by all means, skip the clear base.

Mistakes are easy to fix.
If you dip an ornament and then are not satisfied with how it looks, you can redo it. Let it dry and then repeat the whole process again. The finished surface might be a little less smooth in places because of the excess polish, but you can fix a lot of goofs this way.
This aqua star looked really bare after the first dip, so I redid it and now it looks so much better.

Swirl the ornament for better coverage.
When you dip the ornaments, if the water and polish don’t quite cover the entire thing, you can swirl the ornament around a bit in the water until all of the sides are covered.
Want more fun DIY ornament tutorials? You can see my whole collection here!
I’d love for you to pin this post on Pinterest!

DIY Marbled Christmas Ornaments
Make beautiful marbleized ornaments using plain ornaments and nail polish.
Materials
- White or clear glass ornaments – I used porcelain stars and balls.
- Nail polish in your chosen colors – no instant dry or quick dry!
- Clear nailpolish/basecoat
- Disposable container
- Water
- Toothpicks
Instructions
- You need some sort of container to hold water. It needs to be something that is disposable because it will get ruined in this process.
- Fill the container about halfway with hot water – you don’t want it to splash out when you dip your ornament in.
- Add several drops of clear nailpolish – enough to create a slight film on top of the water.
- Add a few drops of colored nail polish to the container and then swirl them around with a toothpick. Less swirling makes more a of a watercolor type look, more swirling makes a marbled look.
- Carefully dip your ornament into the water and then pull it out smoothly. When you pull the ornament out, the swirly nail polish will all have transferred to it.
- Set it somewhere to dry. (I just set my ball ornaments back in the compartmented box they came in and rested my stars on top of plastic cups.)
- You need to clear any remaining nail polish from the water before doing the next ornament, especially if you are changing colors. Dip a toothpick in the polish and swirl it around. The remaining polish will wrap around the toothpick in a cocoon-looking thing and then you can just throw it away.
- After doing several ornaments, just toss the water and begin again with fresh hot water.

I have used the nail polish for coasters. The 1st two groups went well. Very defined lines. Then the polish started to fan out over the surface in a film. I cant get get defined lines again. I changed water, water temp, clean pans at each start. Nothing helps….any ideas??
Hi Jane, I’m sorry you are having trouble with the nail polish! Did you add clear nail polish to the water first? For me, that really made a huge difference. Also, I found that certain types of nail polish – in my case, quick drying – didn’t work as well. So that may also be something to check. Good luck!
Can you use plastic ornaments?
Yes, plastic ornaments should work great!
I have had unfortunate luck also! I used Dollar Tree ornaments, nail colors and hot water (as recommended on several sites). The color spread out in a nearly invisible film and if I tried to stir or move the colors they just clumped up. It was terrible! If I did not stir they looked like I dropped them straight onto the ball. I have tried lots of solutions even spray paint on the water and still no luck. We have well water and it is also hard water. Didn’t try it with bottled water. We’re also at a high elevation. Just thought I would record my results in case anyone else could be helped by this
Can you use glazed porcelain stars?
Yes, glazed porcelain should work well!