Easy and inexpensive tutorial for DIY industrial curtain rods. All you need are a few basic parts from the home improvement store.
A few weeks ago, I shared my super cheap DIY curtain rods made from basic supplies from the hardware store. Today I am back to share yet another version.
These curtain rods are slightly more expensive but still a killer deal.

I’m a big fan of the industrial look and have been trying to incorporate some industrial touches into the nursery to ‘man’ things up a bit.
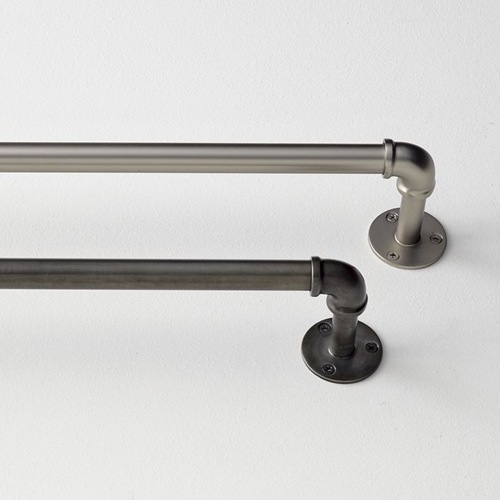
I love these curtain rods from West Elm.

But it just so happens they are $99. Each.
Not happening.
Luckily, it is not too difficult to get a very similar look for a lot less.
Yet again, all you need is some basic equipment from the hardware store. Here is my version which cost $23 each.

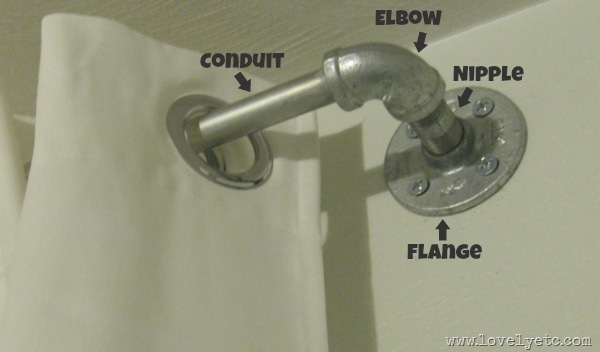
Materials needed for each curtain rod:
- 1/2 inch Electrical Conduit – $2 for a 10-foot length. (I bought mine at Lowes. They told me again that they do not usually cut conduit in the store but when I asked nicely and said they had done it for me before, they had no problem cutting it to the right length for me. You can also cut it easily yourself with a hacksaw).
- 2 galvanized floor flanges (1/2 inch) – $7 each
- 2 galvanized steel pipe nipples (1/2 inch x 2inch) – $4.50 for two
- 2 galvanized 90-degree elbows (1/2 inch) – $1.25 each
The electrical conduit is with the electrical supplies. The rest of the materials are in the plumbing aisle.
Putting these together is extremely simple. Screw one end of the nipple into the floor flange and the other end into the elbow.
Slide the electrical conduit into the other end of the elbow. Screw the floor flange into the wall. Finished.

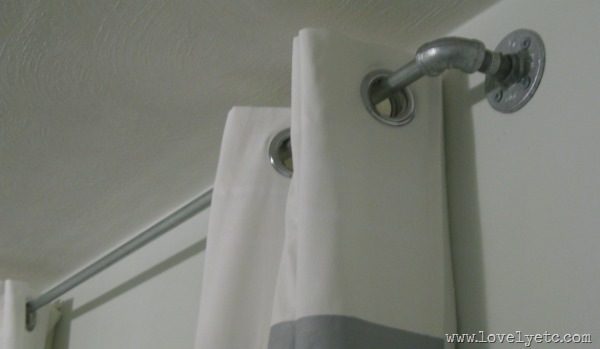
Perfect industrial vibe.
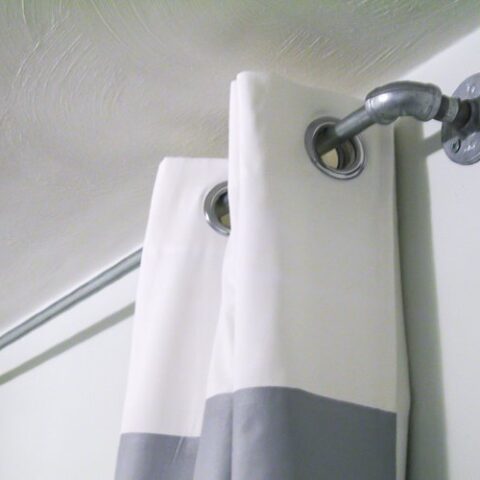
As you can see, I chose to use grommet curtains in this room. With this type of curtain rod, curtains hung with curtain rings would be much more practical.
That way you can easily change the curtains without completely unscrewing the curtain rod.
However, I really wanted to use these grommet top curtains and I am stubborn so I went for it.
Plus, I’m not exactly planning to change the curtains terribly often.
Looking for more DIY Curtain Rod ideas? I’ve got you covered!
20 Inexpensive DIY Curtain Rods that Anyone Can Make
The Cheapest DIY Curtain Rods Ever


DIY Industrial Curtain Rods
Learn how to make your own DIY industrial curtain rods for a fraction of the cost.
Materials
- 1/2 inch Electrical Conduit
- 2 galvanized floor flanges
- 2 galvanized steel pipe nipples
- 2 galvanized 90 degree elbows
Instructions
- Screw one end of the nipple into the floor flange and the other end into the elbow. Repeat for the second nipple, flange, and elbow.
- Screw the first floor flange into the wall.
- Slide the electrical conduit into the other end of the elbow. Slide the curtains onto the rod.
- Slide the second elbow onto the other side of the conduit and screw the second floor flange into the wall.

Retro Restyling says
Oh wow! I loooove these! What a great idea. :)
Nelly @ Brown Girl Decorating says
OMG I’m doing the same thing for RJ’s big boy room. Not nearly close to a reveal though. But will we sharing as soon as I can.
Abby says
Love them! I’m moving soon and will certainly be trying this in my new house
Y Mama says
I did these too! http://www.refreshandrepurpose.blogspot.com/2012/01/boys-curtain-link-up.html
And like you I used grommet curtains, bc that is what I wanted! Can’t wait to see more!
Renee says
Love this {found via Home Stories A2Z}! It may have to happen in my house this weekend.
Mona Knight says
This is very interesting post..and nice review about this article..this is looking awesome..You doing great job..thanks for sharing here.Curtain Tapes
david kulligan says
I have a 75″ space in front of a sliding door I wanted a curtain over. Many industrial equipment store had only short rods. This one is perfect! It fits the space and is of great quality and durable enough to hold the light blocking curtains I have hanging on it. Great Share!
material handling equipment says
Just finish reading your blog. I guess this is the nice idea. Thanks for sharing.
Lesley says
I love reading your web site. Kudos!
Stephanie says
I love this and can’t wait to try it. Where did you get your curtains? They are exactly what I’m looking for.
Carrie says
Thanks Stephanie! The curtains are Ikea hacks. I started with some inexpensive white curtains from Ikea and painted the stripes. I love how they turned out – you can check out the tutorial here: https://www.lovelyetc.com/2012/10/how-to-paint-striped-curtains/
Laura says
Oh my Lord! Thank you, Thank you, Thank you. This weekend I took a trip to Lowes to try and create this very look. At that point I hadn’t found your lovely blog and lets just say that the trip was a bust. Between me not really knowing what i was asking for, and using British terms (I’m actually a Brit- not just weird!) for each and every thing the very nice man at Lowes was even more confused than i was! I shall be going back next weekend armed with this blog on my ipad for visuals!!!
Looking forward to making this blog my new addiction I love love your style!
Carrie says
Thanks Laura! I am sorry you had such a tough time at Lowes. I feel like the poor Lowes employees never know what I want either – they tend to look at me like I am crazy. And I speak “american!” I hope things work out better this trip and good luck with your new curtain rods!
Anna says
I have everything to do this project but the nipple and flange. I bought grommet style curtains that I liked but worry about changing out the curtains. I have birds near them and they need a wash periodically. The rod is 12 feet long so i’m hoping that I can even take it apart after its mounted. any suggestions how to put it up with the grommet curtains and then not have to destroy it by taking it down for curtain wash?
Carrie says
I used grommet curtains with mine as well. I don’t wash my curtains often but I have taken them down once so far. I simply unscrewed the flange from the wall on one side and slid the curtains off the rod. Doing it that way was really quick but I’m not sure if it would become a problem if you do it repeatedly. I am not really sure if there is an easier way to do this. If you cut your rod into two halves and connected them in the middle with a small pipe fitting, you might be able to just unscrew that piece to slide your curtains off. Good luck!
Kristy says
Great tutorial! I’m so excited to put these up! Quick question…when you cut the 1/2 inch electrical conduit there is no thread right? Then when you place it into the elbow what keeps it there and does it fit okay or did you have to make any modifications? Thanks!!
Carrie says
Yes, it was not threaded and it fit into the elbow just fine. (I just went and double-checked to make sure, because I couldn’t remember.) It just slips right into the hole.
Lee says
Planning to make these soon, as I’m only awaiting the delivery of the flanges. Excited! I found that in preliminarily testing the fit of the conduit with the elbow, you can twist the elbow a couple of times to fit more snugly onto the conduit. So it’s snug, but is it more stable? Is this what you did? There is no thread on the conduit, but will it hold without doing what I mentioned? Obviously, we’re all looking to avoid a curtain collapse when you least expect it ;)
Carrie says
I didn’t twist the elbow but if it makes it fit more snugly, it certainly can’t hurt. I just made sure to measure carefully so that the conduit was pushed as far into the elbow as possible on each side when I attached the flange to the wall. That seems to hold it pretty well. It has been a year and a half and no problems so far!
Eva says
These drapery rods are wonderful! Cannot wait to put my own spin on this great idea.
Thanks Carrie!
Carrie says
Thanks Eva! I would love to see what you come up with!
jaymee says
how can i make this work around a corner window?
Carrie says
Hmm, corner windows are tricky. I would probably just butt two curtain rods next to each other. You just wouldn’t be able to pull the curtains around the corner. Something like this could help keep the rods aligned – http://www.homedepot.com/p/1-2-in-Rigid-Conduit-Pull-Elbow-94105/100147764
Jessica says
Wonderful post–exactly what I need. But I really need your help!! Want to do EXACTLY what you did except with a 10″ return. Sounds weird, I know, but I have a hideous 8″ deep radiator and need to clear it. I have great lightweight sheers that I’m layering over bamboo blinds, and was hoping to use 1/2″ conduit in conjunction with galvanized nipples, flanges, and a tee/flange for support in the middle (this spans 3 windows–102″ total).
Wondering 1) if you think that for any reason a 10″ return won’t work. I figure if I use conduit (read: lightweight) with galvanized iron bracing, it should be fine for sheers… right?
And the BIG question I have is regarding fitting the conduit in the elbows. I would think that conduit would be thinner, but from what I’m seeing at Home Depot etc., it looks like it actually has a thicker outer diameter. Is this the case? Did you have any problems using EMT-type conduit with standard galvanized plumbing fixtures of the same size (that is, 1/2″ conduit w/ 1/2″ elbows)?
I know this is an old post, but really hopeful you can get back to me asap. Need curtains before Thanksgiving :).
Thank you!!
Carrie says
Hi Jessica, I don’t see any reason the 10″ return won’t work as long as you have a brace in the middle. Like you said, the conduit is quite light. And I had no problem with the conduit fitting into the elbows. In fact, mine slip in quite easily with a bit of room to spare. I purchased my supplies at Lowes but I would assume they are the same at Home Depot since these are standard materials. I actually made more of these exact same curtain rods for my sons’ big boy room and they worked great in there too. Good luck!
Jess says
Carrie —
Thanks! Just saw your response. I’m definitely going to go with this–it’s a pretty cheap solution that will work great with my decor.
So glad you got back to me years later :)
Lisa D. says
Thank you for sharing–very attractive ! I got to thinking: how does one take the curtains down for a laundering?
Carrie says
Great question Lisa! So I didn’t really make laundering the curtains super easy on myself. The easiest thing to do would be use curtain clips so you can quickly just unclip the curtains. But since I used curtains with grommets, I have to take the curtain rods apart to take the curtains down. I don’t wash my curtains very often so it hasn’t been a big deal, but is definitely something to consider!
Neeka says
How do you unscrew the flange to get the curtain ring down….you take the screws out & put them back in again? Doesn’t that make it all weak?
I put them up & then realized that the other curtain I want to use is grommets :(
Carrie says
Hi Neeka, Yes, I just unscrew the screws. With curtains on rings, this wouldn’t be an issue because you can just unclip the curtains but for grommet curtains, it’s a bit more a pain. Thankfully, you do only have to unscrew one side.
Kathryn says
Hi! I am looking to make these to cover a 8ft slider. Do you have any sagging with your rod being 10ft long? Just wondering if we need a middle support since ours will also be 10ft long. Thank you!
Carrie says
Hi Kathryn! I made one additional support for the center of my 10 foot curtain rod and it has held up perfectly – no sagging!