How to paint striped curtains
I am a firm believer that you can improve almost anything with paint. It’s cheap, comes in thousands of colors, and works on almost anything. Including curtains.
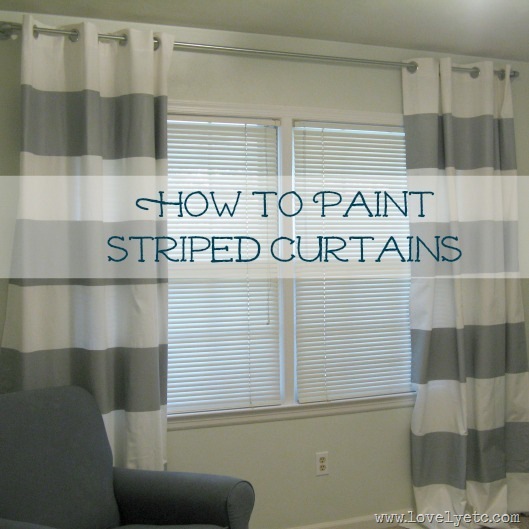
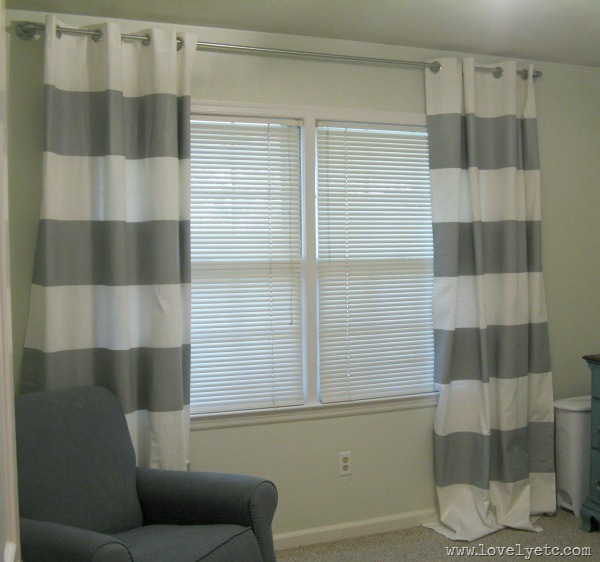
I absolutely love these gray and white striped panels from Crate and Barrel – they are exactly what I wanted for the nursery.
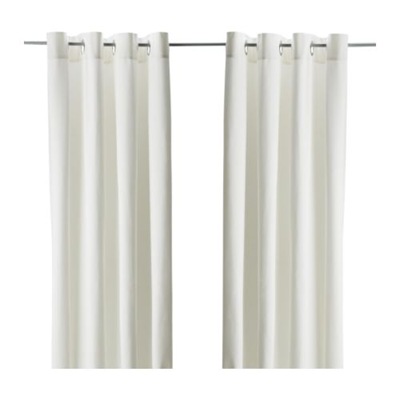
But one 96” panel is $99. On the other hand, these 96” plain white panels from Ikea are $25 for a pair. Not only that, they have a similar grommet top which I love and they are a nice thick, light-blocking fabric.
The only thing missing is the stripes – that’s where the paint comes in. Luckily, I have been hanging around enough risk-taking DIY blogs to know curtains are totally paintable. So I went for it. And I picked up lots of tips and tricks along the way to share with all of you.
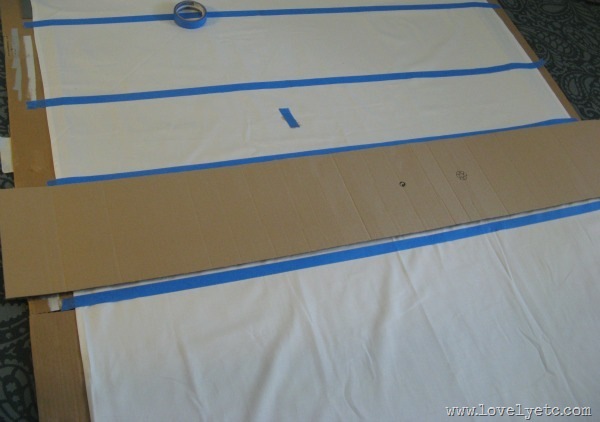
- Before taping and painting, tape your curtains panel down to a large piece of cardboard – I broke down the box our crib came in. This will prevent paint from seeping onto your floor and will also hold the fabric of the curtain in place so that you can get straight stripes.
- Tape off your stripes using blue painter’s tape – not frog tape. Blue painter’s tape sticks just enough to make clean stripes without pulling too much of the fabric’s fibers.
- If you are doing more than one curtain panel, use a template to measure your stripes. I started off measuring each stripe individually and using a straight edge to tape along – but that was taking forever and a day. So I wised up and cut a template out of cardboard to make taping off the stripes easier.
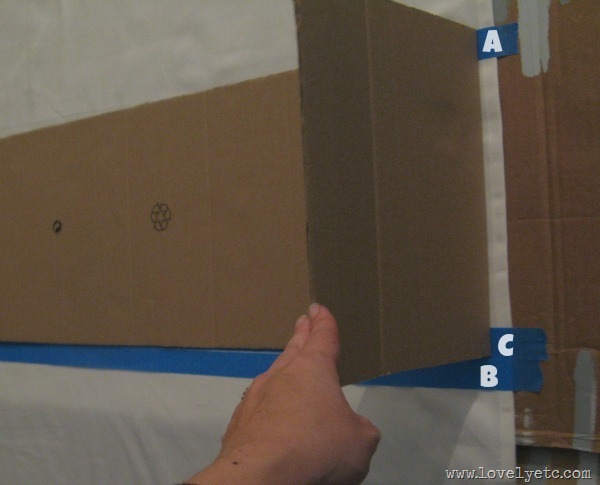
- When taping off your stripes, remember to take the width of your tape into account. The tape should always go on the outside of the lines that will be painted. Which means the tape will be on the inside of the stripes that will not be painted. This way all of your stripes will be the same width once painted. So how do you do this using your cardboard template?
- When measuring the white stripes, I placed the template completely covering the last paint line – A – and then lightly taped a line next to the edge of the template – B. This is simply a guide line. I then taped a line – C- immediately before line B. Then simply remove line B.
- To get nice crisp paint lines, seal the edges of your tape with Mod-Podge before painting. This will keep paint from seeping under the tape.
- I found it helpful to use primer followed by 2 coats of regular latex paint. The primer is not required but it helps keep the fabric from soaking up so much of the paint.
I should probably hem these a bit but otherwise they are exactly what I wanted. And since I used paint and painting supplies that were left over from other projects, they were only $25 a pair – or $12.50 each.
And another plus of painting your curtains – if you don’t like how they turn out, just repaint. The first panel I painted was a much lighter silvery gray. It was lovely and subtle – unfortunately, I was going for graphic and modern. So I simply retaped the panel and painted right over the first shade. It worked perfectly.
And there you have it – these gray striped panels are the perfect complement to the DIY industrial curtain rods I shared a few days ago.
Anyone else out there paint curtains or other fabric before? Or seen any other good Ikea curtain hacks? I love Ikea curtains, by the way.




Wow, what a HUGE savings and the curtains look AMAZING!!
PS…love your name :)
Would love for you to share this at my very first linky party. My sister and I are working together over at “Think Tank Thursday”…would love to see you there!
http://www.saving4six.com/2012/10/welcome-to-think-tank-thursday-1.html
Great DIY post! I just discovered your blog and love it!
This is a great tip! Can you tell us the paint you used? Is a fabric paint? I would also love to know the name of the color you choose. Thanks and I love your blog!
Great post, a very informative post along with pictures makes things much more clear and easier to understand.Thanks for sharing..Curtain Tapes
I have never tried painting my curtains and blinds from Perth because I am not artistic enough to do it well but I guess I need to try this to my old curtains and see if I can still use those. The color of your curtain doesn’t look like it was repainted so I think I should really try this soon.
countrycrafter…
Great idea which makes me want to redo some window treatments. I took painters canvas and painted birds on valances. The canvas is heavy enough I did not need lining. If you are not an artist,paint your design on separate canvas and cut out the good designs and glue with Tacky glue to curtain or valances
That was really artistic. I never thought you could just paint a curtain. I wanna try this at home, but my mom would probably rage over painting our curtains. I might as well get a real painter. My mom knows a house painter in Perth. Do you think he house painting includes curtains?
I’m really excited to try this. About how wide were your stripes?
I’m psyched to do this project! I ordered the curtains from IKEA and they’re supposed to arrive tomorrow. I’ll go buy the paint today. I need a little help understanding the mod-podge piece. Where does it get painted, on the edge of the tape? how does it not tear up the paint and make the edges uneven when you take off the tape?
many thanks for your help!
What color gray did you use? How wide were the stripes?
Shelly, I actually mixed the gray from a few different leftover grays I had from other projects so I can’t help you there. But the stripes are 10.5 inches.
Did you find that the paint seeped under the tape at all? I read on a few “painting” sites/forums to use medium on the edges of the tape before painting to seal the fibers. Just wondering if it’s really necessary, since they’re talking about painting on canvas boards, not curtains.
I used a sealer (Mod podge) to seal the edges of the tape as well. I had no paint seep under the tape but I definitely wouldn’t skip this step.
I LOVE these curtains! did you happen to use any of the day spa by Valspar when you were mixing the paints for the curtains?
Thanks! I started out with silver leaf by valspar and then added a darker gray paint sample I had on hand because it was too light. I’m not sure what the other color was – sorry!
Thank you so much!!
LOVE LOVE LOVE ! the look. What a great idea ! I didn’t know you can use regular paint on curtains. I just picked up some great cub chairs on the side of the road. They are in excellent condition but PINK -yikes ! I am so going to try your painting these ! Thanks for the ideas.
That sounds awesome Debi! I have an old couch that I have really been thinking about painting but haven’t gotten around to yet. I have seen some other bloggers paint furniture using chalk paint with good results. The latex paint works great but does make the fabric kind of hard and crunchy which supposedly the chalk paint lessens.
Thanks for the feedback ! I was wondering about that. I will try chalk paint !
are they washable at all? did you use latex paint?
I did just use latex paint. I haven’t tried to wash them but I really don’t think it would be a problem. I have a duvet cover that I painted with craft paint and fabric medium and it has held up just fine to washing.
I do not know how to really thank you for this amazing info.
Angela