Sharing an update to my painted plywood subfloor three years later…
It is hard to believe it has already been three years since I painted the plywood subfloors in our living and dining rooms.
My painted floors are one of the most worthwhile DIY projects I’ve tackled in our home and are still one of the projects I get asked about the most often.
Now that we have lived with them for several years, it seemed like the perfect time for a painted subfloor update to share how they have held up.
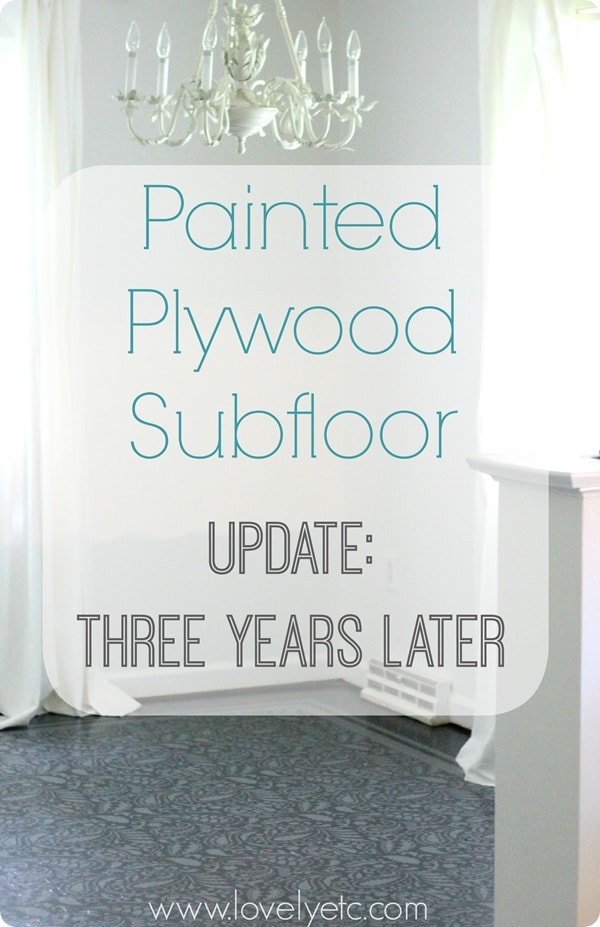
Not only that, but this will also be the final floor update because we are actually ready to lay hardwoods over my beautiful subfloor.
Not because they haven’t held up well or are no longer amazing though. I’ll explain why we are going that route, but first an update on the floors themselves.
(*Just a heads up that you might want to read my post on the good, the bad, and the ugly of painted floors for an update on how things were looking after a few months as well. This update will focus more on the effects of time while that update focused more on the reality of living with painted subfloors.)
This post may contain affiliate links. See my full disclosure here.
How do the painted floors look after three years of use?
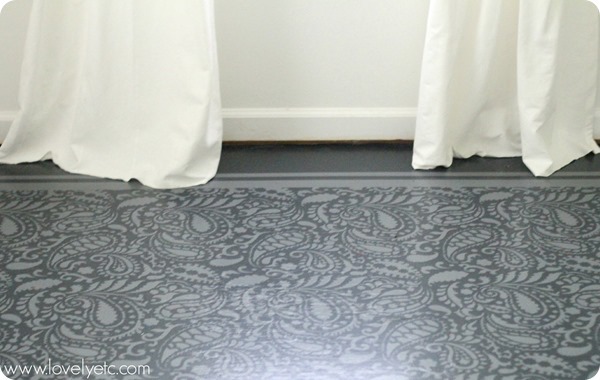
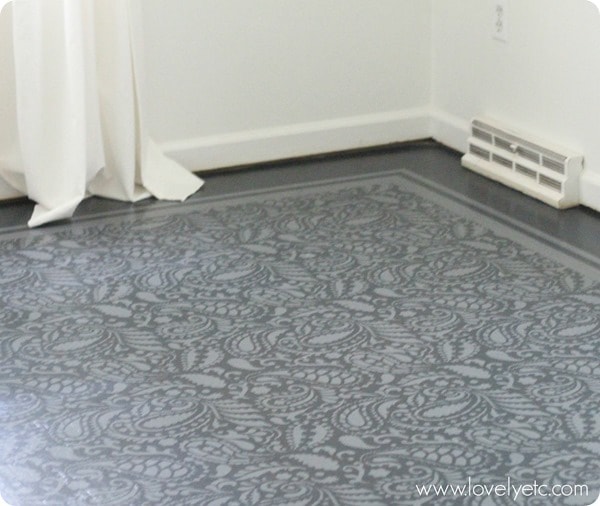
Honestly, they look amazing. In most ways, they look exactly like they did the day I finished painting and sealing them.
There is not a single spot in these two large rooms where the finish has worn away or the paint has faded or scuffed.
The floors have the same soft sheen they had from the start. The actual paint, which is what I was initially the most worried about, has held up phenomenally.
The floors have also been a dream to clean. The stenciled pattern truly does hide crumbs and dust along with hiding the imperfections in the plywood. (We used this paisley stencil and it was perfect.)
I have generally just cleaned the floors by sweeping and mopping the same way I would clean any hardwood or vinyl floor.
There were, however, a few hard-to-reach spots in the corners of the room where the sealer did not cover as well.
In those areas, dust and dirt do like to stick to the paint and are very difficult to clean off. (Which is another reason, using a good sealer is so important!)
Have there been any problems with the floors?
Yes and no.
Although the floors still look amazing, there have been some minor wear and tear issues. These floors have endured a bit of abuse over the years, just like any other floor.
My two-year-old drags toys and other random things across the floors daily. And when I have moved furniture in these rooms, I haven’t taken any special care to protect the floors and there haven’t been any problems.
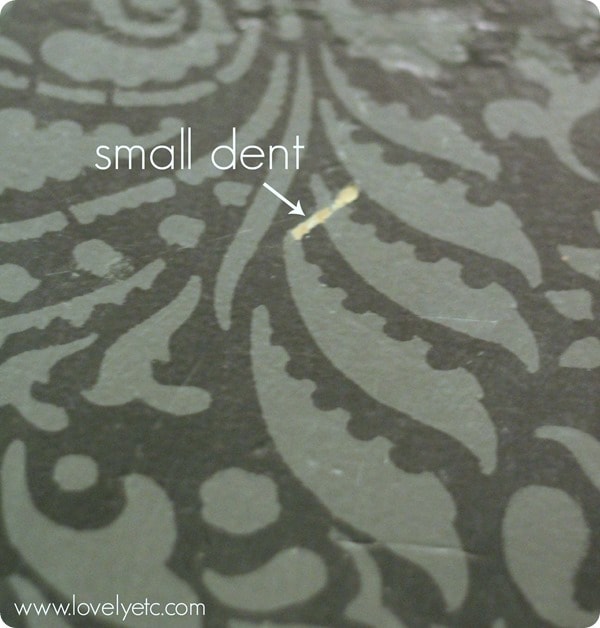
However, even though the floors do not get scratched easily, the soft plywood is easy to ding.
There are quite a few small spots where something with a sharp edge has been dropped on the floor and has left a small dent that goes through the paint and shows some of the wood below.
These spots are all very small – the largest is around the size of a pencil eraser, but they are visible if you look closely.
There has also been a slight problem with some of the staples and nails that secure the subfloor to the joists popping up.
The floors are not unstable in any way, but clearly, this is a problem. In the dining room, there is one area where a row of five staples has popped up – they have not popped all the way out, but are now visibly sticking up.
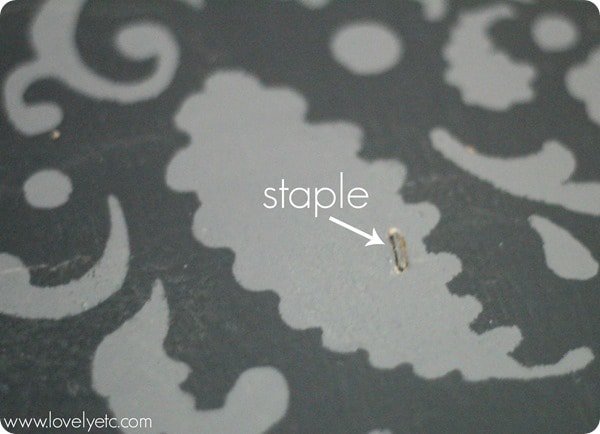
There is another area in the living room where four nails have popped up even higher. I know this happened when we were replacing some subflooring in an adjoining room, but I am not sure the cause of the staples popping up in the dining room.
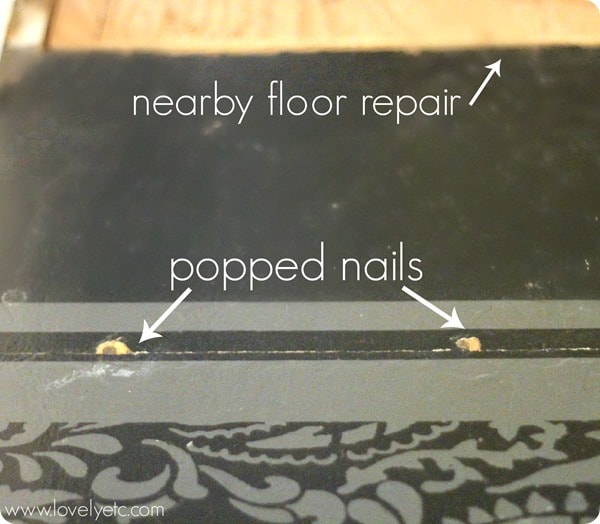
My guess is that this is related to the fact I filled the seams of the plywood before painting. The seams are actually there to allow the plywood to expand and contract as needed.
Since they were filled in, they weren’t able to do this properly which caused the staple popping. I am clearly not a contractor and do not know for a fact this is what happened, but it seems to be the most likely explanation.
So if I were painting the floors today, would I still fill the seams? I think I would. The floor just looks so much more finished without the large seams.
However, I would apply the filler very superficially and keep it on the surface of the floors as much as possible so that the wood could hopefully still expand as needed underneath.
Is this a perfect solution? I have no idea (still not a contractor), but it seems like a good compromise to me.
Was all that work worth it?
So the big question. Was it worth it? The floors were incredibly inexpensive at only around $300 for gorgeous flooring in a 400 square foot space.
I have had a few builders comment on my posts about the floors that paint is not real flooring and I should have just gotten some other type of inexpensive flooring. Clearly, they missed the point.
I have never seen a quality flooring material that you can buy for less than $1 a square foot including all needed materials and supplies.
And any flooring that comes close to that price – peel and stick tiles, vinyl, etc. is not really something I want in the main living areas of my home.
If all I needed was an adequate floor cover, I could have kept the stained carpet we had originally.
But I wanted more than that – I wanted something beautiful that would make me smile when I saw it each morning.
And that is exactly what my painted floor did. So as far as money goes, there is no question. It was worth it one hundred times over.
But what about the time? There is no doubt this project required a much bigger investment of time than money.
Removing the carpet, preparing the floors, priming, painting, stenciling, sealing, waiting for things to dry – it adds up to quite a bit of time.
Especially knowing now that we were only going to enjoy the floors for three years.
To me, the time was also well worth it. There is just no way to adequately explain what a difference these floors have made to our house.
Even if we had only had them for one year, it would have been worth it. They are gorgeous. They are clean and sanitary (as opposed to the gross carpet).
And they completely transformed our living room and dining room from spaces we mostly avoided to rooms we actually like being in.
The difference they made in our home was more than worth the time and effort they took.
So why are we covering the painted floors if they are so great?
This is the million-dollar question and definitely one I have asked myself quite a few times. We are not covering the floors because they aren’t beautiful or we don’t still like them.
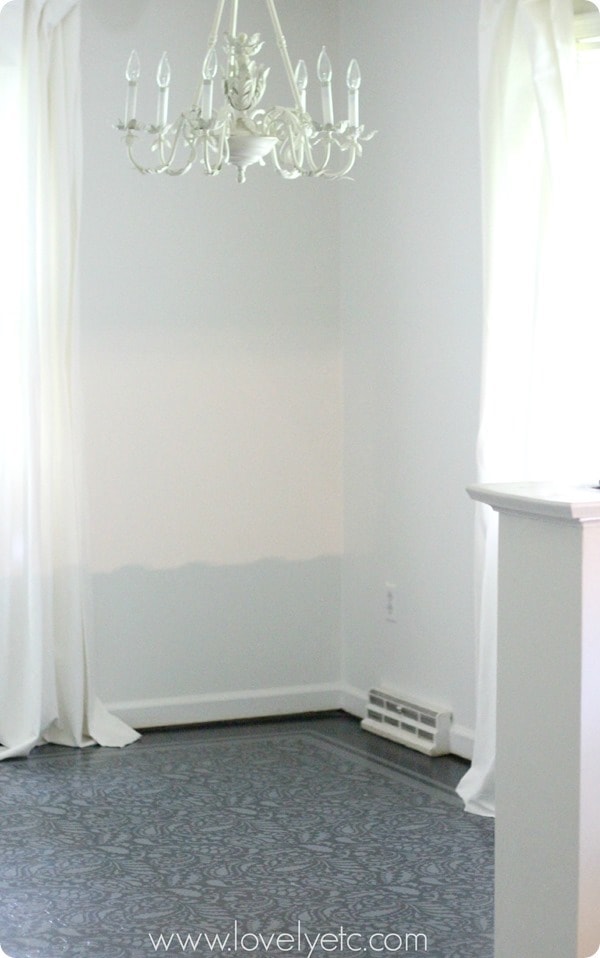
When we moved into our house, the flooring throughout the entire house was not great – lots and lots of old worn-out carpet, dated vinyl flooring, and permanently stained stone.
We pulled up the carpet in the dining room and living room and painted the floors because that carpet was the worst of all.
Our dog was fairly old and had begun having lots of accidents in those two rooms and frankly, it was just getting really gross. But the rest of the house still had the original worn-out flooring.
Not only that, but our house has a fairly open floor plan. The foyer, living room, dining room, family room, kitchen, and hallway are all connected to one another through open doorways.
So everything is pretty open to each other – and none of the flooring types matched. There was carpet next to stone next to carpet next to vinyl next to carpet.
Every single threshold led to something different. So when we painted our floors, they were amazing; but the flooring was still extremely choppy throughout the house.
Here is a very basic floor plan of the various floors we had going on including carpet in the family room, vinyl in the kitchen, and dark stone in the foyer.
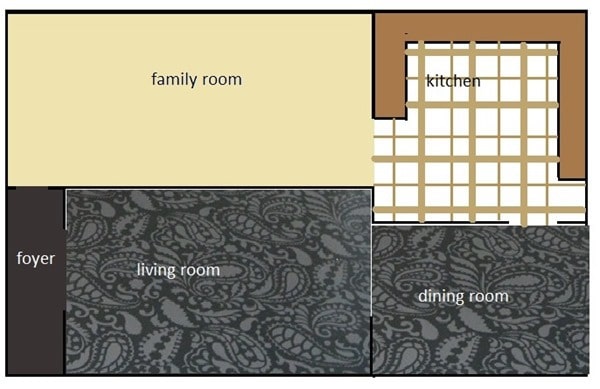
So the short answer is, we are covering our beautiful subfloors to put in hardwoods throughout the main part of the house – foyer, hallway, family room, kitchen, living room, and dining room.
We saved up some money for home improvements, bought the wood during a great sale, and are installing it ourselves.
We actually already laid the floors in the family room and kitchen last year and we love, love, love them. So even though I am sad to cover all my hard work, I am also excited to see our house start coming together as a cohesive unit.
Plus, as my husband says, one day when we are long gone, some other home owner is going to be in for such a shock when they pull up the flooring and discover that beautiful paint job underneath.
Imagining that definitely makes me smile!
So there you have it, the final update. So long beautiful floors. Although, really they won’t be gone – just hiding out for a while.
If you have any questions about things that I didn’t cover, please ask. I definitely want anyone considering doing this in their own home to have as much information as possible and will help any way that I can.
If you are thinking about painting your own floors, you need to check out these other posts for tips and answers to many of your questions:
Amazing Painted Floors: A How To
Painted Plywood Floors Update: The Good, The Bad, and The Ugly
The Absolute Best Floor Stencils and Tips for a Perfectly Stenciled Floor
15 Gorgeous Painted Floors: Ideas for Every Type of Flooring
Robyn Taylor says
My first thought when reading this was about someone pulling up the hardwoods some day and getting the delight of their lives. They are lovely. Enjoy your new floors! Thanks for sharing.
Carrie says
Thanks Robyn! That is exactly what I like to think. I imagine some future home owner feeling like they have uncovered a hidden treasure. Anyway that is how I know I would feel!
Anna says
Hi Carrie and everyone else that is doing this – I am totally doing this!! I just ripped up about 300 sf of cheap, ugly, thin, stained carpet – I understand all parts, I think, going to buy the filler, primer, paint and sealer, but I have a small question about the palm sander: what grit or type of sandpaper would work best for a quick over smooth sanding experience before the primer? any suggestions? thanks a bunch!
Carrie says
Hi, Sorry I’m a bit behind on responding to this. Hopefully, even if you have already finished your floor this will be helpful to someone else. For sanding something smooth, I recommend starting with 60 grit, then sand again with 150. If you want it super smooth, sand it one final time with 220 grit. I hope your floor turns out amazing!
Robin Taylor says
I know I’d feel like that if I pulled up a floor and found something like that! It’s beautiful, but I can understand why you had to put down the hardwoods.
Carrie says
Thanks Robin. Definitely a bittersweet project laying the new floors!
Cat @ MaryMarthaMama says
I was just looking at this on pinterest the other day and I love love love this. I know you’re covering them and it totally makes sense so I’m glad you were able to enjoy them for a little while!
Carrie says
Thanks Cat! I really love them too even though it is time to say goodbye to them. But if there is ever an opportunity for more painted floors in my future, I’m going to jump on it!
shonee says
Love your floors! Change is always inevitable. Excited to see how your new floors look!!
-Shonee
http://www.hawthorneandmain.com
Carrie says
Thanks Shonee – and you are so right, change is definitely inevitable. Even when you love something.
Maureen says
I am getting ready to paint a plywood floor in a room above a garage that is rarely used. Loved your use of stencils, and post work notes. We have hardwood and softwood floors in our entire 1950’s house, so I can see why you are opting for the cover up.
Carrie says
Thanks Maureen, good luck with your floors. I think you will love them!
Kelle says
Hi I’m about to pull my carpeting up and I’m pretty broke so I will just have my plywood floor that’s under the carpet to deal with. Can you give me the steps you took to do your floors and with the paisley pattern? I’m desperate. Thanks, kelle
Carrie says
Yes! That’s the exact same circumstances I was in when I first painted my floors. I needed to get rid of the carpet but had no money for a different floor. Here’s a link to the step-by-step tutorial – https://www.lovelyetc.com/amazing-painted-floors-how-to/
Jessica says
Thanks for this! My husband and I have decided to put in plywood floors, the kind with the very thin veneer on top that looks like oak. I don’t know the technical name. But anyway, our biggest concern has been how it will hold up over time. I imagine it will hold up much like your painted floors did, though! Which I can totally live with! Thanks again!
Carrie says
I’m glad it helped Jessica. I can totally picture your plywood floors – I bet they will be beautiful.
sherissa says
Hi Carrie, this a very amazing idea, thank you for sharing. I was surfing the net to learn about interiors and stuff, really glad I came across this. I’m gonna try doing this on concrete floor (planning to make a mini showroom) , it’s common in our country to use concrete because of termites.
Carrie says
Thanks Sherissa! This would be fantastic on concrete – much smoother and sturdier than plywood for sure.
Heidi says
Is there a gap between the baseboard and floor?
Carrie says
Heidi, Yes there is but only because we never got around to installing shoe molding. That would have completely taken care of the problem – and now that we have installed hardwoods, we still have to do it anyway!
Mike Campbell says
The floors are (were?) lovely. I was thinking that any dings or scuffs that exposed the plywood underneath would surely have been easy to touch-up with a small brush. And even if the touch-up sheen did not match entirely the wear of the original layer, surely those spots would have been so small in all of that space — who would have noticed? And I like the idea of a surprise hiding under the hardwood for a future owner. That happened to me when I removed carpet. I was at work the day the previous owner’s carpet was removed and new carpet installed in my recently purchased older home — I never did know what was hiding underneath. Ten years later, in 2013, I got bored with my dingy carpet and began peeling it up. Imagine my surprise to find gorgeous hardwood with a vintage 1962 Johnson wax shine waiting for me. Congrats on your new hardwood and your marvelous paint experience that you have graciously shared with readers. I have a backyard shed-library with finished walls and plywood floors – guess what I will be doing soon.
Carrie says
Thanks so much! You are right – I could have definitely touched up those tiny dings without a problem. And what a great surprise to find those old hardwoods! The only really great thing about hardwood floors getting covered up with wall to wall carpeting is it keeps the floors protected! And how fun that you have a she shed – I would love to have one someday! Good luck with painting – what a fun project to tackle!
mgriffice says
I so appreciate that you have shared your story! After months of weighing our options, we have decided to save time, energy, & enough $ to buy some good wood flooring instead of painting our plywood. Have you blogged about that chapter of your remodeling adventure? Do you have advice where to shop & what type of wood flooring to buy? Thanks!
Carrie says
I am glad that I was able to help by sharing my own experience. I haven’t blogged about installing our wood floors, but installing them yourself is definitely very doable. My main advice is to read reviews before purchasing your floors if possible. We installed engineered hardwoods from Lumber liquidators. And while they look great and were pretty easy to install, I haven’t been that impressed with the durability.
DellAnderson says
Thanks for sharing this interesting how-to paint plywood floors. As for your Lumber Liquidators flooring, I hope it isn’t one of the carcinogenic ones listed in this lawsuit:
https://www.forthepeople.com/class-action-lawyers/lumber-liquidators-formaldehyde/
or
http://www.classaction.org/lumber-liquidators
Carrie says
Thankfully our floors aren’t on that list. Hopefully they are clear. Thanks for sharing though!
Dawn Johnson says
Amazing! I love this! Nothing beats that feeling, when, with a fresh cup of morning coffee in hand, you look out over that beautiful floor and you break into huge smile! About 12 years ago, I painted about 728 square feet of our plywood sub floors. I painted a tan and brown diamond pattern with a boarder. I had no stencil back then, just me and my blue painters tape! I spent weeks, after putting my babies to bed, scooting around painting those diamonds with my little brush. (I have been a SAHM for 22+ years, DIYing all along, and it is still, to this day, my most favorite project of all time!) I would agree about not skimping on the Poly. I didn’t have it back when I did mine, and it attracted dirt like a magnet! I enjoyed it for almost two years until my OCD couldn’t handle it any longer. I have had four different floors in that space since then, none of which I have loved more than my beloved painted floor! We are in the process of remodeling this space (again!) and I dreaming of what I can do…
Thanks for the post, I brought back pleasant memories!
Carrie says
Ah, so glad I could bring back some good memories! It’s funny, your painted floor experience sounds a lot like when I painted our porch. I also painted it in a diamond pattern using painter’s tape and it took forever! And I didn’t use a sealer so it is not looking so great now. I am hoping to paint it again this fall, but I am definitely going to go the faster stencil route this time. Good luck with your remodel!
Sue says
This is gorgeous! Where did you get the stencil thing you used? I never have luck with stencils, the paint goes under them and just makes a mess, but I really love this idea and would like to try it. You can’t see many of the imperfections with that pattern unless of course your on your hands and knees! My plywood is older and I will never get it perfect.
Carrie says
Thank you Sue. You are right – this pattern really hides all the imperfections. (It is also great at hiding crumbs which is very helpful with my two boys!) To make sure the paint doesn’t get messy when you are stenciling, make sure you only use a small amount of paint. I used a small foam roller to stencil. I loaded it lightly with paint and then rolled it once or twice on a paper towel to get any excess paint off before stenciling. Here is an affiliate link to the stencil I used – http://amzn.to/2asKMQz
Taurean says
HI there! Closing on our first home soon and because we can’t decide upon what type of flooring we want to do (carpet in bathroom and dated vinyl in kitchen), we are super excited by the idea of saving a ton of money while creating a custom, unique flooring! I’m curious if your floors got really cold in the winter? And if you would advise against doing this method in a bathroom (water + toddler!) or if a good seal would do the trick? Also, did you reapply sealant at any point in those three years?? Thanks for the inspiration!
Carrie says
Taurean, congrats on buying your first home! What an exciting time! I did not reapply sealer at any time during the three years we had them and it didn’t seem we would need to anytime soon if we had kept them longer. Also, I never noticed them being particularly cold. I am barefoot a lot and I would say the painted floors felt similar to wood floors – warmer than tile but cooler than carpet. As far as the bathroom, that is hard to say. We had occasional spills on our floors and I cleaned them by mopping, but we didn’t have much standing water on them. I think if everything was sealed very well all the way to the walls, you might could get away with it. But like I said, I don’t know for sure. Good luck!
Chris Hickman says
My girlfriend is interested in doing this to a 500 sf room and two 25 foot long hallways. How many hours do you estimate it will take the two of us to complete the filling, sanding, painting, stenciling, and sealing process? I have removed carpet before, so I have a good idea how long that step will take. Let me know what your experience was.
Carrie says
Hi Chris, It’s hard to say for sure how many hours this took because I worked on it a few hours a night over several weeks. The rooms I did this in were a combined 400 square foot space so that size is certainly doable. If I had to guess, maybe it was around 40 hours of work?
Toni says
I love your floor project, just gorgeous! I am planning to paint the floor in our foyer and powder room. The flooring is a laminate that is supposed to look like 12×12 tiles. There are no true “grout” lines, but I am concerned about the seams and finding the right primer for the project. I am also thinking of sanding the floor lightly…any recommendations or tips?
Carrie says
Hi Toni! I haven’t personally painted laminate before, but I definitely think the prep is the most important step. A light sanding is a good idea and I always recommend using an oil-based primer on anything that needs a bit of extra grip. As far as the seems, you could patch and sand them or embrace them in your design. I don’t know how you feel about it but I reallly love some of the patterned tiles these days and there are some awesome stencils that could make your laminate look like awesome tile. Good luck with your project!
Angela says
I am so inspired by what you did to your floors. We have two bdrms, one very large, one smaller, that need flooring. They are currently just subflooring. I am definitely going to paint them now!
Also, I wanted to relate a tip if its not too late, about installing hardwood floors. My friend had all hardwood on her first floor. There was a leak in the kitchen that went undetected for a while. They ended up having to have the entire kitchen floor refinished to match the repair, but now it doesn’t quite match the rest of the factory finished wood on the first floor.
There are some fabulous laminate floors that look like real wood and if theres a problem, the fix is exponentially cheaper!
Carrie says
Good tip! And good luck with your floors!
lisa says
Are these full plywood sheet to cut plywood planks?
Carrie says
This is full sheets of plywood – they were already installed as a plywood subfloor.
Tracey says
I am disgusted by our carpeted floors. We have 4 dogs who have practically done everything to these carpets. We can’t afford to replace with vinyl right now so I thought this would be the cheaper alternative. But I’m at a loss when it comes to a color to paint. Especially with 4 dogs running around. I want it to be durable and hide some dirt.
Carrie says
I totally get this. That is how I felt when I ripped out our carpets and painted our floors – it absolutely had to happen! As far as color, any color can work. Since your floors are going to get a lot of use and have lots of dirt tracked on them, I would avoid anything that is extremely light or extremely dark since those colors show dirt and dust the most. And it may seem like extra work, but stenciling some sort of pattern truly helps hide dirt and scratches so well. The pattern keeps your eye moving and any imperfections don’t stand out so much. Good luck!
Jenn says
Love this tutorial. I am thinking on taking on the huge projecting of stenciling our subfloors in the kitchen (currently laid over with sheet vinyl which isnt wearing well after only two years). This should hold us over until we are ready to reno in a few years. I feel like i will have to do this piece meal because we both work full time and have a young child. Do you think If i work on it in sections you will notice a difference>? (Esp thinking about the poly). How long does it take to dry bw coats?
Carrie says
Hi Jenn, I definitely get what you are saying about needing to work in sections since you are doing a kitchen and can’t just drop everything to work on this. I think painting in sections would be totally fine but it would probably be best to poly everything at once. You could paint everything in a few sections and then wipe it all down to make sure it is clean before doing poly over everything. I am afraid if you poly it in sections, it will leave obvious ‘seams’. I believe the dry time between coats of poly is 4 hours so you could potentially do several coats on a weekend day. Or you might could do it in the evenings after your child goes to bed by doing a coat and letting it dry overnight. The next day only wear socks to walk in the room and try to keep toys and things off the floor and repeat this for a few days until you have three coats. Good luck! I know DIY with little ones around is tough.