Beautiful DIY Small Bathroom Remodel on a Budget
I completely renovated our small master bathroom on a budget. This DIY bathroom remodel took everything down to the studs and now the room feels bigger, brighter, and much more inviting.
When we moved into our fixer upper years ago, this bathroom clearly hadn’t been updated in a few decades. While it wasn’t the worst bathroom I’ve seen (or even the worst bathroom in our house), it was pretty outdated.
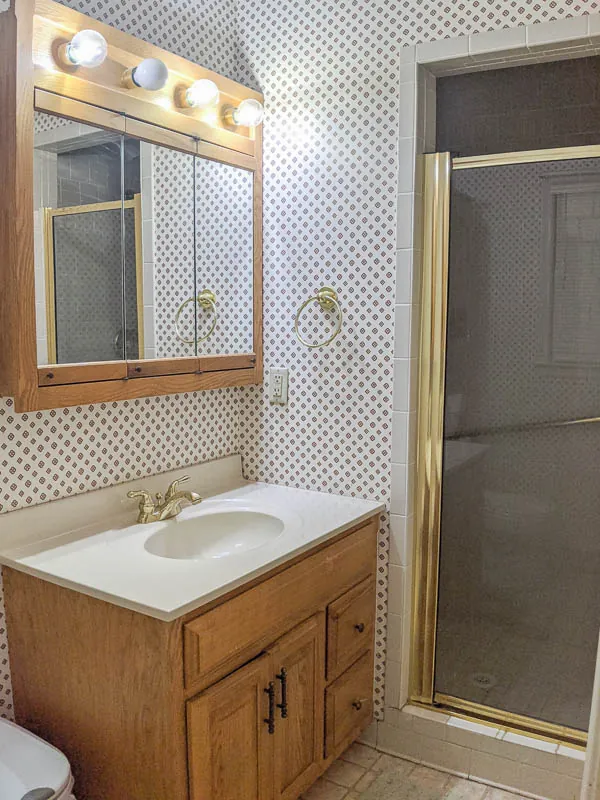
This bathroom was pretty low on our priority list, so it continued to look exactly like this for several years while I worked on other parts of the house.
Then in 2020, I finally gave it a quick makeover as part of the $100 room challenge. This was a challenge to make over one room in your house in four weeks, using only $100. And despite the tiny budget, I was able to make some pretty big changes to the look and feel of the room.
Even though I loved how that inexpensive makeover turned out, I always knew it was just a temporary fix. We have a 50 year old house with hard water that has slowly eaten holes in our copper pipes. We knew we’d eventually have to do a full gut renovation to replace the old pipes and repair old water damage.
I would consider myself a pretty capable DIYer at this point. I’ve learned how to fix and update all kinds of things from installing new faucets to laying tile.
But completely gutting and rebuilding a bathroom is a whole new level of DIY and I’ll admit I was pretty intimidated.
So I kept putting it off.
Redoing our master bathroom has been on my list of house goals year after year. And year after year, I just didn’t get around to doing it.
Until every single other room in our house had been completely updated and this little bathroom was the only thing left. So I finally gathered up my courage and got to work. And of course now, my only regret is that I didn’t tackle this room sooner.
I did almost everything in this bathroom myself, but I did have a little help. We got a plumber to replace the old corroded pipes in the shower and an electrician to relocate an electrical outlet. And my husband helped out with demoing everything and replacing the subfloor.
But everything else was all me. I demoed the old shower and rebuilt it from the studs up. I repaired the subfloor and laid new tile floors. I tiled the shower, installed the vanity, replaced the toilet, and did dozens of other tiny and not so tiny tasks.
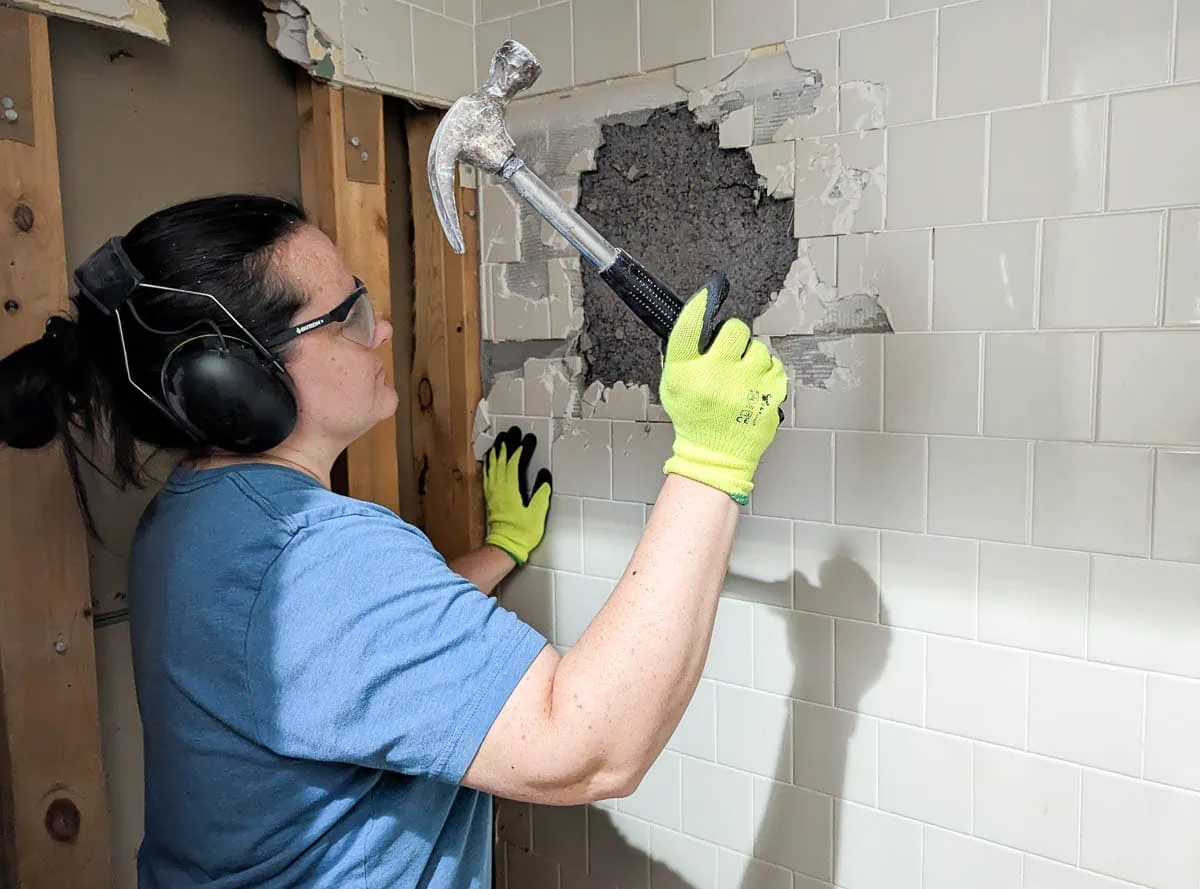
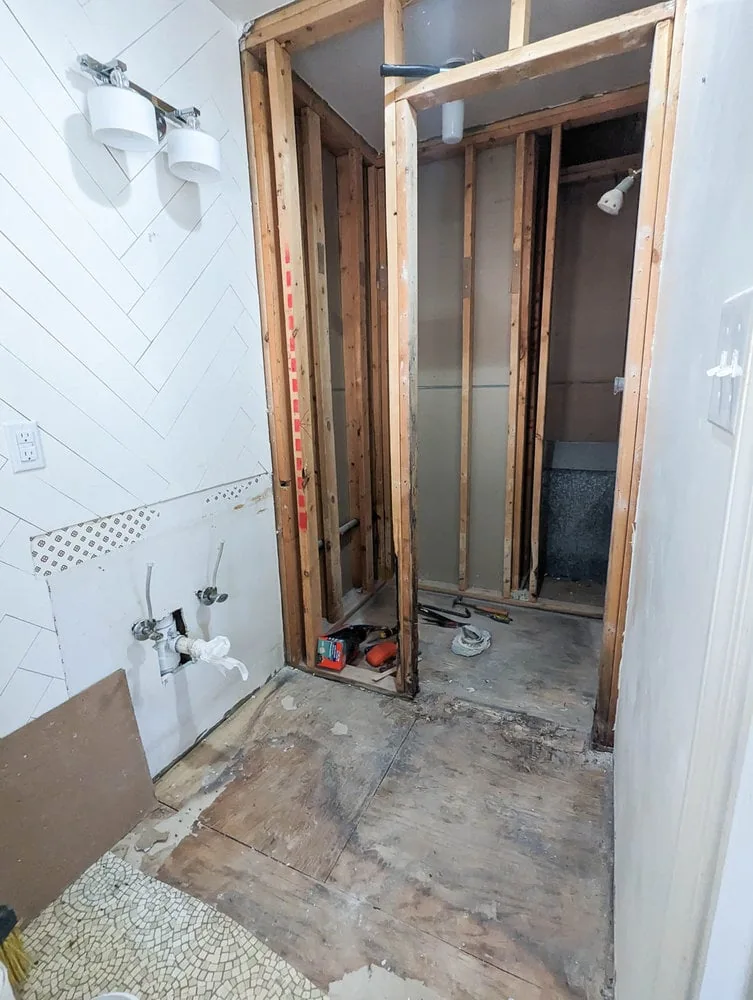
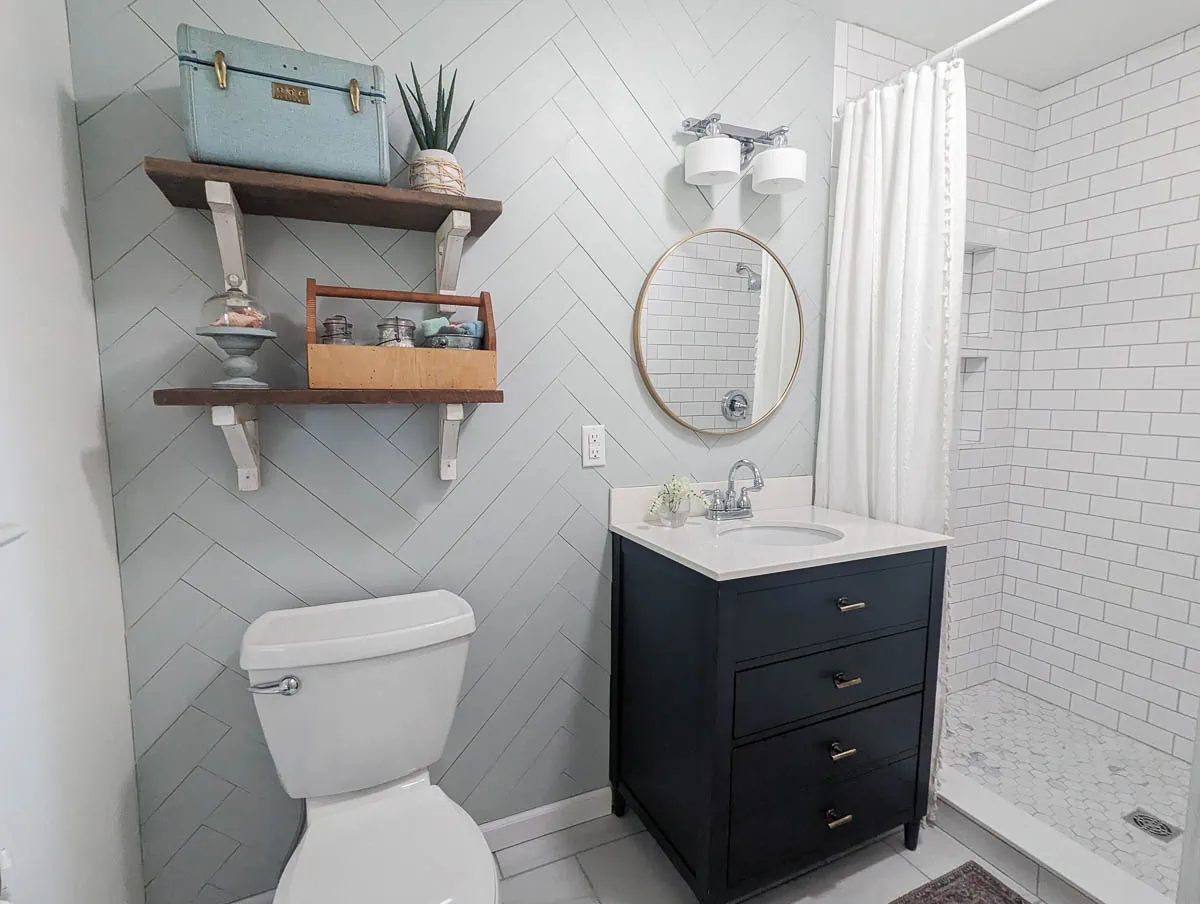
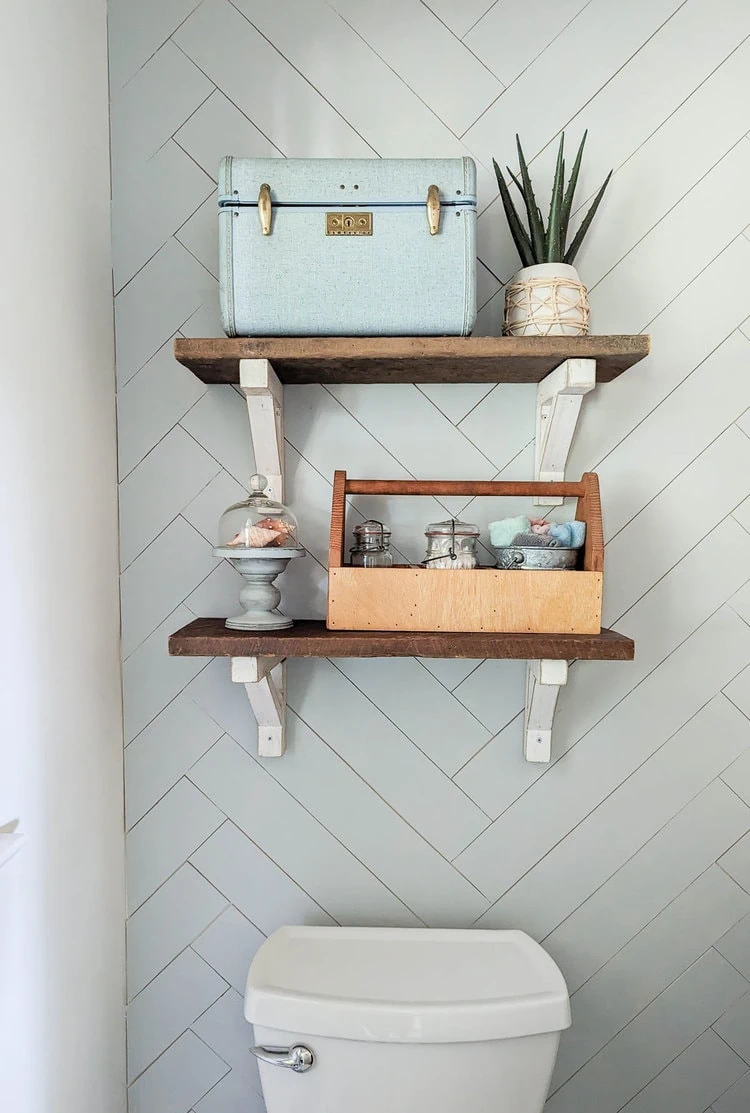
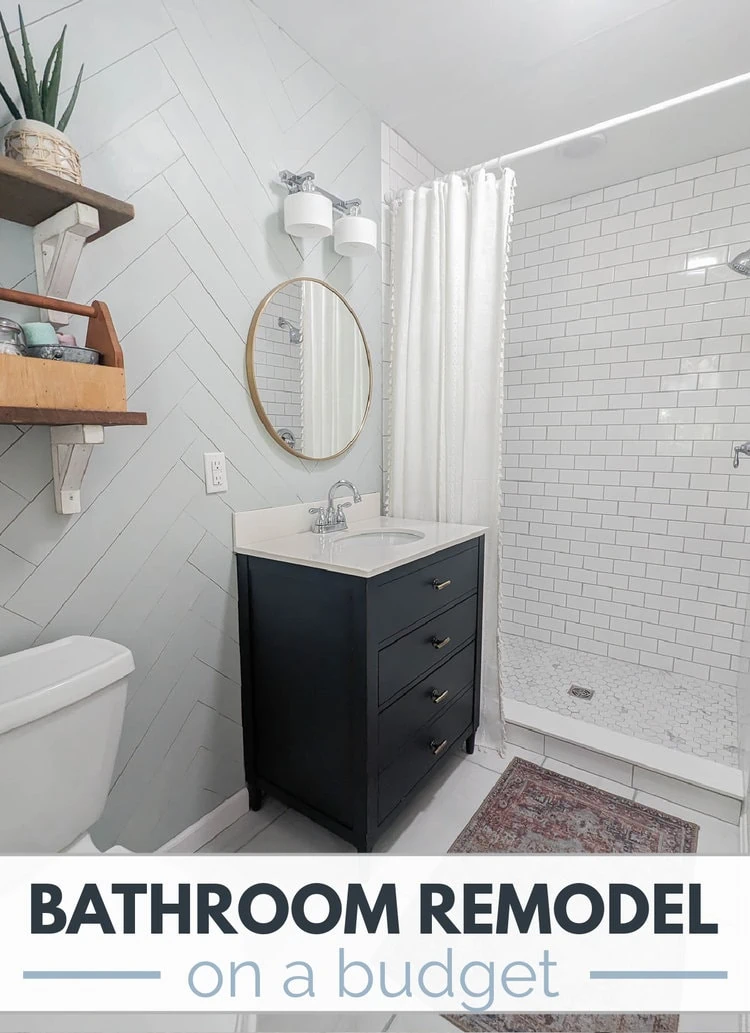
When I say this was a full gut renovation, I mean literally everything had to go. There was some water damage to the old flooring and subfloor so we demoed basically everything. The only things that stayed were the herringbone wood wall and the vanity light fixture.
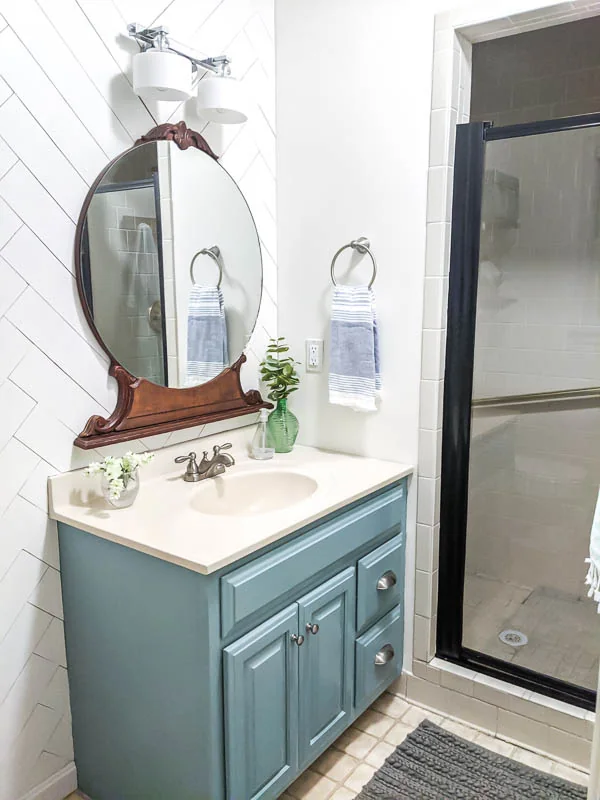
And now, after many, many hours of work, here’s how our bathroom turned out.
This post contains affiliate links which means if you make a purchase after clicking a link I will earn a small commission but it won’t cost you a penny more. Click here to see my full disclosure policy.
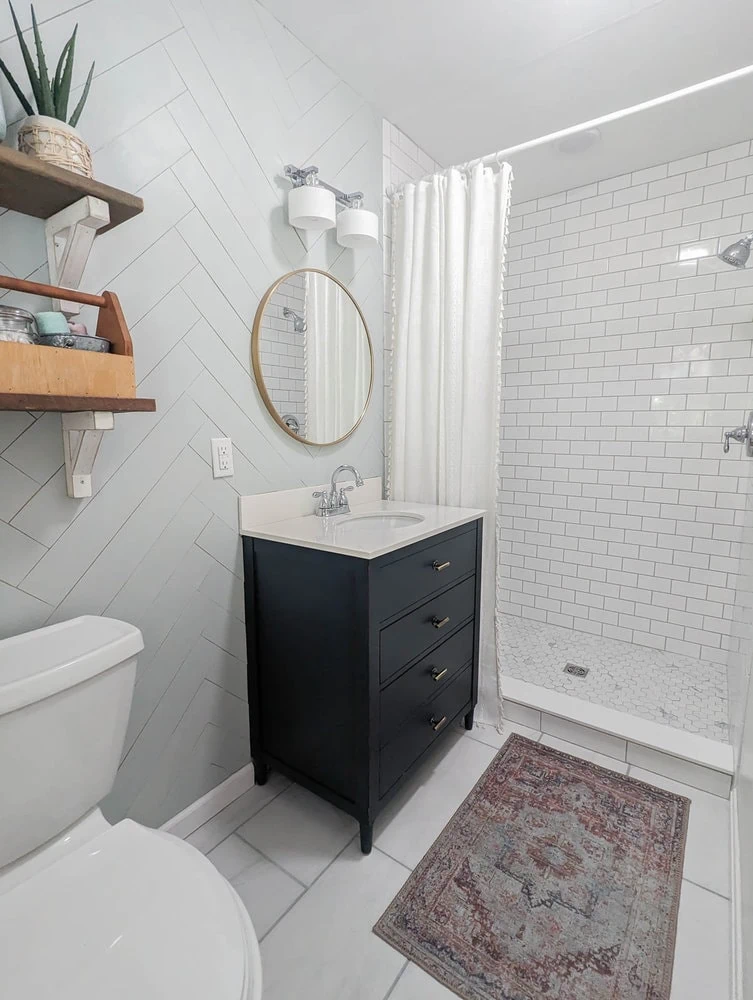
The Walk In Shower
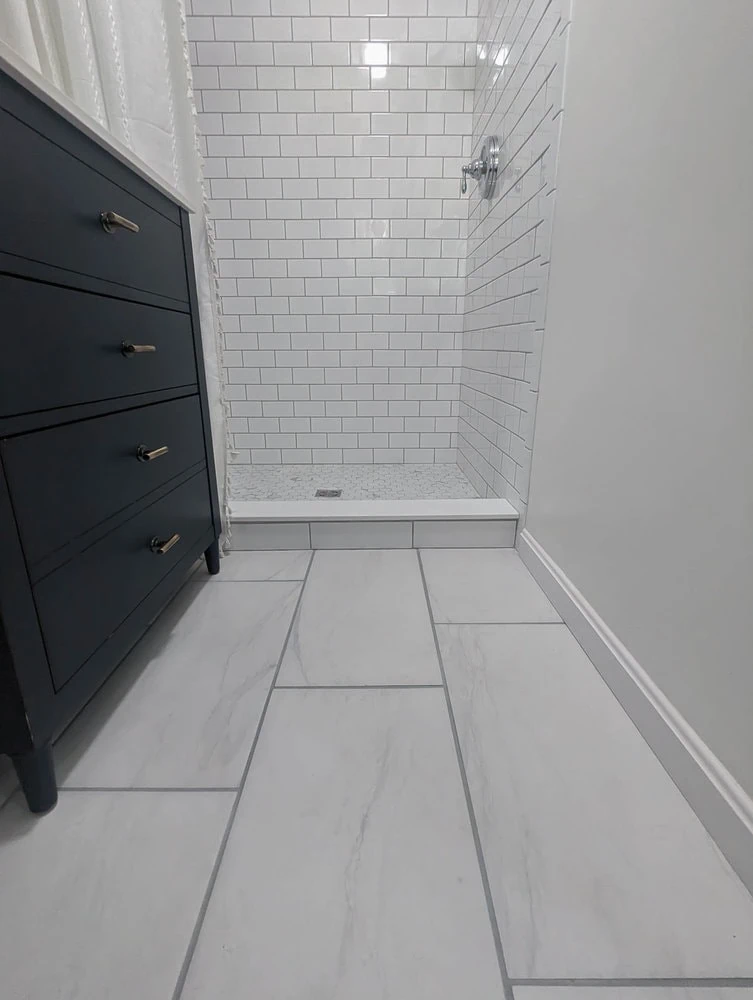
Building and tiling this walk-in shower was by far the biggest, most labor-intensive part of this bathroom makeover.
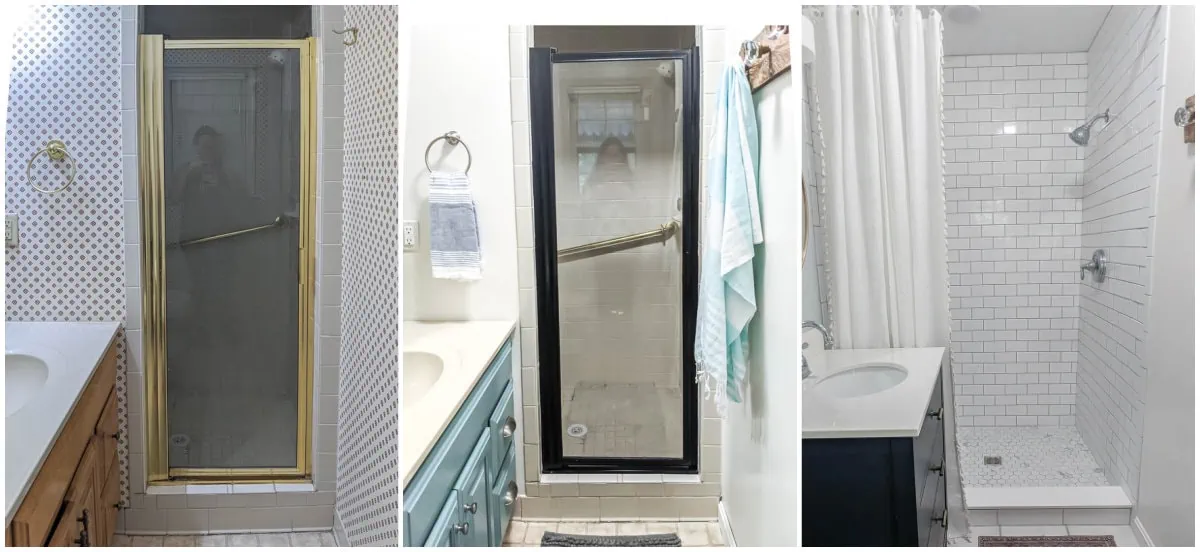
This shower was actually a pretty good sized shower to begin with, but it was completely enclosed with a tiny little door and felt very dark and cave-like.
Once we’d removed the fourth wall to open things up and repaired the subfloor, it was time to actually rebuild the shower.
I chose to use the Schluter shower system to build the shower. I used this shower kit which includes a premade shower pan with drain, shower curb, and waterproofing membrane for the shower walls. It was a bit pricier than doing things the old-fashioned way but it was much easier to install and it was still way, way cheaper than hiring a professional.
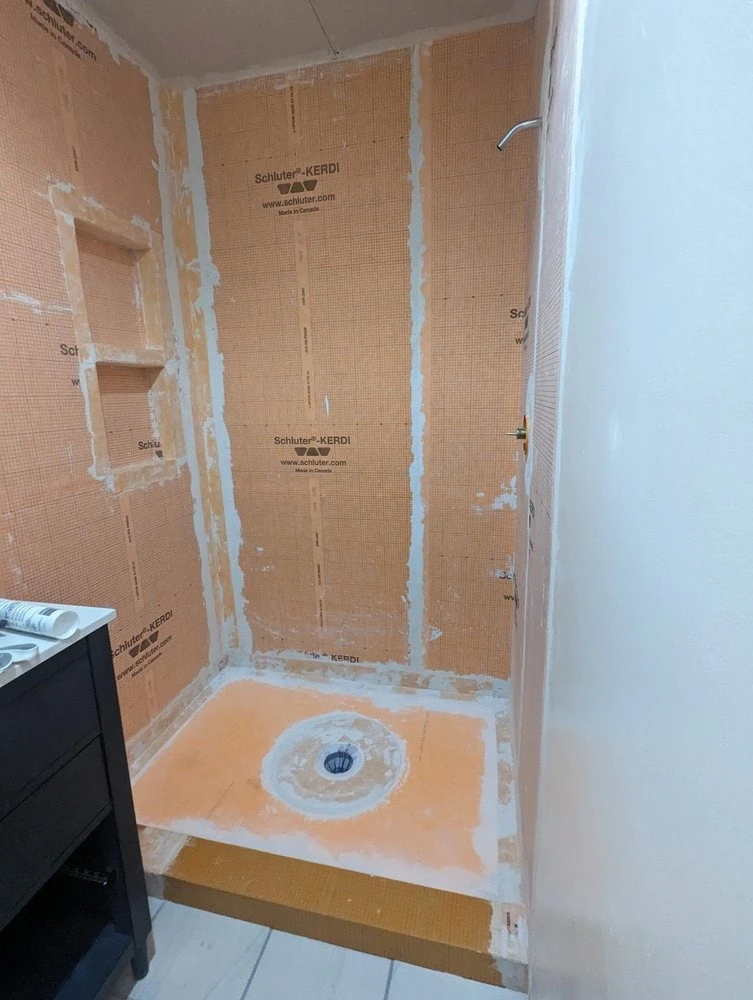
I plan to write a more detailed post about installing the shower with a full review of this shower system, but for now I’ll just say that while there were a few challenges, it made building a water-tight shower so much easier and more approachable for a DIYer.
Tiling the Shower
As far as the tile for the shower, I wanted something classic and simple.
I know that handmade tiles in saturated colors are super popular for showers right now. And I agree that they look beautiful.
But when it comes to things that can’t be easily changed like tile and flooring, I prefer to go super neutral and classic. I save the color and personality for things that are easy to change every few years like paint and furniture.
So I went with basic white subway tile for the shower walls and pretty marble-look hexagon tile for the shower floor.
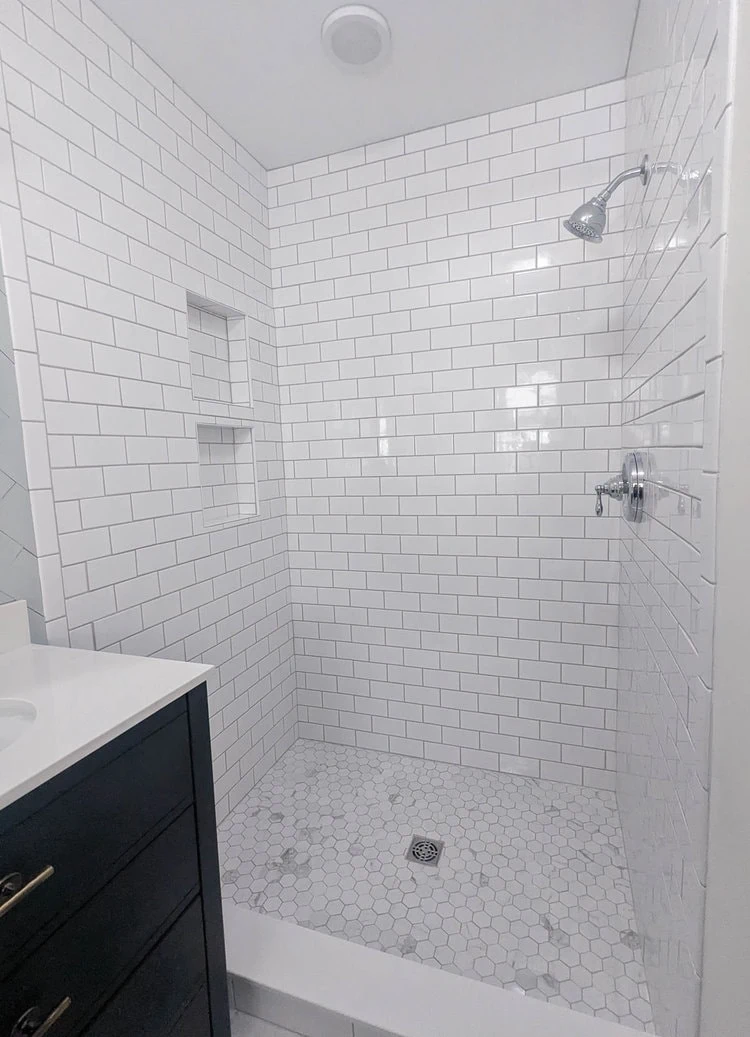
I love how bright and clean it looks. And while subway tile has been more popular at times and less popular at times over the last several decades, it’s a look that I think is too classic to ever be truly outdated.
And of course it doesn’t hurt that subway tile is incredibly cheap – all the tile for the shower walls in this huge shower cost less than $150. Now that’s a steal.
Shower Curtain vs. Shower Door
Originally I planned to have nice glass shower doors installed in here. But as I was nearing the end of the bathroom renovation, we started talking about possible listing our house for sale soon. Glass shower doors are very expensive and I didn’t love the idea of paying such a high price when we probably wouldn’t recoup the money when we sell our house.
So I went with a shower curtain instead.
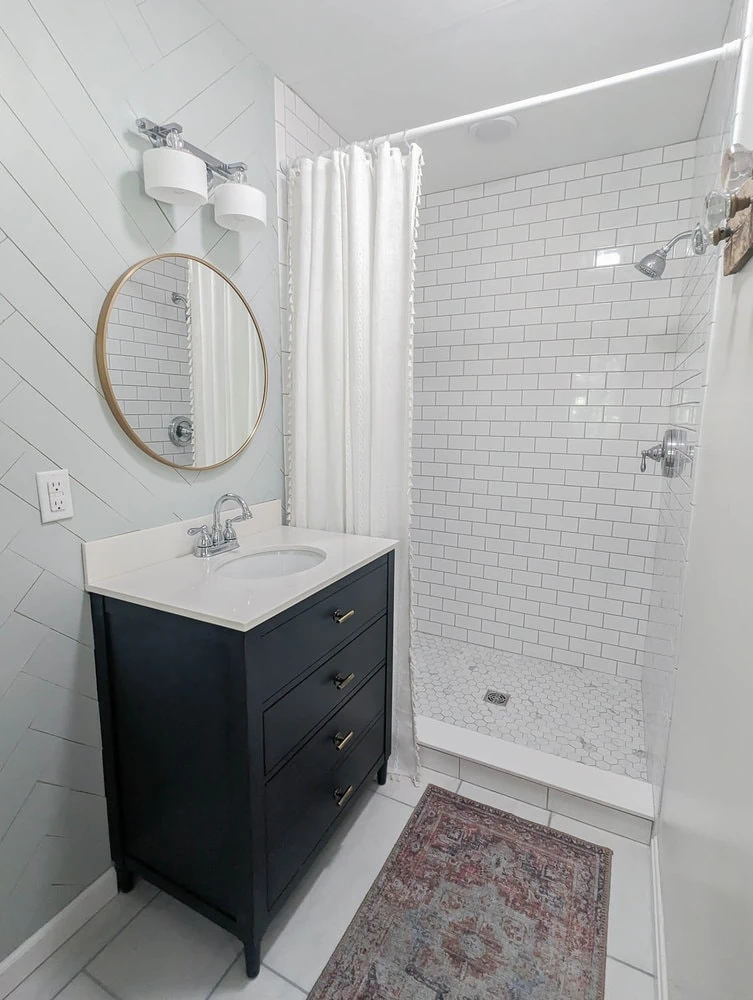
I got an extra long 84″ shower curtain and liner and I’ve actually been really happy with them. Functionally they work just as well as a glass door and we leave the curtain open when not in use so the bathroom still looks nice and big. Plus we don’t have to worry about keeping a glass door clean all the time.
And most importantly, we saved at least $1000.
If you’re considering using a shower curtain for a walk-in shower, I do strongly recommend getting an extra long shower curtain so it doesn’t have to hang awkwardly low.
Tiling the Floor
I love the look of marble, but I knew I didn’t want to use any real marble in this bathroom for a few reasons.
One, it can get very pricey. And two, marble isn’t the most durable material for a bathroom. I didn’t want to have to deal with babying my tile to keep it looking good.
So after shopping around a bit, I went with these large gray and white marble-look porcelain tiles. These matte porcelain tiles are available at Home Depot for around $1.50 per square foot. They were super cost effective and I think they look beautiful.
Just be sure to check your tiles carefully when you buy them. The online reviews mention that some boxes have a lot more gray to the background than others and I found that to be true with the tiles I purchased as well.
A new Vanity
The vanity I painted in this bathroom a few years ago still looked beautiful, but since this is such a small space, I wanted to switch it out with something a bit smaller. I love the dark blue color of this 30″ vanity and it works great in this small space.
The only downside is there isn’t a ton of storage space, but I think that’s pretty unavoidable with a smaller vanity.
Wood accent wall
I decided to keep the herringbone wood wall I added during the $100 makeover. I had to rework it a bit around the new vanity, but since I attached all of the strips with nails instead of glue, it was easy to pop individual boards off and cut them to size.
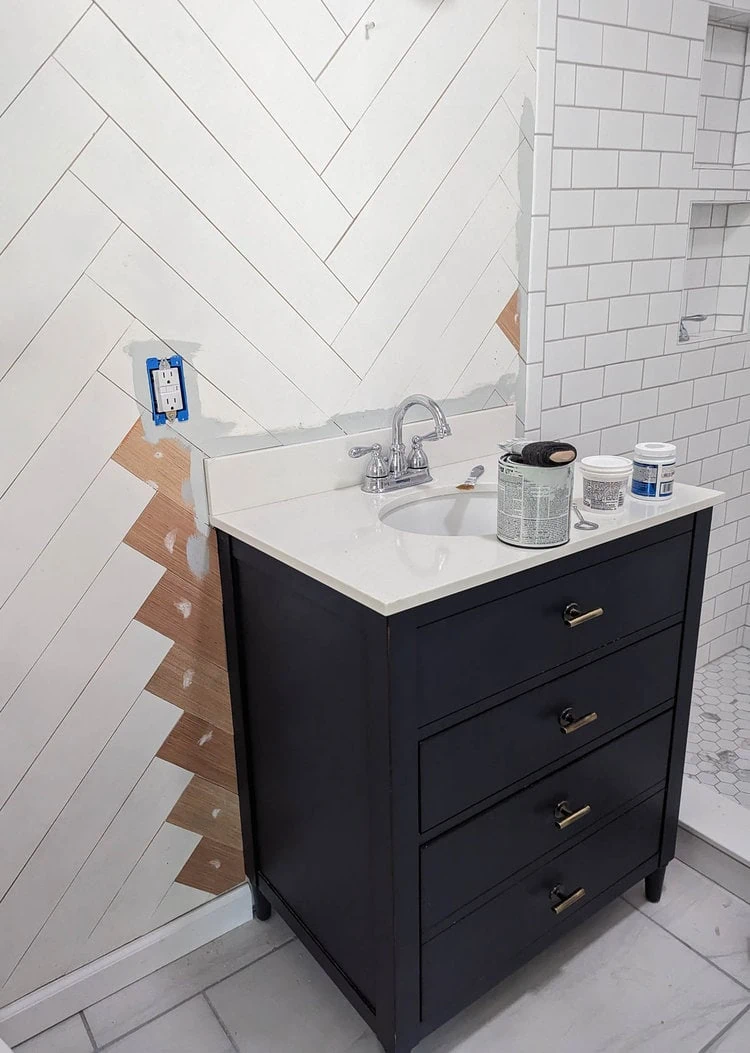
I also gave the wood wall a quick update with new paint. Since there was so much white in the room already with all the subway tile, I chose a light greenish-gray shade (Sherwin Williams Lapland Ice).
Time and Cost
It’s hard to pinpoint exactly how long this bathroom renovation took. The total time between starting demo and the last finishing touches was five months, but during that time, there were weeks we were travelling and I didn’t work on it at all and weeks I put in many, many hours.
Even though I don’t know exactly how much time I spent, what I can say is that it took a lot of time. There are many, many steps to a bathroom reno and even for a very small bathroom, it takes a lot of time.
As far as cost, we were able to drastically cut costs by doing almost all of the work ourselves. We saved thousands of dollars that way. And I also worked to stay on budget by choosing inexpensive, durable materials that look great now and will hopefully continue to look great for years to come.
All the materials for this bathroom reno came in right around $2300. That includes all the tile, the grout, the vanity, the toilet, the new showerhead and faucet as well as the more hidden costs like screws, quickset, and new longer water lines. We also spent an additional $1500 for the plumber and electrician to replace the pipes and move an electrical outlet. So all in, it was $3800.
$3800 is obviously way more than the $100 I spent a few years ago, but it’s still a super steal for a full gut renovation. (According the the internet, the average cost for a bathroom remodel is around $12K). You can absolutely make an outdated bathroom look a million times better for just $100. But when you need to address water damage or want to make bigger changes, costs really add up quickly.
Before and After Photos
Before I share the full source list, here are a few pics of this bathroom before, after the $100 makeover, and after the full renovation. Looking back to see how far things have come is always one of my favorite parts of any room redo!
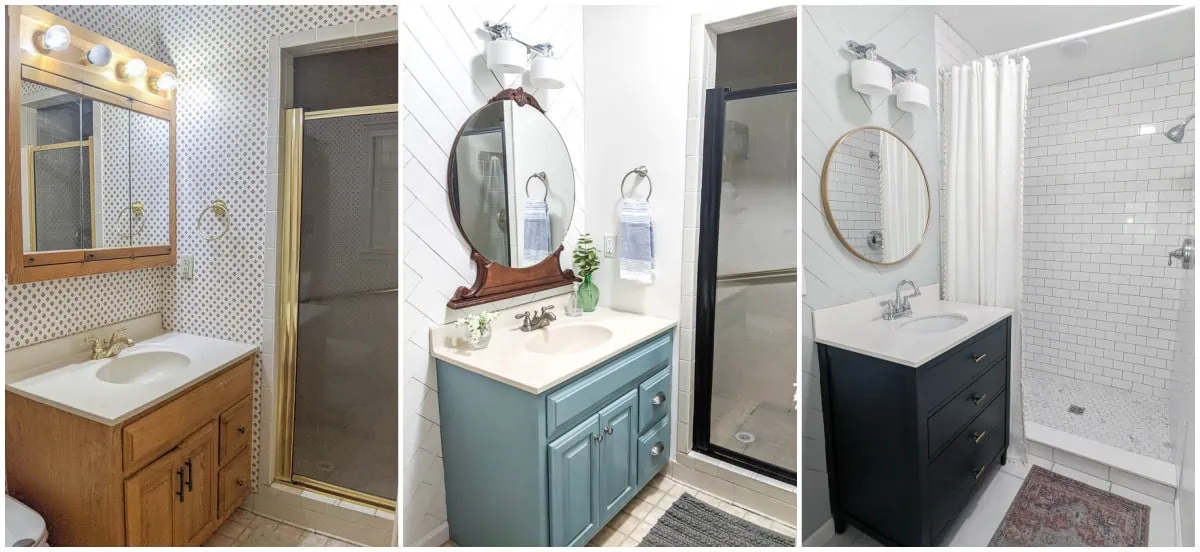
Opening up that shower really made such a huge difference!
Bathroom Source List
Listed below are the names and sources for everything in this bathroom.
- Paint colors – Sherwin Williams Lapland Ice on the herringbone wall, Valspar Dove White on other walls
- Floor tile – Alexandra White 12″x24″ matte porcelain tile
- Grout – Warm Gray Unsanded grout
- Shower tile –
- Floor tile – 12″x12″ polished porcelain hexagon marble-look tile
- Wall tile – 3″x6″ white subway tile
- Grout – Warm Gray Acrylic Pre-mixed grout – This grout is great for showers because you don’t have to seal it like other grouts.
- solid threshold for shower curb – white polished 6″x84″ composite sill
- Schluter Shower System – There are shower system kits for various shapes and sizes of showers. This is the one I used.
- Vanity – 30″ navy blue dresser style vanity, available at Home Depot and Wayfair (currently it is way cheaper from Wayfair)
- Mirror – 24″ round gold mirror
- Washable non-slip rug
- Shower curtain – Extra long cream shower curtain with tassles
DIY Projects in this Bathroom
- How to Demo a Bathroom: A Step by Step Guide
- DIY Herringbone Wood Wall on a Budget
- How to Make Cheap and Easy DIY Shelf Brackets
- Gorgeous Small Bathroom Makeover on a $100 Budget (the original mini reno)
I’d love for you to pin this post on Pinterest!

Nice update and it likely was inexpensive according to most renovations of baths. I do think if you could have squeezed the $1000 for a clear glass shower door across the entire shower opening, it would have paid for itself in the elegance of the bath when you sell. As a realtor and remodeler, sometimes I have found that 1 expensive item can add thousands to a resell and even help it sell. The bath is small for a master so any extra is a plus for buyers. You actually saved a lot with the hexagon wood on the wall rather than tile or marble but got a similar look.
WOW! You did a fabulous job. Your bathroom renovation is beautiful. That shower looks huge now. Congratulations.
Beautiful job. Not sure I would ever want to try an project like that. . Congratulations. I watched the herringbone wall redo when you did it. Still love it. The only thing I can’t quite rap my head around is the tool box above the toilet. Just looks heavy and out of source for the style you chose on for the bathroom. Just a opinion.
My hat is off to you on a lovely re-do, renovation, re-model or what ever you prefer to call it. We had to pay someone to up grade our bathroom, and though it looks good, your’s looks better because you put your hard earned sweat, and study, into making it truly yours. Our bathroom is very much like yours, in relationship to the tiling of most every thing, but to us, the walk in shower stole the show, on both your bathroom, and ours. I hope you enjoy the fruits of your labor for years to come. Well done!
You did an amazing job! It looks way more high-end than the costs you quoted. Beautiful!
Your bathroom looks amazing. Your finish are classic and will never go out of style. I’ll be watching for your review on the schluetter system. We are planning on a manly navy groom renovation around the first of the year and I’m considering it. Well done!!