Gorgeous Small Bathroom Makeover on a $100 Budget
Our small master bathroom got a total makeover on a tiny $100 budget. This bathroom remodel is full of ideas for adding loads of style without any major demo or expensive layout changes.
I’m super excited to share the before and after of my $100 bathroom makeover with you guys today.
I consider myself pretty good at making over a space on a budget, but I was still surprised at how much I was able to transform this space with only $100!
This $100 bathroom makeover is part of the $100 room challenge, a challenge dreamed up by Erin at Lemons, Lavender, and Laundry to makeover one room in your home in one month on a $100 budget.
A bunch of other awesome bloggers also worked to makeover a room in their homes for only $100 and you can find all of their room reveals linked at the bottom of this post.
I am always blown away by the things that people are able to do with such a tiny budget!
In fact, I also gave my other bathroom a $100 makeover as part of this challenge a few years ago.
If you haven’t seen it yet, I definitely recommend checking it out next.
Master Bathroom Before
Okay so before I share the big reveal, I need to show you what this bathroom looked like when I started.
This was not just a bland bathroom that could use some personality. This bathroom was straight from the 1990s.


You can see more before photos and read more about my makeover plans here, but basically, I wanted to change everything.
The wallpaper, the huge medicine cabinet, the ugly light, the boring vanity, the gold shower door, everything.
I’d say I pretty much succeeded! I’ve got everything broken down below with plenty of photos and I also put together a video tour walk-through.
And at the end of this post, there’s a full list of tutorials for all of the DIY projects in this space as well as the final budget breakdown.
This post contains affiliate links which means if you make a purchase after clicking a link I will earn a small commission but it won’t cost you a penny more. Click here to see my full disclosure policy.
$100 Bathroom Remodel
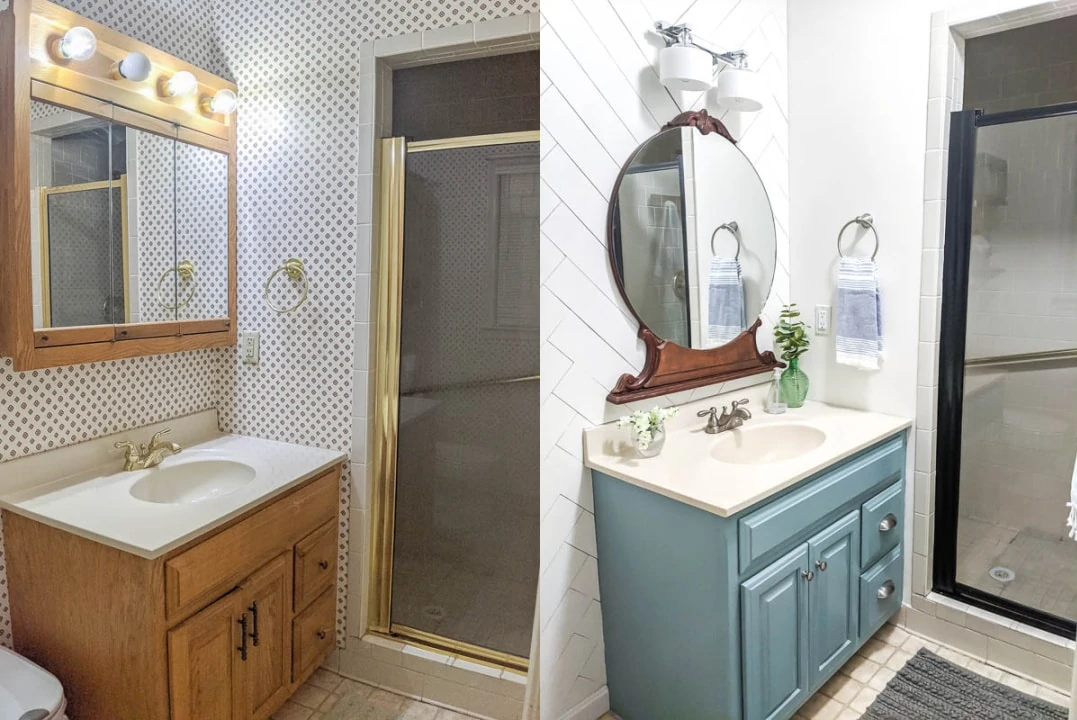
Here is my bathroom now after my $100 bathroom makeover. I love how it turned out!

Even though this space looks completely different, I didn’t change the layout, the flooring, or most of the fixtures at all.
This was all about changing up the details. Even so, what an incredible difference!
Fresh Paint and an Accent Wall
The first thing I did was get rid of the wallpaper that made this tiny room look incredibly busy and dated.
I painted the walls Valspar Dove White which is a creamy white color that I had leftover from another project.
One of my biggest tips for making over a room on a tiny budget is to use what you have.
If you have leftover wood, use that. If you have leftover paint, use that.
If you have stuff in your basement or garage that you’re not using, pull it out and see if you can make it work.
The herringbone wood wall also made a huge difference in this space.
I love how it adds texture and interest to the wall without being super busy like the old wallpaper.

I have a full tutorial on how to create a herringbone wood wall if you’re interested.
It’s a lot easier than it looks and it was super cheap to make. All of the wood for this wall only cost $30.
Painting the Vanity
The second major thing I did was paint the vanity and it looks so much better now.
I have a full tutorial of the method I used to paint this bathroom cabinet including how I got such an incredibly smooth paint finish on an oak vanity.
You cannot see a bit of the pronounced wood grain now and I think it looks beautiful.

I used General Finishes Milk Paint in Persian Blue and I also sealed it with General Finishes High Performance Top Coat for extra durability.
I updated the hardware at the same time. Luckily I had found this hardware at a yard sale a few years ago and was holding onto it, just waiting for the right project, so I didn’t have to use any of my budget on it.
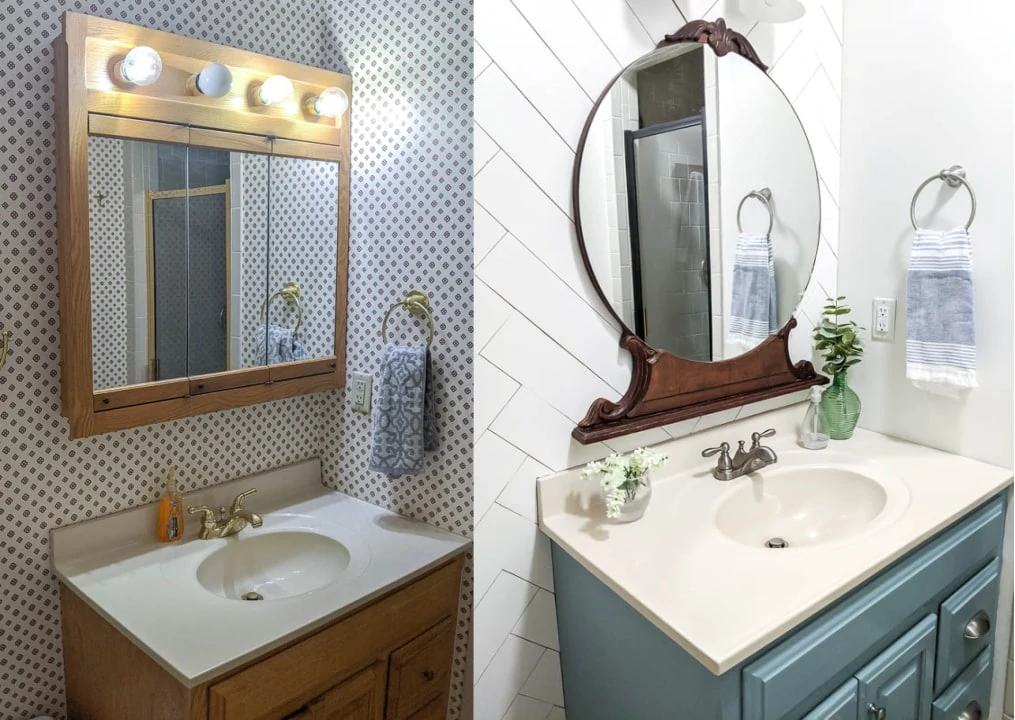
Replacing the Medicine Cabinet and Light
I also changed out the mirror from the gigantic medicine cabinet/light combo that was here before. That thing had to go.
I picked up this mirror at a yard sale last summer for $5. I am always on the lookout for vintage mirrors when I am thrifting.
The mirror had a bit of an issue – somebody had carved the name Paul and ‘you suck’ into the bottom of the wood frame.
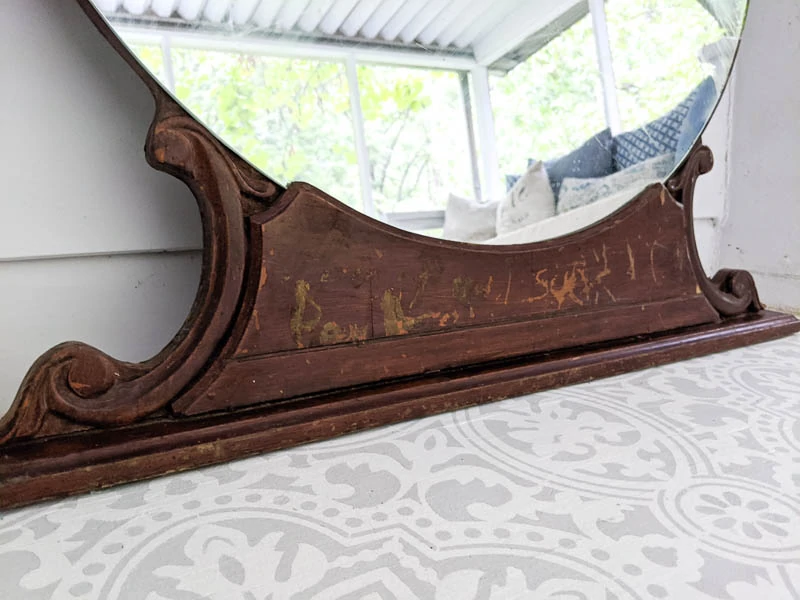
Luckily, I was able to sand that out and re-stain that part to match the rest of the frame.

This light was something else I had stashed away after taking it out of another bathroom a few years ago.
I will admit that if I’d had to buy a light, I probably would have gone over my $100 budget.
But if I hadn’t had this beauty tucked away, I would have been hitting the Habitat Restore and looking for a light that I could upcycle.
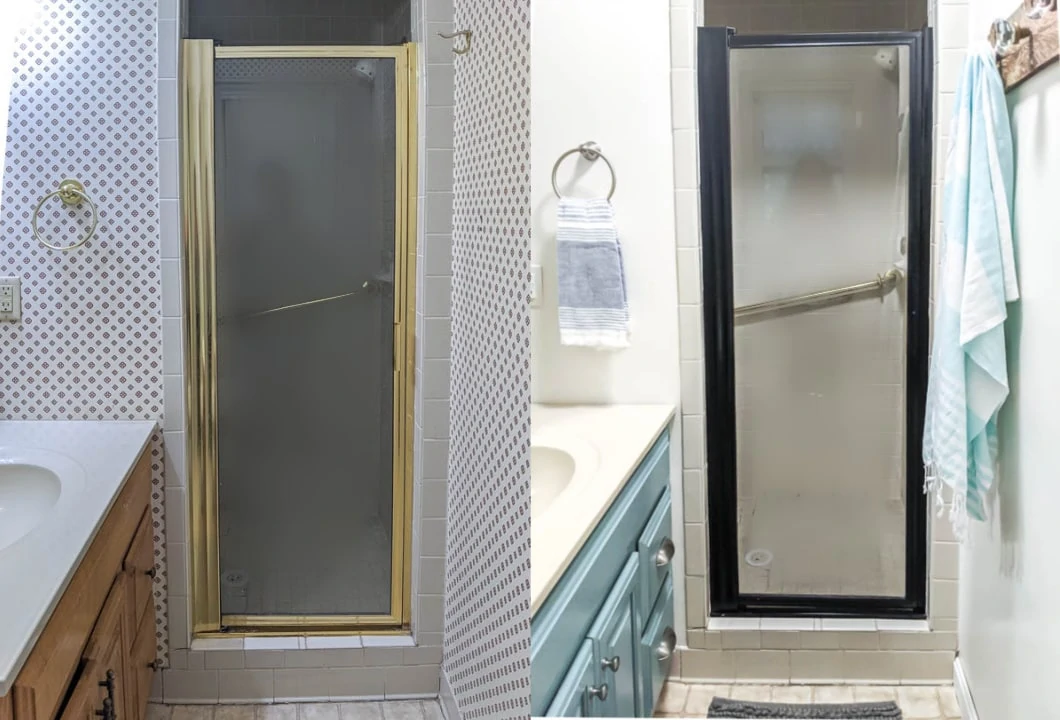
Painting the Shower Door
One of my goals for this makeover was to get rid of all of the shiny gold!
The shower door got a makeover with some black spray paint and it looks gorgeous and so much more up to date now.

There is still a bit of gold inside the shower, but it’s pretty well tucked away so I can live with it.
Replacing the Faucet
The shiny gold faucet also had to go. I considered spray painting it but to be honest, I was a little worried about how it would hold up.
I knew I would rather just switch the faucet out.
You can buy a basic faucet for around $30, but I didn’t have that left in my $100 budget.
So I was trying to come up with another solution when I realized I already had a perfectly nice brushed nickel faucet – on my kids’ play kitchen!
Several years ago I made a really nice upcycled play kitchen for my kids and I wanted to use a real faucet.
I found a faucet at a yard sale for $15 and it even came with towel rings that matched.
I put it in my kids’ play kitchen and it was gorgeous. (It was even featured in Better Homes and Gardens magazine!)
But my kids haven’t been playing with it that much. And I decided I deserve to have a nicer faucet in my master bathroom even more than they deserve a nice faucet on their play kitchen.
So I switched out my old gold faucet with their brushed nickel one.

Open Shelving
I replaced the big cabinet over the toilet with some open shelving.
I made these simple shelves using scrap wood and I have a simple tutorial for the DIY wood shelf brackets.

On my open shelving, I added an old train case and a little wooden tool tote. Little vintage suitcases like this are one of my favorite things to snap up at yard sales because they are perfect for storing things away in plain sight and still looking cute.

That’s my second biggest tip for making over a space for super cheap – buy stuff used.
You can go on Facebook marketplace or Craigslist or shop thrift stores, yard sales, and estate sales.
In this space, the mirror, toolbox, small suitcase, vanity hardware, and vintage doorknobs all came from yard sales.
Before and After Photos
Here are a few side-by-side before and afters. Those are always my favorite part of any room makeover!
Video Tour of $100 Bathroom Remodel
I also have a video walkthrough showing the whole space before and after because sometimes it’s easier to get a real feel for a room on video.
If you haven’t , I’d love for you to subscribe to my Youtube channel!
Okay, so where exactly did I spend my $100 budget?
$100 Bathroom Budget Breakdown
- Vintage mirror: $0 – already owned
- New light: $0 – I was lucky enough to have a great light I removed from our other bathroom a couple of years ago
- New baseboard: $10
- Paint for vanity: General Finishes Milk Paint in Persian Blue, $20
- Sealer for vanity: General Finishes High Performance Topcoat $20
- Hardware for vanity: $0 – already owned, these are similar
- Wood for accent wall: $31
- Spackling: $4
- Paint for walls: Valspar Dove White, $0 – leftover from another room
- Faucet and towel rings: $10 – I stole these from my kids’ play kitchen, but did need to buy a small replacement part, this is the same set I used and it is a pretty great deal even new
- Shelves: $0 – made from scrap wood
- New hand towel: $6
Grand Total: $101
Now go visit everyone else’s before and afters below and prepare to get inspired! And don’t forget to check out my other $100 Bathroom Makeover if you haven’t seen it yet!
I’d love for you to pin this post on Pinterest!


Wow! It looks awesome! That wood wall is so cool and I love the paint color of the vanity.
Thank you so much!
What a transformation. It turned out so pretty. Love the wall, mirror and the color you painted the cabinet. Looks amazing Carrie!
Thank you! I love it too!
Love it Carrie!! Paint really is a miracle worker, and that vintage mirror is killer! Enjoy your new space!
Thank you! I think your shed is proof paint can do anything!
carrie, this looks so good! i LOVE that mirror with the vanity! SO good!
Thank you so much Cassie! I wasn’t sure if it would be an odd pair but I think it really works!
Looks amazing! Can’t believe you only spent $100! I love that herringbone wall. Got to figure out where i will put one in my house.
Thank you!
WOW! This bathroom makeover is absolutely GORGEOUS!!! What a huge difference $101 and 4 weeks make. My jaw has hit the floor. Amazing job! Thank you so much for participating in the challenge again. Enjoy that new bathroom!
Thank you so much Erin! I love doing this challenge – it really gets my creativity flowing and makes me actually finish rooms! Thanks for hosting!
Oh my gosh, what an amazing transformation! I can’t even decide which thing I like the most. I love the herringbone wall and will be checking out that tutorial next. An the mirror! I love that Paul you suck was there and now it’s not. LOL. And I also love the little cloche on the open shelving. Great tips on how to find things at a discount too. I just love everything about this. You did a great job!
Thank you so much Wendy! I love how that mirror worked out too – and I’m glad it was pretty easy to get rid of Paul!
This is the most dramatic makeover! It’s beautiful… I will be using that tutorial for a herringbone wall for sure.
Thank you! I am so thrilled with how it turned out!
That’s an amazing transformation for $100! Wondering if your flooring is vinyl or tile and whether you’d ever try to paint it. You are so clever at doing things like this and I’d love to see a tutorial if you ever choose to paint it.
Thank you! The floor is vinyl and I strongly considered painting it for this challenge. I would definitely consider doing it in the future, but after I had updated everything else, I decided it looked fine for now. Also, I was ready for a break lol. If I ever paint it, I will definitely share a tutorial!
Hi Carrie,
Eye popping make over! I had to stop and zoom in on every picture, just so I could drink in all the details. What is absolutely blowing my mind is the fact that I have almost all of the elements you used sitting around in my house, too! Thrifting is the way to go! I too bought a similar mirror for $5.00 at a garage sale, and it hangs above my couch. My grandma’s little train case is sadly sitting on a basement shelf, similar doorknobs, ditto in a box, and I even have the same pot and faux lamb’s ears plant from IKEA, in my guest room! Looks like I will be doing a bit of rearranging here, too! Thanks for all the great ideas and inspiration.
That is awesome! Thrifting really is the best. It is crazy what fun stuff you can get for super cheap!
This came out great! I love how you used the antique mirror in the space. Everything is perfect! Congrats on a wonderful job
Thank you so much! I love it!
This is such an amazing bathroom transformation it really does not even look the same! Great job! I love the blue cabinet and pretty herringbone shiplap.
Thank you so much!
Carrie,
This is amazing! All the details are so perfect. That mirror is so neat!
Thank you!
It’s fantastic! Amazing how far such a small budget to can go!
Thank you!
You’re so right! It’s all of the details that have really brought this space together. Beautiful job
Thank you so much!
Wow, this doesn’t even look like the same room! Love the colors and I definitely need to find a spot in my home for a herringbone shiplap wall!!
Thank you!
Girl that turned out amazing! You rocked that budget, I may have went over just a smidge… That herringbone wall is my favorite!
Thank you!
Hi, I’d love to subscribe. Can you send me the link?
You can subscribe here: https://youtube.com/c/LovelyEtc Thank you!
You did an amazing job! I cannot believe that cost only $101, looks so much more high end than that. Great job!!
Thank you Brooke!
This is genius! I absolutely love your creativity and your esthetic. Well done!
Thank you!
love the vanity color. I am a big fan of using what I have on hand and the beautiful antique mirror, spot on. The only thing I would change is to maybe paint the vinyl flooring white.
Thank you! And I agree the floor wasn’t my favorite. I think at that point I was running out of steam for the project and it seemed good enough!