A mountain mural for the little explorer

A painted mountain mural is exactly what this room was missing – I just didn’t know it before!
Ever since I finished my three-year-old Griffin’s little explorer bedroom last year, the bed nook has seemed a little off. I thought it was probably just because the box spring and mattress were resting on the floor until he got used to being out of a crib. But then a few weeks ago, I finally wrestled them up onto a bedframe…and it still seemed bare.
Of course a headboard would be the obvious solution. However, Griffin has developed a major love of climbing, running, jumping and generally being destructive, so going out and buying a nice headboard didn’t really seem like the best idea.

A little celebrating of the new bigger bed
Paint, however, is not easily climbed, jumped off, or thrown. And it also happens to be my favorite way to make a huge impact for cheap. Since this is a room all about exploring and having adventures, a simple mountain mural seemed like just the thing.
Painting a Mountain Mural
Painting this little mural is so incredibly easy. It doesn’t require any artistic talent or skill – it’s basically just a bunch of triangles painted on the wall.

Tape off the triangles (mountains) using painter’s tape. They can be as tall, short, fat, or skinny as you want; just try to vary the shape of each mountain a little bit. To get nice, crisp lines you need to seal the edge of the painter’s tape. First run your finger along the tape, pressing down firmly on the edge to make sure it is tight against the wall.

Then paint your base wall color over the inner edge of the painter’s tape. This creates a really strong seal so that none of your mountain paint will seep under the tape and make things messy.
Fill in your mountains using the paint color of your choice. I used Valspar Silver Leaf for my mountains and Silver Dust for the background. The white mountain tops are just some white paint leftover from another project.

To keep your paint from peeling, it is important to remove the tape before the final coat of paint dries. I just left some pieces of tape at the peaks so I could add my snow caps.

Tape the bottom of the snowy peaks at different angles and then fill in with white paint.

And that’s it! Or at least it should be. At this point, I realized that my snowy mountaintops were almost the same color as the rest of the wall. Instead of my mountains looking snowy, they were looking more like the tops had been taken off. So at this point, I went back and painted the ‘sky’ and the rest of the room Valspar Silver Dust. Of course it would be much easier and faster to repaint the background before adding the mountains! Lesson learned.


Who needs a headboard, when you’ve got snow-capped mountains!
(And no, he most definitely does not keep all of those pillows on the bed, but he has learned to leave the Explore letters alone. Plus he can name them all! Hooray for educational decorating!)
Did you miss any of the other projects in this little corner?


Check out the rest of the room

Add a beautiful, simple painted mountain mural to your child's bedroom for a bit of whimsy and fun. As an Amazon Associate and member of other affiliate programs, I earn from qualifying purchases.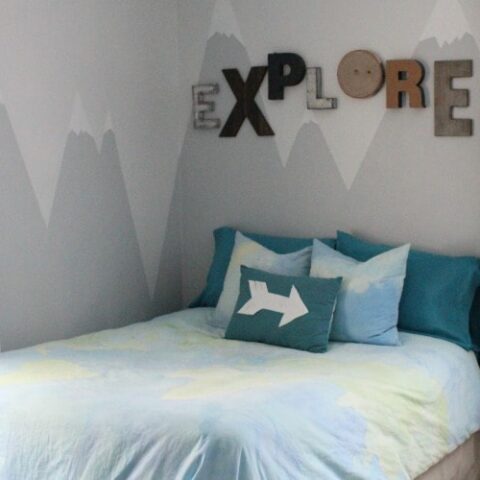
How to paint a mountain mural
Materials
Tools
Instructions
Recommended Products


this looks awesome- i love the palette you used! amber from wills casa did something similar in her son’s room and i have been in love with the look since. hers was more modern and bold in color, but similar vibe, and it’s perfect for a boy! you can see it here:
http://www.willscasa.com/2014/06/mountain-mural-the-makings-of-a-ron-swanson-nursery/
Thanks Cassie. I love her mountain wall too! It’s always fun seeing two totally different takes on similar projects.
This looks so awesome! It’s like a little daybed headboard that can’t actually be climbed on and destroyed. It looks great – just what that corner needed!
Thanks Jenny! That is exactly what I needed – a headboard that can’t be climbed all over!
Absolutely love this, what a great idea! Totally pinning :) xo
Thanks so much Jess!
Wow saw this featured, don’t know how I missed it first time. What an awesome decoration for a boys room or any room. Then again I do love a mountain theme. Thanks !
Thanks Claire! I’m definitely a mountain lover as well. :)
I love this & am going to attempt it in my little boys room. Where did you get ‘EXPLORE’ sign from? I can’t find one anywhere & it’s driving me mad!! Thank you xx
I hope your boys love the mural! I made the explore sign using a bunch of letters I gathered from different craft stores. Basically I just went to a few different stores and gathered letters in different colors and fonts to spell it. A few of the letters were bare wood and I stained those. And I have a tutorial for how I did the first metal E here: https://www.lovelyetc.com/make-your-own-industrial-metal-letters/ Good luck! Kids rooms are so much fun!