How to Paint a Shower Door Frame on the Cheap
Painting your shower door frame is an easy, inexpensive way to make dated bathroom fixtures look fresh and beautiful without needing a total bathroom renovation.
I have hated our shiny gold shower door since the day we moved into this house.

For years I’ve been wanting to do a huge bathroom renovation and completely gut our shower.
But we aren’t ready to tackle a major bathroom renovation right now, so instead, our bathroom is getting a budget DIY makeover as part of the $100 Room Challenge.
After my success painting my sliding glass doors, I decided to paint my shower door too and now I only wish I had done this years ago!
In the first week of the challenge, I shared my $100 bathroom makeover plans, and last week I shared my design plan.
This week I’m sharing before and after photos of my shower door along with a step-by-step tutorial to help everyone else out there struggling with a shower door they hate. (There’s also a video tutorial below for those who prefer video.)
This post contains affiliate links which means if you make a purchase after clicking a link I will earn a small commission but it won’t cost you a penny more. Click here to see my full disclosure policy.
Materials
- Cleaner – I used my favorite soap scum-busting cleaner: a mixture of white vinegar, Dawn dish soap, and water in a spray bottle but any good bathroom cleaner will work.
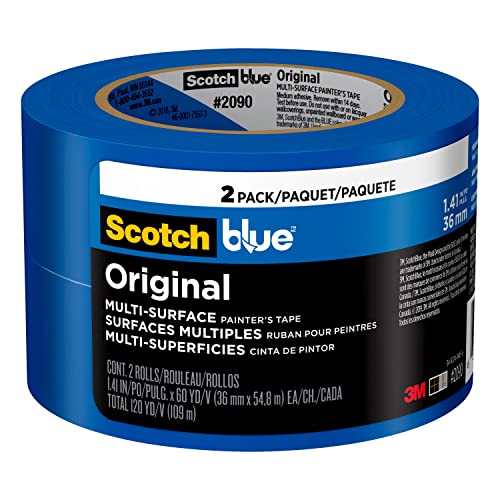
- Painter’s tape
- Plastic drop cloth or kraft paper – to protect everything around your shower from overspray
- Spray primer – I used Rustoleum Spray Primer for Clean Metal
- Spray paint – I used Rustoleum Satin Protective Enamel in black
- Utility knife – this is optional but it can make it easier to remove the painter’s tape cleanly.
- A protective mask – this is a must when spray painting inside. If you have an N95 mask, that can work, but a respirator mask is best.
How to Paint a Shower Door Frame
Cleaning the shower door
Step one of painting anything is cleaning it well.
Paint won’t stick to dirt, dust, grease, or soap scum so you need to be sure your shower door frame is really clean before painting it.
Protecting the area around your shower
Once your shower door is all clean, it’s time to break out the painter’s tape.
Spray painting inside isn’t ideal – no matter how careful you are, spray paint tends to go everywhere!
So you’re going to want to protect everything near your shower door.
Start by taping all along the edges of your shower door frame with painter’s tape, making sure your tape lines up exactly with the edges of your door.
Then you can use a plastic drop cloth or thick paper to cover the glass in your shower door, the walls, your tile, your tub, your floors, anything that is within a foot of your shower door.

Make sure to close off any openings behind your door as well, so paint doesn’t make its way inside your shower.
And if you aren’t sure if you’ve taped enough, tape more! I thought I had protected everything possible, but paint still ended up on the tile above my shower door.
Luckily it was pretty easy to remove with a little elbow grease.
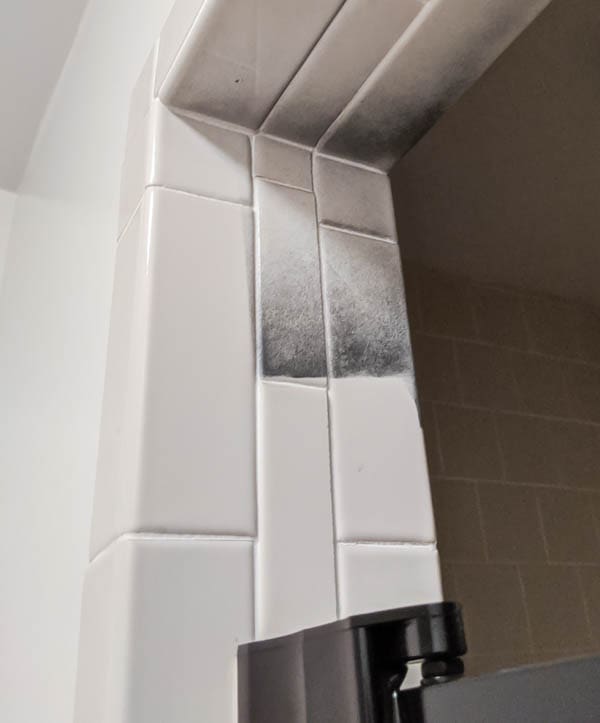
I also discovered that covering more of the bathroom including the entire floor would have been a smart idea.
Spray paint produces a lot of paint dust and while the spray paint stayed pretty contained, a layer of gray dust settled all over everything.
I was able to wipe it clean pretty easily but it would have been even better if I could have avoided that step altogether.
Priming
Before you start priming, remember to wear your mask to protect yourself from paint fumes. If there is a window in your bathroom, it’s also a good idea to open it before painting to help ventilate the room.
Once everything is fully protected, the actual painting process goes super quickly.
Start with a coat of spray primer.
The spray primer will help your paint stick to the slick metal shower door frame.

Anytime you are using spray paint, remember to do very light coats of primer/paint. Keep your spray can at least six inches from the surface you are painting and keep it moving evenly over the surface.
You definitely don’t want to do a thick layer of paint – that just leads to drips and gunky paint build-up.
Once the primer is fully dry, it’s time for paint!
The primer I used recommended waiting 15-30 minutes before painting; if you use a different primer, just check the can for the recommended drying time.
Painting
When the primer is totally dry, you can spray on your first coat of paint.

first coat of paint
Remember, you want to do several light coats of paint rather than one thick, drippy coat.

third coat of paint
If you do end up with drips in your paint, it’s fairly easy to fix.
Wait for your spray paint to completely dry. It’s going to be really tempting to try to wipe off the drips right away, but that usually just leads to a bigger mess.
Once the paint is dry, you can gently sand off the drip with high grit sandpaper. Then spray another light coat of paint to cover the sanded area.
Removing the tape
When removingthe painter’s tape, the main goal is to make sure the paint doesn’t peel off your shower doors.
There are two options for removing the tape without peeling the paint as well:
- Remove the painter’s tape before the final coat of paint dries. This is the method I usually use and it works really well. The downside is it can get messy pulling off the tape that is covered in wet paint.
- The other option is to wait for the paint to completely dry and then score the edge of the tape before removing it. Just lightly run the blade of a utility knife along the edge of the painter’s tape. If the paint has formed a seal between the metal and the tape, this will break that seal so that the tape doesn’t rip the paint from the metal.

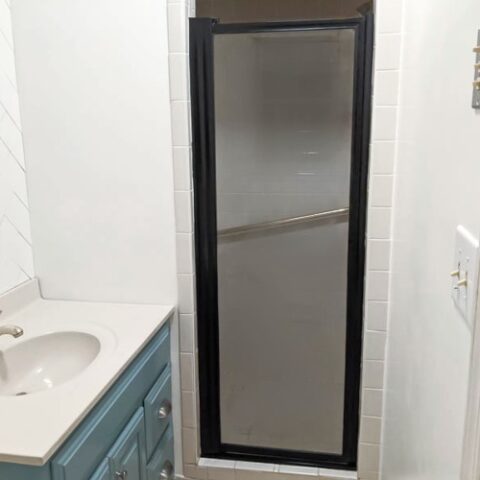
I used the utility knife method to remove the paint this time around and it worked perfectly! Just look at those crisp paint lines!

If despite being careful, you have a few places where your paint needs to be touched up after you remove the tape, Lauren from Blesser House has a smart trick for touching up spray paint.

I chose to only paint the outside of my shower doors and leave the inside of the doors gold.
You certainly could paint the interior of the doors as well; I just decided not to since the inside of the doors can only be seen from inside the shower and really haven’t bothered me.

I love my black shower door! It really makes the whole room look more modern – even next to the bland beige tile.
Video Tutorial
I’d love for you to subscribe to my Youtube channel!
There are only two weeks left until the big $100 bathroom makeover reveal and I am so excited about how everything is coming together! In addition to painting the shower door, I also painted the bathroom walls and vanity this week.
Here’s an update on where the budget and project list stands.
Bathroom Budget Update:
- Total from last week: $30
- Paint for walls: $0 (leftover from previous project)
- Paint rollers and brushes: $0 (already owned)
- Paint and primer for shower doors: $8.50
Running Total: $38.50
Bathroom Project List:
remove wallpaper and prep wallspaint walls- accent wall
paint vanity and replace hardwarereplace medicine cabinetreplace vanity lightpaint gold shower doors- paint or replace gold faucet
- replace cabinet over toilet with shelves
remove tile trimand install wooden baseboards- paint or cover vinyl floor
- new window treatment
- add towel hooks and other accessories
There’s still a lot to do, but I’m feeling pretty confident I can pull it off.
You can check out everyone else’s progress at the links below!
I’d love for you to pin this project on Pinterest!

How to Paint a Shower Door Frame
Paint is an easy way to update an old shower door frame. It's inexpensive and can completely change the look of a dated bathroom.
Materials
- Cleaner
- Painter’s tape
- Plastic drop cloth or kraft paper
- Spray primer
- Spray paint
Tools
- Utility knife
Instructions
- Clean your shower door frame well.
- Use plastic drop cloth or thick paper to cover everything around your shower door frame.
- Spray a light coat of spray primer on your shower door frame.
- When the primer is dry, spray your first coat of paint. Use several light coats of paint, rather than one heavy coat. You will probably need 2-3 coats of paint for good coverage.
- To avoid peeling off the paint when you remove the painter's tape, either remove the tape before the final coat of paint dries, or wait for the paint to dry completely and then use a utility knife to score the edge of the tape before removing it.
Recommended Products
As an Amazon Associate and member of other affiliate programs, I earn from qualifying purchases.
-
 Scotch Painter's Tape Original Multi-Surface Painter's Tape, Blue, Paint Tape Protects Surfaces and Removes Easily, Multi-Surface Painting Tape for Indoor and Outdoor Use, 1.41 in x 60 Yards, 2 Rolls
 -
Stanley 10-079 Retractable Blade Utility Knife
-
Frost King P115R/3 Clear Polyethylene Drop Cloths (3 Pack), 9' x 12' x 1Mil


So smart! I have the same gold around my shower door and need to update this since we are waiting for a major Reno as well.
Yes, it makes such a big difference!
What a fantastic idea to save some money and it looks great! I know that brass is “suppose” to be coming back in style, but I really think the black it so classic, and looks amazing, good choice!
It looks amazing and will give you a smile each time you walk into the room. Can’t wait to see your reveal!
Thank you!
The black looks so good!!
Thank you! I love it!
Looks so much better! I love the door black.
Thank you!
Looks great- love the black. Good tips for anyone who might want to try it
Thank you!
It looks fantastic! What a clever solution to a pesky and potentially expensive problem.
For those times when overspray happens – like on your tile – the best thing ever to get that paint off with ease is Goof Off (NOT Goo Gone). It comes in a spray bottle for regular strength and a can for professional strength. I have little patience and usually put some professional strength on a blue paper shop towel and that paint wipes right off, no elbow grease needed. Be careful using it on a painted finish – the regular strength is okay but the pro will take off topcoat and paint. I always keep some on hand to clean my stencils (makes it a breeze!), remove paint from where I don’t want it, remove stains and gum and all sorts of things. The pro strength does have a smell but it quickly evaporates. Bonus, unlike most of these types o removers, there is no oily residue. Nope, I don’t work for Goof Off. I just love the product and you gave me another place I would’ve used it.
Thanks for this tip! I am definitely going to try it for cleaning stencils because that is one of my least favorite DIY related tasks!
This is a great idea! my daughter has lots of gold frames she has been asking what to do with them. You bathroom is look great.
Thank you!
I love that we are both taking on bathrooms for this challenge! The shower door looks so good! I can’t wait for the reveal!
Thank you!
This is such a great idea! We have a shower frame that is currently silver, but could definitely use an update. This idea is a perfect, budget-friendly way of doing it!
Thanks Erin!
Looks amazing! I am currently in the middle of a very small bathroom renovation, because of budget, and the size and shape of the new shower I had to purchase one with gold frame. I wanted to ask how has the paint held up after a few months? Since I am considering painting brand new shower door frames it’s making me very nervous. Have you had any high traffic areas chip? Thanks for any updates.
Thanks! So far we haven’t had any chips, but it has only been a few months so we’ll see. I can definitely see why you would be nervous to paint a new shower. If you hate the gold though, I think it’s worth it.
Now that it has been a year or so, is the paint still holding up? Looking to try this weekend as yours looks fantastic! My shower is silver and needs an update!
So far it has held up great – no chips yet!
What did you do for the inside? Did you leave it gold?
Yes, I just left it gold. Since you can really only see it when you are in the shower, it hasn’t bothered us. You could also paint the inside of the door and I think it would still hold up well. I just didn’t want to do the extra work to retape and cover everything to do the inside once the outside was done.
How has this held up?
It has held up very well so far. It’s been two years since I painted it and so far there are no chips in the paint so I’m very pleased!
good morning. my neighbor did this on his shower before he put on market. when the new people moved in and we talked to them they told my husband that they had to get new shower frame as the black was coming off. any tips on how to keep it from chipping?
The biggest thing to prevent chipping is to make sure to clean the doors really well and use primer before painting. My shower door is still looking good without chipping, but some factors could contribute to chipping like if the shower tends to have standing water.
I was skeptical of this but the gold trim really dated my bathroom. Silver gutting and starting over want in the budget I decided to try your method. So far so good (other than the paint fumes). 2 coats in and waiting to complete the third. Thanks so much, Carrie. Super excited for the new look.
I’m so glad you’re loving it. It really does make such a difference!
This looks really sharp – our daughter in law, realtor and home interior designer, sent some pics from a friend who updated someone’s shower with professionally black coated shower doors, yet the price was not associated with the post! I just painted our shower caddy’s black this past weekend (my husband hasn’t seen them as he is away on a golf trip) but I love them and can’t believe how much of a game changer even those are! It’s a whole different feel – can’t imagine what three new shower doors in black would yield! HA! Glad they are holding up for you. I read another post where they primed three times prior to painting. Thank you for sharing!
How do you clean any soap scum or rough water build up on the frame? I would be nervous scrubbing the frame clean would also scrub off the paint.
I don’t scrub it with an abrasive brush, but cleaning it with cleaner and a microfiber cloth has worked well.
Did you do the inside of shower too? I’m guessing the water from shower would cause it to bubble or peal?
I did not do the inside. I have used spray paint on exterior metal doors and they were fine in the weather, but a shower door is put through poor conditions much more regularly so I wasn’t sure how it would hold up. I also figured nobody else would be looking at the inside anyway. You could always give it a try though, just be sure not to use the shower for at least a week after painting so the paint has time to fully cure.