Details of a DIY Play Kitchen
I recently shared the DIY play kitchen I just finished for our little man. I showed exactly how I transformed an old entertainment center into a fun play kitchen for only $50, but I wanted to share more detailed instructions on how to use inexpensive details to really make your play kitchen amazing.

Update: My little play kitchen was actually featured in the pages of Better Home and Gardens magazine! Seriously! If you want to see what it’s actually like to be a in a photo shoot for a huge magazine, I have lots of behind the scenes details right here. (I also used some of the photos taken at that photo shoot in this post. All photos not taken by me are noted.)
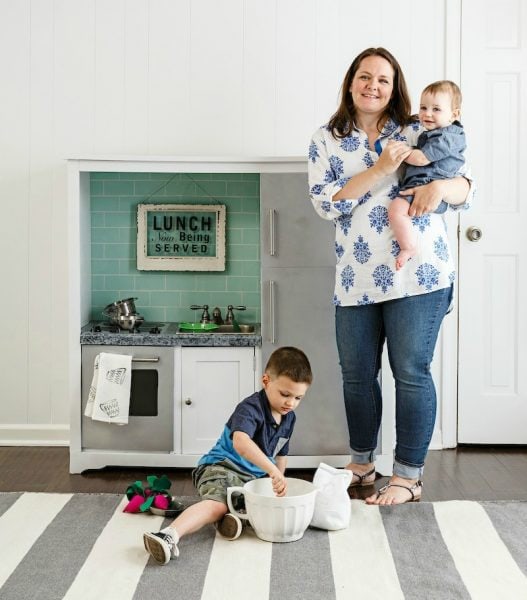
photo by lincolnbarbour.com
The very best parts of the kitchen – the ‘tile’ backsplash, ‘stone’ countertops, and ‘stainless steel’ appliances – were all created using simple paint techniques. Even in person, they look amazingly real; my own husband thought I had installed a real piece of countertop. (In fact, I’m pretty sure I would be quite happy having that backsplash and counter in my grown up kitchen until I can afford the real thing!) Creating all of the finishes using paint was one of the biggest factors in keeping the cost of this project so low and I’m sharing detailed instructions so that you can recreate the same look for yourself.
(You can find a full source list and budget breakdown for the kitchen along with the rest of the tutorial right here.)
This post contains affiliate links – you get to buy stuff you want and support Lovely Etc. at the same time. See my full disclosure here.
Painted tile backsplash

The backsplash is painted right onto the backing of the entertainment center. In my case, I had to replace the original backing with a piece of hardboard from the home improvement store but it would work the same way on any type of backing.
I knew I wanted the look of subway tile. I considered using peel and stick tiles, but I knew it would be cheaper to use paint. Plus, that way I would have complete control over the color and size of my ’tiles’.
After considering several ways to get that look including using painter’s tape, I decided the easiest thing would be to make a stencil. I cut a stencil out of a piece of thin plastic – vinyl or even cardboard would also work. I decided to make each ‘tile’ 2.5 x 5 inches with a quarter inch grout line. I used a cutting mat and a ruler to draw straight lines with a marker and then cut the lines with a craft knife. (If you want to save yourself some trouble, you can also buy a subway tile style stencil from Etsy.)

Then I simply used a small foam roller to roll the paint on with the stencil. That gorgeous color is Laurentien from Fusion Mineral Paints.
Painted granite countertop

The beautiful countertop is also painted. After priming the entertainment center shelf, I painted it with black craft paint. Next I did three layers of sponge paint. I used a synthetic sea sponge which is much rougher than a kitchen sponge – you can find them with the painting supplies at most craft stores. I sponged on two layers of gray craft paint and a layer of metallic silver craft paint, letting the counter dry between each coat.

Then I finished off the whole thing with several coats of spray polycrylic to keep everything nice and protected. These countertops seriously look way prettier than my real countertops.
Painted stainless steel appliances

I wanted the appliances to have the look of stainless steel. The refrigerator/freezer and over doors I primed with spray primer and then painted with Krylon Chrome spray paint![]() . I tried a regular silvery spray paint at first, but it did not look anything like stainless steel. So I painted over it using the chrome spray paint which is much shinier and more reflective.
. I tried a regular silvery spray paint at first, but it did not look anything like stainless steel. So I painted over it using the chrome spray paint which is much shinier and more reflective.

After taping off the stove top with painter’s tape I painted it with several coats of the same chrome spray paint. The stove burners are just CDs that I spray painted with oil rubbed bronze spray paint.

photo by lincolnbarbour.com
And how about an action shot, because I just can’t resist.

photo by lincolnbarbour.com
All of the appliances were finished off with a few coats of spray polycrylic as well.

And that’s the kitchen! Be sure to check out the original post for all of the other details and sources. And if you have any questions I didn’t answer just let me know.
More Projects I Think You Might Love:
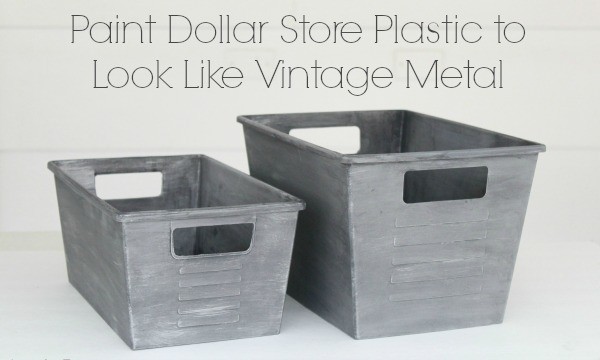
How to Paint Plastic Like Vintage Metal

how did you install the stove and oven knobs and do they move?
Daisy, the stove is painted on. I used painter’s tape to mark off the area I wanted to be the stove and then spray painted it silver. The eyes are old cds that I spray painted black and glued on. For the oven knobs, I drilled holes through the ‘counter’ and then screwed them on with bolts coming up from below the counter. I just took my knobs to Lowes and tried out a few different size bolts until I found some that fit. The knobs do move – you can tighten them more to make them stationary or leave them a little loose so they can be turned.
I’ve seen a lot of these online and love how this is a way to repurpose a ubiquitous but now useless piece of furniture. Yours is particularly darling, and I love the modern style.
Thanks so much Jackie! I totally agree – why fill up landfills with old entertainment centers when they can be used for something awesome!
Where did you get the sink? I can only find round bowls but would love one just like yours!
Hi NaKeisha, I actually found it at the Goodwill (very lucky find!) Look for pans that are called steam pans, roasting pans, or casserole pans. I found several on Amazon and some weren’t too expensive. This divided pan is especially sink-like, though it’s a bit more expensive: http://amzn.to/2GS8rb8
I assume the freezer and fridge doors open. Can you include a picture of what they look like on the inside please.
Yes, they do open! I don’t have a picture but there is one shelf inside the fridge and all of the insides are painted white. You could always add some little shelves to the inside of the door to be more like a real fridge, but I didn’t do anything fancy in mine.
What did you use for the faucet? A real faucet?
Yes, I bought a real faucet at a yard sale. You can also find real faucets at the Habitat ReStore and on Facebook Marketplace pretty regularly. When people upgrade their faucets in their home, they are usually happy to get rid of them for cheap!