Painting A Night Sky Mural
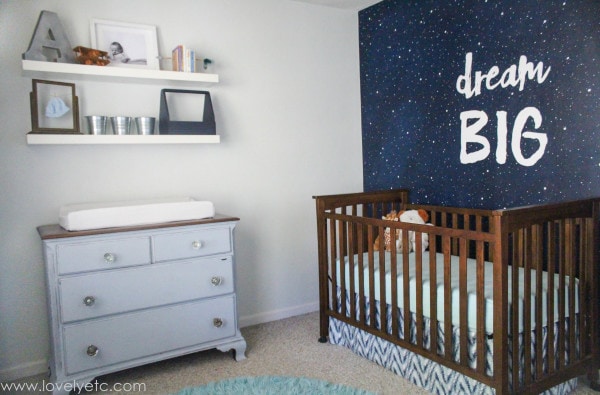
Thanks so much for all of your kind comments about the new nursery! I completely love the way the room came together, but the absolute best part is definitely the big starry night sky mural.

When I decided I wanted to paint a night sky on the crib wall, my biggest concern was that it would end up looking like a big navy wall with white polka dots.
Not the look I was going for! I was extra careful to avoid the whole polka dot look and figured out a few tricks that definitely helped with that goal.
This post may contain affiliate links. See my full disclosure here.

Painting the Navy Wall
The first step was painting the wall navy – I used Sherwin Williams Anchors Aweigh.
With such a dark color on one wall, it was extra important that the paint lines be clean and crisp.
I used painter’s tape to tape off the wall that would be navy.

Then I sealed the edges of the tape with paint to make sure no navy would seep under.
This step is very important to getting crisp paint lines.

You don’t want any dark navy paint seeping under the tape and leaving little navy splotches on the white baseboards or light adjoining walls.
To prevent this, you can create a seal along the edges of the tape so that no dark paint can break through.
You create this seal using paint that matches the adjoining trim and walls.
I used white paint to seal the edges of the tape along the ceiling, baseboards, and door frame because those areas were painted white.
I used the existing wall color, Allen + Roth Day Spa to seal the tape along the corners where the navy wall met the other walls.
As always, be sure to remove the painter’s tape before the last coat of paint dries. (This will keep the paint from peeling.)

I had to paint two coats of navy paint to get even coverage, and when I pulled off the tape, it looked perfect!
I didn’t have to touch up a single spot! (When we moved into our first house, we painted our living room red and I’m pretty sure we spent longer touching up the paint edges than we spent painting in the first place.)
One of the things I did to keep the wall looking more starry and less polka dotty, was to add some lighter areas to my navy wall.

When you are outside looking at the night sky, there are some areas that look lighter than others and I wanted to replicate that on my wall.
I mixed a little white paint with my navy and lightly brushed it on in several areas across the wall.
Then I used an old rag to help further blend the light and dark areas together.
Dream Big
Next I added the “Dream Big”. I wanted it to look like I just took a paintbrush and spontaneously added it to the wall.
But there was no way I was actually going to just start throwing white paint on my fresh navy wall. My handwriting is nowhere near good enough for that.
Instead I used a font set I purchased from Creative Market called The Treasured Years.
Using this font, I typed out my phrase in PicMonkey.
Now if you own a projector, you can simply project your phrase on the wall and then fill it in with paint.
I don’t happen to have one, so I used the printer method instead – I printed my phrase out extra large and then transferred it onto the wall.
To do this from Windows Live Photo Viewer, choose print. When the window opens, click ‘options’ and then ‘printer properties’.
Choose the Page Setup tab at the top.

Choose tiling/poster and then hit the specify button to choose how big to make it. I made mine 4 sheets by 4 sheets.

On the original print screen, be sure to uncheck the box that says ‘fit picture to frame’.

Once all 16 sheets of paper were printed, I lined up my letters and taped them together.

Then I used chalk to transfer the letters to the wall. This trick is so easy to do and it also works great for making really clean designs on chalkboards.
Simply rub chalk all over the back of the paper. Tape it to the wall where you want your letters to be and use a pen or pencil to trace around the outline of each letter.
When you remove the paper, there will be a perfect chalk outline of each letter on the wall.

I used a small paintbrush to fill in my letters with three coats of white paint.

Stars in the Sky
Lastly came the stars. I chose to use several different sizes of stars to give the illusion of some being closer and some being further away.
I used a medium sized round paintbrush, a smaller paintbrush, a small wooden chopstick, and a toothpick.
I started with the largest brush, dipping it in white paint and dotting it onto the wall.
I was very careful to make sure my dots were not evenly spaced.
This is not as easy as it sounds – our natural inclination is to put things in patterns so I had to work to make sure some dots were clustered together and others were more spread out.

I feel pretty confident this wall looks sufficiently starry and not just like polka dots.
I think the three things that really made the difference were adding lighter areas to the background, making different sizes of stars, and varying the spacing of the stars.


I really love how this wall turned out. It is eye catching and beautiful and it gives the room a strong focal point.
It is one hundred percent baby proof – no heavy frames that can be pulled off the wall.
And it cost less than ten bucks to make – two sample cans of paint and some painter’s tape.
Here are a few more projects I bet you’ll love:
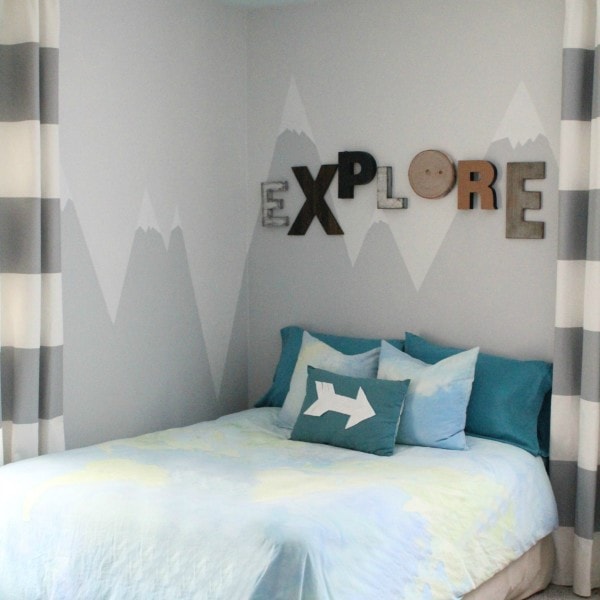
Mountain Mural (the perfect headboard for child’s room)
10 Smart Tips for Planning the Perfect Nursery


Painting A Night Sky Mural
Create a beautiful starry night sky mural with this surprisingly easy tutorial.
Materials
- Navy paint - I used Sherwin Williams Anchors Aweigh
- Painter's Tape
- White Paint
- Chalk
- Medium Round Paintbrush
- Paint Roller
- Small Paintbrush
- Wooden Chopstick
- Tooth Pick
Tools
- Printer
Instructions
- Tape off the wall with painter's tape along the ceiling, baseboards, and door frame.
- Paint the wall with 2-3 coats of navy paint.
- Remove the painter's tape before the last coat dries.
- Mix a little white paint with navy paint and brush small areas across the navy wall.
- Print out Dream Big on copy paper using the font of your choice in extra large. I used this font from Creative Market.
- Tape the printed pieces together and rub chalk all over the back of the paper.
- Tape it to the wall where you want your letters to be.
- Use a pen or pencil to trace around each letter.
- Remove the paper and there will be a chalk outline of each letter on the wall.
- Use the small paintbrush to fill in the letters with three coats of white paint.
- Add three different sizes of stars using the white paint and the round paintbrush, smaller paintbrush, chopstick, and toothpick.
Recommended Products
As an Amazon Associate and member of other affiliate programs, I earn from qualifying purchases.


I adore your nursery!!! I love that you took a chance with the night sky. It looks amazing. I hope I can borrow some of your courage to try something out of my comfort zone by reading your blog. I really want to rip up the carpet in my office and just go for painting the subfloor. But I’m too chicken at this point! Keep being fearless and blazing the trail for the rest of us!
Thank you so much Maggie! I would definitely encourage you to take some risks – whenever I try something that feels a little scary in my home, it ends up being one of the things I love the most!
Hiiii…
Loved the whole look!
Can you please tell me would it be okay if I add fairy lights to this look? And can you please guide me a bit how to do so?
Thanks Jay. I think fairy lights would be a cool addition, the problem would be all the cords everywhere. It might work to outline the wall with fairy lights. You could spray paint the cords a similar color as the wall so they blended in better.
I made this thanks to your guide!!! I don’t know how to post a pic but thank you!!!
Liz, that makes me so happy! I am glad you tried it and I hope you love yours as much as I love ours!
What size letters did you use?
I am sorry it has taken me so long to reply to this. Every time I had a chance to reply to comments, the baby was sleeping so I couldn’t go in his room to measure. Go figure! The BIG letters are 13 inches high. The d in dream is around 11 inches high. I hope that answers your question.
Hi Carrie,
Looks great. Your technique led to a beautiful finished result! For the mixing of the navy with white to produce the lighter areas, did you use a white latex wall paint or a different kind?
Thanks!
Thanks! For the white paint, I just used the same white latex paint I later used for the stars and letters. I poured some of the navy paint in a paint tray and then slowly added a little white until it was a lighter blue. I wasn’t sure exactly how it would work, but now I wish I had made it even lighter.
I LOVE how this wall turned out. I have been tinkering around with the idea of doing something like this in my son’s room…he’s 8. You tutorial is great…and I love that I don’t even have to leave my house to print out the template. This is right up my ally. Thanks so much!
Megan
Thanks Megan! I am glad you liked it. I am a huge fan of doing projects I don’t have to go anywhere for to – if I have everything I need at home and can avoid dragging my kids out, it’s a major win!
I really like this. I wonder how long did it take you? Great job!
Thanks Laura! It is hard to say how long it took because I had to work on it a little at a time whenever I could steal time away to myself. (I didn’t paint this until the baby was already born – much harder that way!) Painting the wall navy took several coats and then it took a few hours to add the stars and words – with drying time in between.
Oh my goodness I love it! I was set on a black, white and mint nursery until I saw your wall! I can’t wait to get started. Thank you so much for the tutorial!
Thank you Ashley! I still smile everytime I see this wall. Good luck with your nursery – I would love to see a pic when you finish!
Hello, could you maybe measure how big your biggest stars and second stars are? I don’t know what size round brush to start with. Thanks.
Jordan, the biggest stars are about half an inch in diameter. The second largest are about half that. Good luck!
Wow, this is absolutely gorgeous! May I also say that I love how detailed you are on your instructions? This is perfect for my toddler’s room in our new home and I feel completely confident pulling it off. Thank you!!
Thanks Ari! This would be perfect in a toddler’s room!
Hi! Beautiful!! Did you let the navy wall dry completely before brushing the white/blue brush strokes onto the wall then blend?
I did let the wall dry completely first because I was figuring out things as I went. But I think it would work well to do it before the final coat of navy paint is 100% dry as well.
hi carrie. in terms of painting on the lighter tone of navy blue. could you help by explaining more in detail how is it being done. like is it one light stroke of paint and immediately followed by using a rag to blend?
This is one of those things you really can’t mess up. When I did it, I would brush back and forth a few times in an area and then immediately follow with the rag. I think if you experiment you will be fine. Start with just brushing on a few strokes of paint and blend it. If you want more variation, add a bit more and blend again. Just make sure to recheck the color after the paint dries a bit because it will probably look darker once it dries and the color difference might not show as much as you thought.
Wha color white did you paint the other walls? I love your details and we are planning on doing this on our kids ceiling!
Ariel, this will look so great on a ceiling! The rest of the walls were already painted a neutral color so I just left them the color they were – Day spa by Allen + Roth. It is a very light gray that looks a little blue or green in some lights. I think any white or very light gray would work though.
This looks great! I love it and the detailed instructions make me feel confident to give it a go soon.
On a separate note, has this Amazon product listing pinched your pictures?
The ‘Perfect for children’s bedroom’ picture looks like it has exactly the same cot (and toys!) and swirly blue paint, just with glow in the dark stars photoshopped on…
Thanks Phil! And good eye – they totally stole my photo and photoshopped it. Very weird.
Where do you buy a round paintbrush and what size medium and small paintbrush did you use for this? Did you just literally do a dot with the paint brush or do you have to swirl it around to make a small circle? Did you use the large end of the chopstick or the small end or both? Are most of the small dots in the background you did using the toothpick? What finish did you get in the navy and white paint (eggshell/flat?) I am not crafty at all, so the more help the better! Thanks so much-I LOVE this nursery wall and can’t wait to try it!!!
Hi Susan! It’s been a couple of years since I painted this wall but I will do my best to answer all of your questions. First of all, I used paint in a satin finish – this is generally what I always use for walls because it can be wiped down unlike flat paint. I got both round brushes from Michaels in a set of inexpensive art paintbrushes. They have stiff bristles and the medium brush is around 3/4 inches in diameter. The small one is around 1/4 inch. I believe I used the small end of the chopstick and yes, most of the very small dots were done with the toothpick. I didn’t swirl the paintbrushes – simply dotted them right onto the wall. Since you feel a little unsure, I would just experiment a little on a scrap piece of paper or cardboard before going for it on the wall. Good luck! You can definitely do this – it doesn’t require any crazy artistic talent!
Hi Carrie,
I love this idea so much that I am in the process of doing a night sky wall for my son’s “big boy” room. He just turned 3. :)
My walls are very flat and smooth (I notice that your nursery wall is quite textured) and I am trying to figure out how to add the lighter areas to the dark wall without it looking so obvious that it’s been added after the final blue coat. Do you have any suggestions?
So far, I have tried with a brush to feather on the light areas and I’ve also tried with a rag. Both still show edges when they dry so it just looks like I slapped on the light area after the fact, not so good.
I’m afraid that with such smooth walls, I’m going to have to just do a solid blue, which as you know is quite dark. Do you think yours works better because of the texture?
I realize that your post is several years old already. Hopefully you are still checking comments as I would love to hear your suggestions.
Thanks, Leila
Hi Leila, Hopefully this reply isn’t too late to be useful to you. My walls do have texture and I can imagine that perfectly smooth walls would be a bit tougher to get natural looking color variation on. In my experience it is easiest to get natural looking blending by adding the lighter paint before the last dark blue coat is fully dry. That way when you add the lighter paint, it blends a bit with the layer underneath. But I do think you can still get some variation even after having painted the dark color. I would just make the lighter color just a few shades lighter than the original blue by mixing a small amount of white with it. Then start applying it lightly with a rag. If it isn’t light enough, add a bit more white and blend that with the paint you just added. Also, keep in mind the paint you are adding will darken when it is dry so it might not look as abrupt as it seems. Good luck!
Thank you so much for this tutorial! My husband and I did it this weekend for our nursery and we had so much fun! Neither of us knew we could do something like this but your tutorial made it easy and now we have a beautiful, unique wall in our nursery. ♥️
That makes me so happy to hear! It really is so much easier than you would think just by looking at it. Enjoy your nursery and your little one!
Hey Carrie!
I recreated it with minor changes. It looks perfect. Your tutorial is very clear and on point. I love star gazing and added in some actual constellations. My wall is so cute I want to cry ! Thank you so very much for this!!
Cheers,
Priya
Thank you so much for sharing this! I’m so glad your wall turned out well and my tutorial helped!
Thank you for your tip about the different sizes of brushes. I laughed when I saw that you used a toothpick. Then, I started to do my stars and my husband commented to make them smaller. I looked at my brushes, thought about the toothpick, and told myself “why not? If it worked for you, maybe it’s not a silly idea!”
It turned how really nice with the different brushes and the toothpick. Thank you so much!
Ha, yes the toothpick seems crazy but really works! I’m glad you love your wall!
I followed this tutorial to make a night sky ceiling for our 7yo new Harry Potter themed bedroom. He was very precise on what he wanted and a night sky ceiling was a non negotiable. It took a long time and I spent more time on a ladder than I ever thought I would but it’s done and looks amazing, even if I do say so myself.
I’m so glad it turned out great! Kids can definitely be the toughest ‘clients’!