How to Build a Simple Inexpensive DIY Closet Organizer
This DIY closet organizer is simple to make using inexpensive wood and basic tools and can be made to fit your specific closet exactly. No complicated closet systems needed!
The master closet in our 1970s brick ranch isn’t exactly the huge walk-in closet everyone on House Hunters is looking for. It’s a small reach-in closet that always seems to be packed to the limit.
A few years ago I built DIY closet shelves in the small closet my three boys share and it has been a game-changer for storing all of their things in a way that actually stays neat and tidy.
And I decided it was definitely time to try to work the same magic on our own closet, but in a more grown-up version.
I started by converting the old sliding closet doors into hinged doors so we could see and reach everything in the closet more easily. Then I gave the blah closet doors a major update with inexpensive wood planks and a fun paint color.
Next up: tackling the inside of the closet.
Our closet started with a pretty basic set-up – two shelves across the top and a single closet rod for hanging clothes. It was fine, but it definitely wasn’t making the most of the space.

I knew that with a better closet organizer, I could make the closet look a million times nicer and more importantly, make it much easier to find the things we need.
I know there are lots of closet organization systems out there at a variety of price points. But I quickly realized that I could make something much sturdier that fits my closet exactly for way less money.
This DIY closet organizer is inexpensive and can be customized to fit any small closet. I’m sharing a full materials list and wood cut list, step-by-step instructions, and a video tutorial below to make it easy to create your own DIY closet organizer.

This post contains affiliate links which means if you make a purchase after clicking a link I will earn a small commission but it won’t cost you a penny more. Click here to see my full disclosure policy.
If you’re looking for a DIY closet organizer with built in drawers, check out this organizer I recently built. It’s also built from inexpensive materials and has a similar layout but with lots of drawers and shelves for added storage.
Materials
- five 1″x12″x8′ MDF shelf boards – These inexpensive MDF boards will make up most of the structure of the closet organizer.
- five 1″x2″x8′ boards – This will form the outer face of the closet organizer. Poplar or pine boards work well for this, but with current lumber prices, pine is much less expensive.
- two 1″x1″ square dowels – This will be used to trim the shoe cubbies. If you don’t want to add individual shoe cubbies to your organizer, you can skip this.
- two 1″x4″x12″ boards – These boards will be used to support the top shelf. Scrap wood would work well for this.
- wooden closet rod – I was able to reuse the closet rod that was already in my closet and cut it into two smaller pieces. But if you need to buy a closet rod, a 1.25″ round dowel works perfectly, can be cut to the exact size you need, and is very affordable.
- two pairs of closet rod sockets – to support the closet rods
- 1.25″ Kreg pocket hole screws
- caulk – for filling any tiny gaps for a perfect finish
- spackling – for filling the nail holes made during building
- paint in the color of your choice
- small foam paint roller and paintbrush
Tools
- miter saw or circular saw – for cutting your wood planks to the correct lengths
- jigsaw – for cutting notches so your organizer fits around your existing baseboards. Another option is to use an oscillating tool to remove part of your baseboards instead.
- Kreg Jig – I use and love the Kreg R3 – it’s a smaller, less expensive Kreg Jig that is still pretty easy to use. If you are new to woodworking and don’t want to make a big investment, the Kreg Jig mini is an even cheaper option.
- nail gun – for assembling the closet organizer. You can also make this with a hammer and nails, but it will take a lot longer. This is the nail gun I have and it is very easy to use.
- tape measure
- drill – for attaching the pocket screws and hanging the clothes rod
- carpenter’s square
- level
- safety gear – hearing and eye protection
How to Make a DIY Closet Organizer
Dimensions
My closet is a small closet that is 63.5″ wide. The diagram below shows the dimensions of my finished closet organizer. If your closet is smaller or larger, you can adjust the measurements of the top shelf and the shoe shelves to make it fit perfectly.
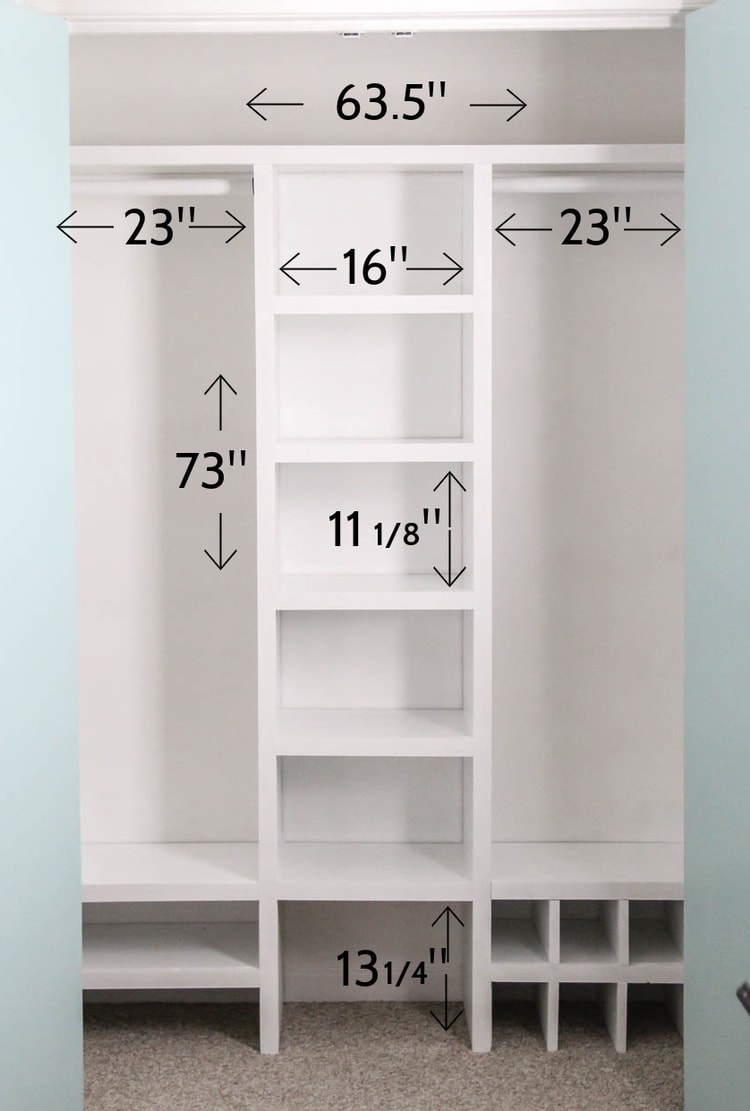
In the middle section, the top five shelves are all 11 1/8″ high while the bottom section is 13 1/4″ high.
Wood Cut List
You can use this wood cut list to make a closet organizer exactly like mine. If you are making a slightly different size organizer, be sure to adjust the measurements accordingly.
1″x12″ MDF for main structure:
- 1 @ 63.25″ (or total width of closet minus .25″)
- 2 @ 73″ for vertical supports
- 5 @ 16″ for middle shelves
- 4 @ 23″ for shoe shelves
- 12 @ 6 1/4″ for supports for shoe shelves and dividers for shoe cubbies
1″x2″ boards for facing:
- 1@ 63.5″ (or total width of closet)
- 2 @ 72 1/4″ for vertical supports
- 5 @ 16″ for middle shelves
- 4 @ 22 1/4″ for shoe shelves
1″x1″ boards for facing:
- 8 @ 5 1/2″ for supports for shoe shelves and dividers for shoe cubbies
1.25″ round dowel
- 2 @ 22″ for closet rod
Scrap wood for shelf supports
- 2 1x2s @ 11.5″ to support the bottom shoe shelves
- 2 1x4x @ 11.5″ to support the top shelf
Choosing the right materials
I used 1″x12″ MDF shelf boards for this project. MDF is great for building shelves because it’s super straight and smooth and also a bit cheaper than real wood. And since I was planning to paint my closet organizer, there really wasn’t any need to pay more for nice wood grain.
I also added 1″x2″ boards to the face of the closet organizer. This is a really inexpensive way to make nice, thick shelves.
I used pine boards for this, but poplar is also a good choice. If you choose to use pine, remember that you need to start with a sealing primer to keep the knotholes from bleeding through the paint.
Poplar doesn’t usually cause an issue with bleeding through white paint, but is quite a bit more expensive right now. (The two used to be more comparable, but some wood prices have been skyrocketing in recent years).
Clear the Closet
Before you get started, you’re going to want to clear everything out of your closet..
This is also a great time to do some decluttering and clear out things you no longer need and wear. Then you can get a much clearer idea of what you have left and what you need to make sure you have space for in your closet organizer.
Demo
Once your stuff is cleared out, you can remove any shelves and closet rods that are already in the closet. Depending on their size and condition, you may be able to reuse the shelves that are there in your new organizer.
In my own closet, there were metal shelf supports that were really easy to unscrew. But there were also wooden shelf supports nailed to the walls that I had to use a prybar and a lot of elbow grease to get out.
Clean and Paint
Once everything was out, I patched the holes left from the old screws and nails with spackling and then gave the whole closet a good cleaning and a fresh coat of white paint.

Lay out your design
I looked at a bunch of closets on Pinterest and had a rough idea of what type of organizer I wanted to make. I knew I needed room for hanging clothes, room for folded clothes, and lots of shoe shelves to get all of our shoes under control.
I decided against doing a double row of closet rods since we don’t have a huge amount of hanging clothes and I wanted to use the extra space for shoes instead.
Once I had a basic idea of what I was going for, I used painter’s tape to tape out the design on the back wall of my closet. Seeing it laid out this way made it much easier to visualize what it was going to look like and helped me finalize the measurements for each section.

Cut the MDF to size
Once I had the layout figured out, I took measurements and started cutting my MDF boards to size. (My measurements are listed above in the Wood Cut List).
At this point you can cut the top shelf board, the tall vertical boards, the boards for the middle shelves, and the boards for the shoe shelves. (See the wood cut list above for the dimensions I used).
If you are working on a small closet that is the same size as mine, you can use the same measurements I did. If your closet is a different width, just adjust the measurements to be smaller or larger as needed.
If your closet has baseboards around the bottom of the wall, you will need to cut a notch in the bottom of your two long MDF pieces with a jigsaw so that it can sit flush against the wall. Or if you prefer, you can use an oscillating tool to cut and remove the section of your baseboard that is in the way instead.

Build the center section
I decided to use pocket screws to build the middle section of shelves.
I used to be intimidated by pocket screws. But once I bought a simple pocket hole jig and started using them, I realized they really aren’t complicated and make building furniture and other projects so much easier.
For this project I added four pocket holes to the underside of each shelf. (Make sure to adjust your jig to the correct depth first.)
Once you have drilled all of your pocket holes, you are ready to assemble the middle section.
I found it easiest to do this by laying one of my long vertical sides flat on the ground. I then measured and marked where each shelf needed to be placed and used wood glue and pocket screws to attach each shelf to this side.
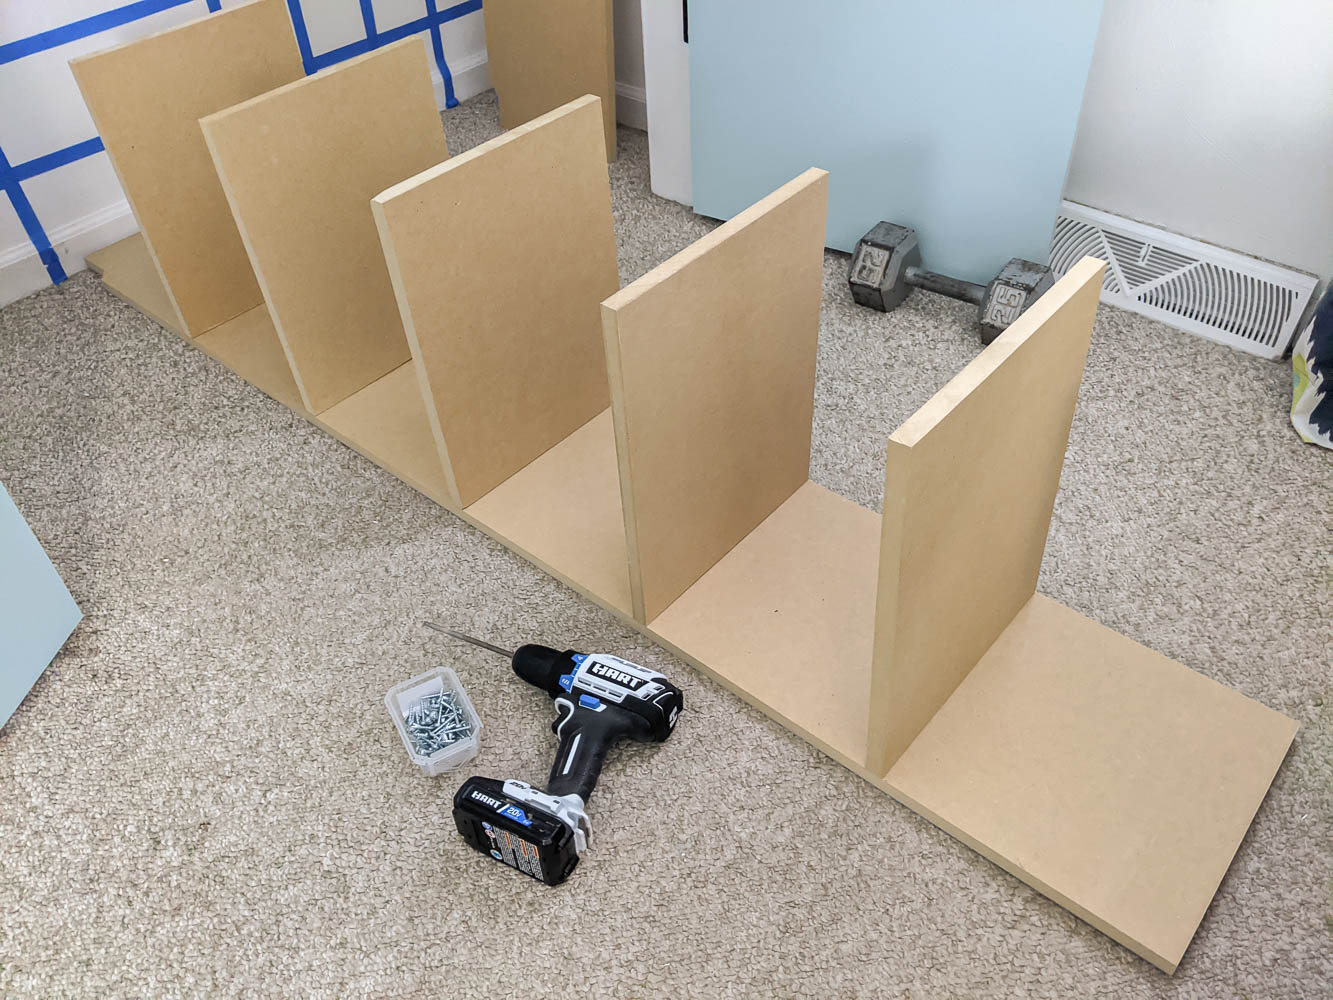
Then I laid the other vertical edge flat on the ground and flipped the shelves over to be on top of it.
Make sure that the two notches you cut for the baseboards are both on the same side. Use a carpenter’s square to make sure all of your shelves are square and then attach them to the second long side with pocket screws.
Now you can lift your middle section into place in the closet. (This is also a good time to remove your painter’s tape layout if you haven’t yet.)

Attach the top shelf
Now you can add the shelf across the top. Set it in place on top of the middle section of shelves.
Use a level to even out the middle section if needed. The weight of the top shelf will hold it in place once it is level.
The middle supports will support most of the weight of the top shelf but to keep it stable, we also need to add a support to each end wall.
Attach a 1×4 board to each end wall immediately beneath the shelf, nailing into a stud if possible. If you can’t attach it to studs, be sure to attach it using drywall anchors. This board will be helping support the weight of all your hanging clothes so it needs to be sturdy.

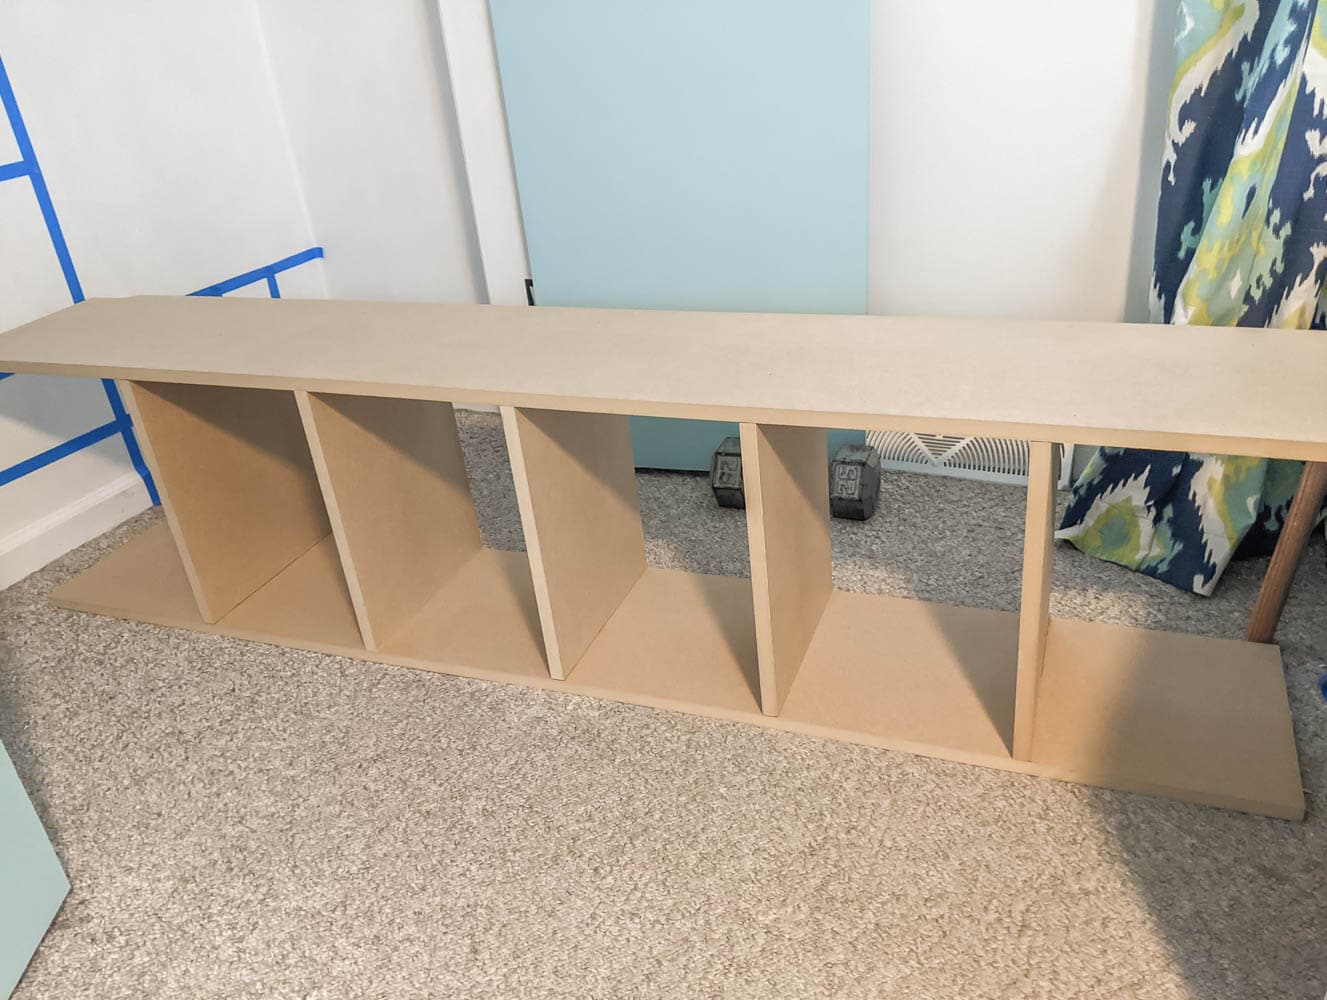
Build the shoe shelves
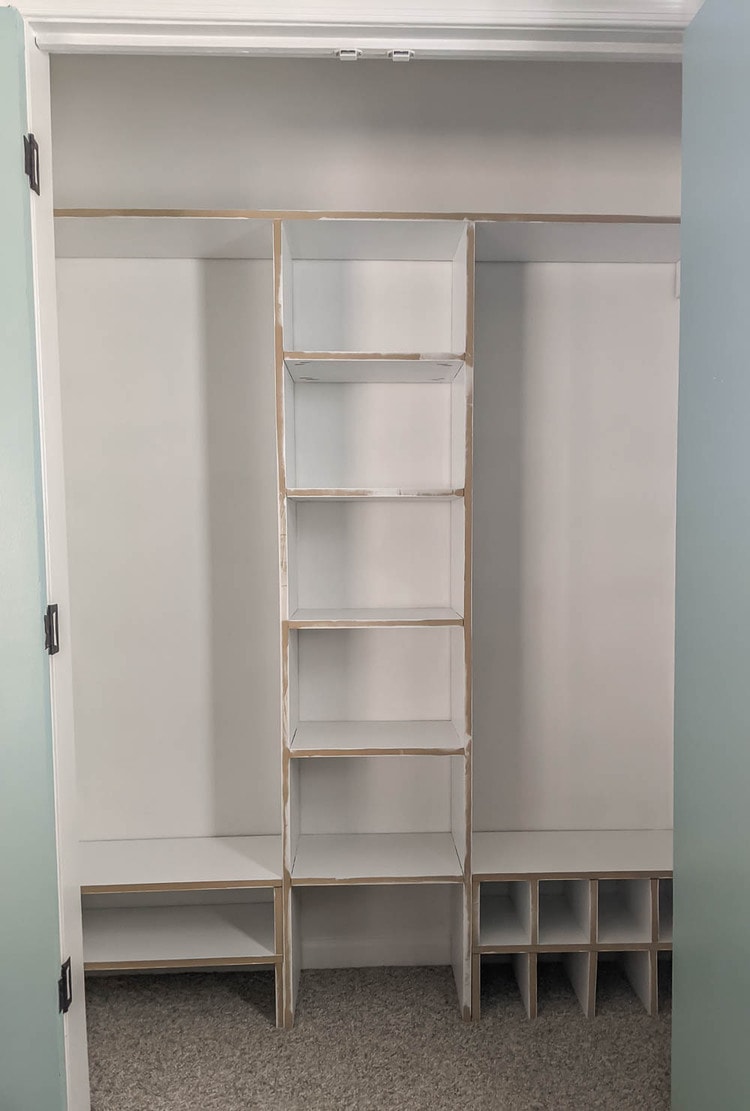
I tried to keep the shoe shelves as simple as possible. One side of the closet has two simple shelves and the other side has smaller shoe cubbies to help keep sandals and other smaller shoes organized.
The main challenge when adding the shoe shelves was working around the baseboards. For the lower shelf support along the closet side wall, I attached a scrap 1×2 board directly to the wall to act as a support. Again, you want to attach this to studs or use drywall anchors.
For the inner shelf support, I cut a vertical support from MDF and used my jigsaw to notch around the baseboard in the back.
Once both supports were in place, I set my shelf on top of the two supports and nailed it in place with my nail gun, nailing down through the top of the shelf into the supports at each corner.
Then I added the second layer of shelf supports and nailed the second shelf into place.

I built the shoe cubbies on the other side the same way, except I also added extra MDF dividers to create the cubbies. (Remember to cut notches for the baseboards in each of the dividers on the lower level.)

These shoe shelves line up with the lowest shelf in the middle section to make one continuous line.

You could also add a second shelf in that middle block, but I chose to leave it open as a space to store boots.
Once the shoe shelves are finished, the major structure of the closet organizer is complete.
Paint the shelves
In general I find it a lot easier to paint wood before installing it; it’s just way faster to paint loose boards of wood than it is to try to paint all the nooks and crannies of completed builds.
In this case, I was too eager to get started so I didn’t paint first. But I did stop and remove the shoe shelves and paint everything before adding the outer trim.
Even though that meant I would have to paint the trim separately at the end, it was still worth it. Those little shoe cubbies would have been nearly impossible to paint once they were permanently in place.
Cut and add the wood trim
While the paint on the organizer was drying, I started measuring and cutting the 1″x2″ boards for the trim.
I know that adding slightly thicker wood to the front of the shelves doesn’t seem like it would make much of a difference, but it really does.
Adding the wood trim makes the separate shelves and pieces look like one cohesive unit. And it makes the finished organizer look much higher-quality.
For the smaller shoe cubbies, I used a 1″x1″ square wooden dowel for the trim because I didn’t want the thicker trim to cut down on the amount of usable space in the small cubbies.
You do need to be careful when measuring the trim to account for the added width of the boards. This wood trim is 1.5″ wide, while the MDF was only 3/4″ wide. Some of your wood pieces will be shorter than the MDF pieces because of this.
You can refer to the wood cut list above for the measurement I used. If you are figuring out your own measurements, it’s easiest to start with the top shelf and the vertical supports and then measure everything else as you go.
When you are attaching the trim, make sure to line up the top edge of the horizontal shelf trim with the top edge of the shelf board. You don’t want the trim to be in the way of actually using the shelf.
For the two long vertical pieces, line the trim up at the bottom to cover the side of the shoe shelves as well as the middle vertical support. This makes the bottom sections look a lot more cohesive.

Once you have each piece cut and lined up appropriately, you can nail it in place with your nail gun.
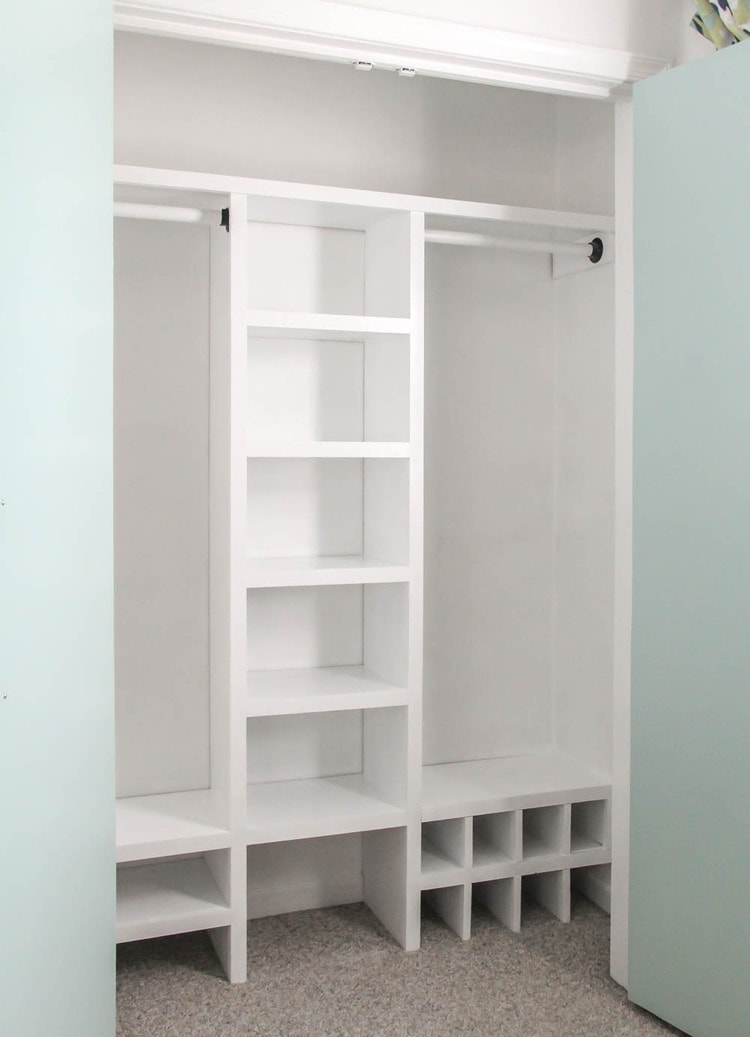
Paint
Once all the trim is in place, it’s time to prepare it for the final coat of paint.
I caulked anywhere there was a visible gap between boards and I used spackling to fill in all the tiny nail holes made by the nail gun.
Finally I painted the trim white to match the rest of the shelves.
Hang the Closet Rods
The final step was to add the closet rods. I cut my old closet rod into two pieces at the correct lengths and painted them white to match everything else.
When it was time to hang the closet rod sockets, I used one of our clothes hangers as a guide to make sure I left enough room between the rod and the wall.

Then I predrilled holes and screwed the socket into place. When I installed the other three sockets, I made sure to place them so they would all line up.

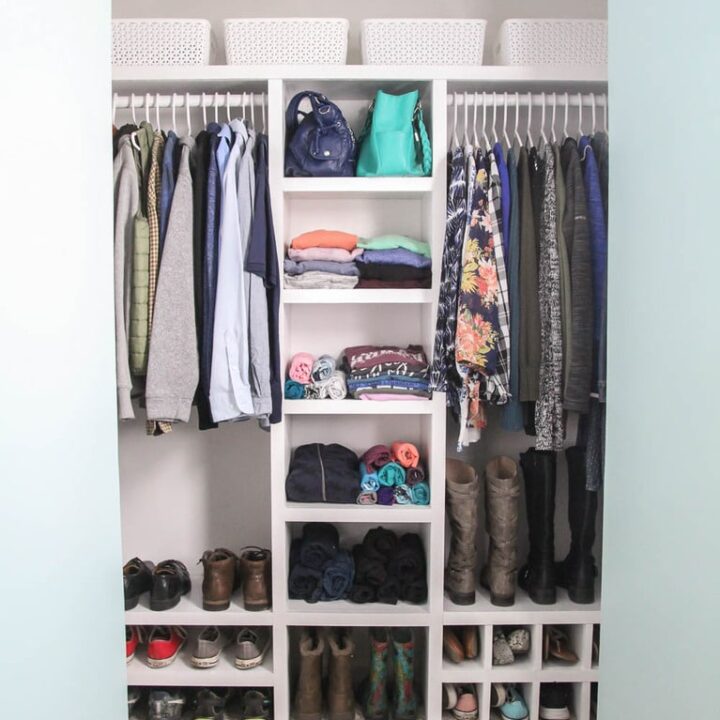
Finished Closet Organizer
And it’s finished!
I love how clean and fresh it looks, all ready to keep all of our stuff neat, organized, and off the floor!

Of course the real test is how it works once we’ve loaded everything back in.
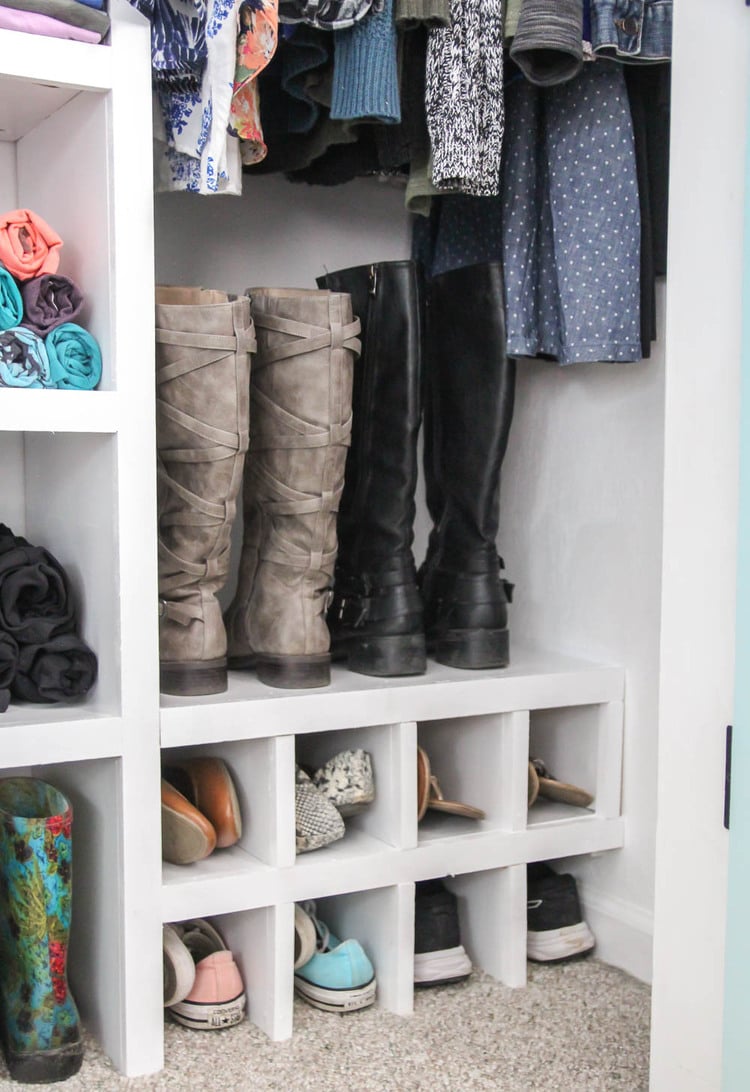
I’m happy to report it’s perfect! There is plenty of room for folded clothes, hanging clothes, shoes, and purses.
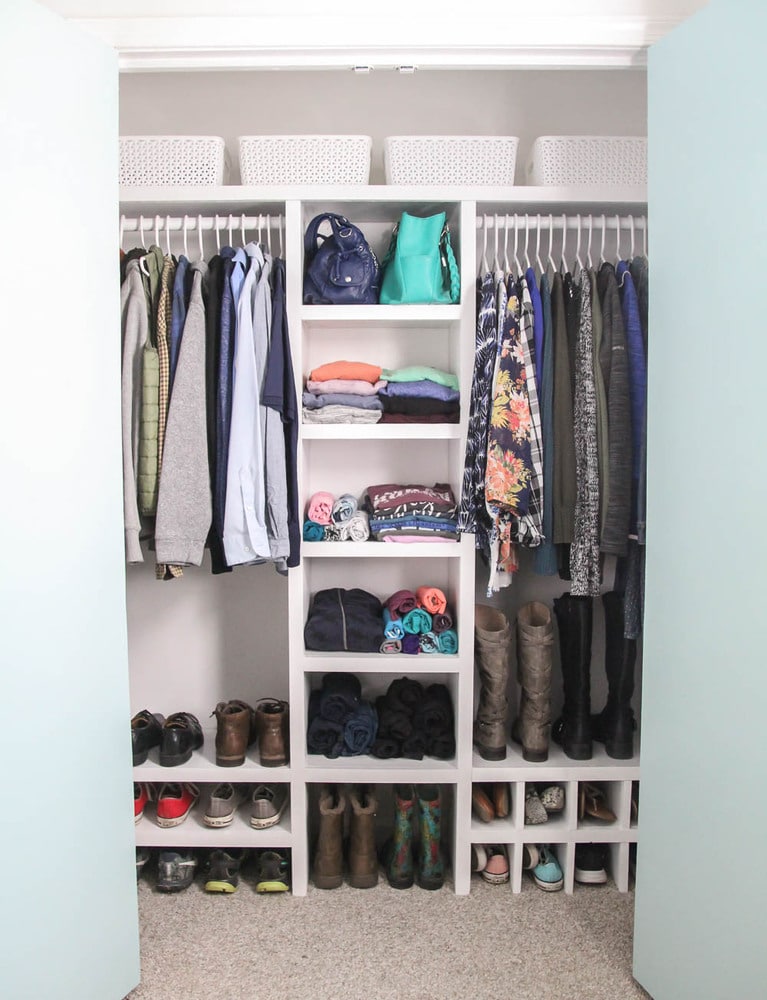
I borrowed some small storage bins from my son’s closet for this photo, but I’ve since bought these larger bins for the top shelf and they are the perfect fit.
My favorite part of this whole closet organizer is the shoe storage. I hated how our shoes were always a scattered mess before. Now there’s plenty of room for my husband’s big shoes, my smaller shoes, and boots of all shapes and sizes.
Time and Cost
This closet organizer came in at around $75 for the lumber and basic supplies. Even if you need to buy paint, you should be able to make this for under $100. I’d say that’s a pretty great deal for a super sturdy custom closet organizer with lots of added shoe storage.
This project took around five hours to complete. It isn’t super complicated but it does involve a lot of steps.
Video Tutorial
I’d love for you to subscribe to my Youtube channel!
Other DIY closet ideas I think you’ll like:
I’d love for you to pin this post on Pinterest!

How to Build a Simple Inexpensive DIY Closet Organizer
See how we transformed our dated closet with a simple DIY closet organizer without buying a complicated closet system. We used budget-friendly wood and basic tools to maximize space.
Materials
- five 1″x12″x8′ MDF shelf boards – these will make up most of the structure of the diy closet organizer.
- five 1″x2″x8′ common boards – to form the outer face of the closet organizer.
- two 1″x1″ square dowels – to trim the shoe cubbies.
- two 1″x4″x12″ boards – to support the top shelf.
- wooden closet rod – a 1.25″ round dowel works perfectly, can be cut to the exact size you need, and is very affordable.
- two pairs of closet rod sockets
- 1.25″ Kreg pocket hole screws
- painters tape - to help plan your design
- caulk – for filling any tiny gaps for a perfect finish
- spackling – for filling in the nail holes made during building
- white paint (or the paint color of your choice)
- small foam paint roller and paintbrush
Tools
- pry bar – for removing the old closet shelf supports.
- miter saw or circular saw
- jigsaw – for cutting notches so your organizer fits around your existing baseboards.
- Kreg Jig
- nail gun – for assembling the closet organizer
- tape measure
- drill
- carpenter’s square
- level
- safety gear – hearing and eye protection
Instructions
- Measure your closet to get the correct dimensions.
- Determine your cut list. You can refer to mine and adjust if needed:
WOOD CUT LIST
- 1″x12″ MDF for main structure:
- 1 @ 63.5″ (or total width of closet)
- 2 @ 73″ for vertical supports
- 5 @ 16″ for middle shelves
- 4 @ 23″ for shoe shelves
- 12 @ 6 1/4″ for supports for shoe shelves and dividers for shoe cubbies 1″x2″ boards for facing:
- 1@ 63.5″ (or total width of closet)
- 2 @ 72 1/4″ for vertical supports
- 5 @ 16″ for middle shelves
- 4 @ 22 1/4″ for shoe shelves
- 1″x1″ boards for facing:
- 8 @ 5 1/2″ for supports for shoe shelves and dividers for shoe cubbies
- 1.25″ round dowel
- 2 @ 22″ for closet rod
SCRAP WOOD FOR SHELF SUPPORTS
- 2 1x2s @ 11.5″ to support the bottom shoe shelves
- 2 1x4x @ 11.5″ to support the top shelf
- Clear everything out of the closet including any shelves and closet rods that are already in the closet.
- Patch any holes left from the old screws and nails with spackling.
- Give the whole closet a good cleaning and add a fresh coat of white paint if needed.
- Use painter’s tape to tape out the design on the back wall of your closet.
- Cut the MDF to size. Cut the top shelf board, the tall vertical boards, the boards for the middle shelves, and the boards for the shoe shelves.
- Add four pocket holes to the underside of each center shelf using a simple pocket hole jig.
- Assemble the middle section using pocket screws to screw each shelf to this side.
- Remove the painter's tape from the wall and lift your middle section into place.
- Attach the top shelf.
- Attach a 1×4 board to each end wall immediately beneath the shelf, nailing into a stud.
- Build the lower shoe shelf and secure with shelf supports. Nail into place.
- Add the second layer of shoe shelf supports and nail the second shelf into place.
- Repeat with the shoe cubbies, adding MDF to create the cubbies.
- Paint the shelves.
- Cut and add the wood trim using a nail gun and wood glue.
- Once all the trim is in place, prepare it for the final coat of paint.
- Caulk anywhere there are visible gaps between boards and use spackling to fill in all the tiny nail holes.
- Paint the trim white to match the rest of the shelves.
- Hang the closet rods.
Recommended Products
As an Amazon Associate and member of other affiliate programs, I earn from qualifying purchases.
-
 Dap 12328 DryDex Spackling Interior/Exterior, 1/2-Pint
 -
DAP 7079818670 Alex Painter'S (18065) Raw building material, 10.1 oz, White
-
ScotchBlue Sharp Lines Multi-Surface Painter's Tape, 1.41 inches x 60 yards, 2093, 1 Roll
-
Kreg Zinc SML-C125-250 1-1/4" Coarse Thread Number 8 Coated Pocket Hole Screws (250 Count)
-
Small House Painting Tray Set with 4-Inch Foam-Covered Roller Refills (8 Pcs)


Wow great job. Looks awesome!
Thank you!
This looks awesome Carrie! I love great organization.
What size screws did you use for studs and no studs?My short boards are just like yours and the outside edges (facing the room , not the wall)won’t be over a stud..you didn’t mention how to handle that.
If you can attach at least one screw or nail into a stud, that is best. But it should still be sturdy enough even without using studs. Because the center section of the closet divider supports the upper shelf, the short supports are more for secondary support. So using screws with drywall anchors should be good enough. I hope that answers your question!
how deep did you make the pocket holes?
Set your pocket hole jig and your drill guide to the thickness of the wood. Some 1″ MDF is actually 3/4″ thick and some is actually 1″ thick, so measure the thickness of your MDF and set your pocket holes accordingly.
Gurl power! Thanks!
Glad to help!
How did you connect the middle tower to the wall? Was this via the pocket holes? I didn’t see this in the directions. Connected to studs?
I’m digging this project. Looks cool.
Thanks! I didn’t directly attach the middle section to the wall, but you definitely could. The shoe shelves hold it in place at the bottom and the clothes racks hold it in place at the top and both are attached to the side walls. These connections and the weight of it keep it in place quite snugly. But for extra security, you could use some small L brackets to attach it to the back wall.
Thank you! Also, in one description you said you used 1×2 trim but later in another you said 1×1..which is it?
I used 1×2 for most of the closet, but I did use 1×1 trim for the small shoe cubbies. Hope that clears it up!
I’m hoping you see this – this project is so inspiring! I’m always curious what happens when you need to change out the carpet when something like this is installed. Do you think you would have to remove it for this? Thanks!
Good question. I think it would probably work best to remove the closet organizer to remove and install new carpet. It might be possible to cut the old carpet at the closet door and slide it out but I think it would be very difficult to slide the new carpet or flooring under.
Only thing I would add is use peel and stick on floor
Easy clean and cheap
Good idea!
This post is great! What is the depth of the shelves for your clothing? Thank you
Thank you! The shelves are around 12.5″ deep (that’s the depth of the board plus the depth of the trim.)
I was thinking of doing the exact same thing to our closets, including replacing the sliding doors with swing open doors. We also live in a ranch with reach-in closets. While I’ll adjust the dimensions a bit, having this as a starter guide makes my closet to-do job so much easier to complete. So glad I found this!
I am so glad to help. It really has made a huge difference in our small closet!
Thanks for the inspiration !!
This looks great. I have wanted to do something like this to my closet since we moved here 30 years ago. Great explanation. I am going to give it a try.
Thanks!
Thank you! Good luck with your closet!
I’m a total newbie. How did you cut the MDF safely? As I am researching everything f says to wear a respirator and use a vacuum cutting tool. Did you just cut this outside with a mask on? Don’t want to harm anyone
MDF produces a lot of dust when cut, but from everything I’ve read the dust isn’t inherently dangerous. I wore a mask while cutting the MDF and then cleaned up the dust afterward. Cutting outside would be ideal when weather allows. I also was able to buy my MDF in precut shelf size boards, so I only had to cut it down to the right length which really cut down on the amount of cutting needed.
Great job—bravo! I can’t believe it only took 5 hours to put together, but it helps if you already have some skills! LOVE it!
Thank you!
Thanks for the inspiration and guidance! I’m really new at this, and while it took a lot longer than 5 hours, I made this closet!! I added a double rod on the right side, but used your instruction for almost everything. And the boards for facing sure do make a huge difference. Thank you so much!
I am so happy to hear that! I hope you love your new closet!
It looks fantastic, explain very well.
But I’m wondering why you didn’t just remove the trim vs notching the boards
Good question – Removing the trim would also be a good option, especially if you are planning to keep your closet organizer in place for a long time. But notching the wood was really just as easy as removing the trim, so I went that route.
I love this idea! The step-by-step instructions are super clear and the materials seem really affordable. Can’t wait to try this out in my own closet! Thanks for sharing!
Thank you!
I’m curious how this has held up as I’ve read that pocket holes shouldn’t be used on melamine. I’ve been looking for a way to do what you’ve done, but don’t want to be drilling holes for cam locks, which is what’s recommended.
It’s held up great! I used MDF which is different from melamine and the pocket holes haven’t had any issues.
Hi,
Quick question on how to install 1/4 support boards to the wall on the sides when there is no studs? What kind of screw I have to use to keep board secure to the wall longer ?
Thank you very much.
Good question. If there aren’t studs, use screws with drywall anchors.
Thank you details steps, I did followed and able to setup but I see the center part is kind of wiggle. What precautions should we take for it not to wiggle?
If the center section doesn’t seem secure, you can use L brackets to secure it to the wall. I just finished another closet organizer and show how to anchor it in that post – https://www.lovelyetc.com/diy-closet-organizer-with-drawers/
What is the depth is this closet?
Good question. I don’t have the exact depth, but it is a standard reach-in closet so around 24″.