Amazing Boys Bedroom Transformation – Vintage Travel Themed Room on a Tiny Budget
I’m sharing all the details of my son’s colorful travel themed bedroom filled with budget-friendly DIY projects and fun vintage finds.
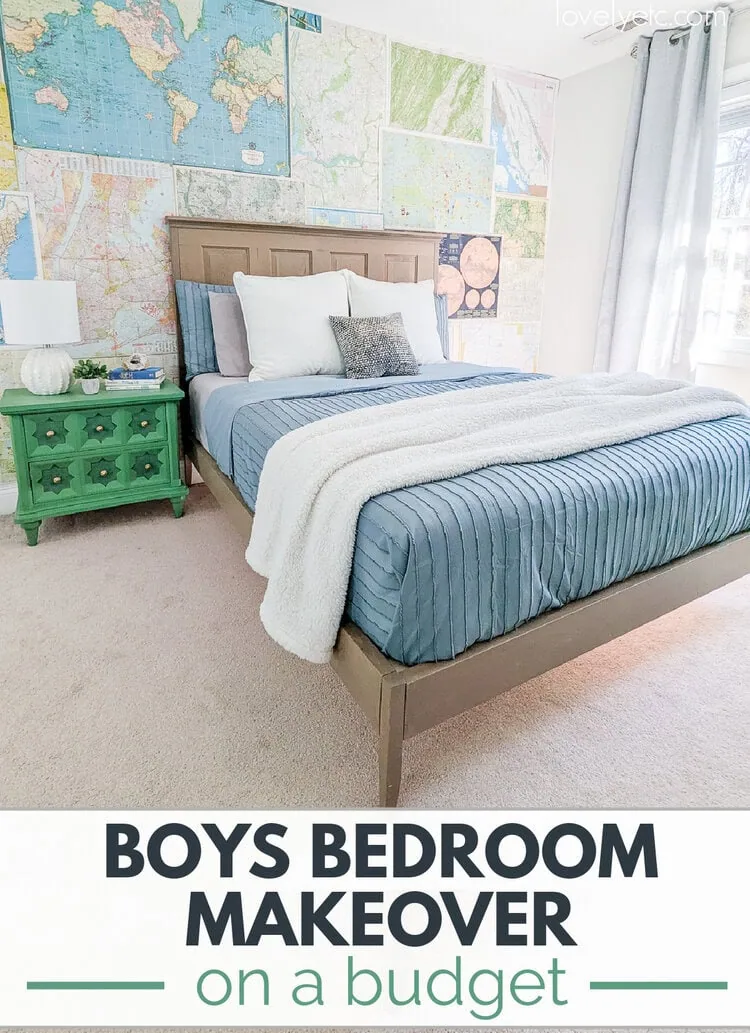
After months of working on my son’s bedroom, I am so excited to share the final reveal today! This room is full of inexpensive DIY projects, fun thrift finds, and lots of functional storage and it was so much fun to put together.
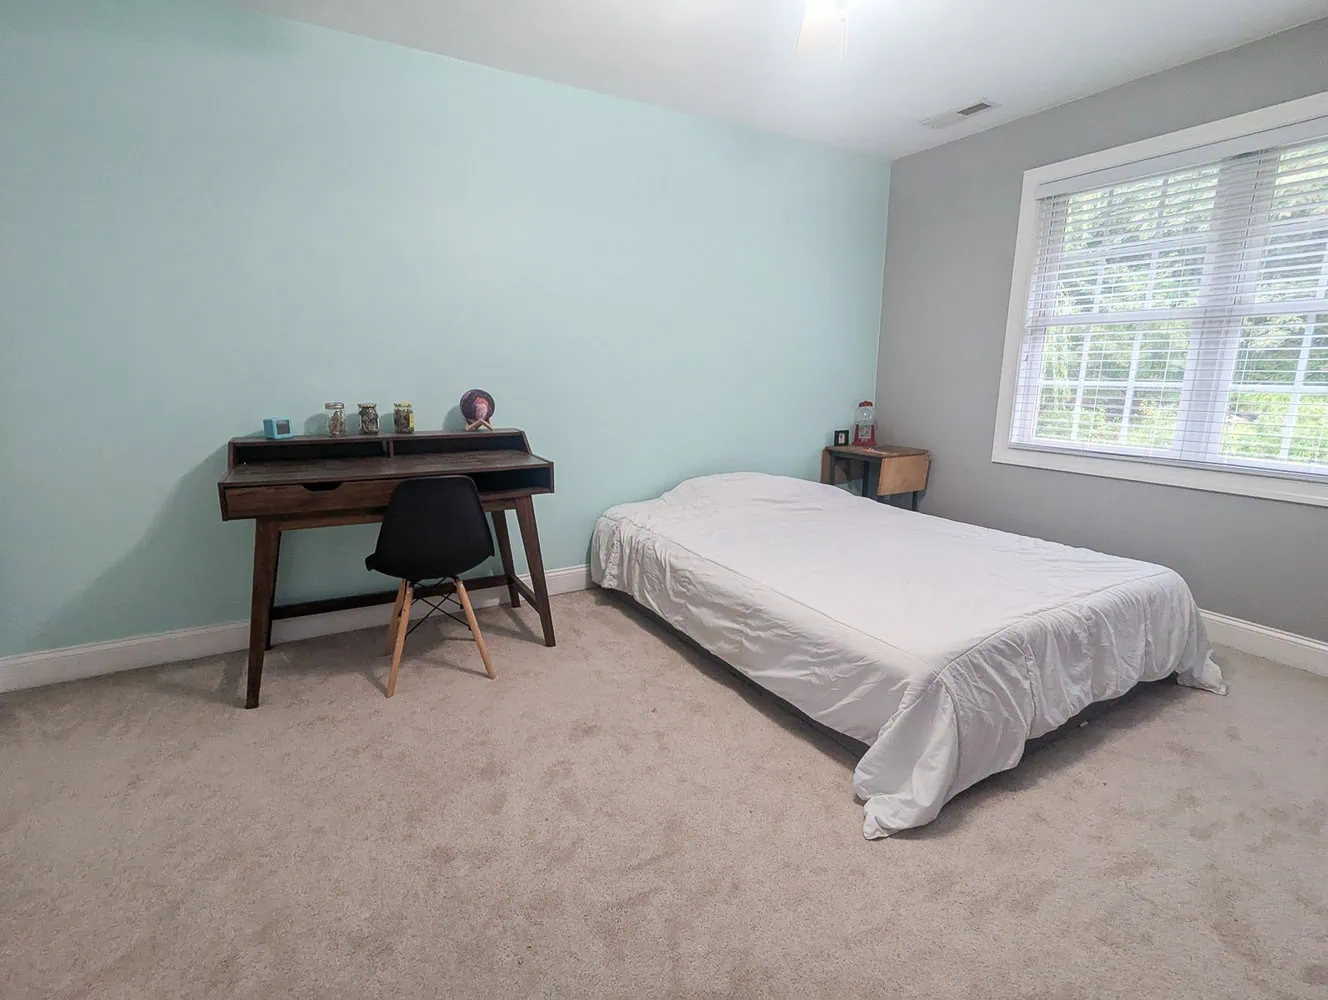
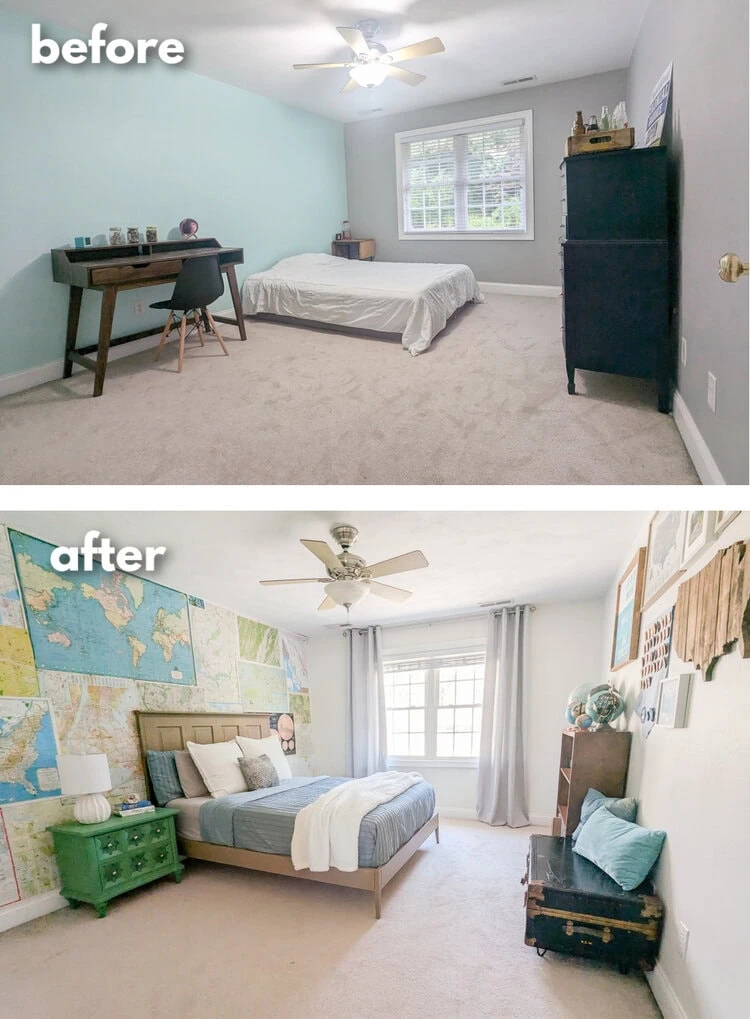
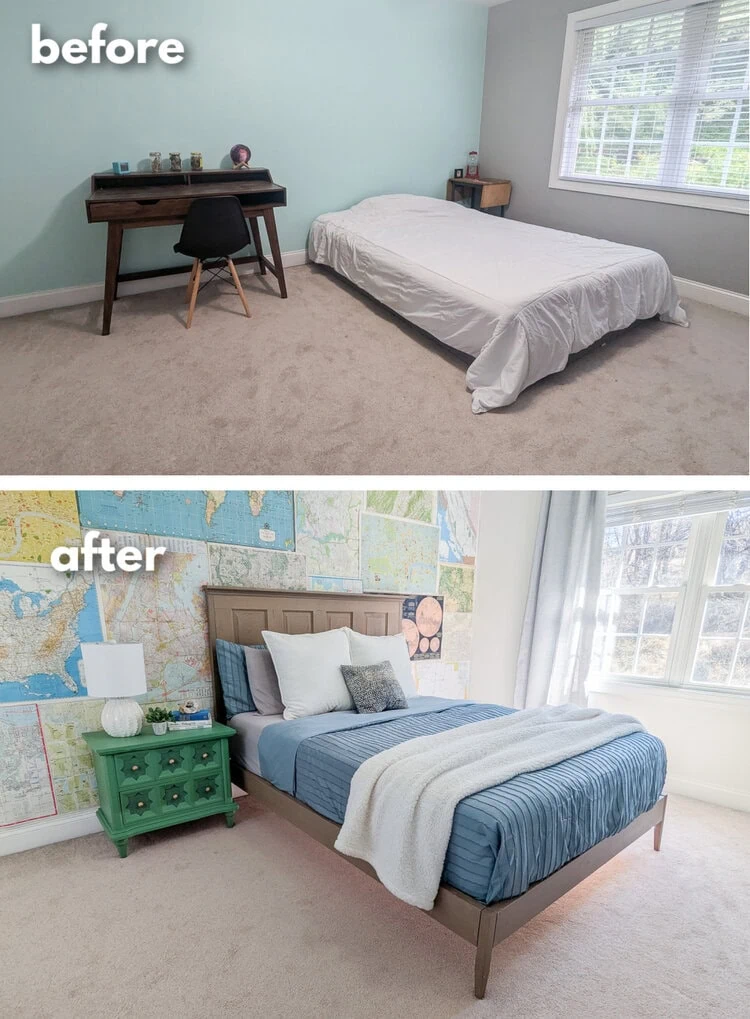
Here’s how his room looked for the first several months after we moved to this house. It really was a blank box of a room.
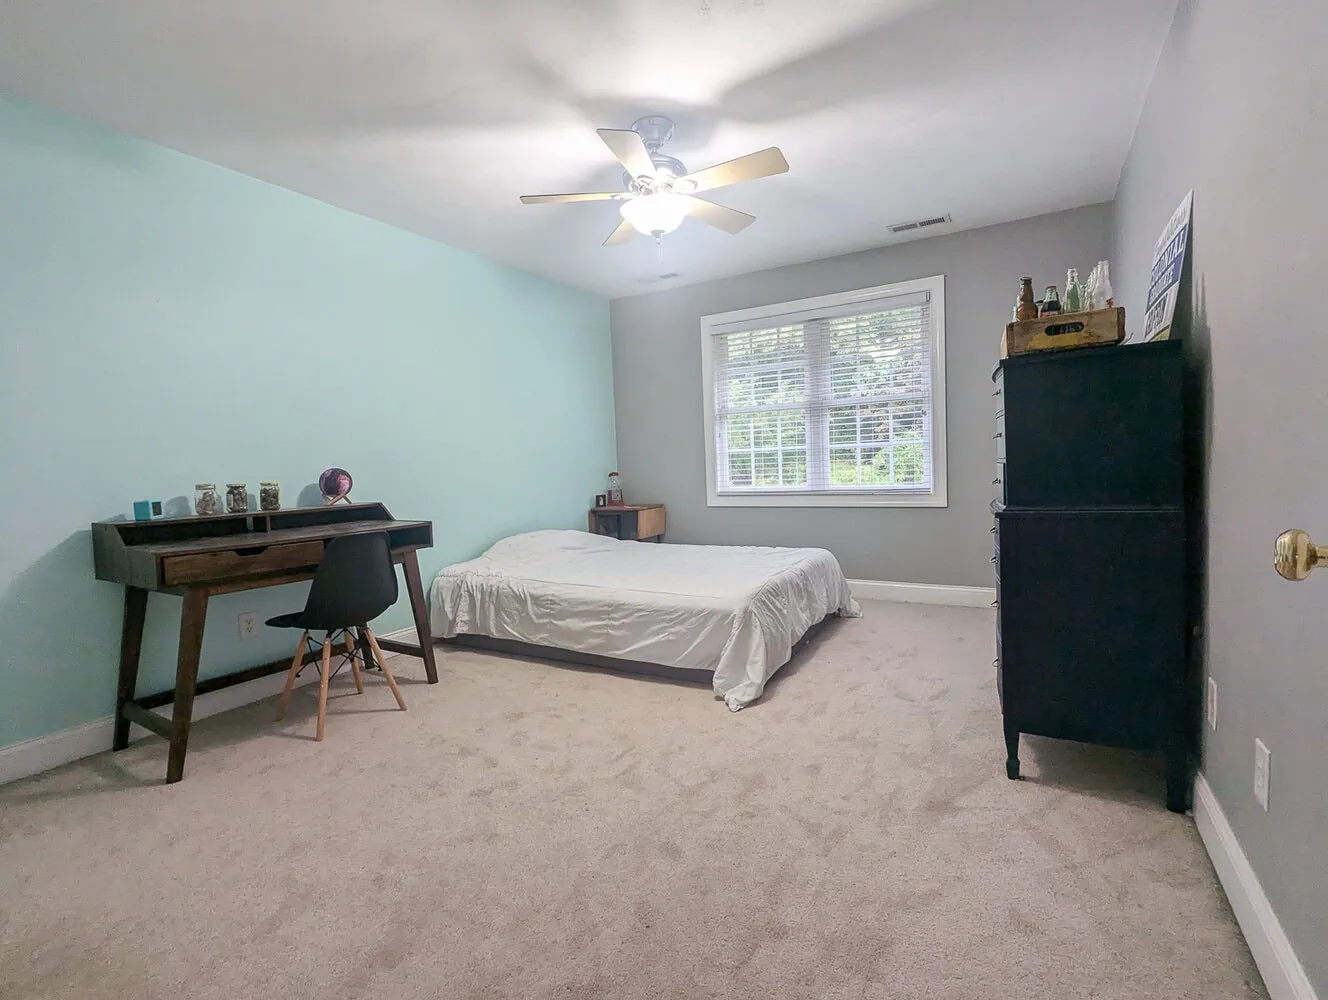
All three of my boys shared a room at our last house, but when we moved, our 12 year old got to have his own room for the first time since he was a toddler. With all the added space, he also got to move up from a twin bed to a queen bed. Unfortunately, we didn’t actually have a queen size bed frame at the time, so all he had was a sad mattress on the floor.
The Plan
I had a few big goals for this room:
- Add functional storage to the room and closet.
- Replace the desk (which he never used) with more useful furniture
- Add some color and personality so it isn’t such a big blank box.
- And finally, get an actual bed!
I also really wanted to create a space that he would feel at home in now as a 12 year old, but that would also grow with him over the next several years. And of course, I wanted to do it all on as small a budget as possible.
And I’m happy to say I think I nailed every goal! So let’s get into how this room came together.
This post contains affiliate links which means if you make a purchase after clicking a link I will earn a small commission but it won’t cost you a penny more. Click here to see my full disclosure policy.
The Map Wallpaper
I started by giving the walls a fresh coat of paint using Sherwin Williams Alabaster, which is a great creamy white.
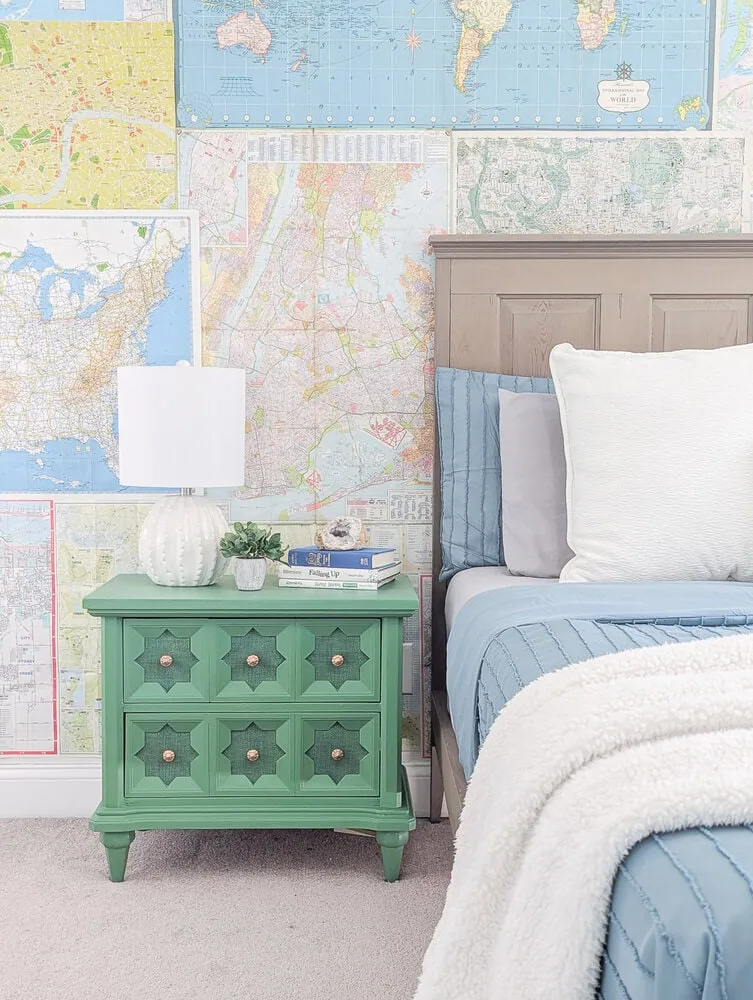
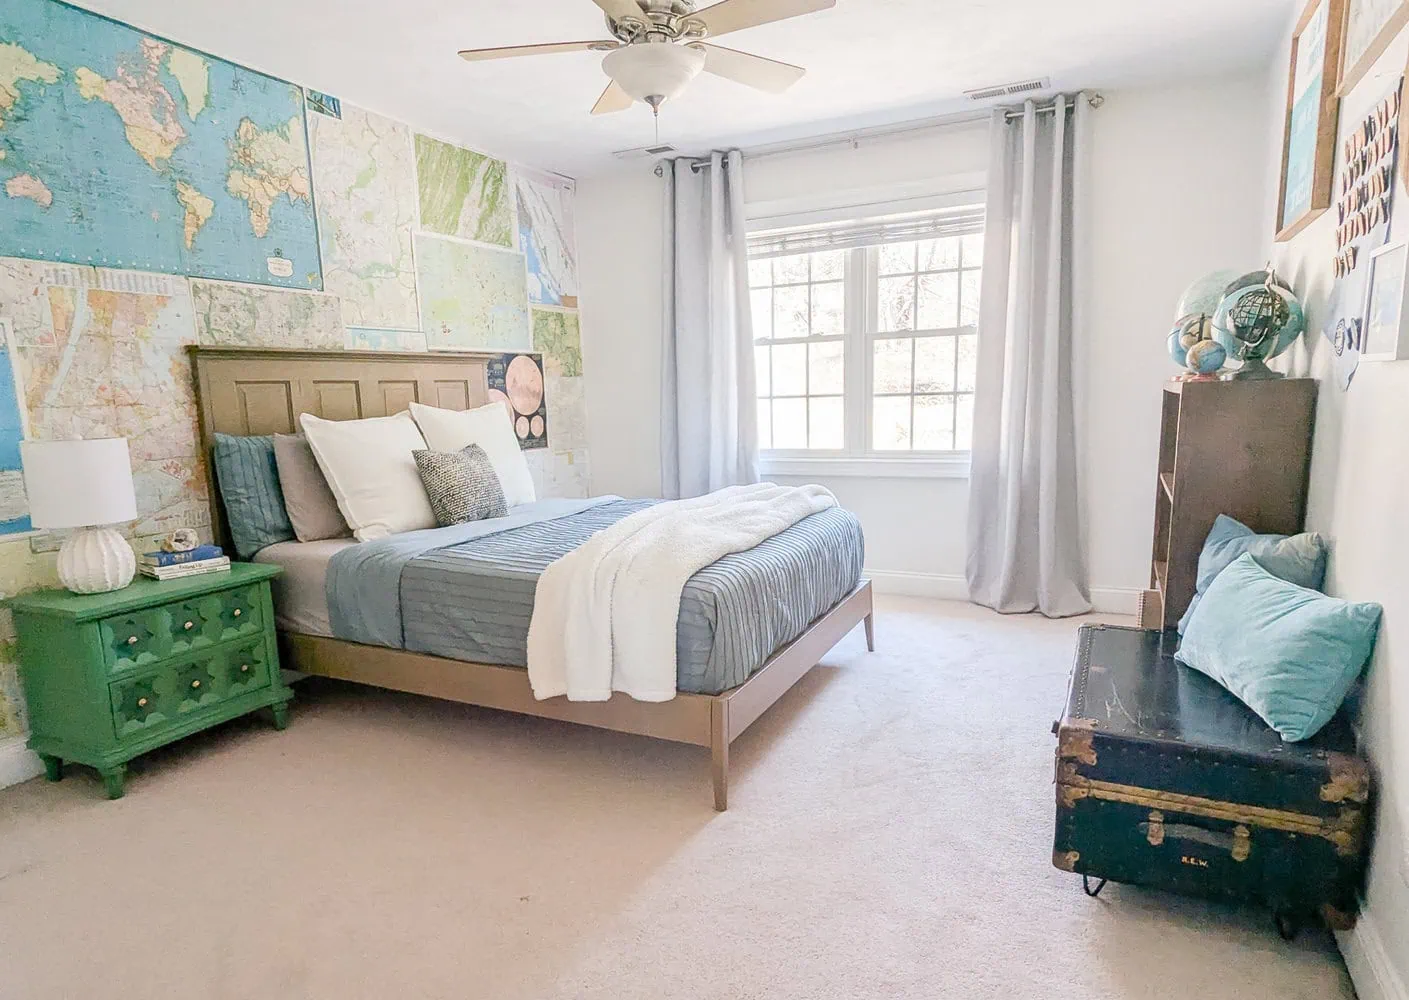
I’ve been wanting to create a map wall for years and luckily, my son loves old maps as much as I do. I used a stash of old road maps and city maps I had found at estate sales to create an awesome accent wall.
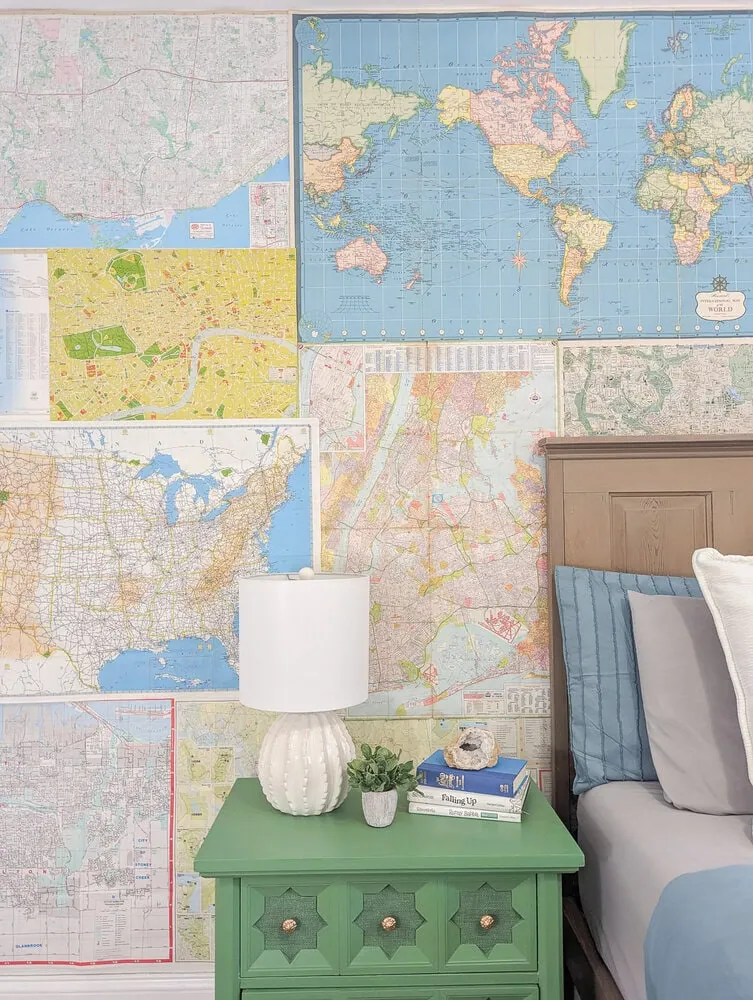
I love the color and interest all the old maps add and they created the perfect focal wall for this space.
You can check out the step-by-step tutorial for this map wall here.
Building a DIY Bed
The next step was the much needed bed. I found an old headboard at the Habitat for Humanity ReStore for only $20 and gave it a fresh new look with trim and a paint wash to create a beautiful headboard.

Then I built a DIY platform bed to go with the upcycled headboard. Just adding this beautiful bed made such a huge difference in this room!
You can check out the tutorial for this DIY platform bed here or find the printable pdf build plans to make this bed in any size (twin through california king) in my shop.
The Nightstand
I found a great deal on a nightstand on Facebook Marketplace but it needed some work. I repaired the water-damaged top and gave it a fresh coat of paint in a great shade of green (Dixie Belle chalk paint in kudzu)
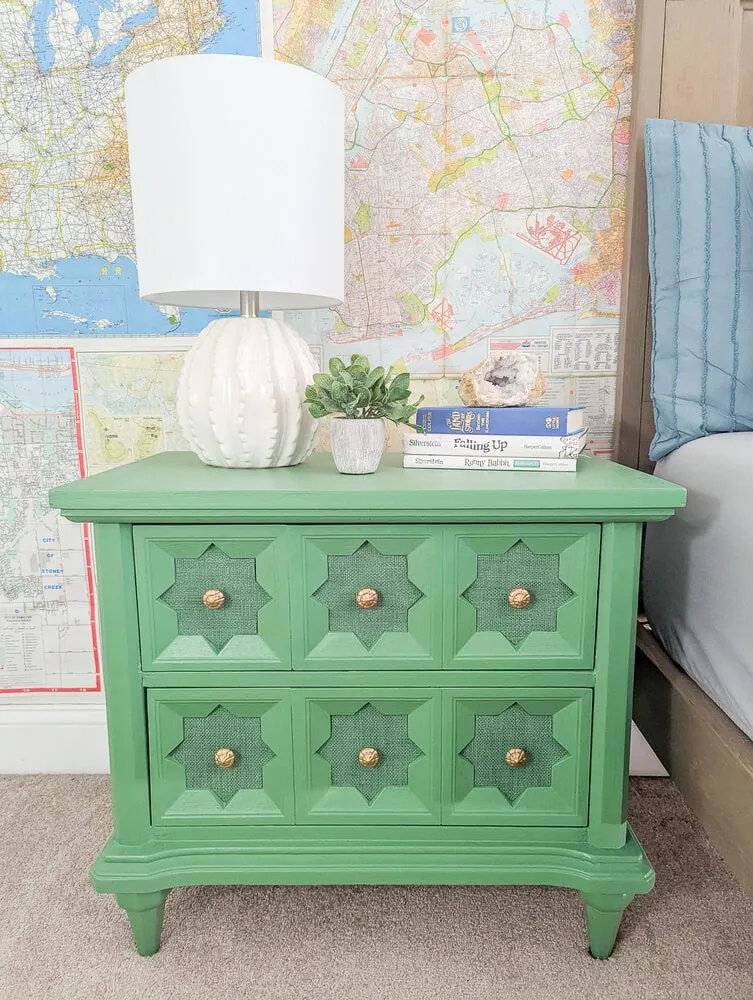
Then I used a dollar tree find to add some beautiful texture to the drawers and used liquid gold leaf to update the old hardware. It turned out really beautiful!
You can find all the details of this nightstand makeover here.
DIY Closet Organizer
The closet might not really be visible from the room, but to make this room function well, the closet really needed to be more functional. It was a pretty standard builder-basic closet with one shelf and one closet rod and had sooo much wasted space.
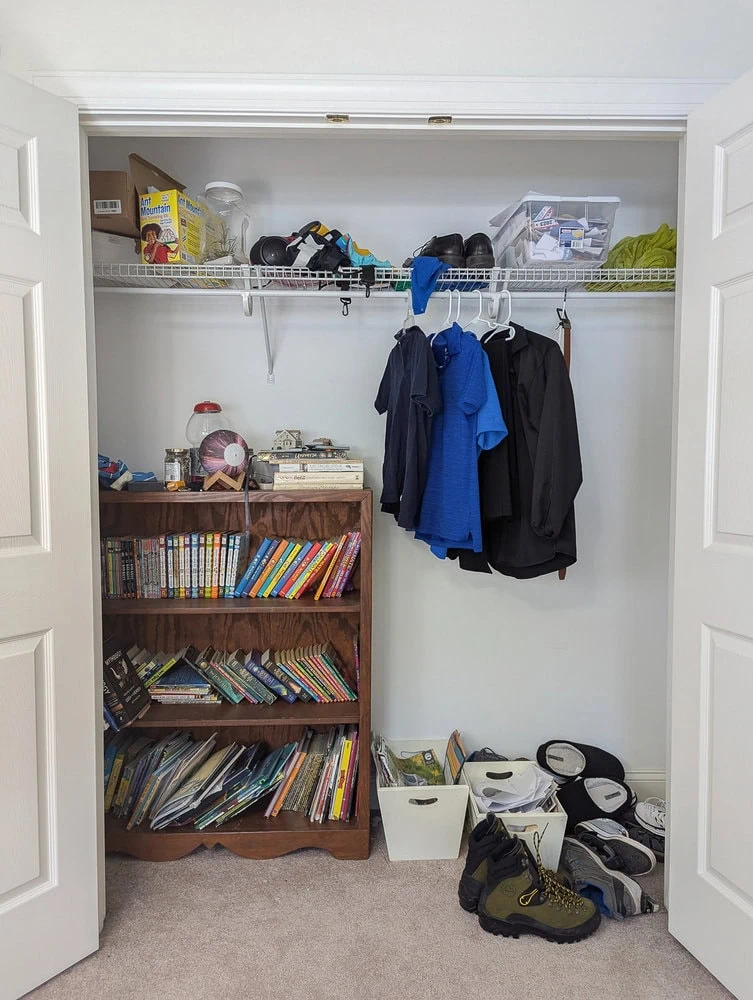
I built a DIY closet organizer for this closet and it made such a huge difference! Now there are plenty of drawers and shelves for storing all kinds of things and there’s still plenty of room for hanging clothes.
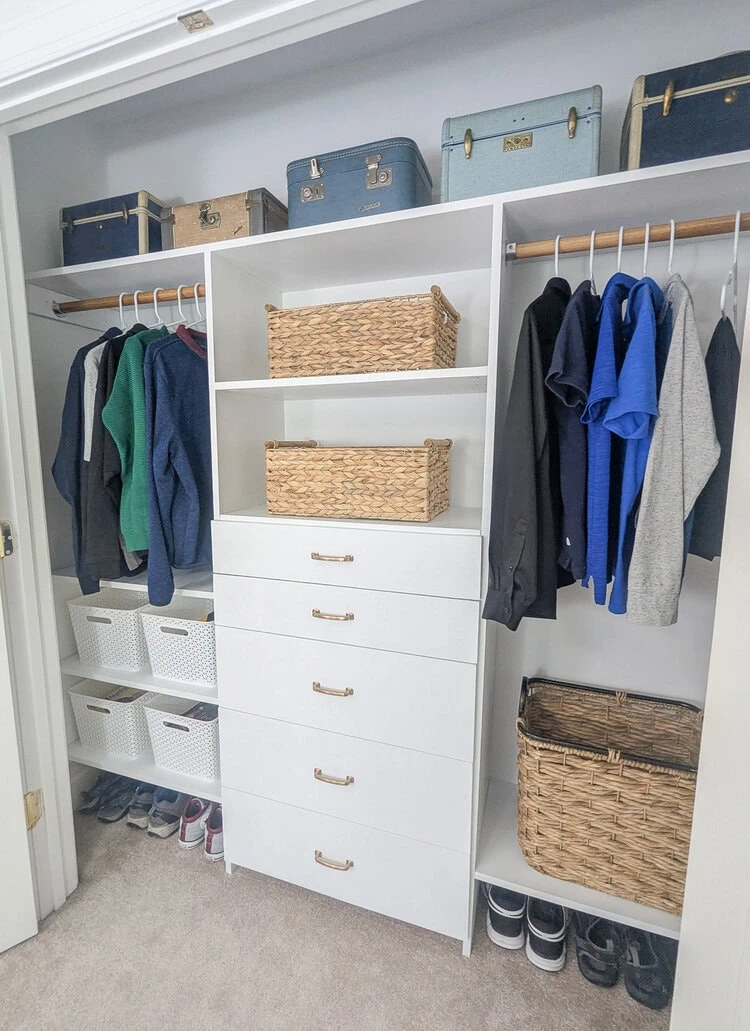
I used vintage train cases I’ve thrifted over the years instead of plastic storage bins on the top shelf and didn’t even realize until right now how perfectly they fit the travel theme of this room!
I’ve built quite a few closet organizers now and I think this is my favorite one yet. You can see the full tutorial here or if you are looking for a simpler closet organizer without drawers, check out this similar closet I built a few years ago.
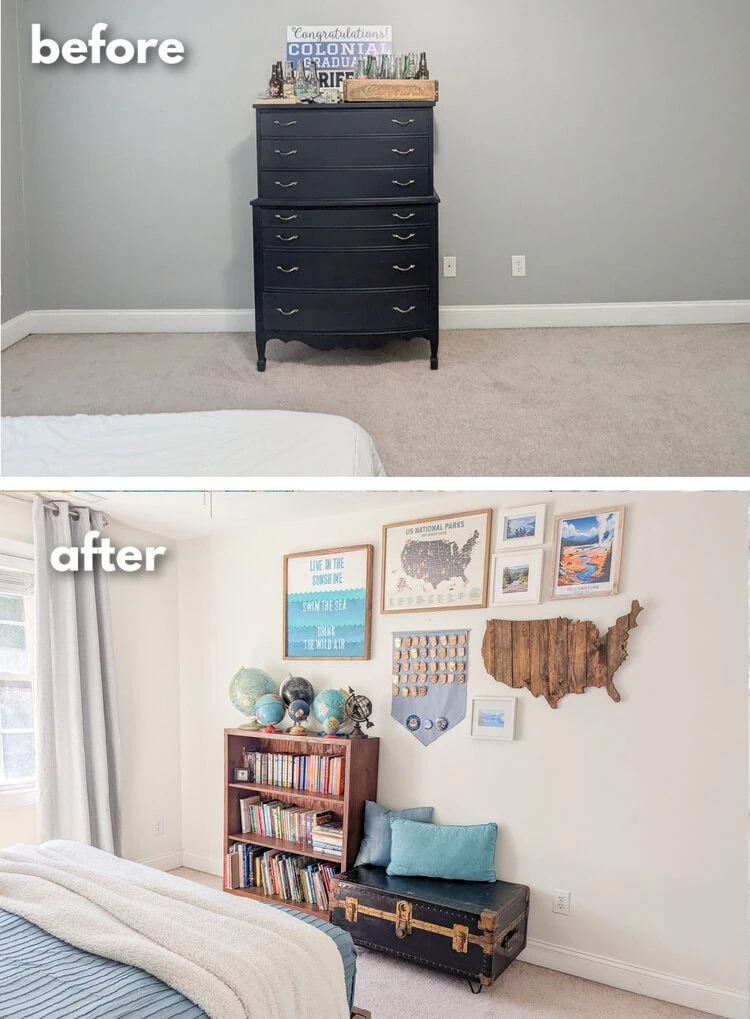
Rearranging the Furniture
Because there was plenty of space in the closet now for all of his clothes, I moved the chest of drawers out of his room to use somewhere else. I also moved the desk out. I thought having a desk in here would be great when we moved in, but I’m pretty sure he never actually sat at it. Instead, it was just a place for all kinds of clutter to gather.
That opened up lots of space so we were able to move his bookcase out of his closet and into the room. My mom and great grandfather built this bookcase together years ago so I’m keeping it exactly as is.
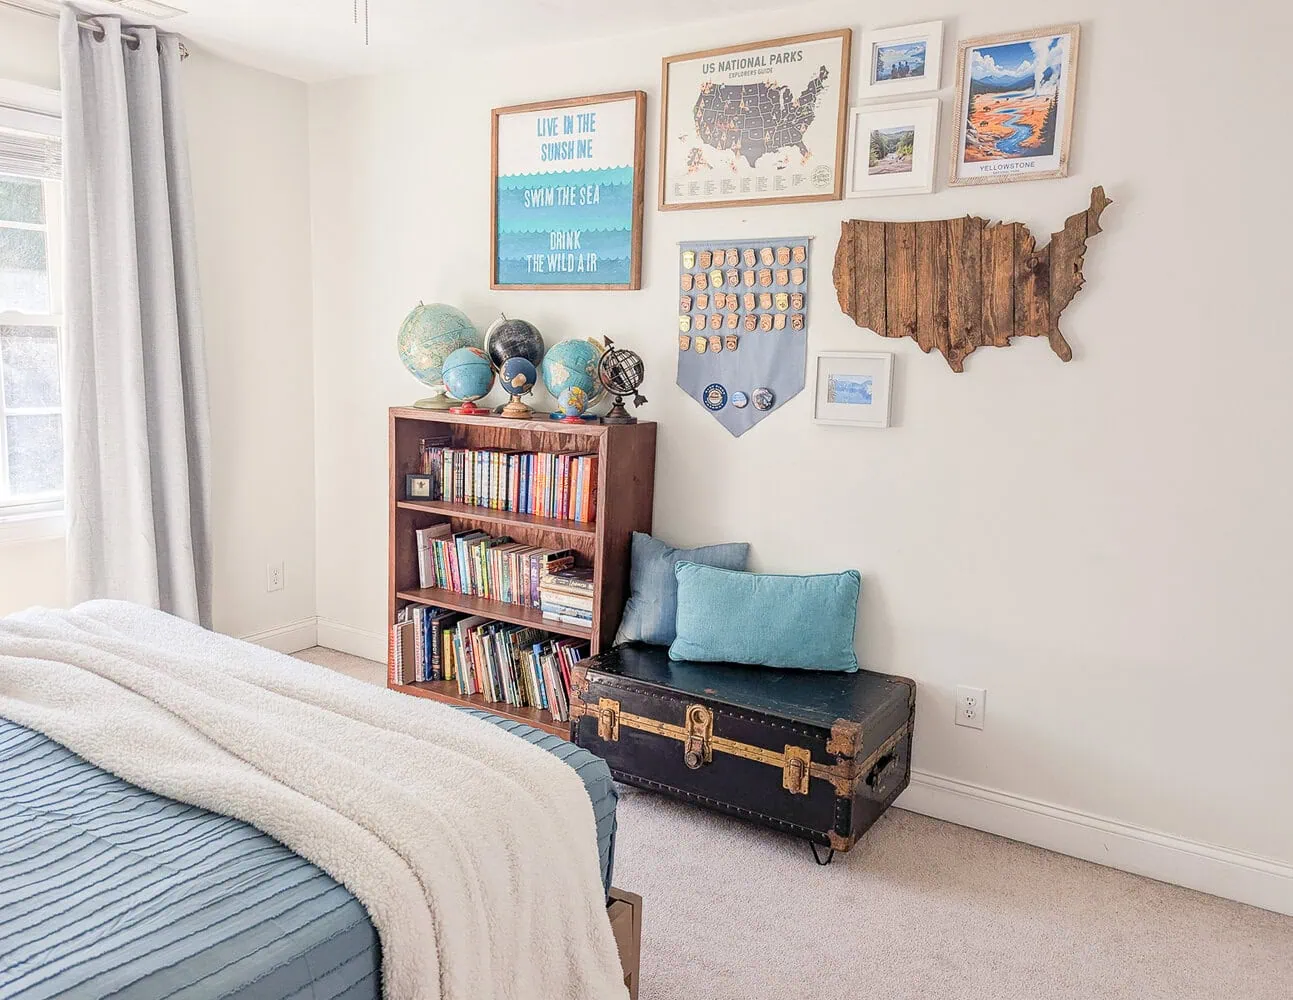
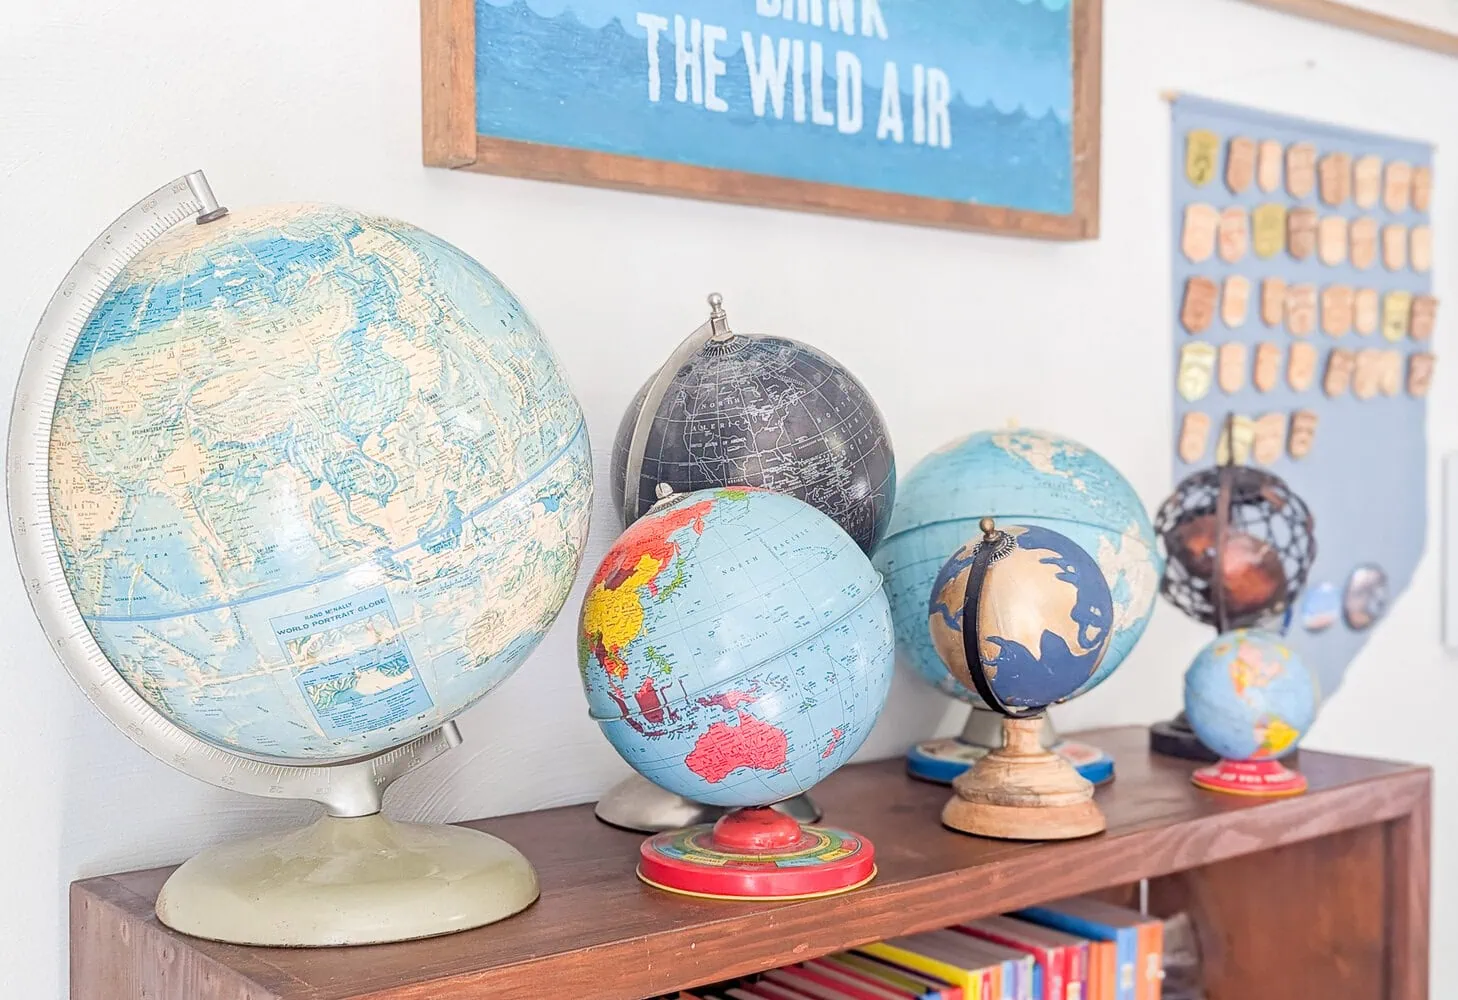
On top of the bookcase, I added some of my globe collection. These are a mixture of vintage metal globes and newer decorative globes and they used to be in our boys’ shared room at our old house. Just like maps, I’ve always had a thing for globes – they’re beautiful and colorful and I love studying the old ones to see how things have changed through the years.
Vintage Trunk Bench
I felt like the room needed a little something more and then I remembered a vintage trunk I’ve had for a few years.
My son really likes to sit in the floor and draw so I knew the trunk would be a great low table for him to use for that.
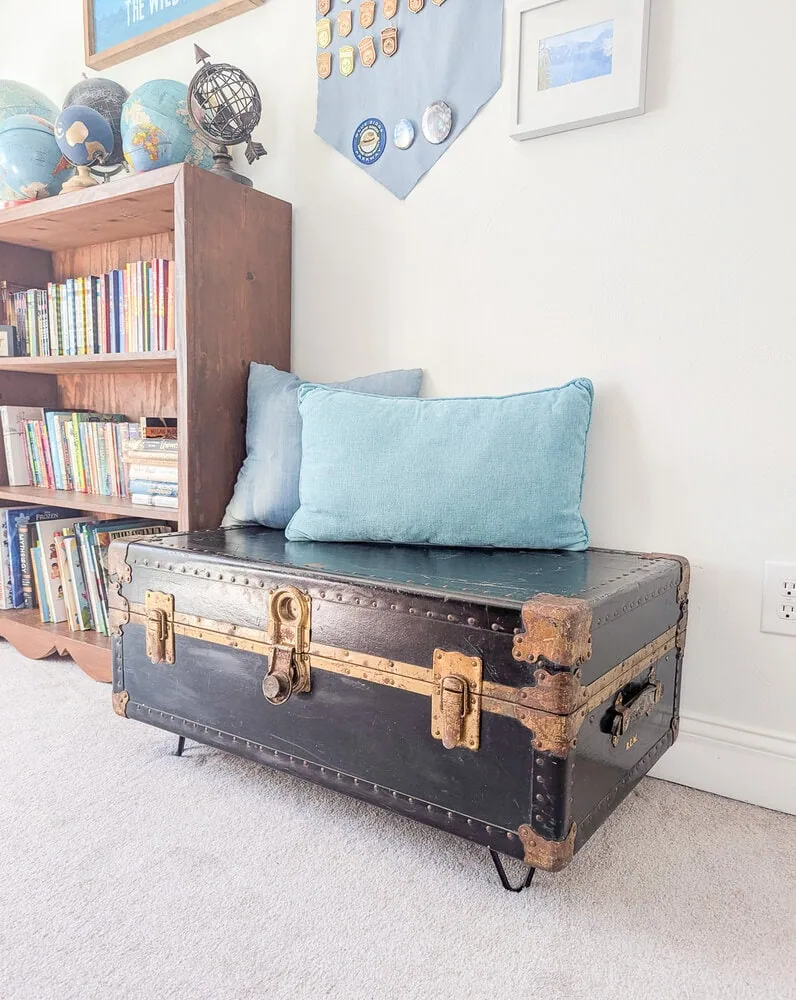
I added hairpin legs to the bottom and it became the perfect height. I think it will also work well as a bench for extra seating and of course, it also has lots of room inside to store things away.
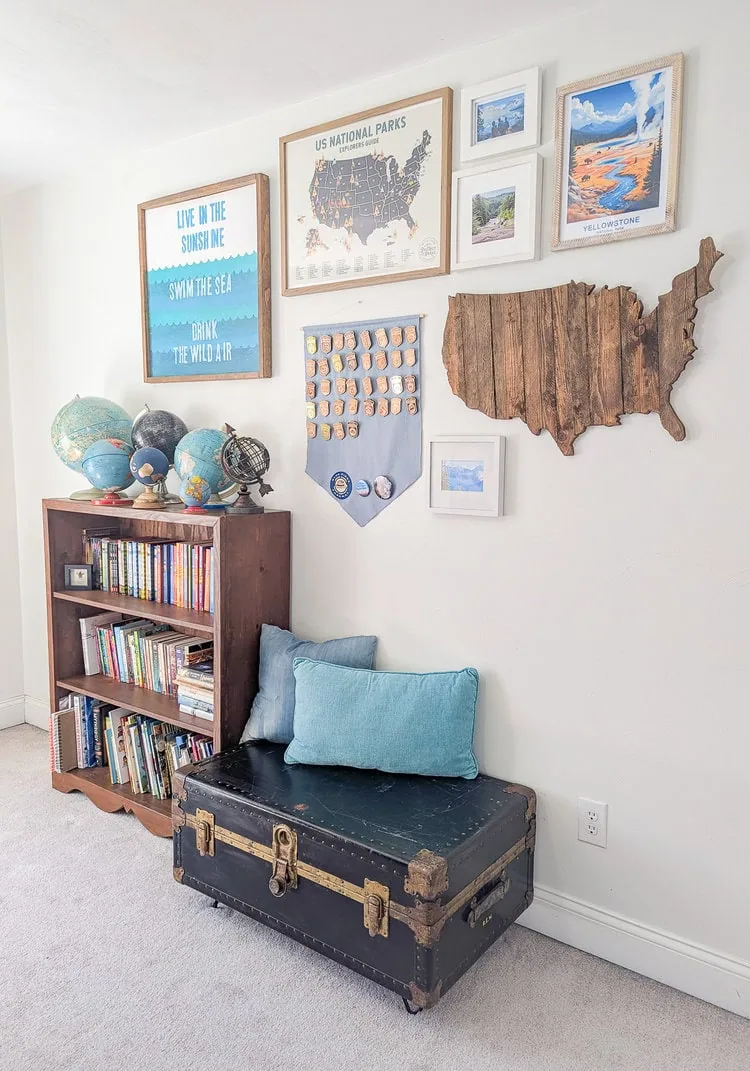
Travel Gallery Wall
The final touch was to hang some art on the walls. I didn’t think the map wall really needed any art, so I gathered all the wall art in one spot to create a gallery wall.

As I started gathering items for the gallery wall with my son, an obvious theme arose. My son loves road trips and hiking and national parks and that definitely shows in this wall. It’s a collection of photos and souvenirs from his travels and handmade art celebrating outdoor adventures.
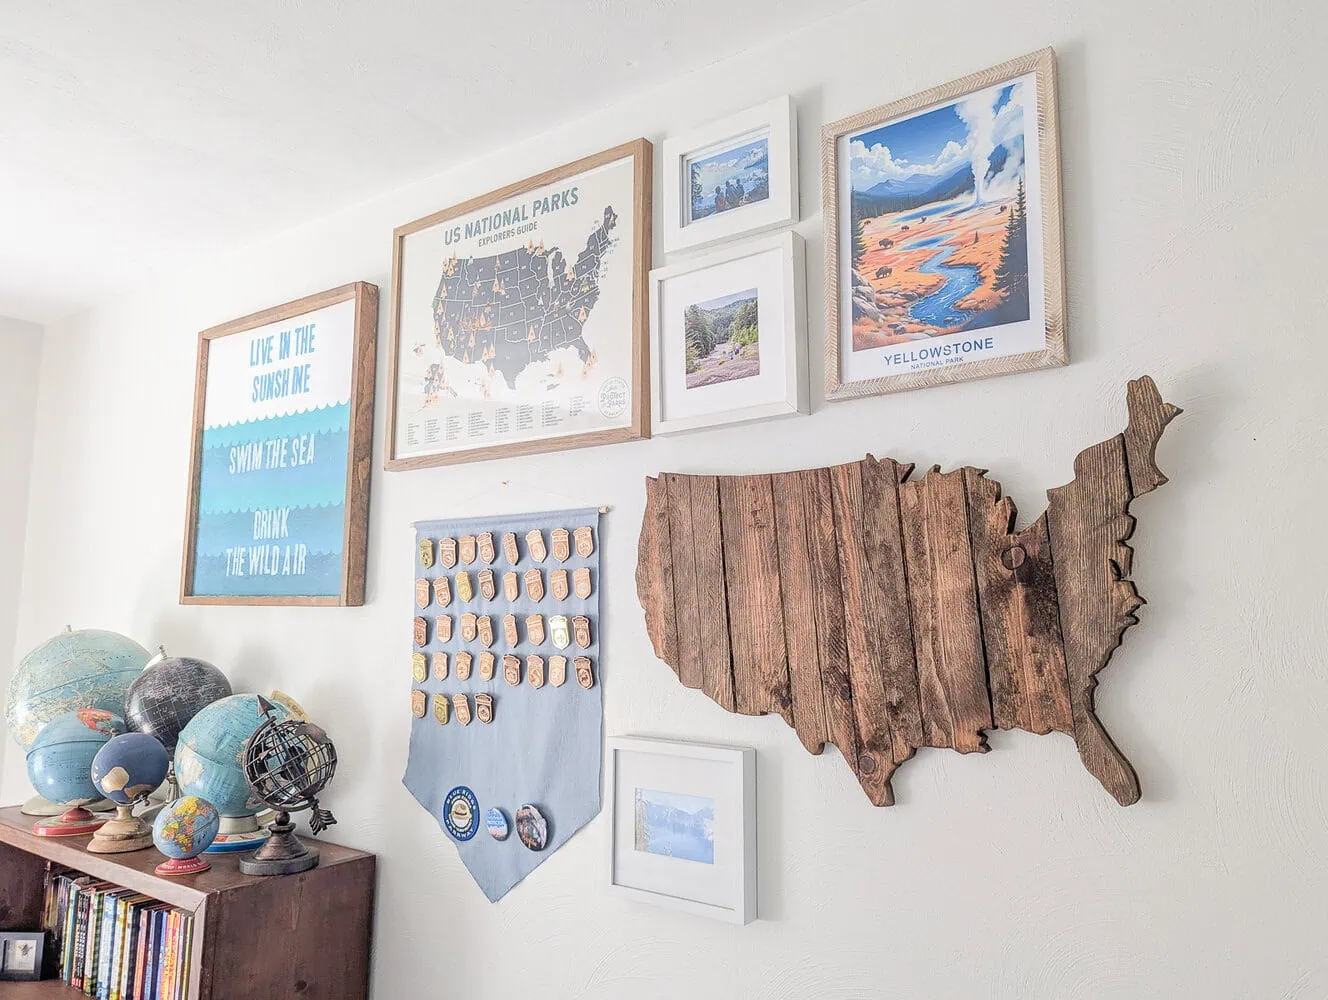
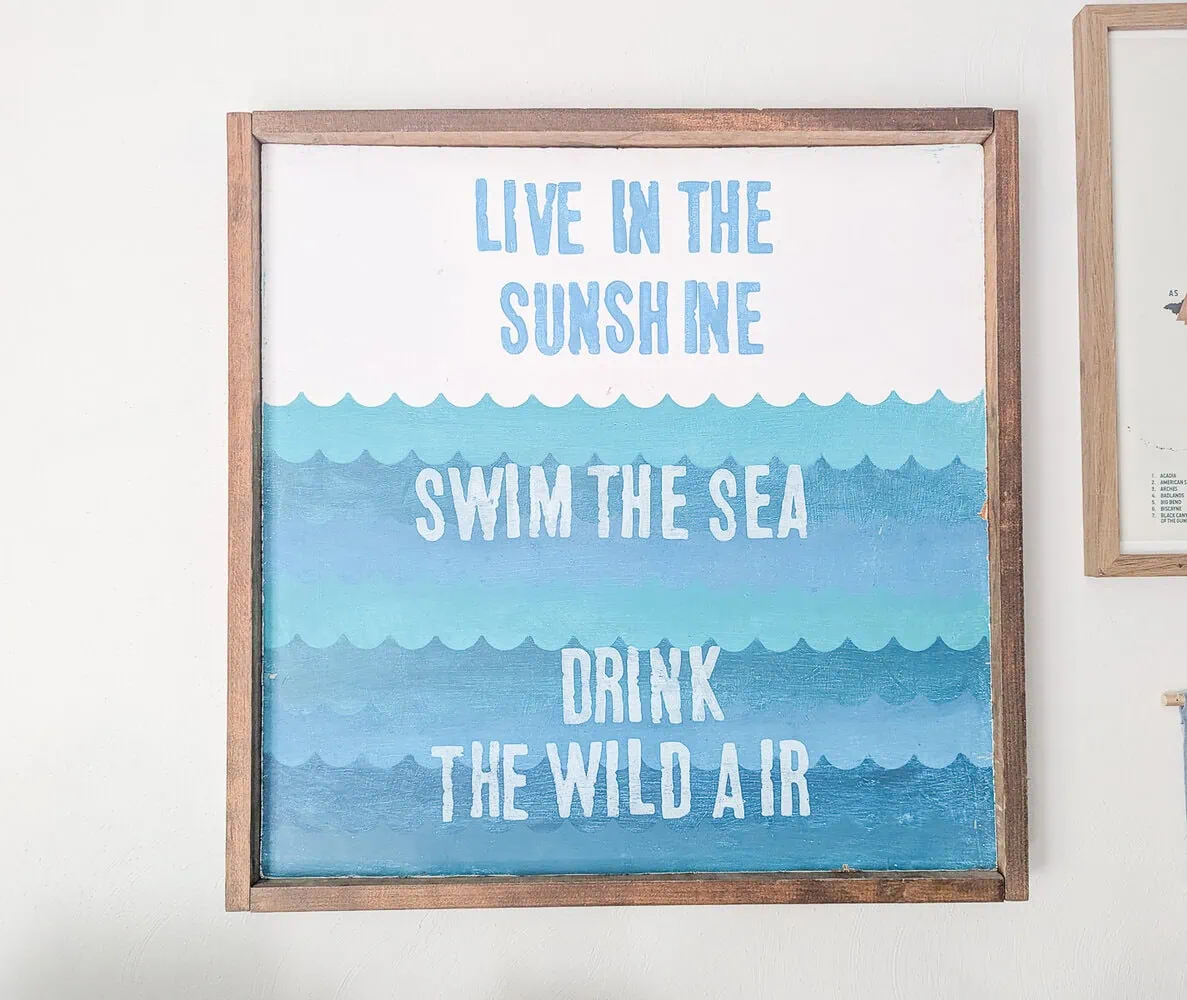
There’s a wooden sign that I made for his toddler room ten years ago.
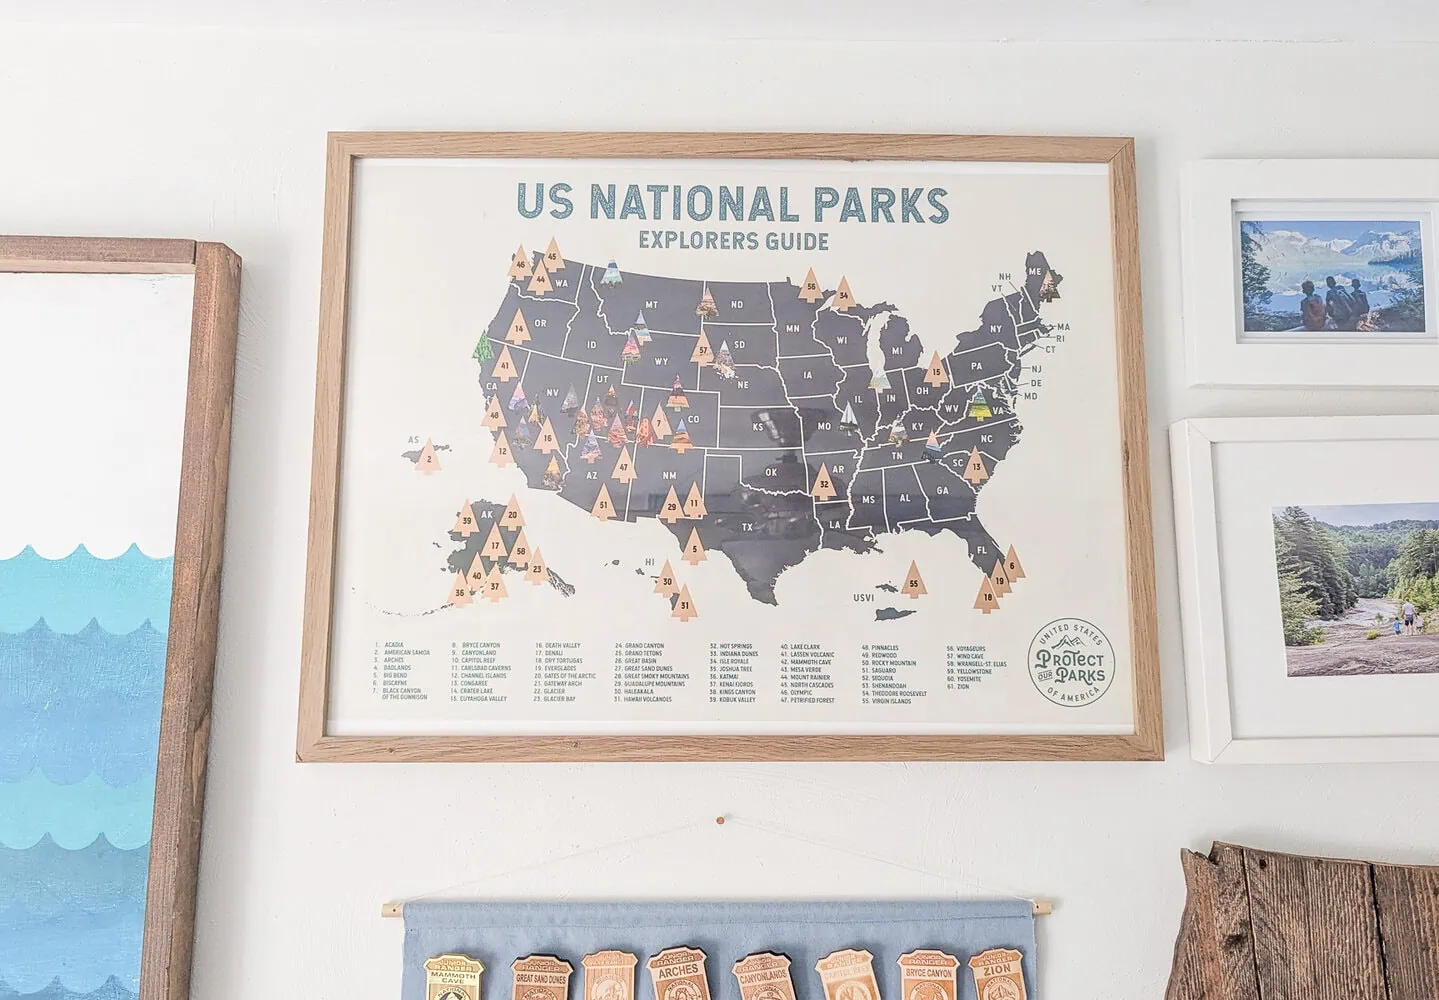
There’s a cool scratch off poster that he uses to keep track of which national parks he’s been to so far (27 and counting!).
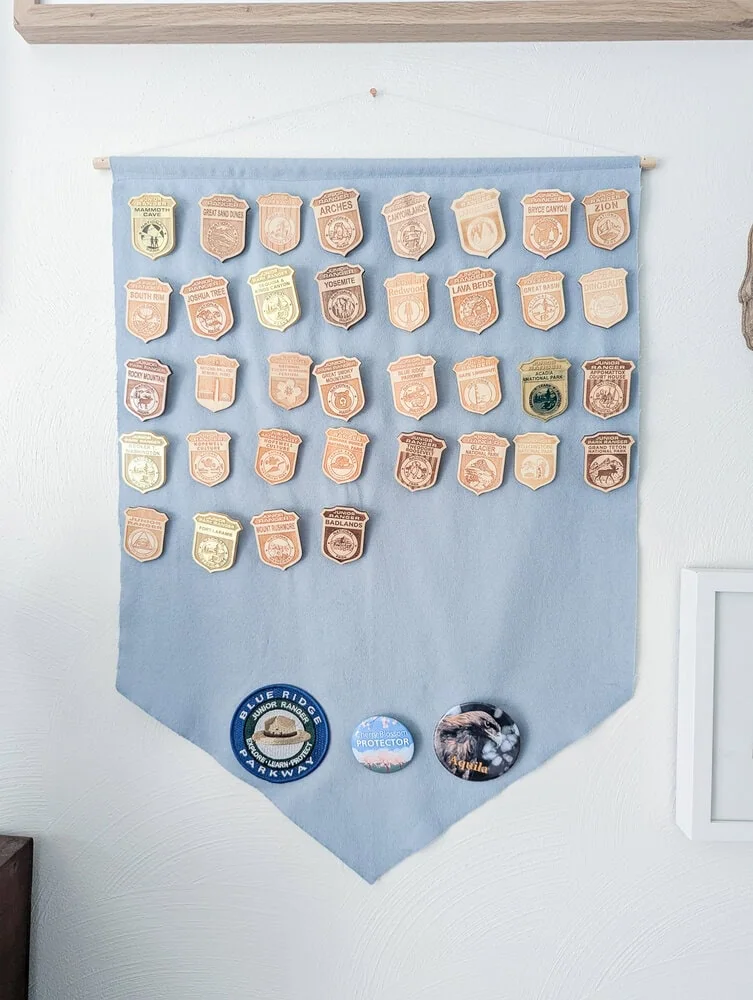
I also made this felt banner to display the Junior Ranger badges and patches he’s collected from various parks and monuments.
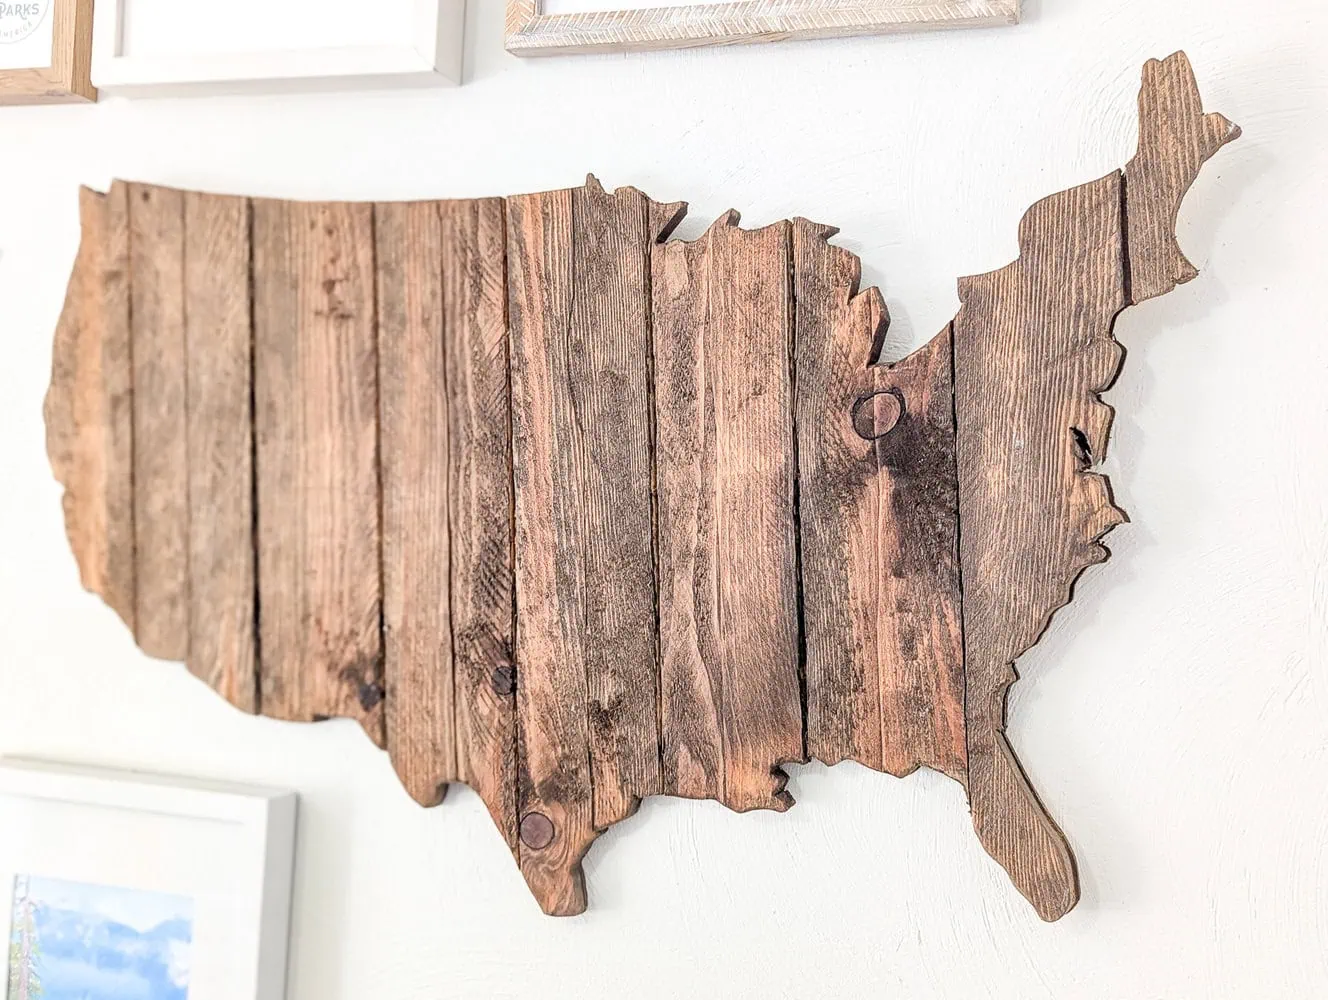
The USA outline was another project I made years ago using pallet wood.
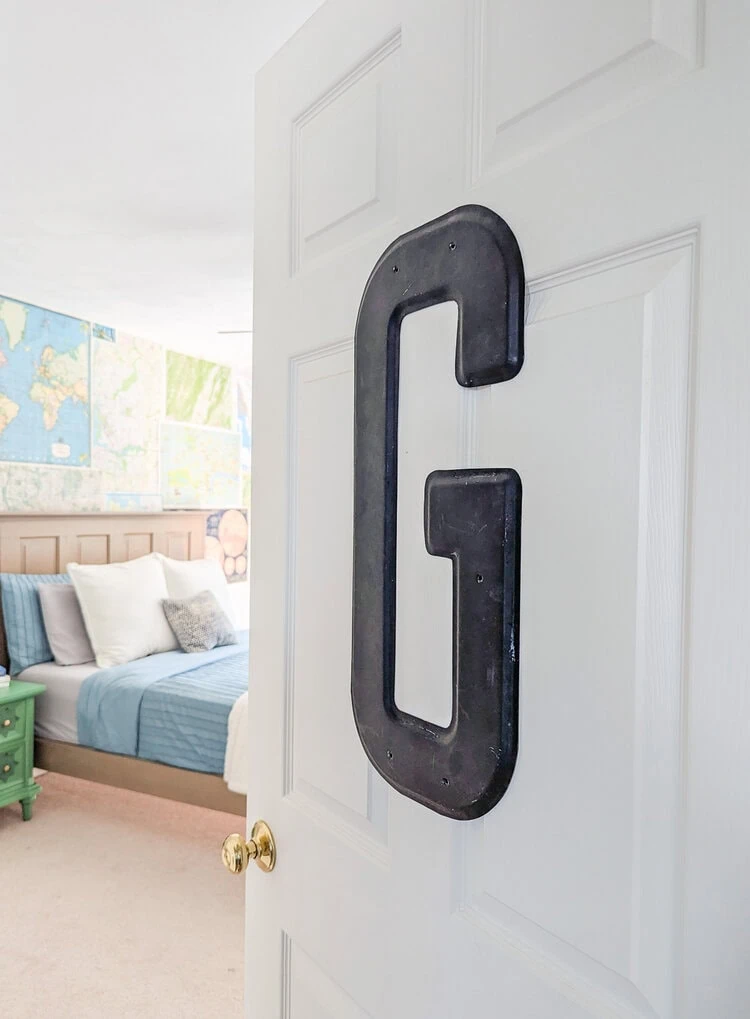
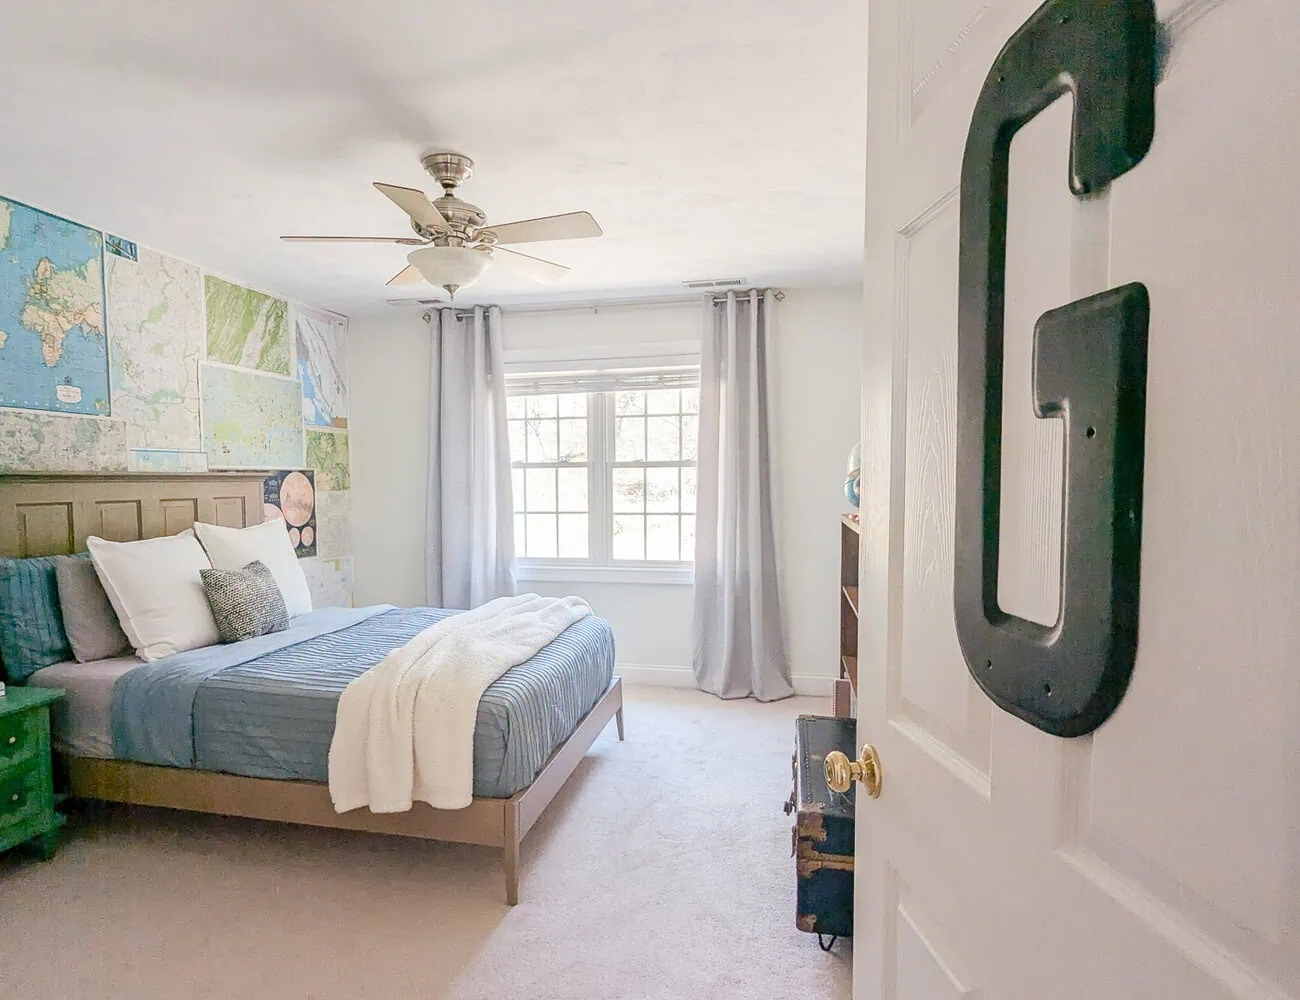
And finally, I thrifted a huge vintage marquee letter with his initial that’s hanging on the door to his room.
Boy’s Vintage Travel Bedroom
And that’s the room! He’s really happy with it and I love it too. I think this room will grow right along with him for quite awhile.
Here are a few before and afters to show just how far this room has come.
This is such a happy, colorful room now and I love that it is filled with one-of-a-kind DIY projects and vintage finds. Now on to the next room!
Sources
Here are links to all the things I purchased for this space. (There’s not a lot since I made or thrifted almost everything, but I wanted to share what I had!)
- Blue duvet cover Amazon
- National park scratch off map Etsy
DIY Tutorials
And here are links to all the DIY tutorials for the projects in this space.
- How to create map wallpaper using vintage maps
- How to turn an old door into a beautiful headboard
- How to build a simple DIY platform bed frame
- DIY nightstand makeover using a surprising Dollar Tree find
- How to build an inexpensive DIY closet organizer with drawers
- How to turn a vintage trunk into a table/bench
- Easy hand-painted ‘Live in the Sunshine’ sign
I’d love for you to pin this post on Pinterest!