How to build cheap and easy DIY closet shelves
Learn how to build closet shelves for any closet in your home. These DIY closet shelves are inexpensive and easy to customize for any size closet.
My sons’ shared closet is finished and I have never been so excited about a closet before!
The closets in our house aren’t anything to write home about – all of our bedroom closets are standard double closets with sliding doors.
When I started planning how to make this room work as a shared bedroom for both of my sons, I knew there needed to be way more usable storage in the closet to hold all of their stuff. So I designed and built custom DIY closet shelves, gave everything a fresh coat of paint, and now it is perfect!

In this post I’m sharing how to plan and build custom closet shelves to perfectly fit your closet. The shelves I designed work especially well in a child’s room, but you can also use this basic tutorial to build shelves in all kinds of closets.
This post contains affiliate links which means if you make a purchase after clicking a link I will earn a small commission but it won’t cost you a penny more. Click here to see my full disclosure policy.
Planning the new closet layout
For those who are new here, I am in the middle of a complete redo of my sons’ bedroom.
I am transforming my 4 year old’s bedroom into a room he can share with his two year old brother. (Baby boy #3 is coming this summer so we’re on a bit of a deadline!)
This is how the closet looked before.
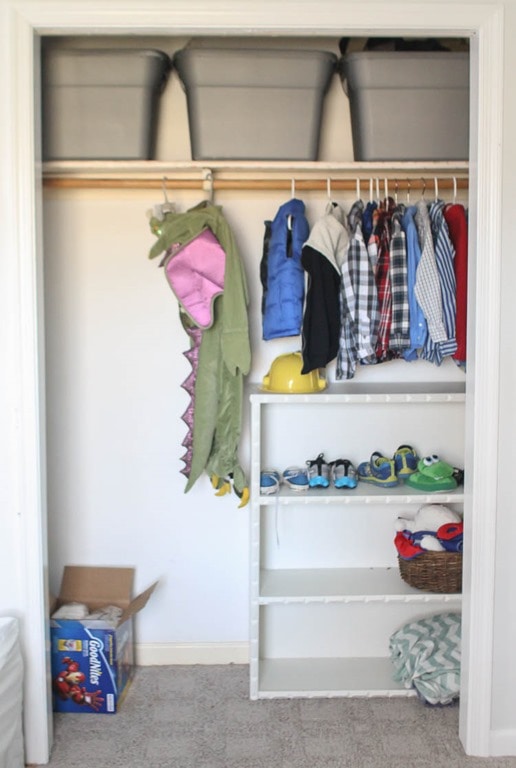
One bar for hanging clothes and one high shelf. Plus a small bookcase I stuck in there to add a bit more storage.
Not a great closet for anyone, but considering how few hanging clothes my son has, it was basically just one huge waste of space! I knew I wanted to create my own custom closet system. That way I could configure it exactly how I want – plus it would be way cheaper!
When I started figuring out the design, I tried to keep several things in mind:
- It needed to have lots of shelf space for storing toys, shoes, clothes, etc. and my 2 and 4 year olds needed to be able to reach as many of the shelves as possible. (I definitely want to encourage them getting out and putting away their own clothing!)
- I also wanted it to continue to function years down the road when they are older (or someone else has this room) so the area for hanging clothes had to be big enough to fit adult clothing.
- And since this is a closet with sliding doors, you can only access one half of the closet at a time. So whatever built-ins I created needed to make sense with only one door open at a time.
I came up with a few ideas and then used painters tape to see how they would actually work in the closet.

In the end I decided the design on the far right above was the winner.
There were plenty of low shelves/cubbies for storing all kinds of stuff, a long hanging bar, and a high shelf above it to put absolutely all of the vertical space to good use.
The boys won’t be able to reach the clothes that are hanging on the bar for quite some time, but almost none of their everyday clothing needs to be hung up, so that wasn’t a deal breaker.
More fantastic DIY closet system ideas
If this kid-friendly closet layout isn’t really what you’re looking for, I have several other fantastic DIY closet organizer designs that work great for small to medium reach-in closets.
- This super simple DIY closet organizer adds tons of storage to a small closet including space for shoes and long hanging clothes. I built this in our small master closet and it was perfect.
- This slightly more advanced DIY closet organizer includes tons of shelves and hanging space along with DIY drawers for maximum storage.
- These super simple DIY closet shelves work great for any closet that just needs some basic storage.
How to Build DIY Closet Shelves
Supplies
- A sheet of MDF cut into 14” strips – My cubbies are 14” deep but you can use whatever measurement works best for you based on your closet size. Another option is to use 12″ MDF shelf boards if you want to avoid having to rip your MDF down to the correct width.
- 1″x2″ pine boards to create the side shelf supports (two 14” pieces for each shelf)
- 1″x2″ poplar or pine boards to create a nice thick facing for each shelf (amount depends on size of your closet and shelves)
- spackling and caulk – for filling any tiny gaps and nail holes for a perfect finish
- white paint (or the paint color of your choice)
- small foam paint roller and paint brush
Tools
- miter saw or circular saw – for cutting your wood planks to the correct lengths
- nail gun – You can also make this with a hammer and nails, but it will take a lot longer. This is the nail gun I have and it is very easy to use.
- stud finder – this is by far the best, easiest stud finder I’ve ever used
- level
- tape measure
Remove the old closet rod and shelves
First step, remove everything that was already in the closet including the closet rod, shelf, and shelf supports that were there before.
I patched up the nail holes with spackle and then gave the whole closet including the trim a fresh coat of white paint.
If they are still in good shape, you may be able to reuse some of the old components of the closet. It will save you money and time, since they are already cut to the correct size.
I was able to reuse the clothing rod and top shelf that were already in my closet; I just rehung them higher than they were originally.
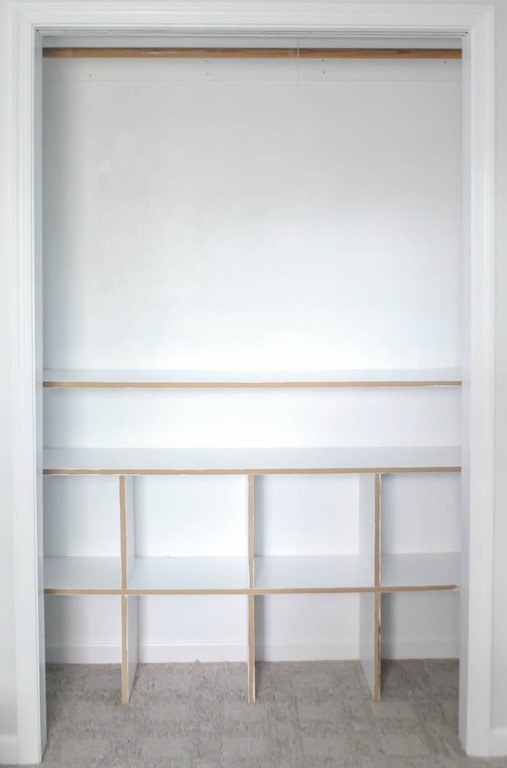
Cut your shelves to size
My closet plan involves building square cubbies, but the first step is to build three simple shelves spanning the closet.
I built my shelves using MDF. I’ve used MDF to build several different closet organizers now and I think it’s a great choice. The boards are always perfectly straight and smooth which makes them easy to work with and MDF is usually quite a bit cheaper than plywood.
Your shelves should be 1/4″ shorter than the width of your closet. That will allow you to move them into place more easily.

As you can see, I prefer to paint all of the pieces of a project like this before installing them. You will still need to do a quick paint touch up at the end, but painting each piece separately is so much faster than trying to maneuver in all of those tight corners.
Attach the shelves to the wall
Attaching the shelves to the wall is easy. All you need are some inexpensive 1″x2″ boards.
Cut your 1×2 supports to the same size as the width of your shelves – mine were 14″
Screw these shelf supports into the studs on each side wall of the closet. If you don’t have studs where you need them, you can also use screws and anchors to attach these. You want them to be attached securely because they will be supporting the weight of the shelves and whatever is stored on them.
Then set the shelf boards in place. (Be sure to use a level when hanging your shelves!)

If you are building regular shelves rather than cubbies like mine, you also need to add more 1×2 supports along the back wall of the closet.
Simply cut another 1″x2″ board the length of your shelf minus 2 inches (to leave room around the side supports) and screw it to the studs along the back wall of the closet. (Again, don’t forget the level!)
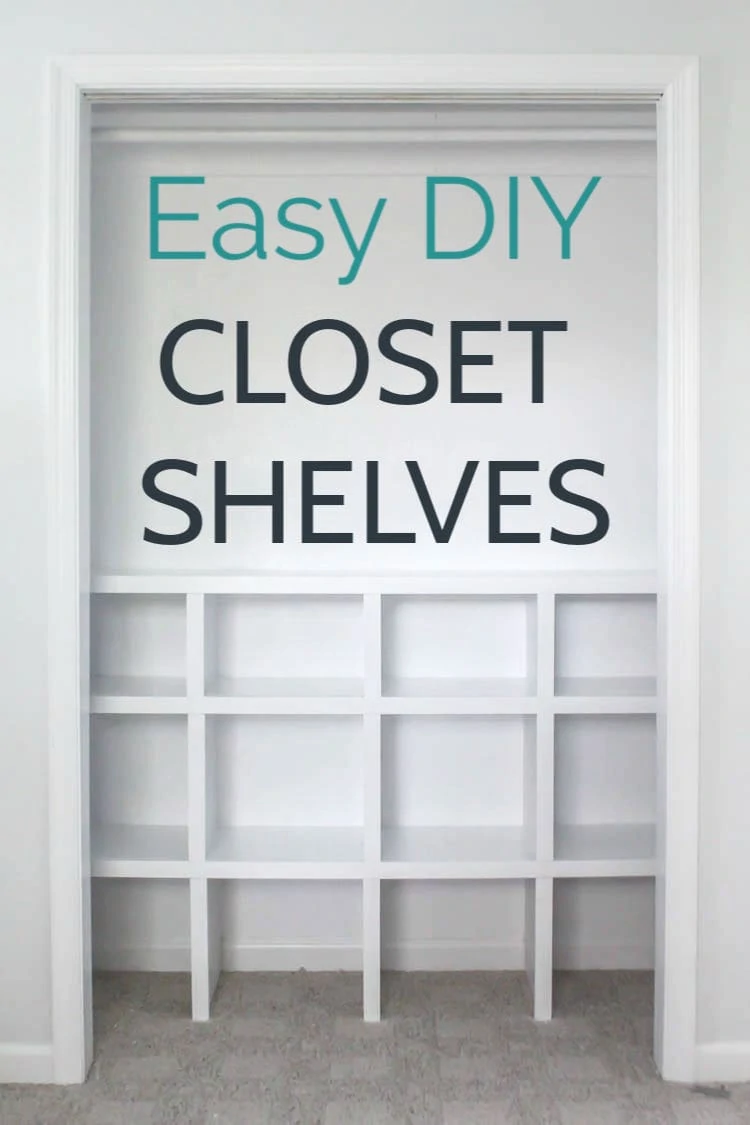
If you are building cubbies like me, you can skip the back shelf support. The vertical pieces separating each cubby will provide plenty of support.
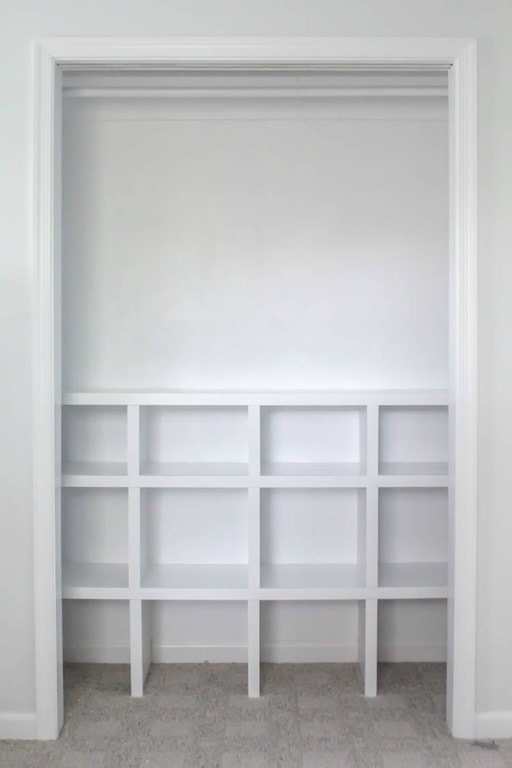
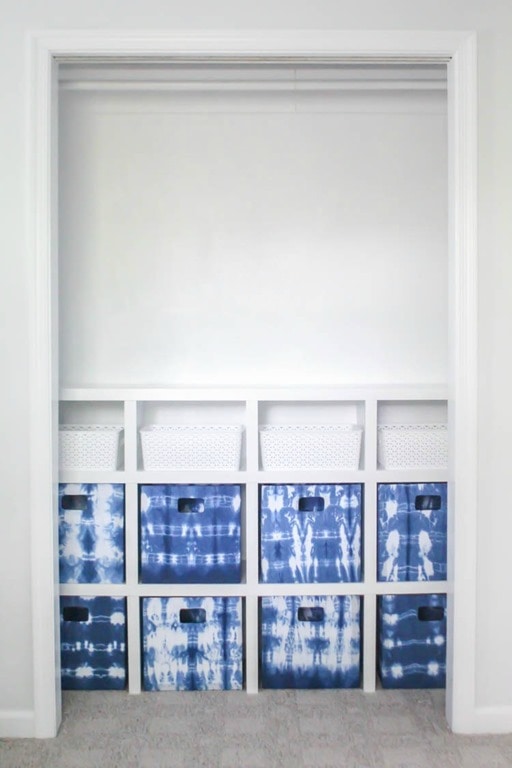
Add the optional cubby dividers
To create the cubby dividers, cut more MDF to the size you need. I used 14”x14” for the bottom two rows because my shelves are 14″ deep and 14″ high.
The top row supports are 9″x14″ because the shelves are 14″ deep and 9″ high.
To install them, I started on the bottom row and slid each vertical support into place. I nailed a few nails into each divider through the shelf above to secure it in place.
Then I added the middle row of cubby dividers and the top row the same way.
Add wood facing to your shelves
Finally, I added 1″x2″ poplar facing to each of my shelves. This is completely optional but gives the whole thing such a great, finished look.
Poplar boards have gotten increasingly expensive over the past few years, so if you are looking for a less expensive option, 1″x2″ pine boards will also work.
If you do use pine for your closet shelves, be sure to use a good primer before painting. Pine is notorious for bleeding through and yellowing white paint if it isn’t sealed well. I like to use oil-based primer any time I am painting pine wood white to prevent yellowing.
Adding the facing is pretty simple. Cut 1×2 boards to the length of your shelves and attach them with a few finishing nails.
Then measure the openings along each vertical support, cut your 1x2s to size, and nail them in place.
The poplar is thicker than the MDF, so it will overhang the shelves a bit. For the horizontal shelves, align the facing with the top edge of the shelf so the extra thickness hangs down. For the vertical supports, you can center the facing with the MDF so there is a small amount of extra thickness to each side.
Once the framing is in place, it will look like the shelves are custom made from thick wood. It’s a small detail that makes a huge difference to the finished look.
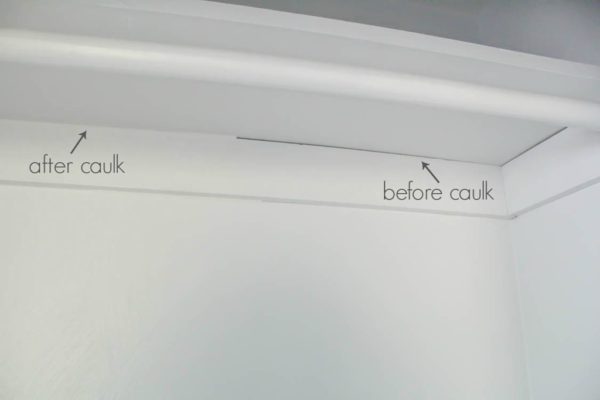
Apply caulk and spackle
The final step is filling the nail holes with spackling and caulking all of the seams.
I am always amazed at how beautifully caulk and wood filler fix up any imperfections. (If you aren’t sure of the difference between caulk and wood filler, I have a whole post on when to use wood filler and when to use caulk.)
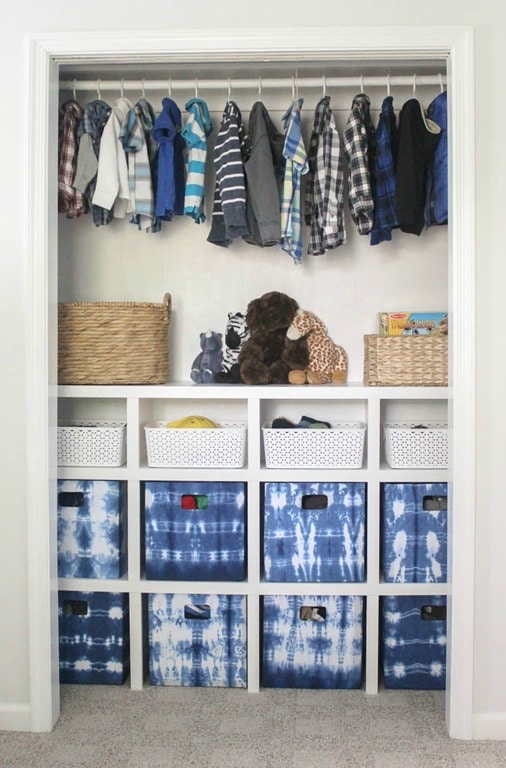
The Finished Closet
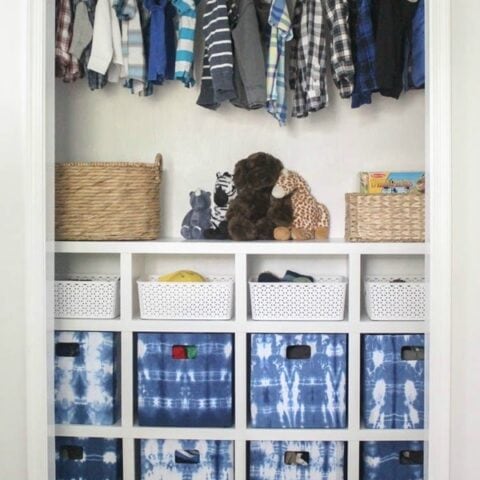
Finally I added the DIY fabric storage cubes I shared last week as well as these inexpensive white plastic baskets I picked up at Target.
And finally, I filled up the closet with all of the boys’ things.
There are clothes in all of the fabric bins, shoes and accessories in the plastic bins, a large basket to toss clothes in as they outgrow them (on the left), a basket full of puzzles (on the right), and extra storage on the high shelf.
And now for the best part of any DIY tutorial – the before and after photos:
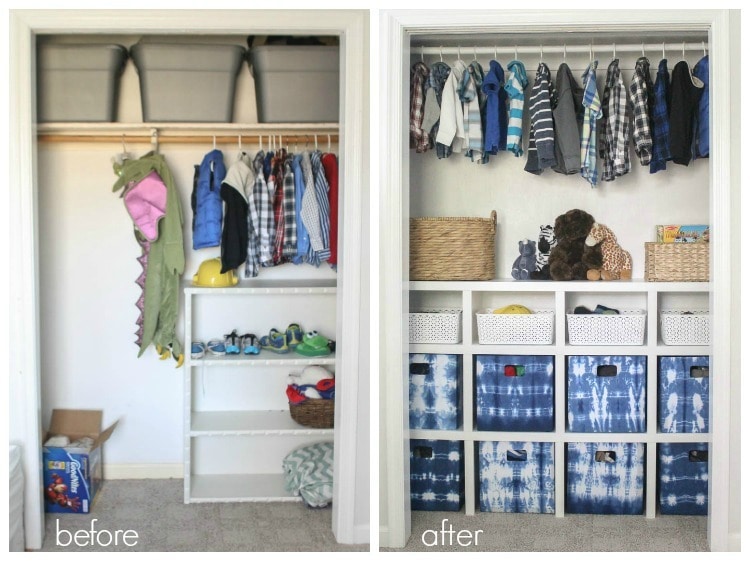
What a change! There is so much more storage space now, plus it is gorgeous!
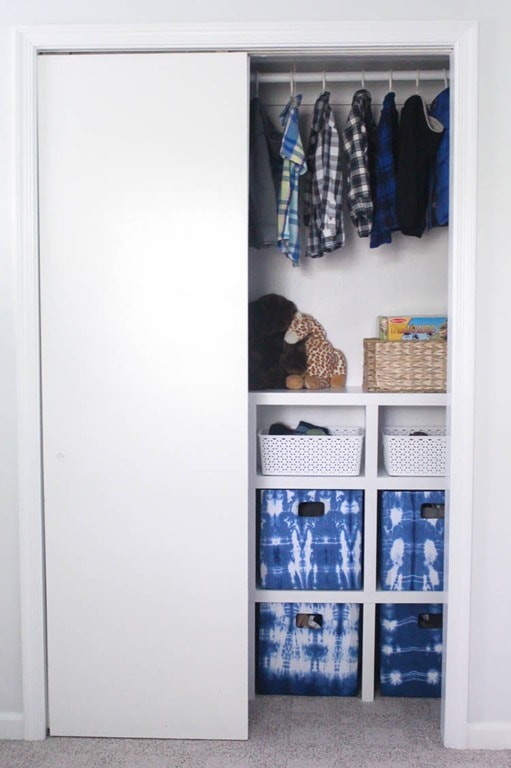
This closet organizer works well with the sliding doors, but I actually ended up just removing the doors all together. The closet looked good enough not to need doors and removing them made it easier to access everything.
We had these exact same sliding closet doors in our master bedroom and in there, I was able to reconfigure the doors to be hinged double doors. It was a huge improvement being able to see the entire closet at one time!
Update: Since sharing these DIY closet shelves, I’ve upgraded my fabric storage cubes to DIY wooden storage cubes made from gorgeous cedar planks.

As great as the fabric bins were, these are so much better!
More DIY posts I think you’ll love:
How to Build DIY Closet Shelves
These DIY closet shelves are cheap and inexpensive to make even if you aren't an experienced DIYer. You can easily adapt the instructions and measurements to create custom shelves no matter what your closet size.
Materials
Tools
- Small paint roller and paint brush
- Tape Measure
- Saw
- Level
- Nail Gun
- stud finder
Instructions
- Remove everything from the closet including old shelves you will no longer be using. Patch any holes in the walls with spackle and give the interior of the closet a fresh coat of paint if needed.
- Cut the strips of MDF to the correct length for your shelves. (If you don't have a power saw, you can have all of the cuts done at the store when you purchase your supplies.)
- It is easiest to paint all of the pieces of wood for your closet shelves before installing them.
- Cut two side supports for each shelf from 1"x2" pine boards. These should be 14" long or the depth of your shelves if you are using different measurements.
- Make sure that each shelf support is level. Attach each side support to the side walls of the closet at the appropriate height by nailing them into the studs.
- If you are building simple shelves rather than cubbies, you also need to add a long shelf support along the back wall of the closet. Simply cut another 1"x2" board to the length of your shelves minus three inches. Make sure it is level and then screw this support to the studs along the back wall.
- To create the cubby dividers, cut more MDF to size. Each cubby divider should be the height of your shelves x the depth of your shelves. (Mine were 14"x14".)
- Hold the bottom cubby dividers in place and use a level to ensure they are straight. Nail a few nails into the top of each divider through the shelf above to secure it in place. Repeat for the middle row and top row of shelves.
- To finish off the closet shelves, add strips of 1"x2" poplar to the front of each shelf and cubby divider. Use a few finishing nails to hold each piece in place.
- Fill any nail holes with spackling. Once it is dry, sand it smooth.
- Caulk all of the seams and then touch up the paint as needed.
Recommended Products
As an Amazon Associate and member of other affiliate programs, I earn from qualifying purchases.
I’d love for you to share this post on Pinterest!

it is looking so good! love those cubbies!
Thanks Cassie!
Looks great, Carrie. Love those cubbies! Looking forward to seeing more. Susie from The Chelsea Project
Thank you Susie! I am so excited about how everything is coming together!
holy crap, it looks incredible!! Seriously, all the love for that fabric too.
Thanks Ashley! That fabric really is awesome, especially for the price!
Looks amazing!
Could you go into more detail on how you created the thick shelf look? I see you used poplar but I understand you made it look thick and carried that through to the back wall.
Thanks!
Yes, I can see how that part is confusing! I should probably take a few more close up pictures. The thicker facing is only on the front of the shelves – it doesn’t go all the way to the back wall. I used 1×2 boards and attached them across the front of each long shelf. The top of the boards are lined up with the top of the shelf but hang down a bit past where the actual shelf board is. Then I attached more 1x2s to the fronts of the smaller cubby dividers. So the whole front facing of everything is thicker but the wood behind is as it appears in the previous pics. When looking at the closet, you can’t tell the actual shelves aren’t as thick as they appear unless you look very, very closely.
Very smart. Thanks for the details! I thought about doubling up all the wood to increase thickness but this is much cheaper.
The exterior cubbies look like they would be a bit difficult to come out all the way or even a bit slightly out. is that true or is the picture not showing it properly?
Cedric, You are right – the far cubbies don’t slide out the whole way. They each slide out about 8 inches which is plenty to put in and remove clothes, but could be a problem for something larger like big toys. Most fabric cubbies you can buy are collapsible and I made these outer cubbies to be collapsible as well so installing and removing them isn’t a problem.
Could you give a cost estimate? I’m looking at something for my son’s small room but can’t spend a lot at the moment.
Hi Diana, It has been about a year since I built these so I don’t remember the exact cost but I believe it was around fifty dollars, maybe a little bit more. I hope that helps!
Nice job just wondering are the bottom vertical supports only resting on the floor. Wondering how stable they are or does the rest of the cubby provide enough weight to stop them from moving . Thanks
Hi Jimmy, Great question. I nailed a couple of small nails into the vertical supports from the shelf above and that has been plenty to keep them in place. They were a pretty secure fit even without that, but I wanted to be thorough, especially since these are in a kid’s room. I haven’t had any trouble with them since I built them a year and a half ago.
Do you have a video..I”m kind of confused on how you completed the sqaure for the cubies…Thank you
This is exactly what I was looking for!
I’m sorry, I don’t have a video. I wish I did but it is hard to make a video as you are in the middle of completing projects. Once the horizontal shelves were in place, I cut the wood to divide them into squares – this wood simply slides into place between the horizontal supports. I added the three supports in the bottom row first. Then I held them in place as I nailed a few nails through the first shelf into those supports. Then I did the same thing for the next levels. I hope that helps. It may be hard to picture but I think it will be clear once you begin the process and have the actual materials on hand.
Hi! I was wondering how much the poplar affected the size of your storage baskets? I want to build it where it will fit standard 13×13 (which I know is the size you have), but when I do my measurements/math with the 1×2 poplar overhang it seems like 14×14 cubbies won’t be big enough?
Great question. 1×2 polar is actually 3/4″x1.5″ in size. (Lumber sizing makes no sense!) The MDF or plywood used for the bare shelves is 3/4″ thick. So adding the poplar facing the the cubby sides means they extend less than 1/2″ into the cubby on each side. From the top, the overhand is 3/4″ into the top of the cubby. So once the poplar is added, a 14″x14″ cubby becomes 13″x13.25″. So 14×14 would be a tight fit. Depending on the space you are working with and how much margin you want to allow around each bin, 14.5″ or 15″ cubbies would probably work better. (This is if you are talking about the measurement of the inside of the cubby, taking the 3/4″ thickness of the plywood into account already.) I hope that makes sense – it’s hard to describe without visuals.
Looks wonderful! What size and type of screws did you use? Thanks!
1.5 inch wood screws should work well!
Thanks so much for this post. I have a linen closet that has a shelf system in it that doesn’t really fit and I have been thinking it would be so nice to make some shelves that actually fit to utilize the entire space. I did one of those online closet design things, and I didn’t even have the number of shelves I wanted and it was well over $500. I just added up all the wood I would need to mimic your design and I think I can do it for less than $100. I was wondering it 1×2 attached to studs was all I needed to do to attach shelves. Now to buy the supplies and actually do it. Your closet came out great and is great inspiration. Thanks again.
I’m so glad to help! It really is crazy how expensive closet systems can get for something so easy to make yourself. Good luck with your linen closet!
Finally! An easy and inexpensive shelving DIY for us not so carpentry savvy grannies! Thank you so much!
So glad it helps!
Hi
Is hard to find caulking closet post online.I am glad find your page.
After you remodel the closet. You wait how long to use it? I want to caulk baseboard in my closet but I worry voc will contaminate my clothes.
I waited for the paint to dry but then started using the closet again. Once the caulk has dried, it should be fine to put your things back in. If you want to be extra careful, you can wait an extra day or two.