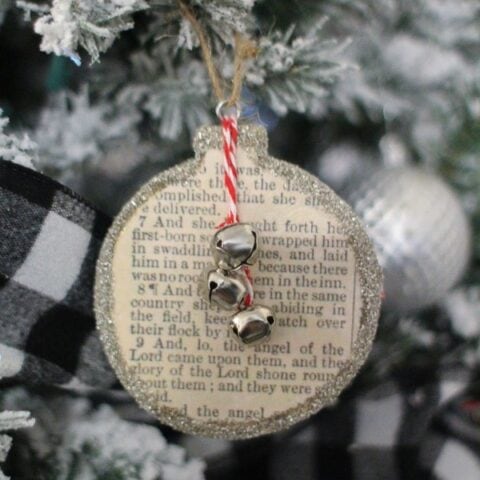
DIY Birth of Christ Christmas Ornament
Every year I love to make a few new handmade Christmas ornaments to add to our tree. My favorites are ornaments that are beautiful, easy to make, and also meaningful.
One thing I really want to focus on this Christmas is keeping the birth of Jesus front and center in our Christmas celebration. As my boys grow older, it becomes easier and easier to get swept up in a wave of Santa Claus, Christmas wish lists, and fun decorating.
And while I absolutely love those things, I don’t want that to be all our Christmas is about. For me the true heart of Christmas is the story of Jesus’ birth, and that is what this ornament is all about.

A couple of years ago I found this awesome little New Testament at an estate sale. It is dated 1911 and has several names written inside the cover.

It may be a little worse for wear, but that’s what I love most about it – thinking about all of the hands that have held it and all the places it has been.
So I turned to the Christmas story in Luke in this little book and that’s where my ornament started.
Don’t worry – I did not cut up my little Bible to make this ornament. I scanned the page and then printed a copy to cut.
And since I realize not everyone has an old Bible available, I also created a free printable from mine for you to use.
This post contains affiliate links which means if you make a purchase after clicking a link I will earn a small commission but it won’t cost you a penny more. Click here to see my full disclosure policy.
Materials
- Blank wood ornament– I used this ornament from Michaels, but you can also grab a pack from Amazon
- Printable of the Bible story (found below)
- Matte Mod Podge – for attaching the Bible story to the ornament, you could also use glossy, but matte gives a great vintage look
- Paint brush
- Silver Glitter – I used German Glass Glitter which is gorgeous but any glitter will work
- Red string – baker’s twine would also look beautiful
- Jingle bells – the 1/2″ size works well
Free Printables of Luke 2
First you’ll need to download and print out the verses from Luke 2.

I have two versions you can choose from. The first version (shown above) shows the full two page spread from my little Bible and the second version (shown below) is the close up on Luke 2: 6-11 that I used for my own ornament.

To get your own copy, just click the version you want below. Then you can download and print it. (If you are on a desktop computer, just right-click and choose ‘save image as’.) These images are jpg files so they can more easily be printed in a variety of sizes to fit your ornament or other craft project.
How to make a Birth of Christ Ornament
Once you have your printout of Luke 2, trace your ornament shape onto the printout and cut it out.
I cut mine a little smaller than the ornament shape to leave a bit of a border.

Brush matte Mod Podge all over the surface of the wooden ornament and smooth the paper onto it. This first layer of Mod Podge serves as the glue to hold the paper in place.
Once that dries, brush another layer of Mod Podge onto the top of the paper to seal everything down.

When that has dried, brush Mod Podge over all of the exposed wood surfaces and sprinkle silver glitter on.

I loved the simplicity of the ornament just like this.
But I didn’t want it to get totally lost on the tree, so I added three little jingle bells hanging from simple red string.

And that is it – pretty simple!
I can’t wait to hang this on our Christmas tree this year!

Want more fantastic Christmas ornament ideas? You can see all of my DIY Christmas ornaments right here.
I’d love for you to share this post on Pinterest!

DIY Birth of Jesus Christmas Ornament
This DIY Birth of Jesus Christmas ornament is a great way to celebrate the true meaning of Christmas. It is fast and easy to make and makes a fantastic gift as well.
Materials
- Blank wood ornament
- Printable of Bible Story
- Matte Mod Podge
- Silver glitter
- Red string
- 1/2 inch jingle bells
Tools
- Small paintbrush
Instructions
- Print the free printable of Luke 2. Trace your ornament shape onto the Bible story printout.
- Cut out the ornament shape, cutting it slightly smaller than the wood ornament.
- Use a paintbrush to brush Mod Podge all over the front of your wood ornament. Smooth the paper ornament shape onto the front of the ornament.
- Once the paper is fully dry, brush another layer of Mod Podge over top of the paper to seal it.
- Brush Mod Podge all over the exposed wood on the sides of the ornament and sprinkle glitter onto the Mod Podge. If any bare spots remain, add more Mod Podge and more glitter.
- Tie on three jingle bells with red string.
Recommended Products
As an Amazon Associate and member of other affiliate programs, I earn from qualifying purchases.
-
 Mod Podge CS11302 Waterbase Sealer, Glue and Finish, 16 oz, Matte
 -
 Jingle Christmas Bells, 300 Pieces Craft Bells, DIY Bells for Wreath, Holiday Home and Christmas Decoration (Silver, 0.5 inch)
 -
 Bakers Twine Red and White, LaZimnInc Cotton Twine Packing String for Gardening, Decoration, Tying Cake and Pastry Boxes, Silverware, DIY Crafts & Gift Wrapping, Art and Crafts (2 mm/328Feet)

Carrie, I am totally in LOVE with your Christmas ornament. It tells THE story and in the most lovely way.
Thank you for sharing again with us. It’s so good to have you in our line-up again this year. :)
Thank you so much Diane! Thanks for inviting me to join in – I have had so much fun checking out everyone’s ornaments!
This may be my favorite ornament shared this month. I love that you used a scanned page from a 1911 bible to create this. Way to remember the reason for the season while creating something beautiful for your tree. If I taught Sunday school, we’d make this for sure!
Thank you Paula – and you’re right, this would be an awesome Sunday School project!
Oh my gosh, I love this SO MUCH! I have pinned and stumbled and scheduled a share on FB; next I need to add this project to my holiday To Do list! So so pretty, and the perfect way to keep Christ in Christmas.
Thank you Kimm! You are the sweetest!
This is just lovely in every way. I was so worried when I saw the bible and thought you’d maybe cut it up, but no, of course not! Such a lovely idea and so beautifully done.
Julie, I figured some people would think I had cut it up! I love the ornament but it wouldn’t be worth destroying that old Bible! Thanks so much for your kind words!
thank you for the print out! I will absolutely be making these meaningful little ornaments xo
Thanks Robin!
I agree with Paula, this may be my absolute favorite. And that is SO kind of you to share the printable! I agree with you about the old Bible and thinking about all the little fingers and the history it’s had over the years. This ornament is precious. Thank you for sharing it with us!!
Thanks so much Heather!
So beautiful!!!
Thank you Maryann!
Such a gorgeous ornament, love the glitter!
Thanks Kristin – you just can’t go wrong with glitter at Christmas!
I really like your ornament, Carrie. I think it’s important to remember the true meaning of Christmas. Thanks for sharing this!
Thanks so much Jennifer!
This is a lovely way to display your faith on your Christmas tree. I love this sweet idea.
Thanks so much Vanessa!
Meaningful ornaments are the best! Great that you are focusing on the real reason for the season.
They are! I love meaningful ornaments so much – even if it is just something meaningful to our own family!
What a special and meaningful idea for a Christmas ornament.
Thanks so much Malia!
This is awesome! Love the photo of the pages idea :D
Thanks Amy!
Oh such cute and meaningful ornament!
Thank you Cristina!
This is absolutely beautiful, and I love that it captures the true meaning of Christmas!
Thank you so much Mary Beth!
Such a lovely and meaningful Ornament!!! Love that you used lovely passages of the bible specially of that one being so antique! Gorgeous!
Hugs
Thanks so much Cami!
I love this ornament. What a clever idea.
I do have a question. You state, ‘Brush matte Mod Podge all over the surface of the ornament and smooth the paper onto it.’ Then you state to spread Mod Podge all over the wood surface.
Where did you get the wood ornaments?
Are you finishing the back side or is this double sided with the paper?
Just another idea if giving this as a gift to someone…..use a wood burning tool and write the persons name on the back side.
Thanks,
Cathy
Cathy, I bought my wood ornaments at Michaels. As far as the Mod-Podge, I did two layers. The first layer acts as a glue to adhere the paper to the ornament and the second layer on top of the paper helps seal it all together. And I left the back of my ornament blank, but I love the idea of wood burning someone’s name into it. Or even the year would be a great touch!
Very nice. I have my grandma’s old bible – very similar. I would like to make these ornaments. What size are the bells?
Hi Doreen, how special that you have your grandma’s old Bible! The bells are 1/2 inch bells.
Hi, this is a special ornament! I made 35 of them!! Let me tell you…it was a big job! I made one for each of my daughter’s classmates and teachers, principal and priests at her catholic school. I wrote the grade and year on the back of the ornament for each. Did I mention it was a big job?? Thank you for your wonderful idea!
That is a big job for sure! What an awesome gift!
This is beautiful! Do you think it would work with silver paint pen on the border instead? (I need to make A LOT!)
Thank you Lisa! I think silver paint pen definitely would work and look beautiful. Originally I wasn’t even going to add anything to the sides but it seemed too plain without it. Good luck with your ornament making!
That’s so lovely Carrie and what a special find too. IIt makes me a little sad to know that something that must have been treasured and passed down ended up in a thrift store. I’m glad you were there to save it and use it to make something beautiful
Thanks Michelle. I often wonder about things I find for sale at estate sales and thrift stores. I know it is just stuff but some of it was so special to someone at some point – like old baby shoes and vintage slides. It’s sad to think nobody cares anymore.
What size wood disc?
The wood ornaments are approximately 3.5 inches across.
I love this lovely ornament and making it now! After applying the final coat of modge podge, how did you make your glitter border so perfect? I’m afraid I will get glitter over the entire front side. Thanks!
Oh good, I’m so glad you are making this! To keep the glitter under control, make sure to let the mod podge fully dry. Then carefully apply glue just around the edges. You can use a small paintbrush to spread the glue exactly where you want it. As long as the glue is where you need it, the glitter will stay in place too. Good luck!
Do you think it would be ok if the 2nd layer of mod podge wasn’t applied on top of the scripture? I want to use this as one of our rotations for our church’s Happy Birthday Jesus party, and kids as young as three years old will make one, but I think glitter may end up all over the scripture unless we only add mod podge to the outside and edges for the glitter.
Yes, it should be fine to only use the Mod Podge under the paper. The paper may be a bit more fragile and prone to wear over time that way though.