Easy DIY Silhouette Art
As much as I love a big, bold house-transforming DIY project, sometimes there is nothing better than knocking out a fun project in just thirty minutes. This easy DIY silhouette art is one of those awesome, quick and easy DIY projects. It’s the perfect addition to your own gallery wall and also makes a spectacular personalized gift. Make a cute silhouette of your kids for the grandparents. Or give a friend a silhouette of her in her wedding dress. Or give any animal-lover a silhouette of their favorite pet. So many possibilities for a truly one-of-a-kind gift.
I absolutely love for the art on our walls to be meaningful to our family in one way or another. It is one of the things that helps our home feel like it is made just for us.
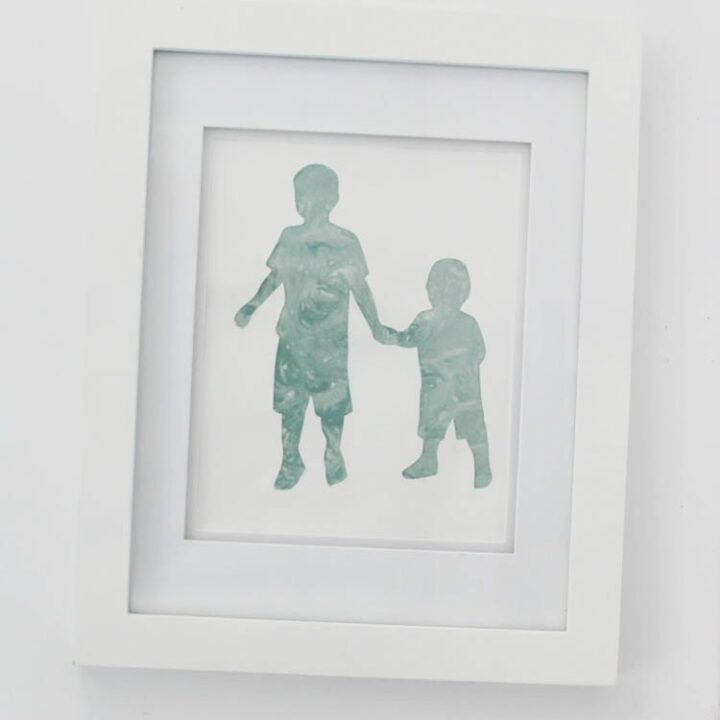
And I love a good silhouette, but the classic black profile silhouette can look a bit stuffy. So I gave it just a bit or a twist. Instead of plain black paper, I used a beautiful marbled paper. And instead of the classic profile, I chose a sweet little photo of my two boys holding hands.

This post contains affiliate links, see my full disclosure here.
Materials Needed for DIY Silhouette Art
- printout of photo – When choosing a photo, remember to focus on a good outline of the person/people. Don’t worry about facial expression, background, clothes, etc.
- pencil
- white cardstock
- craft knife and cutting mat
- pretty paper – scrapbook paper works great for this and there are a million choices
- glue or tape
How to make Easy DIY Silhouette Art

Making this silhouette is really simple and requires no special cutting machines or other equipment. Instead, it uses old tried-and-true methods. First, the simplest way to transfer an image – the good old pencil transfer. Just color with a pencil all over the back of your image.

Turn it back over and place it on top of the cardstock. Then trace the outline of the people firmly with your pencil. The outline will transfer onto the cardstock.

Place the cardstock on top of a cutting mat and carefully cut out the outline with a craft knife. (Tip: be sure to use a fresh blade. If you try to use one that is getting dull, it will just end up fuzzy and messy. Trust me, I speak from experience.)

The last step is to back the silhouette cutout with a pretty piece of paper. I chose this beautiful marbled scrapbook paper.

I cut it out to be slightly smaller than the cardstock and then attached the two together with a little tape or glue. Then just pop it in a frame.

I think this would make a fabulous gift, but I chose to add it to the gallery wall in Asher’s nursery. This gallery wall hasn’t changed since I hung it over year ago and it was time for an update.

So sweet and simple! And because the outline is cut out, it is easy to swap out the colorful paper for different colors or designs if you want to change things up!
Here are a few other simple projects I think you will like:
DIY Wrapped Photo Canvas with Real Canvas Texture


Easy DIY Silhouette Art
Create this easy DIY silhouette art in under 30 minutes. It's such a unique addition to your home and perfect for a gallery wall. This would also make a great gift for grandparents.
Materials
- Printout of photo
- Pencil
- White Cardstock
- Decorative Paper
- Glue or tape
Tools
- Craft Knife and cutting mat
Instructions
- Color the back of your image with a pencil.
- Flip it back over and place it on top of the cardstock.
- Trace the outline of the people firmly with your pencil.
- Place the cardstock on top of a cutting mat and cut it out with a craft knife.
- Back the silhouette cutout with a pretty piece of paper.
- Attach the two together with a little tape or glue.
- Place it in a frame.
Recommended Products
As an Amazon Associate and member of other affiliate programs, I earn from qualifying purchases.


