How to make a Beautiful Buffalo Plaid Christmas Wreath
This DIY buffalo plaid Christmas wreath is quick and easy to make and the perfect blend of traditional and modern.
Earlier this year I put together a super cute plaid wreath and decorated it with beautiful orange flowers.
I’ve been loving that wreath for fall but I knew a Christmas version would be amazing as well.
And since I am all about some black and white plaid this Christmas season, I just couldn’t resist a bit of a Christmas update for my wreath.
I originally attached the leaves and flowers using fishing line so they would be easy to take off if I wanted to change things up as the seasons change. It pays to think ahead!
So I simply snipped off the fishing line and got to work Christmasifying the whole thing. (If that’s not a word, it definitely should be!)

In this post, I’m sharing the whole start-to-finish process for making this wreath.
If you already made the original version I shared previously, you can probably skip the tutorial. All you really need to do is remove your fall flowers and add some Christmasy ones. For everyone else, I’ve got all the details for you.
This post contains affiliate links which means if you make a purchase after clicking a link I will earn a small commission but it won’t cost you a penny more. Click here to see my full disclosure policy
Materials for Buffalo Plaid Christmas Wreath
- wreath form -I chose to use a straw form for my wreath but a foam wreath form would also work well. I used an 18 inch wreath form.
- plaid shirt or plaid fabric -1/3 yard is plenty
- T pins or ball pins – regular straight pins don’t hold the fabric in place as well
- scissors
- faux flowers and greenery of your choice
- wire cutters
- fishing line and duct tape or hot glue gun
How to make a Buffalo Plaid Christmas Wreath
For my plaid wreath, I used an old plaid shirt that wasn’t fitting so well anymore. It was a great way to reuse that beautiful fabric, but if you don’t have a plaid shirt just waiting to be upcycled, buffalo plaid fabric also works beautifully.
You can use any plaid you want but for size reference, the squares in my fabric are two inches wide.
The first step is cutting your fabric into small uniform pieces that can be wrapped around the wreath form.
If you are using a shirt, start by cutting off the sleeves, cuffs, collar, and cutting off all of the seams. You should be left with a pile of fabric pieces.

Cut your fabric into pieces that are 2.5 squares wide. The pieces also need to be long enough to wrap all the way around the wreath.
This may be different depending on the size of your plaid pattern and the size of your wreath. For me, 5 squares long (10 inches) was perfect.
Wrap the first piece of fabric around your wreath form and use T pins or ball pins to pin it in place on the back of the wreath.
(I used a combination of the two types of pins because that is what I had on hand. But I did find that regular straight pins don’t hold the fabric in place very well.)

For the remaining pieces, you are going to fold the long row of half squares before adding them to the wreath so that only two rows of squares are showing. This folded edge becomes the ‘finished’ edge that will show.

Then you simply wrap the fabric strip around the wreath form, slightly overlapping the previous piece of fabric.
Make sure the folded edge is the one showing. Pin it in place on the back and repeat this step until you have covered the entire wreath.

To make a hanger on the back, use another T pin to attach a small loop of ribbon to the back of the wreath.

The back of my wreath clearly isn’t the neatest. If you are planning to hang your wreath on a window where the back will be seen, you can definitely try to cut and pin the fabric more precisely.

Okay, so now to add some holiday spirit to this beauty.
Right now the stores are filled with every kind of Christmas leaf, berry, and flower you could imagine and there are so many combinations that would look beautiful on this wreath.
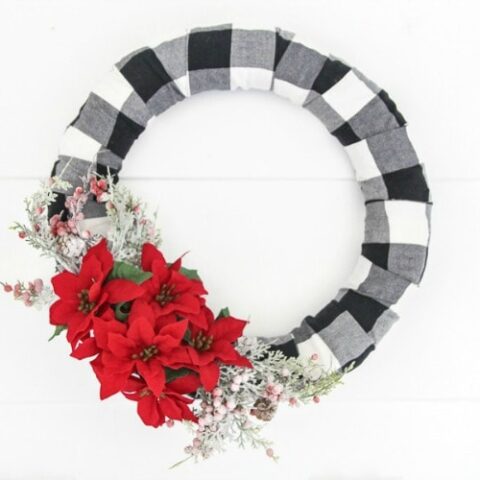
For my own wreath I grabbed a couple of Christmas picks and a bunch of small poinsettias.

I used wire cutters to shorten the Christmas picks and arranged them on one side of the wreath.

You can use a hot glue gun to attach your greenery and flowers to your wreath, but as I said before, I prefer to attach things in a less permanent way so I can easily switch them up in the future.
My favorite method is to use fishing line to tie everything on. The fishing line is nearly invisible and you would never know it was there.
But this time I searched high and low and could not find my fishing line, so I tried a different method.
I used a couple of t-pins and straight pins, sticking them through the stems and right into the wreath form.
It worked well but of course will leave small pin holes in the wreath. I think I still prefer the fishing line method, but this is definitely another good option.
Using the wire cutters, I cut the flowers apart leaving two or three inches of stem on each flower. Then I attached them to the wreath between the greenery.

I’m not always a fan of the color red, but I make an exception at Christmas and I just love that pop of color against the black and white.

And now I need to stop myself before I decorate my entire house with excessive amounts of plaid this Christmas!
Because yes, I just bought two rolls of that black and white plaid ribbon from Michaels that I mentioned earlier. I’m trying to remind myself that while a little plaid is a good thing, all the plaid definitely is not. We’ll see how that goes!
In the meantime, you are definitely going to want to check out this fun collection of 31 DIY buffalo plaid Christmas Decorating Ideas.
Or for a different wreath idea, check out my other favorite Christmas wreath. Did you know it is super easy to add your own flocking to a cheap $5 wreath and create something really beautiful?

(I also flocked my own Christmas tree and you can check out that whole process right here.)
How to make a Beautiful Buffalo Plaid Christmas Wreath
This DIY buffalo plaid Christmas wreath is the perfect blend of traditional and modern, plus it is so easy to make.
Materials
- plaid shirt or plaid fabric (1/3 yard is plenty)
- wreath form
- T pins or ball pins
- faux flowers and greenery
Tools
- fishing line and duct tape or hot glue gun
- wire cutters
- scissors
Instructions
- Cut your fabric into small, uniform pieces that are 2.5 squares wide. The pieces need to be long enough to wrap all the way around the wreath. This may be different depending on the size of your plaid pattern and the size of your wreath. For me, 5 squares long (10 inches) was perfect.
- Wrap the first piece of fabric around your wreath form and use T pins or ball pins to pin it in place on the back of the wreath. (Regular straight pins don’t hold the fabric in place very well.)
- For the remaining pieces, fold the long row of half squares before adding them to the wreath so that only two rows of squares are showing. This folded edge becomes the ‘finished’ edge that will show.
- Then simply wrap the fabric strip around the wreath form, slightly overlapping the previous piece of fabric. Make sure the folded edge is the one showing. Pin it in place on the back and repeat this step until you have covered the entire wreath.
- To make a hanger on the back, use another T pin to attach a small loop of ribbon to the back of the wreath.
- I picked up Christmas picks and a bunch of small poinsettias. Use wire cutters to shorten the Christmas picks and arrange them on one side of the wreath.
- Use a couple of t-pins and straight pins, sticking them through the stems and right into the wreath form.
- Using wire cutters, cut the flowers apart leaving two or three inches of stem on each flower. Then attach them to the wreath between the greenery.

Plaid is good, use it all! Your wreathes are great!
Thank you Laura! I will take that as permission to go plaid crazy!
Love how they both turned out Carrie and you’re right that red against the black and white plaid just pops.
Thank you Michelle!