How to transform a plastic picture frame
See how to transform a plastic picture frame into a beautiful chalkboard piece of art.
It’s time for another round of projects from some of my favorite bloggers who really know how to decorate on a budget: the thrifty style team!
I have a great little trash to treasure project to share this month. It involves using beauty products as DIY equipment which is clearly awesome so let’s get to it. (And then be sure to check out the other fabulous thrift projects at the bottom of this post.)
I scored this beautiful old frame at a yard sale last summer for only $5!

You’d better believe I was excited. It looks like a gorgeous old carved wood frame…but it’s really just a fake. It’s actually molded out of some sort of plastic or resin, but that’s ok. It’s still stunning.

I am guessing it originally framed a mirror, but the mirror was long gone. I considered adding a new mirror, but when I needed something for my recent bathroom makeover, I knew this would make the perfect chalkboard.
The first step, dealing with the grungy beige color. I really wanted to give it the look of old painted wood, but since it wasn’t actually made of wood, I had to get a little creative.
To get the perfect wood look, I used something a little unusual – Vaseline!
This post contains affiliate links; see my full disclosure here.
Materials used for distressed chalkboard
- Dark brown paint
- White chalk paint
- petroleum jelly
- paper towels
- hardboard
- chalkboard paint
- chalk
- chalk marker
- printout of design
- pencil, tape
I removed the old, dirty backing and gave the frame a good cleaning. Once it was dry I painted the whole thing with a coat of dark brown paint. (I used acrylic paint because that was what I had on hand).
This coat of paint doesn’t have to be perfect, just enough to cover the old color. This is going to be the ‘wood’ layer.

Next, I used my finger to rub petroleum jelly on the parts of the frame I wanted to look distressed – mostly the edges and details, areas where the paint would naturally wear away with age.

Then, I painted three coats of white paint (Rustoleum Chalked Paint in Linen White) over the whole thing, petroleum jelly and all.

And then the fun part. Once the white paint dried, I used a damp paper towel to gently wipe the frame down. Wherever there was petroleum jelly, the white paint and petroleum jelly wiped right off.
This is a great alternative to using sandpaper to create a distressed look, especially when you are working with something other than wood.
Since all I used was a damp paper towel, I didn’t need to worry about sanding off the brown paint or even sanding it into the plastic.

Isn’t she pretty!?!

For the chalkboard, I cut a piece of hardboard the same size as the original cardboard backing using a jigsaw. (Hardboard is similar to what they use on the back of inexpensive bookshelves. You can buy huge sheets of it anywhere they sell lumber and it’s pretty inexpensive.)
Then I painted the hardboard with several coats of chalkboard paint.
Ever wondered how people get such perfect writing on their chalkboards? There is definitely a trick to it.
I printed my design and then rubbed a piece of chalk all over the back of the printed design.

I taped it into place on my chalkboard and then traced each letter with a pencil. The pressure of the pencil transfers the chalk from the back of the paper to the chalkboard. It’s like magic!

Then you just need to fill in the letter outlines with a chalk marker.

Let the chalk marker dry for a few seconds and then wipe off any stray chalk markers. Perfection!

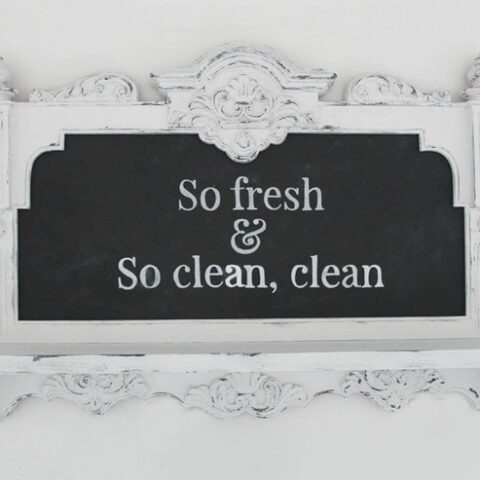
This old thrifted frame turned into the perfect addition to our bathroom.

Want to see the rest of our budget bathroom transformation? You can check it out right here.
And then be sure to stop by and see what the rest of the team is sharing this month.
How to transform a plastic picture frame
Learn how to transform a plastic picture frame to make it look like distressed wood. Complete this gorgeous picture frame by adding a DIY chalkboard and your favorite quote.
Materials
- Dark brown paint
- White chalk paint
- Petroleum jelly
- Paper towels
- Hardboard
- Chalkboard paint
- Chalk
Tools
- Jigsaw
Instructions
- Remove the old backing and give the frame a good cleaning.
- Once dry, paint the whole thing with a coat of dark brown paint.
- Use your finger to rub petroleum jelly on the parts of the frame you want to look distressed – mostly the edges and details.
- Paint three coats of white paint. Let dry.
- Use a damp paper towel to gently wipe the frame down. This will distress the white paint in the areas where the petroleum jelly was leaving a weathered finish.
- Cut a piece of hardboard the same size as the original cardboard backing using a jigsaw.
- Paint the hardboard with several coats of chalkboard paint.
- Prime the chalkboard by rubbing chalk all over it and then wiping it clean.
Recommended Products
As an Amazon Associate and member of other affiliate programs, I earn from qualifying purchases.


I love it, so I pinned it! With all the stuff I have painted and distressed I have never tried the jelly alternative to sanding. That seems so much easier for on the details, so I just added some to my shopping list and I’ll give it a try.
Thanks Bliss! It is so much easier and way less messy too!
Carrie that looks amazing! I can’t believe you found that for $5 and you transformed it into such a gorgeous piece!
Thanks Vanessa!
what a great way to transform that frame. i had no idea that Vaseline can achieve the distressed look. thank you for that!!
Thanks! I was surprised at how well it worked!
Wow! What a beautiful upcycle. If you didn’t share that it was plastic I never would have known.
Thanks Mary Beth!
This turned out adorably, Carrie! I can’t believe it was only five bucks. Great painting technique, too…made it look fantastic!
Thanks so much Kristi!
A lovely new useful thing from a gorgeous frame! And yes, it used to be a mirror. I have one, except mine is wood tone. I love it! And the vaseline – the cat’s meow when it comes to distressing! I had forgotten that. Thanks for the reminder.
Thanks Nancy! How cool that you have the mirror! I really considered turning this one back into a mirror, but I just didn’t have a good place for it as a mirror.
Love how this turned out!! Do you remember what font you used for the chalk lettering?
Thanks Shea! I used PicMonkey.com to lay out my lettering and I used the font Playfair Display. It’s free to use in Picmonkey, but you can probably find it other places by googling.
This looks so amazing, wow! I haven´t tried the petroleum jelly yet, but now really want to!
Thanks Katrin! It was a really fun technique to try.
This is so beautiful! It looks like wood, could not tell the difference.
Thanks Maria! It really is awesome how well that painting trick works!
Gorgeous frame! I never would of thought that it was made of plastic. You did a beautiful job on it. I have seen the petroleum jelly technique but haven’t tried it yet.
I will be looking at plastic frames with a new eye from now on. In the past I have always avoided them. Thanks for the great tips! Pinning!
Thank you Linda! It was so fun to try out this technique – now I can’t wait to try it on more great finds!
So I just tried this on a plastic frame that I have, and it worked beautifully! Thanks so much for the tutorial. I was pretty sure that my version would be a total fail, so I am thrilled to see how great it looks!
Thank you for sharing Cara! I am so glad it worked beautifully for you!
How exactly do you out the petroleum on it? Like is it all over, dabs or whisking with a brush on parts of the frame?
Good question Mariann! I should have been more clear. I dabbed it on using my finger. I did not cover the whole thing, but placed it where I would typically use sandpaper to distress – mostly along the edges and on the raised details.
You are a genius! I just picked up a beautiful quatrefoil mirror that needs to be painted and distressed but it’s plastic, then I found this page. Yay! Thanks so much for sharing your technique.
So glad to help! And I love a quatrefoil mirror – sounds like a great find!
This is fantastic. Soooo much easier looking than sanding it. I will absolutely use this method in the future. Thank you so much for sharing this with us
Yes, I love having this option for getting that distressed look without the mess of sanding!