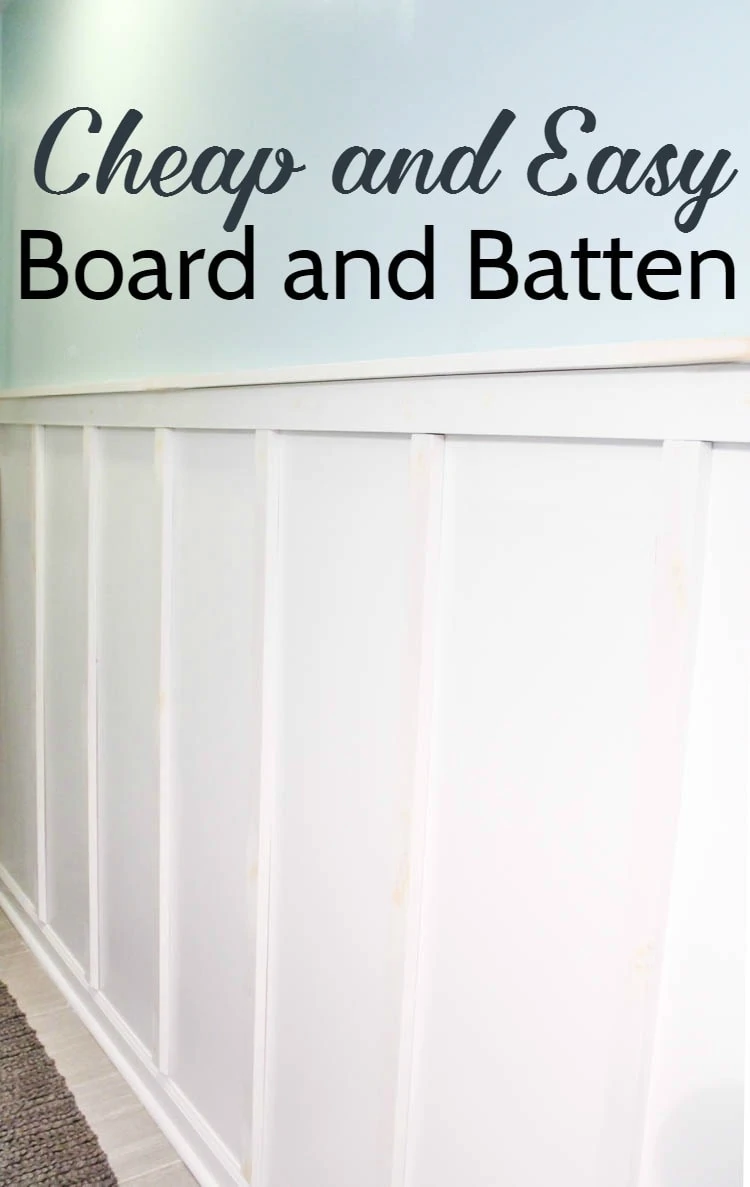
Cheap and Easy DIY Board and Batten Tutorial
How to install cheap and easy board and batten even if you are a beginner. Supply list and full tutorial with lots of helpful tips.
When I realized that board and batten was that missing something in our bathroom, I wasn’t very excited. I knew it was going to pull the whole room together and make it look amazing (which it did), but I also thought it sounded like an awful lot of work.
Not to mention I was on a tiny budget for the $100 Room Challenge. So if I was going to tackle board and batten, it was going to have to be cheap and it was going to have to be easy – while still looking great. (Because if it doesn’t look amazing, what’s the point of doing it to begin with!)
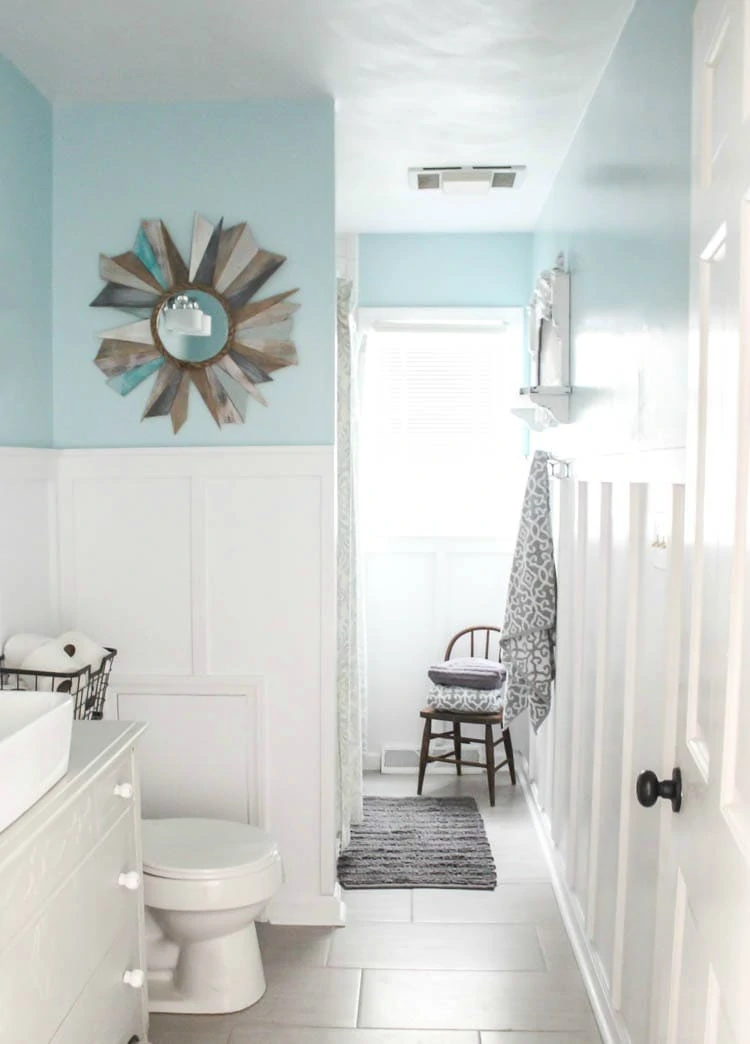
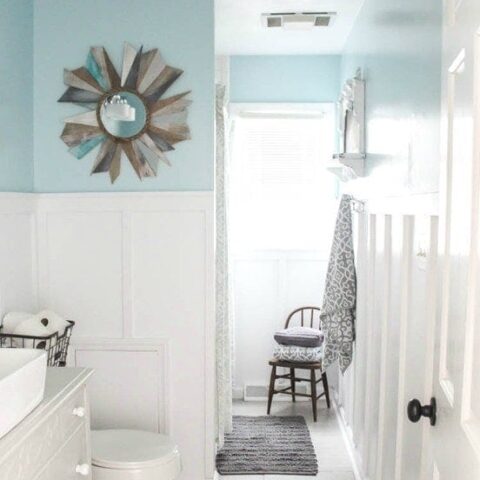
Thankfully, I was able to make it all happen: cheap and easy board and batten that looks gorgeous!
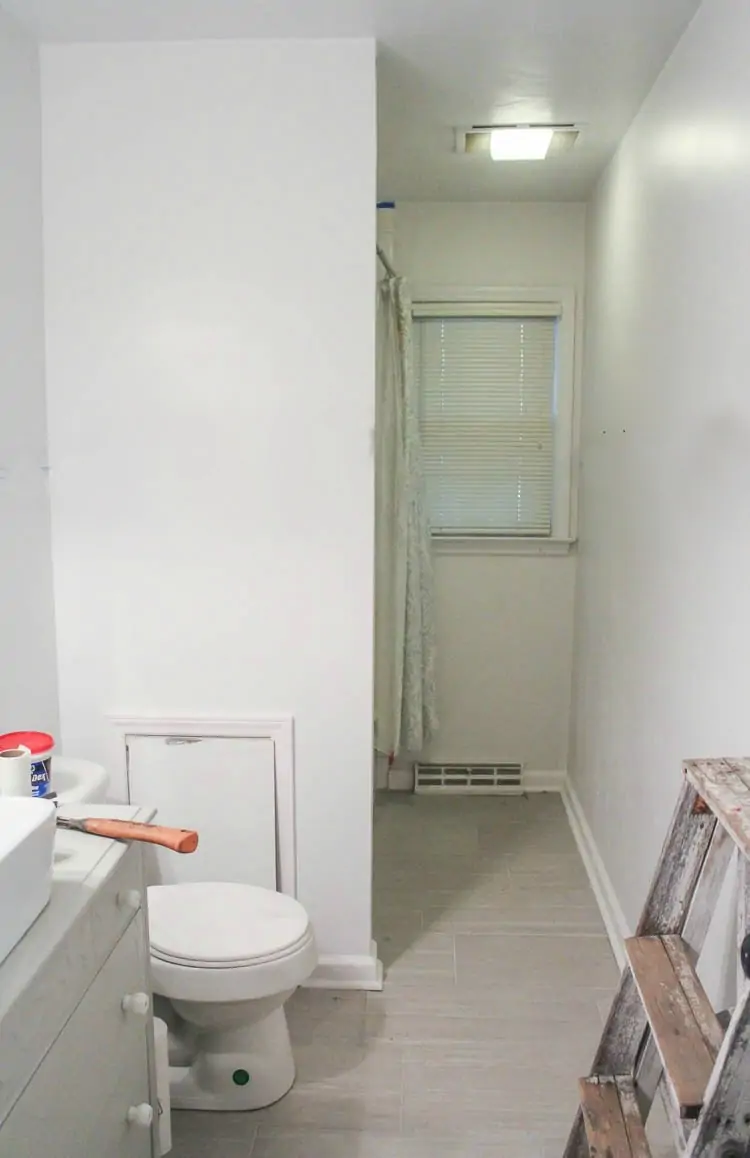
Here’s how our bathroom looked before adding some fresh paint and DIY board and batten – way too white and boring!
Read on for the full supply list and tutorial. Or if you’d rather just see pretty pictures of the finished product, there are plenty of those in my bathroom reveal here!
This post contains affiliate links which means if you make a purchase after clicking a link I will earn a small commission but it won’t cost you a penny more. Click here to see my full disclosure policy.
Supplies for Board and Batten
- 1″ x 3″ common board the length of your walls
- 1″ x 2″ common board the length of your walls
- 1″ x 2″ common board for vertical battens (number of battens x height of battens)
- tape measure
- miter saw – for cutting your wood to the correct length.
- palm sander and sand paper
- level
- nail gun or hammer and finishing nails – either will work but a nail gun will definitely make the process go faster. This is the nail gun I have now and I love it – it’s cordless and super easy to use.
- paint – one color for the top half of your walls and another for the lower half. I used Valspar Mint to Be on the top half of my walls and Valspar Perfect White on the board and batten half.
- wood filler
- paintable caulk
Preparing to Install Board and Batten
Installing board and batten doesn’t have to be hard. In fact, for me the hardest part was the preparation – all the decisions that needed to be made before I could actually begin!
The first decision you have to make is how high you want your board and batten to go on the wall. Keep in mind that you don’t want to have your top boards going through any outlets or light switches.
To help me get a better idea of how different heights would look visually, I used painter’s tape at a couple of different height options.

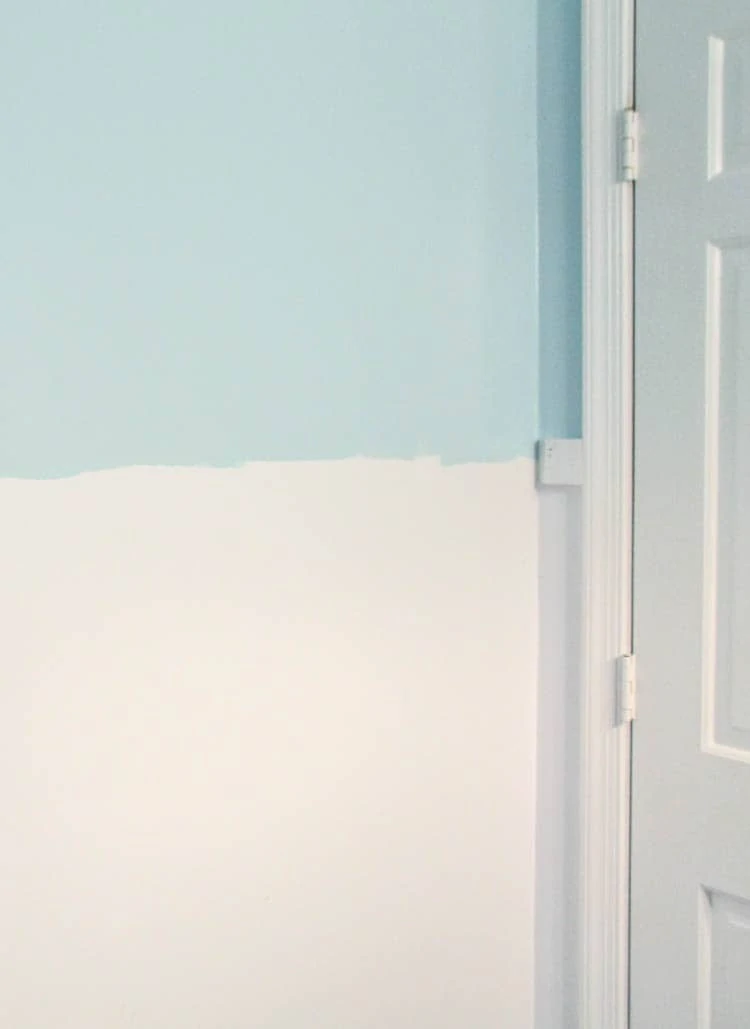
Once you’ve decided your height, go ahead and get painting.
You can save so much time and effort later by painting everything before actually installing the boards. It is way easier to roll some paint over the wall than to try to paint in between dozens of pieces of wood.
Just lightly mark a pencil line where your board and batten is going to end and paint the two halves of your wall the colors you’ve chosen. (I’ve got tips for choosing the perfect color here if you need them.) You don’t even need to worry about painting a straight line for this because the actual line will be eventually covered by wood.
Now comes a bit of math. You want to be sure your vertical boards are evenly spaced across the wall.
If you are doing multiple walls like I did, the spacing between boards doesn’t need to have to be the same for the entire room. It just needs to be equal on each wall.
In my room, each wall is spaced slightly differently. My vertical boards are 13 inches apart on the longest wall, 12 inches apart under the window, and 10 inches apart beside the mirror. The whole room isn’t exactly the same but the boards are evenly spaced along each individual wall so it still looks great.
There is a great tutorial at Remodelaholic that can help you figure out how many battens to use on each wall and what kind of spacing to use.
Once you’ve figured out how many battens will be on each wall, you can figure out exactly how much wood you are going to need.
Measure the length of your wall or walls. Then use the number of battens for each wall (that you just figured out in the last step) and the height of your battens to figure out how many 1″ x2″ boards you need.
At any home improvement store there are a lot of lumber choices. The very cheapest wood is called wood furring; you can get 1″ x2″ pieces of furring for around $1 for 8 feet in length.
I don’t recommend it for board and batten though. The reason it is so cheap is because it is very roughly cut. Usually the wood underneath is fine but you will waste a LOT of time trying to sand down to smooth wood. Also this wood tends to be full of knotholes, cracks, and crooked boards.
Instead I used the next step up which is still very affordable. It is usually called common board or sometimes just pine board.
When I bought mine, this type of wood was around $2 per 8 feet for 1″ x 2″ boards and $3 per 8 feet for 1″ x 3″ boards at both Lowes and Home Depot. You still need to be sure to pick out the best, straightest pieces but the quality is much, much higher than the furring.
What about the trim?
You can choose to replace all of your base molding when you install board and batten, but that isn’t very cheap or easy so I didn’t want to go that route.
The problem is most base molding angles to a very narrow edge at the top. I have seen some people deal with this issue by using 1/4 inch MDF to make their board and batten. That works well because then the board and batten is as narrow as the top of the base molding so there is no problem.
I chose not to go that route because I wanted chunkier, more textured board and batten and also I didn’t want to deal with ripping a big sheet of MDF into dozens of strips of wood.
Instead, I went with a method I found at the site School of Decorating. I simply cut a 45 degree angle into the bottom of each of my vertical boards where they met the base molding. This is really easy to do with a miter saw and in my opinion still looks great.

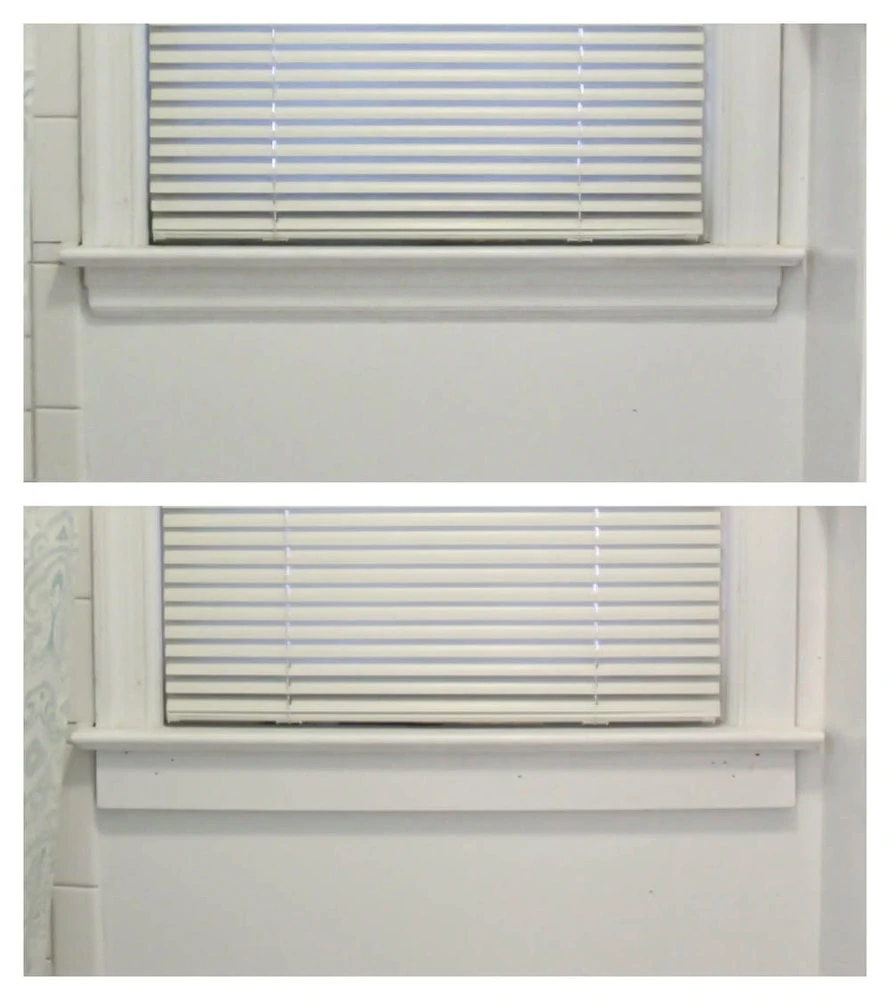
In our bathroom, we were also dealing with a window. The window had a similar issue with the bottom casing of the window frame angling down to a very thin edge.
After considering my options, I chose to simply remove the existing board below the windowsill and replace it with a piece of 1″ x 3″ board cut to the same size.
It blends in with the rest of the molding much better now and I saved the piece I removed in case we want to put it back at some point in the future.
How To Install Board and Batten
Once you’ve done all the prep work, the installation is basically just a bunch of measuring, cutting, and nailing wood.
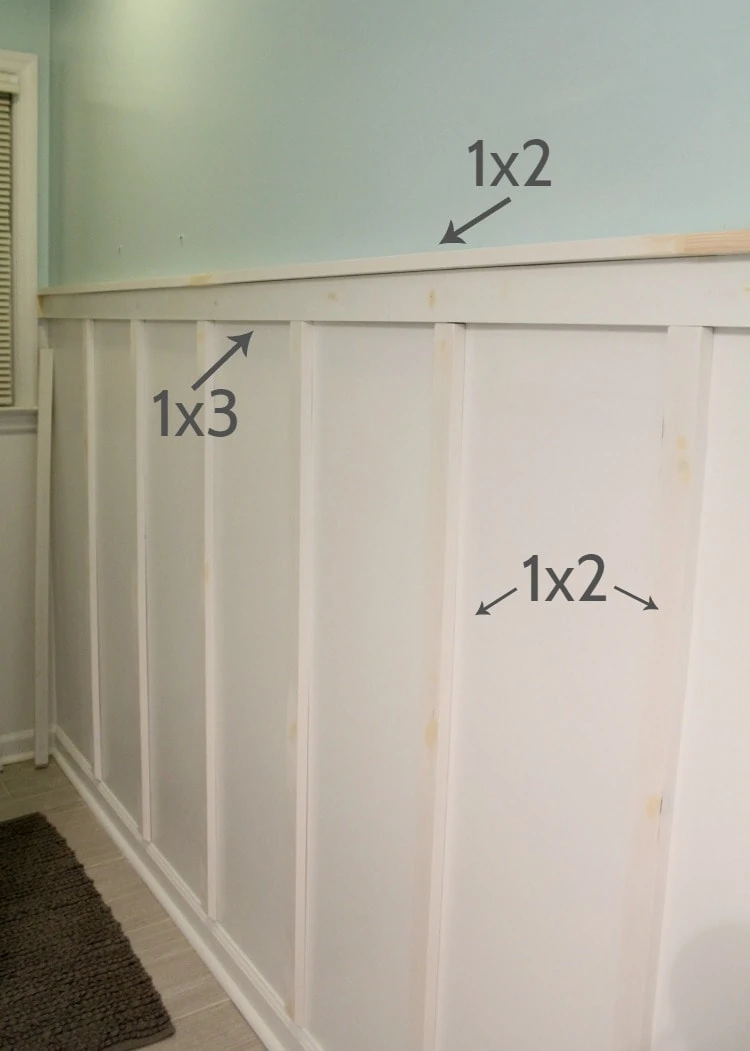
It is easiest to install the 1″ x 3″ board that goes across the top first.
Measure the length you need and cut it to size. Then use a palm sander to remove any rough areas, paint it, and nail it to the wall. (You can always wait and paint everything at the end, but again it goes faster if you paint first.)
When you are nailing it up, be sure to use a level. Just measuring the same height from the baseboards isn’t enough to make sure it’s straight, because a lot of base board aren’t totally level, especially in older homes.
Some people choose to use glue along with nails to attach wood trim, but I prefer to just use nails. They still hold well and aren’t such a paint to remove in the future if needed.
Once all of the 1″ x 3″ is installed, you can go ahead and install the 1″ x 2″ board above it (the part that looks like a tiny cap or shelf) the same way.
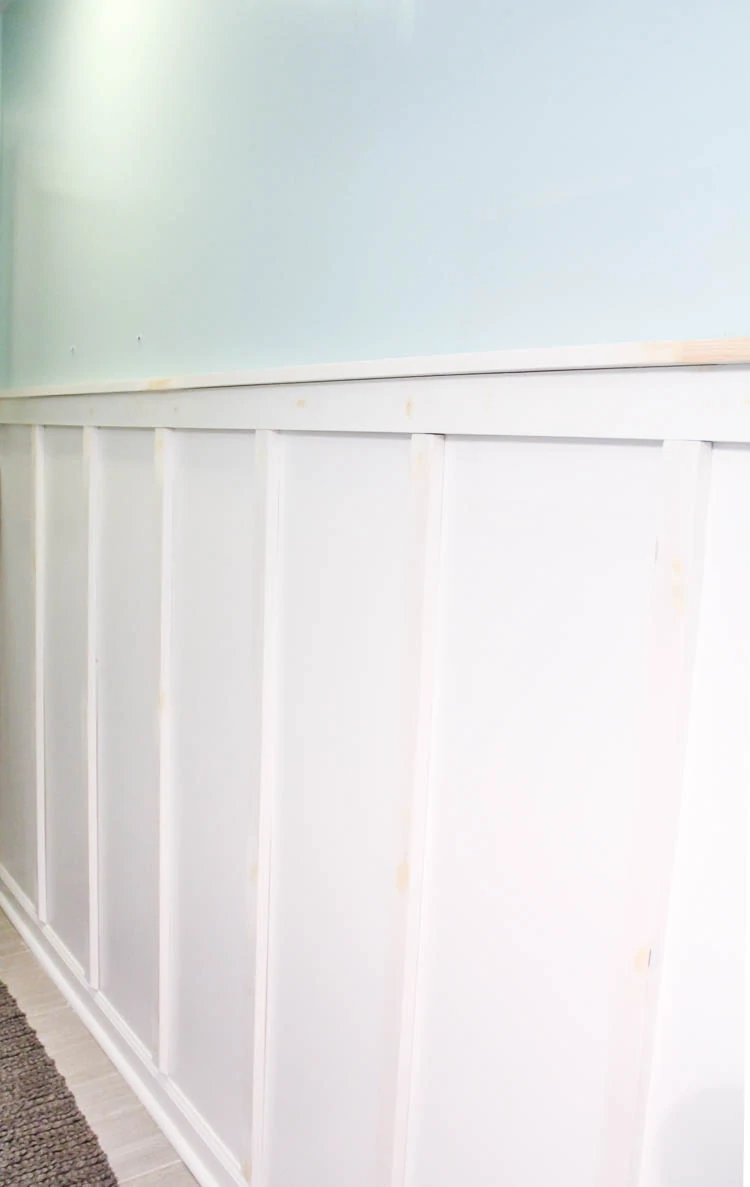
Then you can start installing the battens. Because many walls aren’t perfectly straight, it works best to measure each batten individually before cutting it.
My battens were all around 49 inches but the exact measurements ranged from 49 inches exactly to almost 49 1/2. (Because of those darn uneven baseboards.)
First I cut the 45 degree angle at the bottom of each board. Then I placed each piece of wood where it would actually be on the wall (using my previous spacing measurements) and marked where the board needed to be cut to exactly meet the 1″ x 3″ board going across the top.
Then it was cutting to size, sanding, painting, and installing.
Again, be sure to use a level for each vertical piece as well. Anything that isn’t straight will be very obvious in the end.
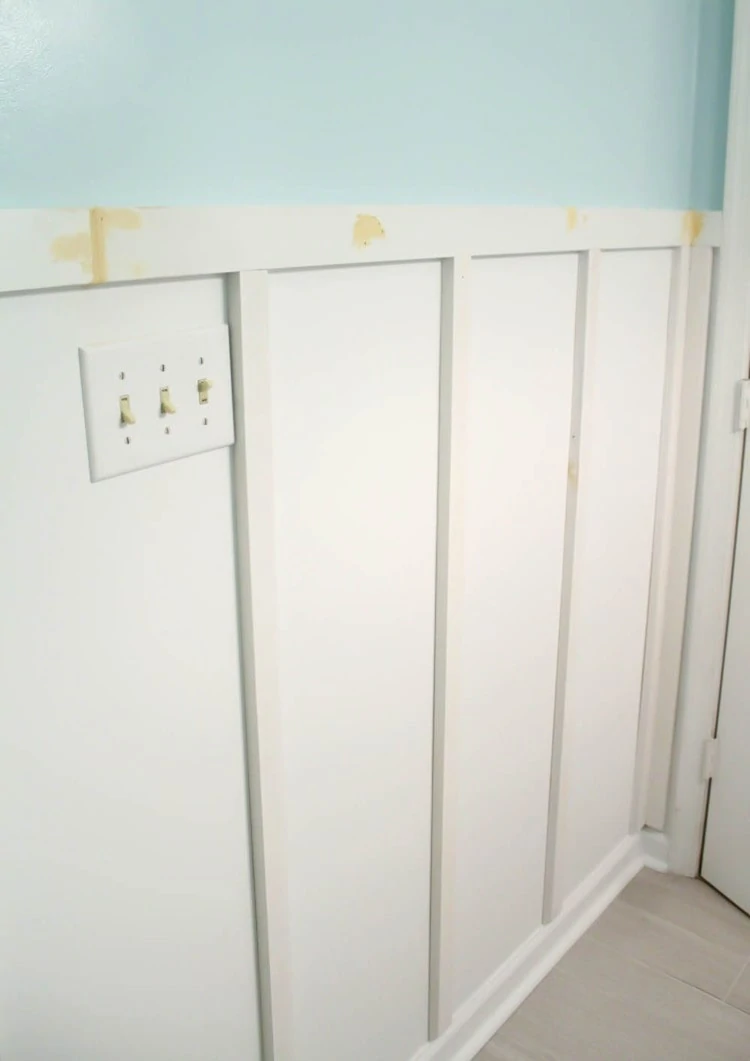
At this point, my bathroom was looking pretty good, but it still looked a bit like some sort of framing rather than a finished project.
The real magic comes with the caulking.
You can use wood filler to fill in all of the little nail holes as well as any other little cracks or imperfections in the wood. Let it dry and sand it smooth.
Then use paintable caulk to fill in the edges around each board. You want to be sure to caulk anywhere a board meets the wall. This makes the whole thing look seamless and beautiful.
It really is amazing how big a difference a bit of caulk can make.
(I’ve got a whole post explaining when to use wood filler and when to use caulk right here if you still have questions.)
The final step is to give the bottom half of the wall one last coat of paint. This will cover all the wood filler and caulk and make the whole thing flawless.
A few notes about board and batten in a bathroom
There are a few special things you will probably have to consider if you are adding board and batten to a bathroom.
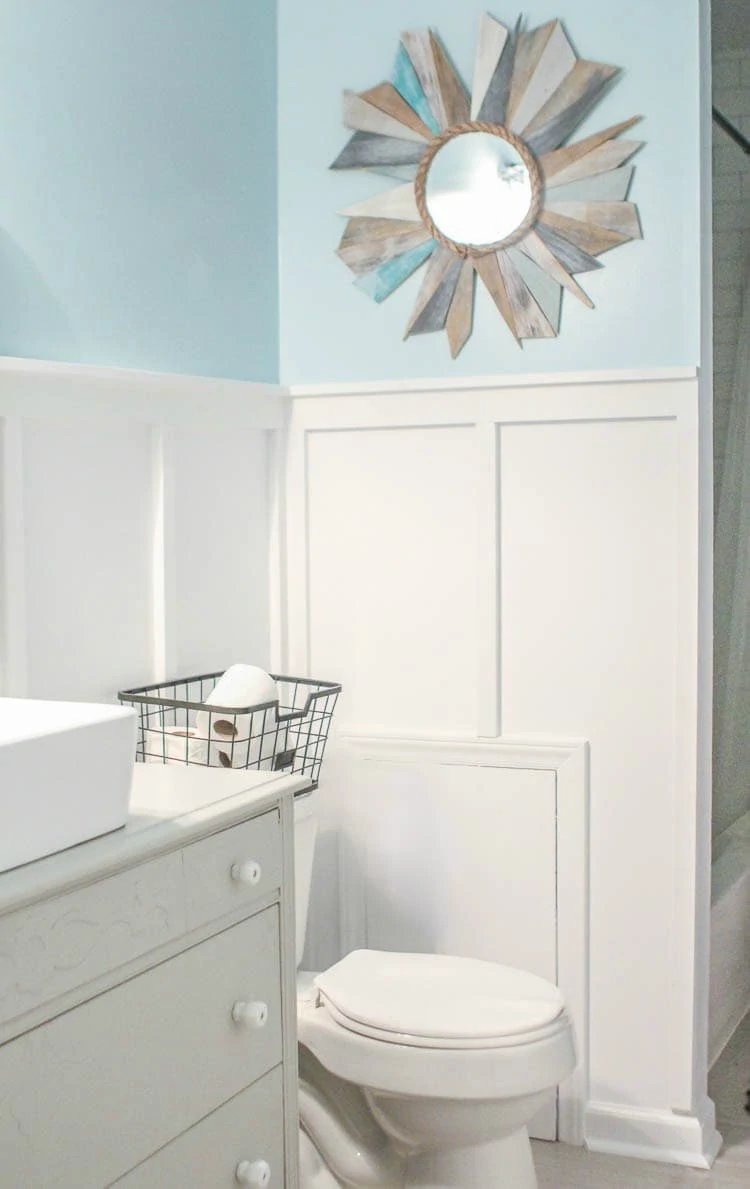
Working around the toilet. It’s kind of a pain but it isn’t nearly as bad as I imagined.
I was able to slide my board behind the toilet tank with no problem. I didn’t bother to caulk or touch up the paint behind the toilet since it was way too hard to reach and nobody will see it anyway
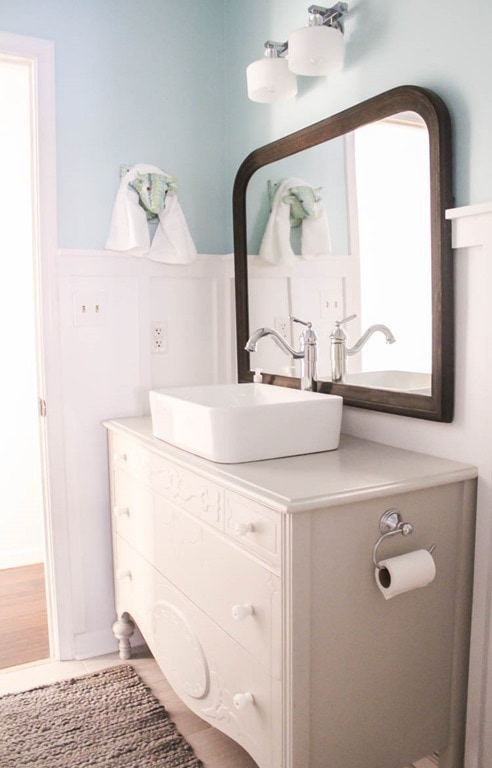
Working around the vanity and mirror. Some people carry their board and batten behind their vanity mirror as well. Personally I chose not too because I like the way my big old mirror looks encased in the trim, but you can do it either way.
I also didn’t try to add any vertical boards behind the vanity. There was no room between the vanity and the wall and it just didn’t seem necessary.
Paint choice. It’s always best to use semi-gloss paint in a bathroom. It resists moisture and wipes down well. Enough said.
The cost of DIY Board and Batten
The total cost for my whole room of board and batten rang in at $74. Using the inexpensive wood I did definitely helped.
Also, I already had most of the tools and other basics like sandpaper on hand so I didn’t include those in my total.
Don’t forget to check out the rest of the projects in our budget bathroom makeover using the links below!
- The finished bathroom with source list and final budget
- Vintage Dresser Bathroom Vanity
- Installing tile: smart tips for beginners
- Choosing the perfect paint color
Cheap and Easy Board and Batten Tutorial
Board and batten doesn't have to be expensive or difficult. See how to add simple but beautiful board and batten to any space.
Materials
- 1″ x 3″ common board the length of your walls
- 1″ x 2″ common board the length of your walls
- 1″ x 2″ common board for vertical battens
- paint
- wood filler
- paintable caulk
Tools
- miter saw
- sand paper
- tape measure
- nail gun or hammer and finishing nails
- level
Instructions
- Measure how high you want your board and batten on the wall.
- Mark with a pencil.
- Paint the two halves of your wall the colors you’ve chosen.
- Measure the length of your wall to determine the number of battens and 1 x2 boards you need.
- Cut a 45 degree angle on the bottom of each of the vertical boards where they meet the base molding.
- Install the 1 x 3 board that goes across the top first. Measure and cut it to length. Sand any rough edges and install it, using a level to make sure it is straight.
- Install the horizontal 1 x 2 boards on top of the 1 x 3s using the same method.
- Measure and cut the vertical battens and install them.
- Fill the nail holes with wood filler and smooth the seams in the board and batten with paintable caulk.
- Prime and paint the wood to match the lower half of the wall.
Recommended Products
As an Amazon Associate and member of other affiliate programs, I earn from qualifying purchases.
-
 DEWALT DWE6411K 1/4 Sheet Palm Grip Sander Kit
 -
Gorilla 8070002 Paintable Silicone Sealant, 9 oz, White, 1-Pack
-
Elmer's E914 Carpenter's Color Change Wood Filler, 16-Ounce, Natural
-
WORKPRO W002900A 3Pcs Spirit Level Set(9", 12", 24")
-
CRAFTSMAN V20 Cordless Brad Nailer Kit, 18GA (CMCN618C1)
-
CRAFTSMAN Tape Measure, Chrome Classic, 25-Foot (CMHT37325S)


Google Web Story: DIY Board and Batten
Google Web Story: How to Install Board and Batten the Easy Way
It looks great! Board and batten is such a cheap way to make a big impact…..I need to find somewhere else in my house to put some, I think :)
Thanks Gretchen! It really does make a huge impact – I’m pretty sure we will end up with more in our house as well!
Hi – I just found your site and have enjoyed reading through many of your posts. I would like to create the board and batten treatment in one of my bedrooms. Is there a way for me to print the directions you have listed here? I find it helpful to have a paper copy to reference while I work versus using my phone. Thank you.
Hi Elizabeth, I am sorry I don’t have any easy way to print tutorials right now other than just printing the article from the internet. That is something I need to look into though. Thanks for the suggestion.
I probably sound stupid asking this . I understand putting the rails and boards up however between the rails is that just the wall and you painted white ?
You don’t sounds stupid at all. Yes, the area between the wood strips is simply the wall painted white. If you have a highly textured wall, you could put up actual plywood instead but just using the wall saves so much time and money and looks great!
Great Result! While I know height is personal preference, can I ask how high you went from floor to top of the top rail? Also, are your walls 8 ft or 9 ft height? Just having a hard time deciding for my project. thanks!
Hi Dicksie, Our walls are 8 ft tall and our board and batten measures 57 inches to the top of the top rail. I tired a couple of different heights that worked with our light switch placement (so they wouldn’t be cut off) and this was my favorite.
I saw your plans and decided to run with this idea using your board measurements. So far I have the walls and boards painted. This project is taking me two weekends to complete instead of one (not a spring chicken anymore). Really excited to see how this turns out!
That’s awesome! I think you will love it!
Love the look! When showing it to my husband he was concerned that just nailing it to the dry wall wouldn’t be enough to hold it. Does the caulk and paint add to keeping it secure?
Thanks, glad I found your site
Nailing it has actually worked great! We have had this board and batten up for a couple of years now and no problems. The paint and caulk does help keep it in place and it has held well!
How do you nail in the top shelf piece??
You can just nail through the top of it at an angle so the nails go into the wall. Hope that helps!
Absolutely beautiful!!! I am so glad to see you did your board and batten in 1×2’s & 1×3’s. I am following your example…wish me luck, my walls are not straight!!! Old houses! Thank you for all the helpful hints & explaining things so clearly, you will make this ladies life much easier. God bless!
Good luck! The 1x2s and 1x3s worked so well for me – I hope they work great for you too! And I sympathize about the lack of straight walls – just remember caulk can cover up all kinds of imperfections! Good luck.
Thank you so much for the detailed info. It helped me a lot to plan ahead and get started. Can I use screws instead of finishing nails to install batten?
You can, but you don’t really need to. The nails should be enough to hold it in. If you use screws, you will need to do a bit of extra work to patch over the screw heads.
I love this look but am wondering if it is timeless or will it go out of style. What’s your opinion? Would you do this in your house again? Thanks for the inspiration!
I would definitely do it again! I love this look. I think board and batten is classic and won’t really go out of style – it’s been used in homes for many decades. And while it has become a bit more popular in the past several years, it hasn’t become overly trendy like shiplap. I think board and batten is a great, easy way to add a bit of architectural interest.
Does every corner have batten coming together? What is the width of each piece?
Yes, the battens meet in each corner. I planned it that way purposefully because the corners look strange otherwise. Each batten is a 1″x2″ board. The spacing on each wall is slightly different to make sure that there is a batten in each corner and even spacing between each of the other battens. So on one wall the spacing between battens is 12″ while on another wall it is 13″. This makes everything look nice and even and when you are standing in the room the different spacing looks completely normal. I hope that helps.
This is so beautiful! For the top railing, where the corners meet, did you use a miter saw to have the pieces come together?
Yes I did use a miter saw! You could do straight cuts and just have the two pieces butt against one another, but mitered cuts definitely give a cleaner look.
The measurements of the boards used would mean therebjs a 1 inch over hang, is this correct? It doesn’t appear that way in the picture. 1 inch seems like a big overhang for the top lip.
Because of the weird ways boards are measured/labeled, it is actually a 3/4″ overhang. 1″x2″ boards are actually 3/4″ x 1.5″, so there is a 3/4″ difference. And it doesn’t look like a big overhang at all in person. It is just enough to give some real dimension.
We are doing this in our basement for a remodel. Looking forward to completing the project! Already painted, going to start the next step soon. Will try and remember to post a after picture.
I hope it turns out great!
I’m getting ready to do this in my bathroom. My concern is where the vertical boards meet the vanity (on the side with the outlet in your picture.) As I’m thinking, either the board stops where the vanity begins, or the vanity can’t be flush against the wall. I’m worried that spot will look clunky. I can’t tell in your picture how you handled this. Any advice?
In my bathroom, there is a small gap where the side of the vanity meets the wall so I was able to slide in the battens as normal (although they are only nailed to the wall at the top because I couldn’t access the bottom.) The back of my vanity is flush with the wall and in that area, I just left off the vertical battens altogether since most of the space is covered by the mirror anyway. If the side of your vanity is flush with the wall, I would probably skip the vertical battens in the vanity is skinny enough for that not to look weird. If not having them there is going to throw off the rest of the room, I would put a 1×3″ board horizontally along the edge of the wall where it meets the vanity (parallel to the top board). The vertical battens can butt up against that board rather than the vanity itself. I think that would still look nice and finished. Good luck!
I’m starting this project! I’ve already bought the lumber! My question is: does every vertical piece of wood need to be nailed into a stud? If not, won’t the battens run the risk of just falling out if someone aggressively brushes up against? (I have kids…)
Hi! The vertical pieces do not need to be nailed into studs. Most of the time when we nail things into studs, it is so they can hold weight, but these don’t really need ot hold any significant weight. I nailed my vertical pieces directly into the drywall. You can also use a construction adhesive like liquid nails if you want it to be extra secure, but that isn’t necessary. I didn’t use glue and I have three kids and haven’t had any issues in more than five years. I personally prefer skipping the adhesive because if I want to remove it in the future, I don’t want the drywall torn up. Also, once the wood is installed, you’ll want to caulk wherever the wood meets the wall. And while the caulk’s purpose is not to act as a glue, it does help hold the wood more securely in place. Good luck!