How to Make Custom Wood Christmas Ornaments
See how easy it is to make personalized painted wood ornaments in any color you like to match your Christmas decorating style.
I am so excited about Christmas this year. Like kid in a candy store excited.
This year I really want to add some color and a hint of shine to my Christmas tree and these ornaments are just the ticket.
I used a super easy paint technique that gives them an artistic look that looks much fancier than your typical painted ornament. And the good news is you really don’t need to have any actual artistic talent to make these.

This post contains affiliate links which means if you make a purchase after clicking a link I will earn a small commission but it won’t cost you a penny more. Click here to see my full disclosure policy.
Materials

- Wooden ornament shapes – I used these wooden ornaments from Michaels. There are also lots of wooden ornament shapes on Amazon that will work, but most of them aren’t as thick.
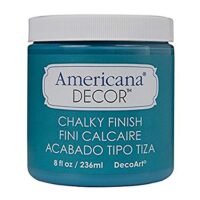
- Chalk paint or acrylic craft paints – I used Americana Décor Chalky finish paint in Treasure and Craft Smart chalky paint in Scarlet (this paint is similar). White paint would also look really beautiful.
- paintbrushes
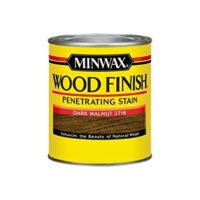
- dark wood stain – I used Minwax dark walnut
- clean rag – for applying stain
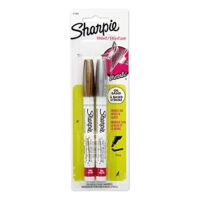
- gold Sharpie oil-based paint pen – these are seriously the best paint pens
- Mineral Spirits
Secret paint tip – chalk paint and acrylic craft paint are actually surprisingly similar and can be used interchangeably for small crafts.
How to Make Painted Wood Ornaments
These ornaments are seriously easy and fast to make – you can definitely knock out three in less than thirty minutes.
The first step is to paint the ornaments. Don’t worry about painting the whole thing, just roughly paint the front.

You could also use basic acrylic craft paints for this instead of chalk paints, but I already had some chalk paint on hand.
Either type of paint can be painted onto raw wood without worrying about primer and they both dry very quickly.
Once the paint has dried, use a clean rag to rub stain all over the ornament, including the painted area as well as anywhere the raw wood is still showing.
Immediately after applying the stain, wipe it off the painted area using a rag dampened with Mineral Spirits. This will wipe any excess stain from the painted area while staining the wood and giving the paint a deeper, richer color.
This two step paint/stain technique is one of my favorites for creating a rich, weathered finish for decor and furniture so I figured why not ornaments too!

Once the stained ornament is dry to the touch, you can add your words.

I used a gold oil–based Sharpie paint pen and it worked fantastically.
The gold has a great shine and the paint pen writes incredibly smoothly. If your handwriting isn’t great, you print your lettering in any font you want and use this super simple technique to transfer it to your ornament.

And of course you could customize these any way you want with your own favorite Christmas colors and words. Or use them to create personalized ornaments with your family member’s names.


I am loving these ornaments so much, I think I just might make some more!
Want more homemade ornament ideas? You can see all of my DIY Christmas ornament tutorials here – there are more than 20!
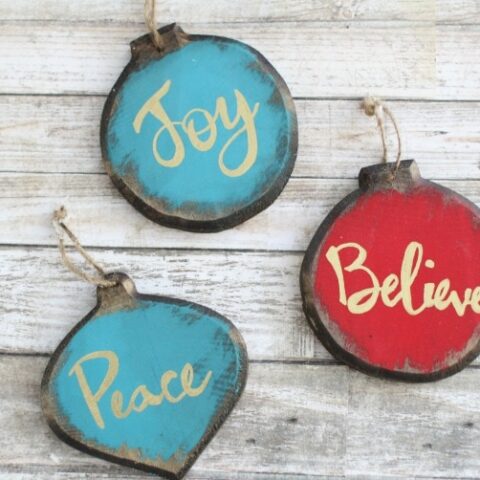
DIY Painted Wood Christmas Ornaments
Make beautiful rustic DIY Christmas Ornaments in any colors you choose with this easy tutorial.
Materials
- Wooden Ornament Shapes
- Chalk Paint or Acrylic Craft Paint in the colors of your choice
- Dark stain – I used Minwax dark walnut
- Mineral Spirits
- Gold Sharpie oil-based paint pen
- Rag - for staining
Tools
- Paint Brushes
Instructions
- Roughly paint the front of the ornaments in your choice of paint color. You don't need to paint the entire ornament, just a quick rough patch of paint over most of the ornament.
- Use a clean rag to rub stain all over the ornaments.
- Use another clean rag to immediately wipe mineral spirits all over the ornament. This will remove excess stain from the painted area.
- Allow the ornaments to dry.
- Add words of your choice using a Sharpie Paint Pen and allow them to dry.
Recommended Products
As an Amazon Associate and member of other affiliate programs, I earn from qualifying purchases.
I’d love for you to pin this post on Pinterest!


This is such a lovely craft my friend!!!! Love the technique of painting and then stain it! Looks amazing and so sweet!
XOXO
Thanks Cami! I’m a huge fan of a stain/paint combo.
Love these! Another one added to my list of MUST MAKE THIS YEAR!
Thanks Jill! There have been so many fantastic ideas in this hop!
So pretty! I need to look for a gold Sharpie like you used. Christmas is going to be fun at your house with two boys to enjoy!
Thanks Paula! I am definitely looking forward to Christmas. Little ones just make everything seem new and exciting again.
These are beautiful, would love to make these with my boys. Pinned :)
Thanks Kristin!
I love these Carrie!! So perfect for that woodland tree I dream of having. Maybe this year!
Thanks so much for joining us for the 31 Days. :)
Thanks for dreaming up this hop Diane! And I love the idea of a woodland tree – sounds so magical!
Carrie, These are so beautiful! Love the colors and the rustic feel. Pinning.
Thanks Cristina. I love using these two colors together for Christmas!
I love the gold lettering on your ornaments! Your lettering is gorgeous!
Thanks Kelly! I was pretty happy with how the lettering turned out on these – it’s always kind of a gamble!
These are gorgeous! One of my faves. Thanks so much for participating. Pinning!
Thanks Malia! They were so fun to make!
Just wanted to say hi! This is terrific. So impressed with all you’ve done!! Please say hi to M. Congratulations from your old friends from Roanoke!
Thanks Arlene! It is so nice to hear from you.
Love, love, love these!! Beautiful!
Debbie
Thank you Debbie!
Gorgeous!!! I want to make some!
So lovely, your writing is beautiful too. I’m going to practice, see if I can manage to get close to something as lovely as that!
Thanks Julie! You are so kind – you can totally do it.
Just saw these on hometalk, and there was no link! Thankfully,I was able to find your blog and the instructions. I love the look of these! Thank you for sharing the information. I will make them if I can find the time!!
I am so glad you were able to find the tutorial! I used to have it on Hometalk but not anymore. These are some of my favorite DIY ornaments – I hope you find time to make some!