3 Easy Tricks to Make your Cheap furniture look amazing in 2 minutes or less
Today I’m sharing three super fast ways to update inexpensive furniture in only a few minutes without breaking out a single power tool OR a paintbrush.
I do plenty of involved, multi-step furniture makeovers to bring old furniture back to life. But some furniture pieces don’t need all of that. Sometimes you really just need a quick tweak to make a cheap piece of furniture look like something much more special.
As much as I love finding high quality secondhand solid wood furniture to fix up, sometimes the convenience of a big box store wins out. Especially if I’m shopping for something that’s hard to find secondhand.
These three quick furniture upgrades work especially well for upgrading cheap mass-produced furniture. I’m talking about furniture from Amazon, IKEA, Target, Big Lots…you get the idea. And you can pull off each of these three furniture upgrades in less than five minutes – some in less than 30 seconds! So even if you’re low on time (or DIY know-how), keep reading for some super simple ideas to upgrade your furniture in a major way.
This post contains affiliate links which means if you make a purchase after clicking a link I will earn a small commission but it won’t cost you a penny more. Click here to see my full disclosure policy.
1 – Replace furniture legs
One of the quickest ways to give a piece of furniture a new look is to switch out the furniture legs. Or even add legs to a piece of furniture that never had them in the first place.
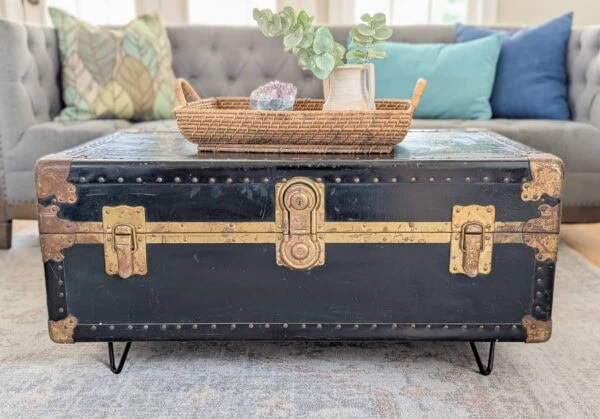
By now, most of us have seen how easy it is to make just about anything into a table using hairpin legs. I most recently turned an old trunk into a coffee table using 4″ hairpin legs.
And a few years ago, I turned a kitchen table into a coffee table by removing the original base and adding hairpin legs.

And all I had to do for this major transformation was unscrew some bolts to remove the old base and then screw on the new legs.
My latest update was to the bed in our primary bedroom. We recently upgraded to a king size bed. I bought this gray velvet upholstered bed from Amazon for a really great price.
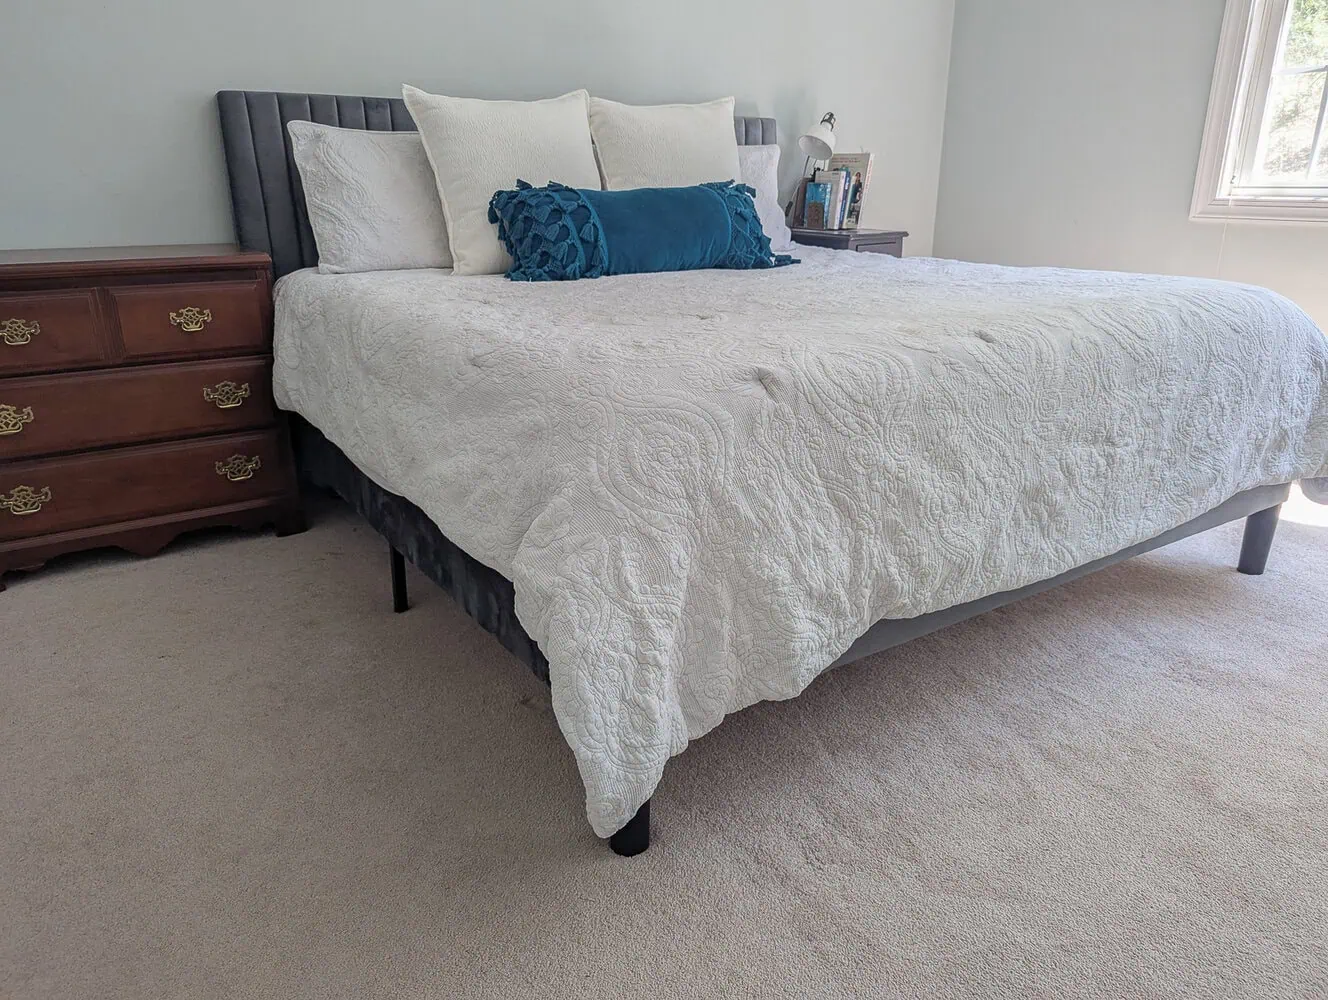
Overall, I’m really happy with this bed. The fabric is beautiful and soft and overall, it looks great for such an inexpensive bed.
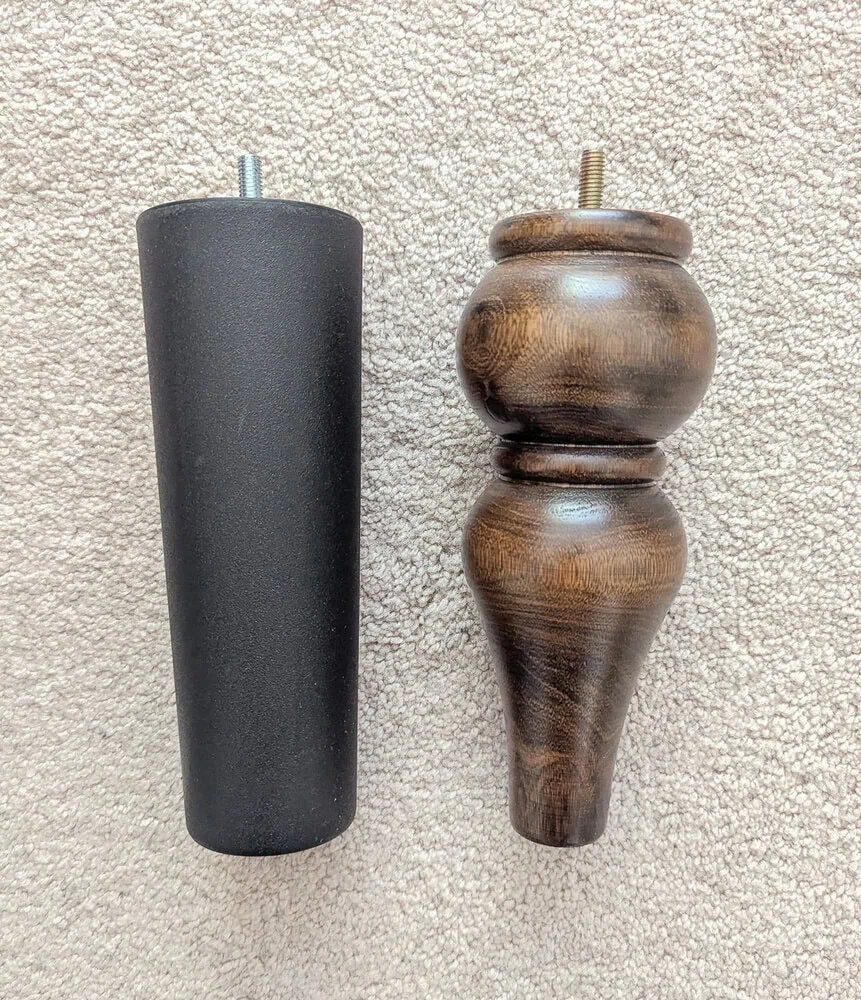
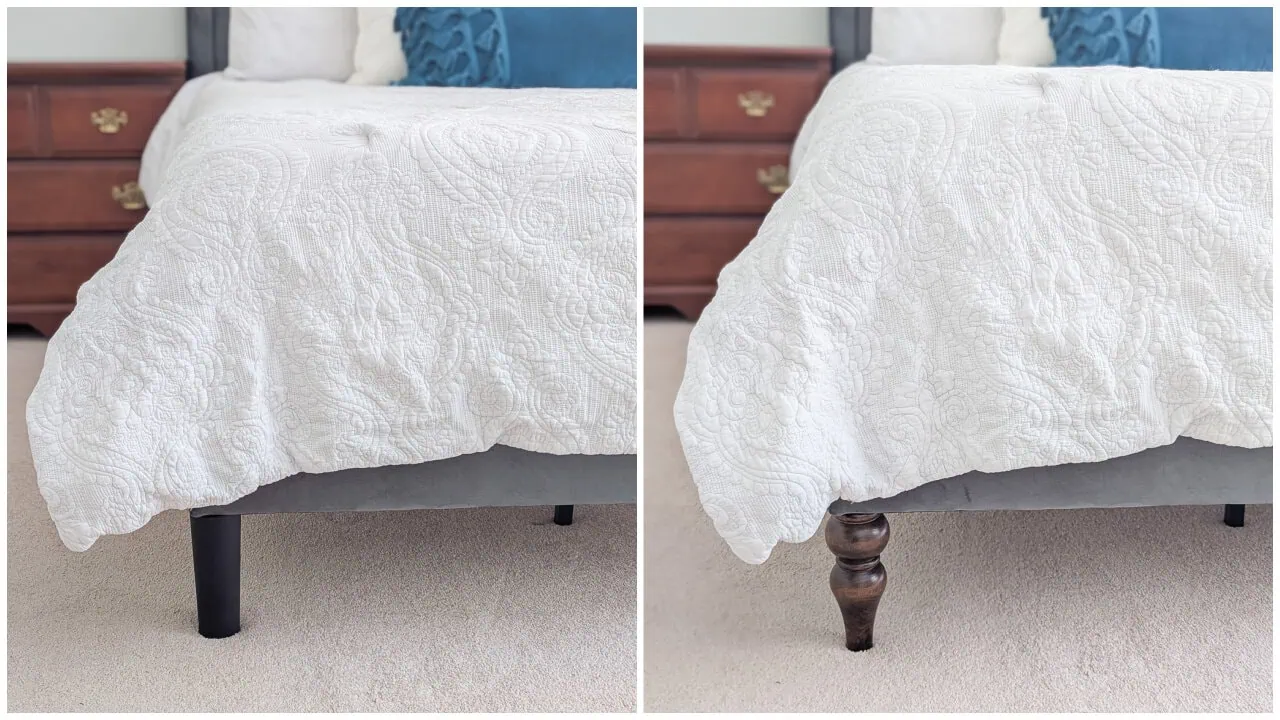
But I hated the black plastic legs at the end of the bed. It’s a small detail, but it really made the entire bed look cheap.
And while it was pretty cheap, I don’t particularly want it to look cheap! So I went in search of replacement bed legs and found lots of great options. Whenever you are switching out furniture legs, it works best to look for legs that are the same height and attach in the same way as your original legs.
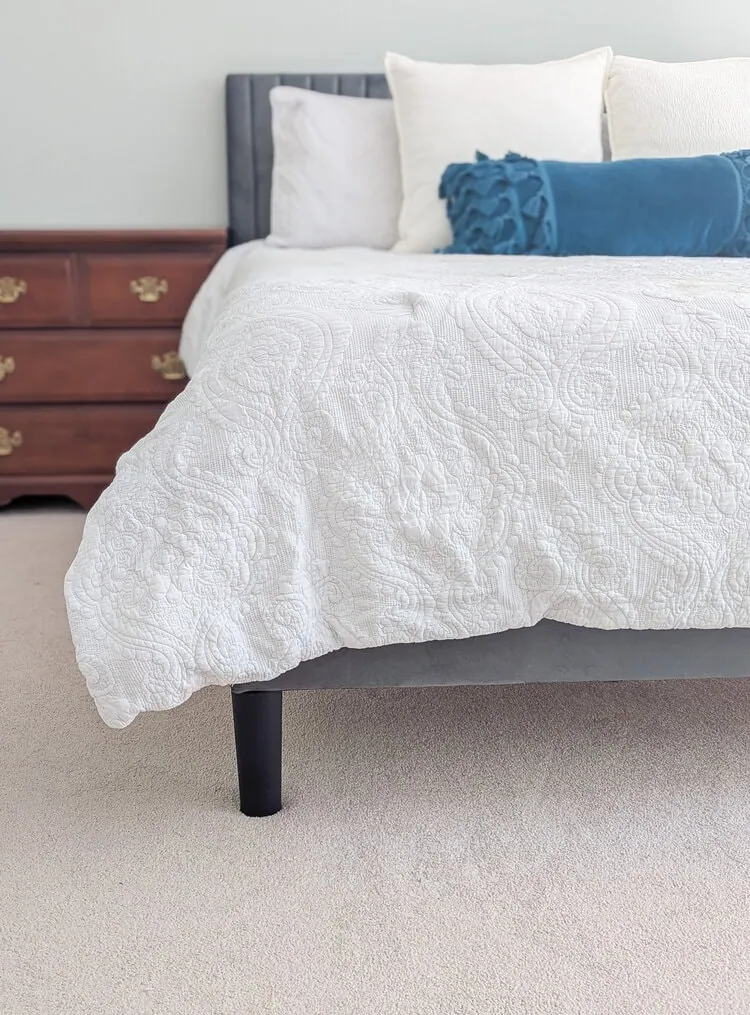
I ended up finding the perfect turned wood legs.
Switching them out was super easy. Really the most difficult part of the whole thing was just figuring out how to do it without having to take the mattress off the bed first. I ended up propping up the end of the bed with some scrap 2x4s.
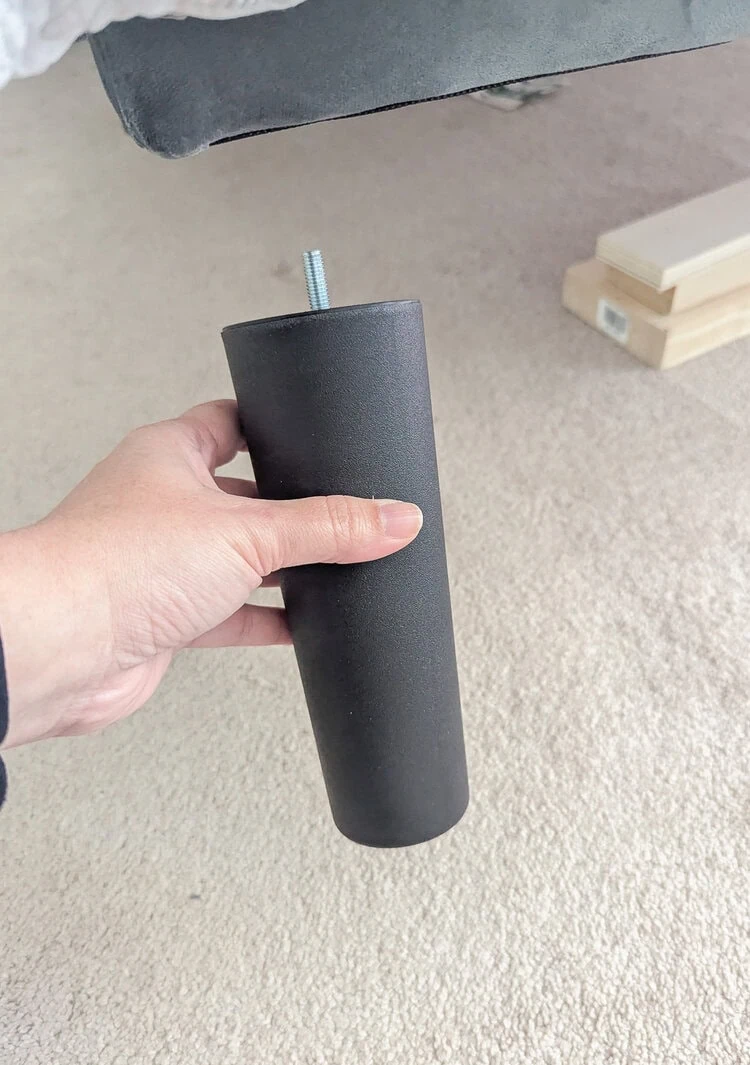
Then I just unscrewed the old legs and screwed in the new ones.
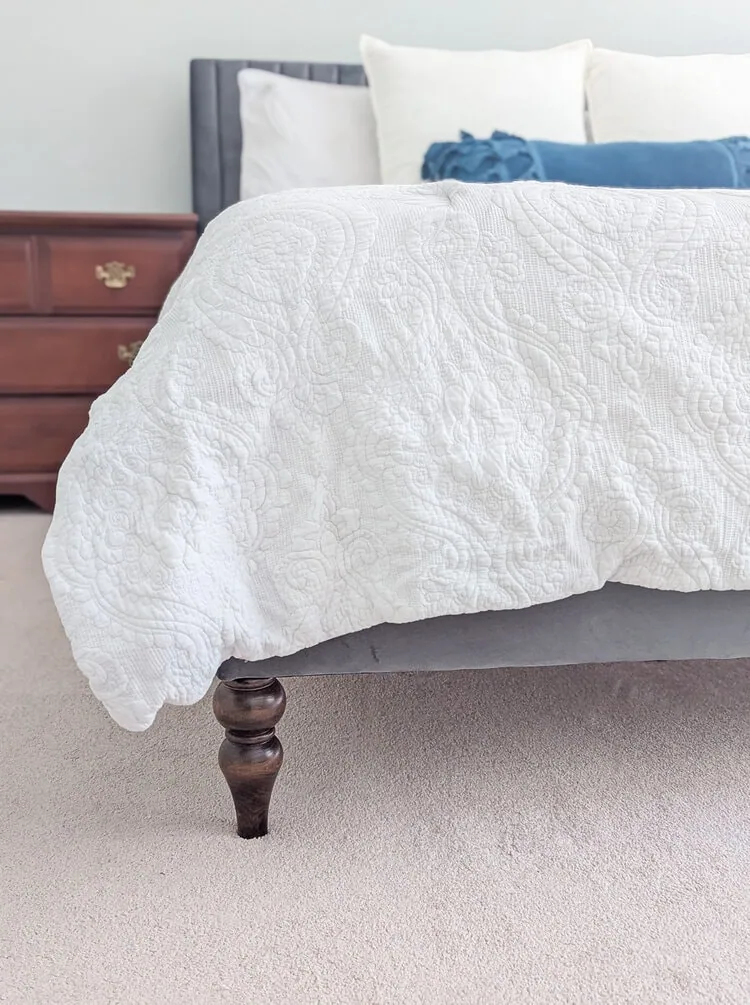
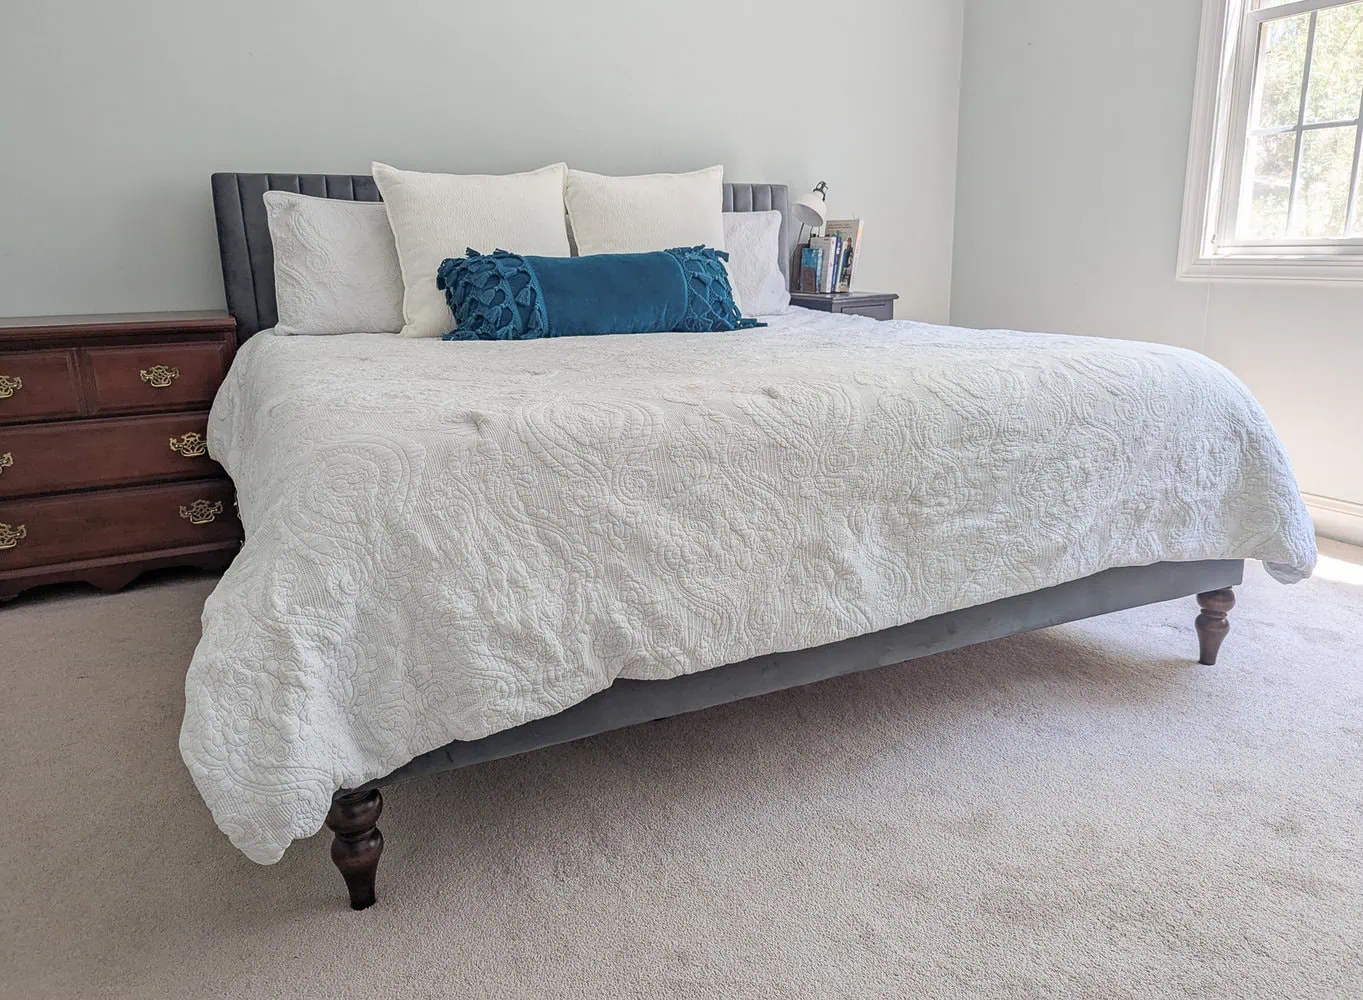
Even though it was a tiny change, it really changed the whole look of this bed.
2 – Replace hardware
Another super easy way to change the style of a piece of furniture is to swap out the hardware. There are so many styles and finishes of knobs and pulls out there, the possibilities are nearly endless.
I’ve done lots of full out furniture makeovers that involved stripping and sanding and painting and all the things. And I usually update the hardware as well. But I think we tend to forget that you can also change the look of a piece of furniture by just changing the hardware without doing anything else.
I’ve had this white desk in our entryway for quite awhile now.

I got it from Big Lots many years ago so this is not fine furniture, but I think it has a great classic shape.
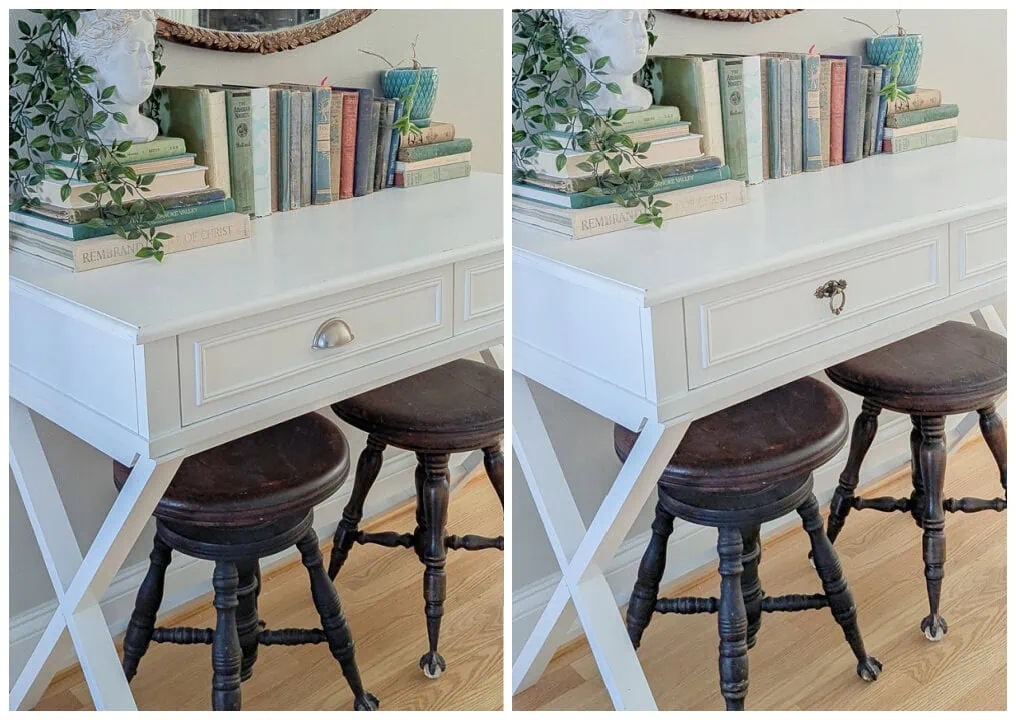
I really didn’t love the hardware though and I didn’t think it was a great match for the style of the desk. The hardware has a vintage farmhouse feel while the desk itself is much more traditional.
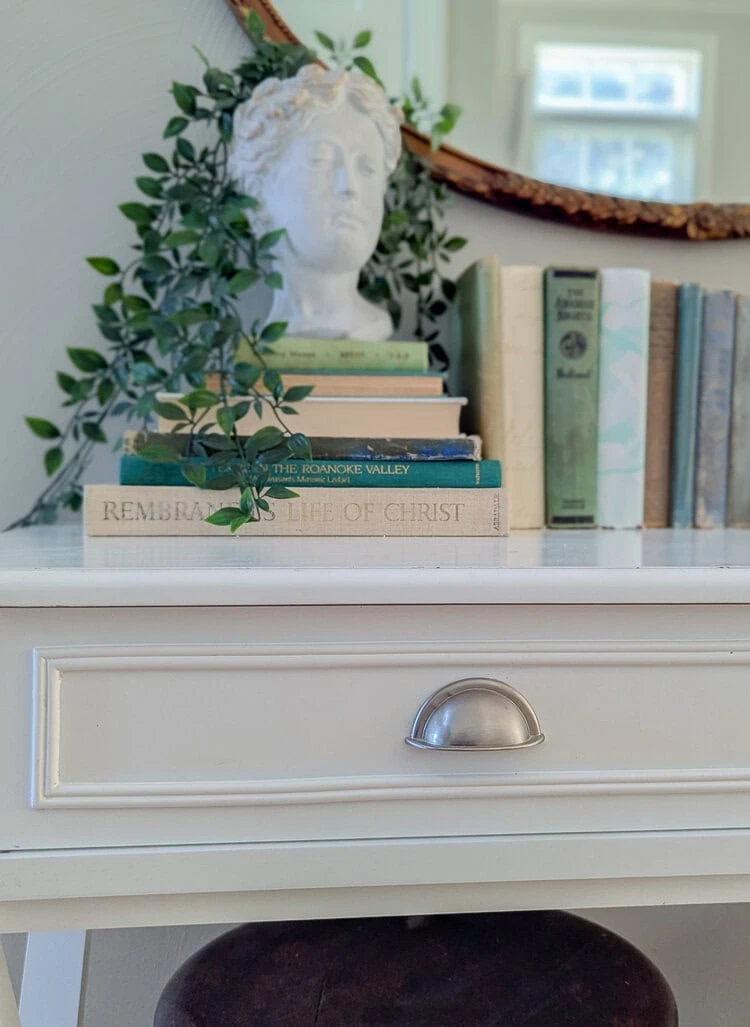
Typically when you are switching out furniture hardware but not painting the furniture, you want to make sure the new hardware has the same hole placement as the old hardware.
Tip: When buying new drawer pulls, the length is typically measured from the center of one screw hole to the center of the second screw hole.
Unfortunately in the case of my desk, I wasn’t able to find hardware with the same hole placement. The old drawer pulls had an odd setup where the two screw holes were only 1.25″ apart.
Luckily I was able to find another solution. I had a few brass drawer pulls left over from the vanity I redid a couple of years ago that completely covered the old screw holes. I still had to drill new holes for the new hardware, but you would never know by looking at it.
If you are looking for the perfect hardware for a furniture project, I keep a running list on Amazon of furniture hardware I have my eye on for future projects.
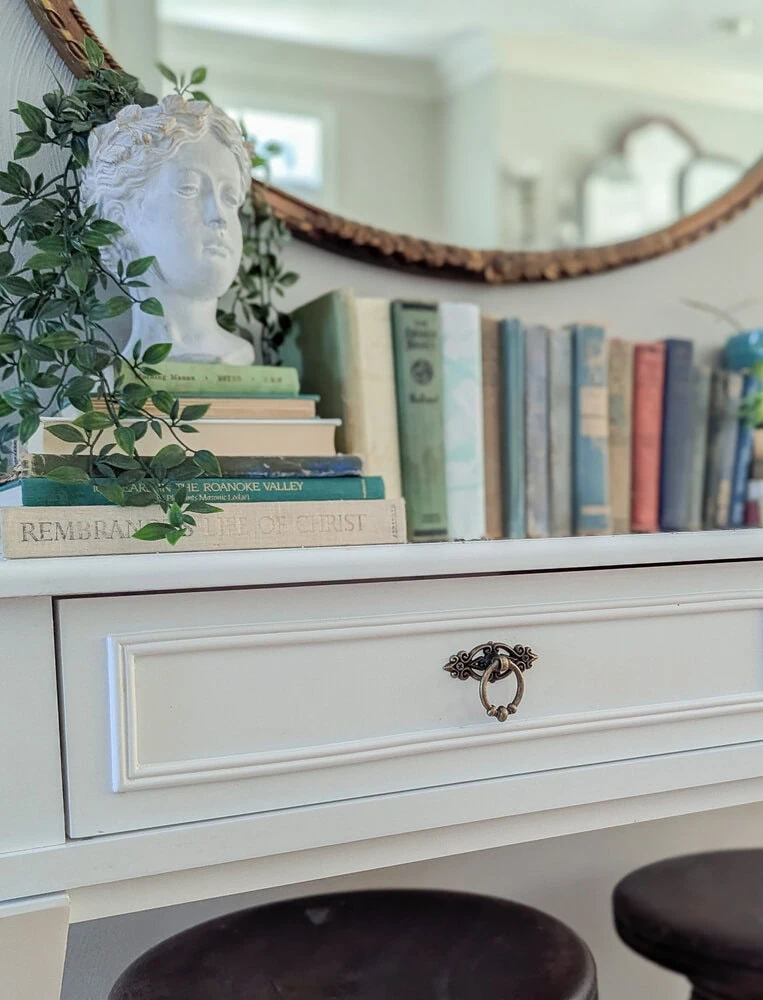
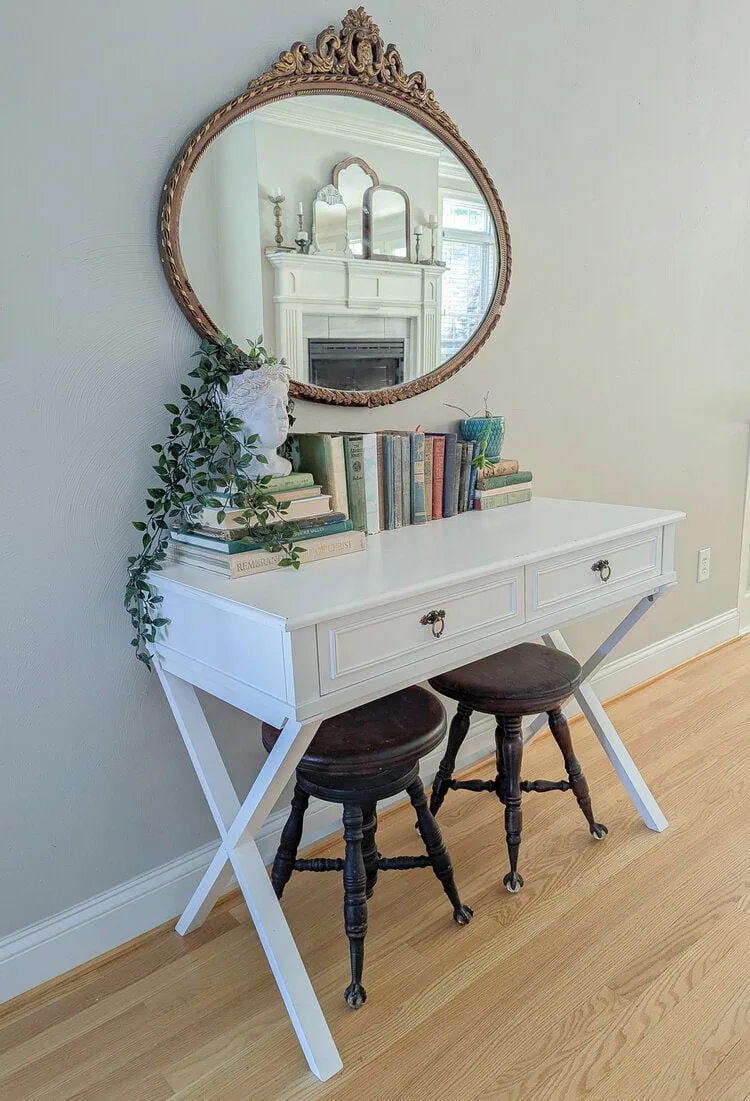
It’s a small change, but it really does make a huge difference to how this whole area feels overall.
Want more ideas for updating hardware? Check out these 25 DIY drawer pull ideas for all kinds of ways to make your own hardware or update the hardware you already have.
3 – Fill adjustable bookcase holes
This third trick is perfect for anyone who has IKEA bookcases or any other kind of cheap flat pack bookcases with adjustable shelving. I’ve shared this hack in the past, but I had to share it again here because it is such a fast, easy way to make your cheap bookshelves look a million times nicer.
I discovered this at our last house when I used a whole bunch of IKEA bookcases to make a wall of built in bookshelves. That was a big project involving all kinds of wood and trim to make the bookcases look like real built ins.
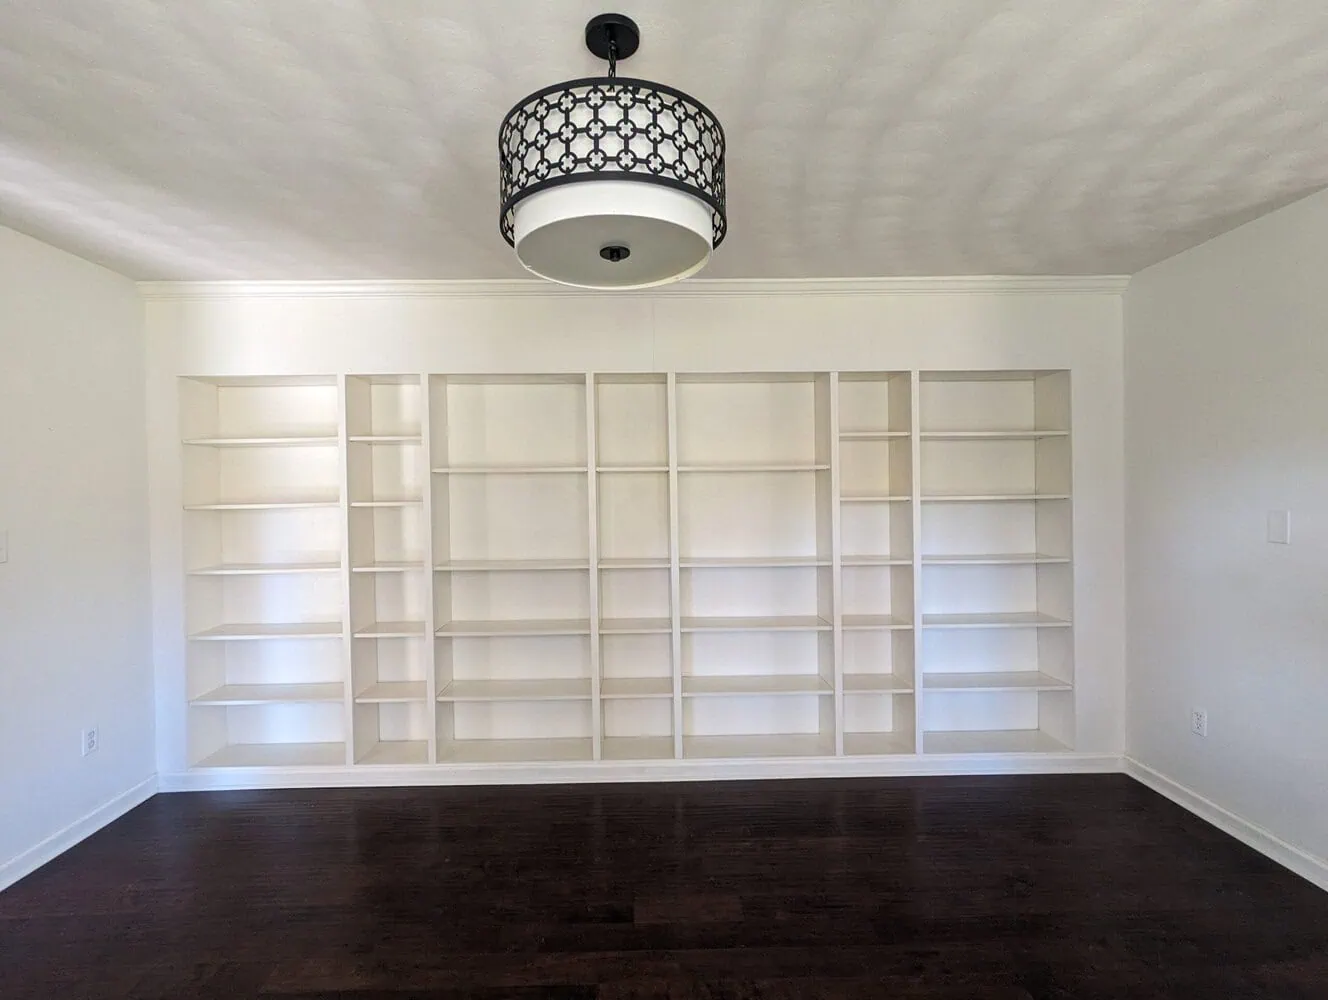
But even if you aren’t going to do all of that, this one little quick thing alone will make your bookcases look so much better and more like real solid wood furniture. All you need to do is fill in the holes for the adjustable shelves.
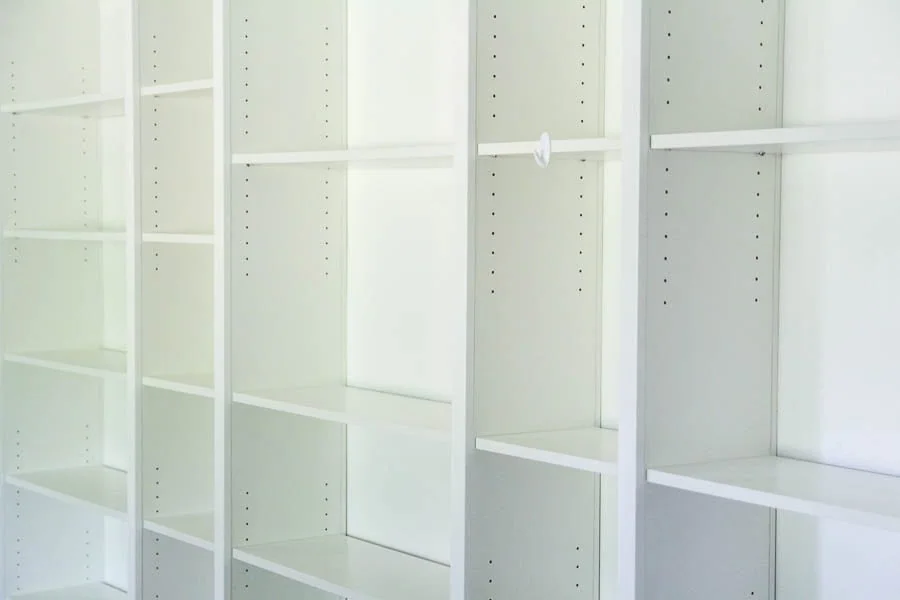
Those holes obviously have a purpose. You can use them to adjust the height of your shelves, remove shelves, add more, whatever you need to do to make your bookshelves work for you. But for most of us, once our bookcases are assembled and the shelves are in place, we’re probably never going to touch them again.
I have found that filling in all the holes you didn’t need upgrades your bookcases almost instantly. It’s so quick and easy and really makes a huge difference. There are a whole bunch of ways you can go about filling in these holes but I’ve found the cheapest and easiest way is just to use spackling.
You just apply the spackling to the holes and let it dry. Once it’s dry, you can use a damp paper towel to carefully wipe away any excess spackling from your shelves.
And if sometime in the future you decide that you actually do want to change the placement of your shelves, you can easily stick the adjustable shelf pins right through the lightweight spackling.
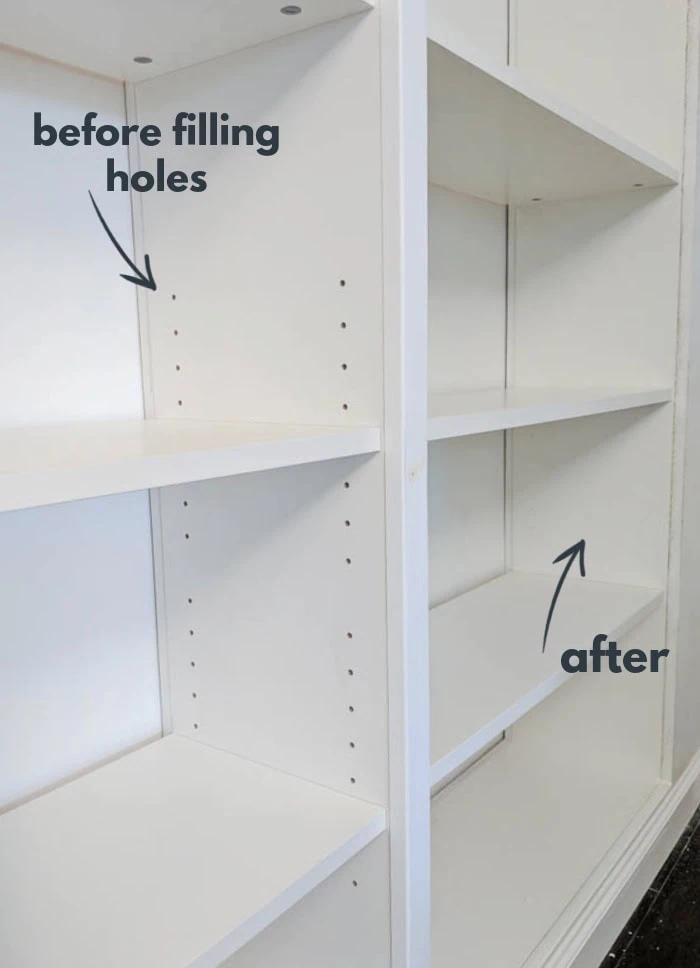
The best part is if you have white bookcases, you don’t even need to paint after applying the spackling. Since it dries white, it will blend right in. If your bookcases are painted a different color, you will need to touch up the paint to match.
This is such a fast, easy way to update bookcases, built-ins, closets, really any bookshelves that have adjustable shelving.
All three of these updates are such small changes, but it really is true that the details matter. Every time I’ve tried one of these quick fixes, I’ve been pretty blown away at what a huge difference it makes to the overall look and feel of my furniture.
Not to mention any project that only takes a couple of minutes is a huge win in my book!
I’d love for you to share this post on Pinterest!

