DIY Map String Art
This DIY map string art is the perfect summer project. It is subtly patriotic (for when you want to show a little pride without completely changing out your décor), it is the perfect celebration of summer road trips, and you can whip it up in a few hours.

Materials for String Art

Scrap of plywood
outline of the United States
small nails
hammer
embroidery floss
How to Make Map String Art
My string art is only one foot square, so I just used a small scrap of plywood left over from another project. You can stain or paint your wood any color you want or just leave it bare. I went for a subtle, weathered look on mine using a combination of white paint and stain. (If you want a similar look, you can see a full tutorial on the technique here.)
Next step, print a basic outline of the United States. Lay the outline over your wood where you want the design to be and tape it in place. Start hammering small nails around the edges of the map into the wood; you can just hammer right through the paper map. Any type of small nail should work; the ones I used were labeled wire brads. They worked well because they weren’t too long and they had a small head to help keep the string in place.

Carefully pull off the paper. You will be left with a perfect nail outline on your wood.

Tie one end of your embroidery floss around one of the nails and then begin weaving the floss back and forth across your design. I didn’t follow any specific pattern; I just worked back and forth across the map.

I did make sure to outline the entire map as I worked and tried to make sure no areas looking extra light or extra heavy. When you are finished, tie the end of the string to one of the nails and trim off the excess.

For this small map, I used one and a half skeins of embroidery floss. I didn’t separate the floss at all, but used all six strands together.


I love how all the overlapping strings look like roads criss-crossing the country. Makes me seriously itchy for a roadtrip – preschooler, baby and all
.

And if you love a map project as much as me, you are definitely not going to want to miss these gorgeous map projects.

I originally shared this DIY string art tutorial on Domestically Speaking on 6/5/2015.
Create a beautiful DIY map string art for a fun summer project with a patriotic flair. 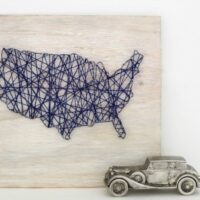
DIY Map String Art
Materials
Instructions

Love it! It’s been too long since I’ve done a string art project. They’re so fun and satisfying :)
They really are Gretchen! Makes me kind of want to do another!