How to turn a lantern into a lamp
This DIY lantern lamp is one of those projects that is both incredibly genius and incredibly obvious all at the same time.

Recently I replaced a bunch of candle lanterns on our porch with some fun string lights. Since I have an inexplicable need to repurpose all the things, I knew I needed to find a way to reuse some of the lanterns.
That is when inspiration struck – turn one into a lamp!
The basic idea is so simple. Take the candle out of an old lantern and put a light bulb socket inside instead.
Simple. The only thing that is complicated is figuring out the actual details of how to turn a lantern into a lamp.
I’ve got all those details for you, plus, even better, I’ve also got 10 other DIY lamp ideas to share. I teamed up with some of my favorite creative bloggers to bring you Lamp-alooza!
All the lamp inspiration you could need. But first, my genius/obvious lantern lamp.
This post contains affiliate links which means if you make a purchase after clicking a link I will earn a small commission but it won’t cost you a penny more. Click here to see my full disclosure policy.
Materials for DIY lantern lamp

- Lantern – I used this one from Ikea – they no longer carry it in a galvanized finish but still have white and black. But any lantern made for candles will work. I think this lantern from Amazon would work well.
- Light socket with lamp cord – if you buy a different one, just make sure it has a switch on the lamp cord, you don’t want to have to open the lantern every time you turn the lamp on or off
- LED Edison style lightbulb
- wire cutters
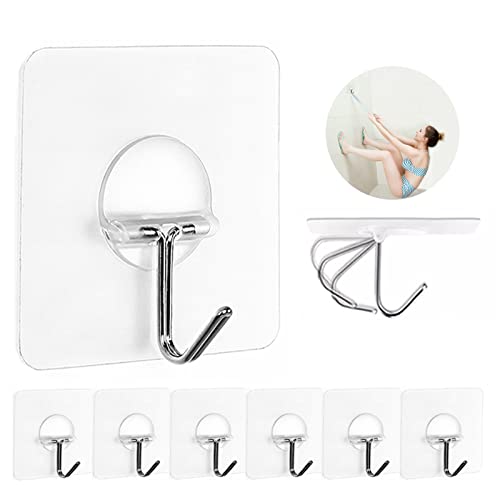
- small command decorating hook
- a strong glue – I used DAP RapidFuse All Purpose Adhesive and it worked really well
How to turn a lantern into a lamp
In order to get the lightbulb socket into the lantern, you have to do a little bit of work.
And it involves messing with wires.
That sounds scary and dangerous, but it really isn’t even that complicated. It isn’t particularly scary either – the wires you are messing with aren’t even connected to an electrical source.
(Of course, as always, if you attempt this project, it is at your own risk. I am not a certified electrician. Be sure to take safety precautions. And definitely do not plug in the lamp while you are working on it!)
These directions work perfectly for sockets like the one I used. (If you would prefer to use a lamp cord and separate socket, you can use the directions found in this post.)

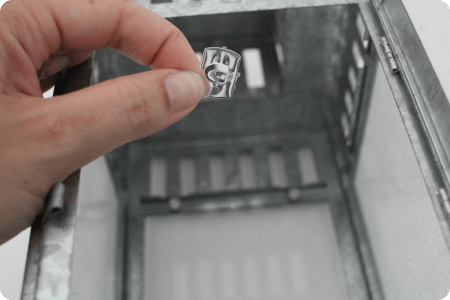
First you need to take the socket apart a bit.
Use a flat head screwdriver to gently pop the socket apart.

Then unscrew the three sections.

Carefully snip each wire using wire cutters.

Strip a small section of the protective coating from each wire end. Slip the rest of the socket parts off the wire.

Thread the lamp cord through a hole in the top of your lantern.
Even if your lantern does not look like mine, it almost certainly has some sort of hole in the top. Assuming it was originally made for candles, the candle smoke had to have somewhere to go.

Thread the bottom socket parts back onto the cord once it is through the lantern.

Reattach the two cords by twisting the exposed wires together. Completely cover all of the exposed wiring with electrical tape.

Pop the socket back together and the wiring is done.
That might have seemed like a lot of steps, but it was seriously less than ten minutes of work.

At this point everything is all wired up, but the socket was just hanging loosely.
Originally, I used duct tape to secure the socket to the top of the lantern.
Take it from me, don’t do that. It only lasted about a week, before the tape gave out. Luckily I came up with a different solution that is much better.
I used a tiny Command clear decorating hook which is the perfect size for holding an electrical cord in place.
Of course, I wanted to be sure everything stayed firmly in place. So instead of using the little adhesive strip that comes with the hook, I attached the hook to the top of my lantern with a strong adhesive.
I used DAP Rapidfuse All Purpose Adhesive, a really strong glue that will basically bind anything to anything.
As for the cord to plug in the lamp, I used silver duct tape to attach it firmly to the back of the lantern out of sight. If you are using a different color lantern, just use the appropriate color tape to secure your cord out of sight.

My lantern also had a small metal spike at the bottom of the lantern to hold a candle in place. It wasn’t in the way, but it seemed like a bad idea to leave a pointy spike below a dangling lightbulb.
I just snipped it off with my wire cutters. It took a bit of muscle, but wasn’t difficult.
And we have a lamp!

I really love this little lantern light. The Edison style light bulb is really important. A regular old light bulb would not be a good look.
After doing some research, I chose an LED Edison bulb. The LED bulbs are more energy efficient, last longer, and from what I read, give out a less yellow light.
The color of the light is similar to that of regular incandescent light bulbs (instead of overly yellow). And the amount of light it gives off is perfect for a lamp.
It isn’t enough to illuminate a room, but is way brighter than a nightlight. Perfect for lighting a dark corner or lighting a hallway at night.

I tried it out in our foyer and it looked amazing.
But I actually made it to go in my son Griffin’s room, so I reluctantly moved it there.

Luckily it looks great in there too. And it is the perfect fit for his little explorer bedroom.
I wanted to hang it on the wall next to his bed, but then I remembered he is a three year old and there is no way it would last a week dangling next to the bed.

So instead it is on top of his dresser. It is safely out of reach and he is more than happy to leave it that way as long as he can use the switch to turn it on and off whenever he wants.

I’d love for you to pin this post on Pinterest!

And now you’ve got to check out the rest of lamp-alooza! There are 10 more awesome lamp makeovers to check out.

Casa Watkins Living: DIY Mud Cloth Lamp
Pocketful of Posies: Vintage Desk Lamp Revamp
Lehman Lane: DIY Hanging Light
One Mile Home Style: DIY Golden Atlas Lamp
The Twin Cedars: No Cost Lamp Revamp
This Is Our Bliss: DIY Color Block Lamp
Green With Decor: Old Lamp Update with Twine
DIY Beautify: Light Fixture Makeover with Mason Jars
Creatively Homespun: DIY Car Parts Lamp
My Life From Home: DIY Coffee Pot Lamp
More DIY home ideas I think you’ll like:
- 23 Gorgeous DIY Light Fixtures that Anyone Can Make
- How to Repurpose Indoor Furniture for Outdoor Use
- Top 10 DIY Projects from 10 Years of DIY


How To Turn A Lantern Into A Lamp
See how easy it is to turn an old lantern into a beautiful DIY lamp with just a few supplies.
Materials
- Lantern
- Light socket with lamp cord
- LED Edison style lightbulb
- Small command hook
- DAP RapidFuse All Purpose Adhesive
Tools
- Wire Cutters
Instructions
- Use a flat head screwdriver to unscrew the three sections of the lamp socket.
- Snip each wire using wire cutters.
- Strip a small section of the protective coating from each wire end.
- Slip the rest of the socket parts off.
- Thread the lamp cord through a hole on top of your lantern.
- Put the bottom socket parts back on the cord.
- Reattach the two cords by twisting the exposed wires together.
- Cover all of the exposed wiring with electrical tape.
- Pop the socket back together.
- Add a tiny Command hook to the top of the lantern with DAP Rapidfuse All Purpose Adhesive.
- Hang the light cord from the command hook.
- Use silver duct tape to disguise the cord on the back of the lantern.
Recommended Products
As an Amazon Associate and member of other affiliate programs, I earn from qualifying purchases.
-
 IKEA - BORRBY Lantern black
 -
LEDesign 8002682134 Dimmable Edison ST21 LED Vintage Filament Light Bulbs, 6.5W (60W Equivalent), 800 Lumen, 2700K (Soft Warm White), E26 Base, IC Driver, CRI 80+ (Pack of 6)
-
Capri Tools 20013 Professional Wire Stripper and Cutter
-
DAP 7079800155 00155 0.85 oz Rapid Fuse Fast Curing All Purpose Adhesive, Clear
-
JINSHUNFA Wall Hooks 13lb(Max) Transparent Reusable Seamless Hooks,Waterproof and Oilproof,Bathroom Kitchen Heavy Duty Self Adhesive Hooks,8 Pack


Gorgeous! A few of these will look fabulous on our deck! Thanks for this!!! <3
Yes, these would be perfect on a deck!
This looks amazing against that wood wall! I love this makeover. Great idea. :)
Thanks Amy! I love it too!
What a cute project! I love the Edison bulb in there too! It really makes it stand out as something special! Thank you for playing along! Pinning!
Thanks Cat! The Edison bulb was definitely a must!
I had no idea this could be done, I LOVE lanterns and this idea is brilliant!
Thanks Cindy! I feel like I see so many great lanterns every time I am out – this just makes it that much easier to actually use them!
I love this!! The Edison bulb is the perfect bulb for your lantern lamp. I just can’t get over the whole look!!! I have a lantern that is very similar and I’m eager to recreate you lamp!!
Thanks Stephanie! I was so excited when I thought of this idea!
This is genius AND adorable! So good! Pinning for future reference!! – Rachael
Thanks Rachael!
This is so great! I love the Edison bulb!
Thank you Meg!
I’m confused…what happens to the cord? I see it hanging in the photo before you attach it to the lantern with the command hook, and then it disappears in the next photo. Is the cord still attached? Is it hanging down the back of the lantern?
Yikes! Sorry for that Jessamine. I thought that was in the instructions but apparently not so I just added it. I secured the loose cord to the back of the lantern with duct tape. Since my lantern is silver, I used silver tape but you can use any color that matches your lantern. It might not sound elegant, but because it is on the back of the lantern, nobody sees it anyway and the duct tape actually blends in really well.
You did a fantastic job on the lantern. It turned out beautiful! Great idea for hiding the cord, and the Edison light bulb fits perfect with the lantern. This would be my favorite lamp as well.
Thanks Linda! Now I really think I need to make a few more because I keep moving this one from room to room!
Where do I sign up for your news letter?
Hi Pam, if you go to this page, there is a sign up form at the bottom: https://www.lovelyetc.com/free-guide-best-paints-every-project/ Thanks!
If you look inside where the wires go into the socket housing you will see little holes. With a Bobby pin or anything straight, solid and small enough to fit you will be able to release the wires instead of having to cut them and then reattach with electrical tape. Just make sure to mark at least one wire and the housing on the same side to make sure the proper wires are in the proper place. I’m not an electrician but I prefer to put the wires back in the same side I removed them from….it’s a quirk I guess.
Thanks for the tip!
I love your project and the step by step detailed instructions! Thank you! I am eager to create a few of these and hang it from an oak tree. Do I need to do any different wiring if I’m planning on LED lighting? I understand the bulb is LED, but if I want LED voltage outdoor lighting on a tree, do I need to use a different wire socket?
You shouldn’t need to use different wiring to make it work with LED bulbs. But if they are going to stay outside during rain and wet weather, you should probably check if your socket is able to be used outdoors. If you are going to store them when not in use, this probably won’t be an issue. Good luck!
I want to make this – your instructions are so good! But what if I wanted it to use a brighter bulb? How is it decided what brightness of bulb you can use? Is it dependent on the socket or lamp or can any strength light bulb be used?
Great question! Using a brighter bulb shouldn’t be a problem. The wattage you can use is determined by the socket and most basic lamp sockets like this can handle any standard lightbulb. I just chose the one I used because it is cute. :)