DIY rustic fireplace mantel: the cure for a boring fireplace
This DIY rustic fireplace mantel has all the charm of reclaimed wood but it’s inexpensive and easy to make using basic lumber and supplies.
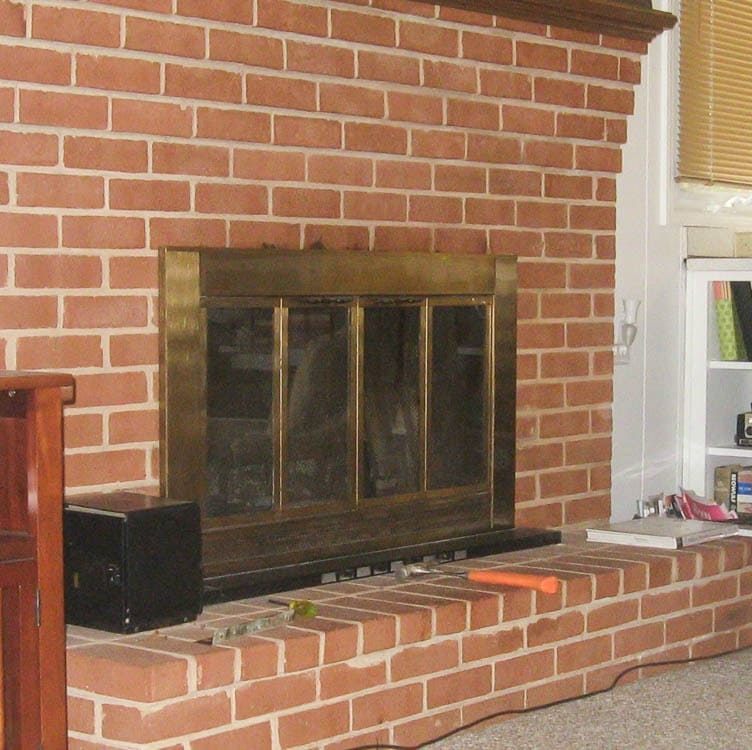
I’ve never been a huge fan of our brick fireplace. It’s really big and awkwardly placed in the room, right up against the kitchen peninsula.
I’ve made lots of improvements to it over the years.

First painting the brick white with a wooden mantel and then painting the brick navy (HGTV Home by Sherwin Williams Blue Mystery) and the mantel white.

Each change has been a big step in the right direction but something was always off about it. (Other than the glass doors which have to stay for practical reasons.)
Finally, I figured out the problem! This big, wide hulking brick fireplace was topped off with a dinky little mantel. The tiny mantel didn’t look great when it was natural wood and it was even more nondescript once I painted it white.
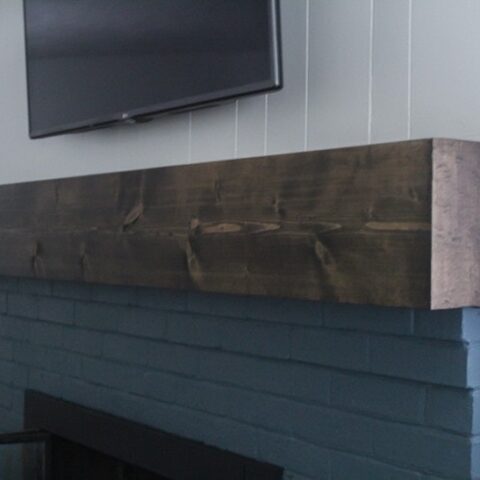
Not anymore! No more wimpy mantel for me; now our big fireplace has a mantel with presence. Nobody’s going to ignore this guy anymore!

My chunky DIY rustic mantel was inspired by this awesome mantel by Addicted to Decorating.
Her instructions are top notch and are perfect for anyone with a flat-faced fireplace, but I did need to change several things to accommodate the style of fireplace I have, where the brick doesn’t extend above the mantel.
This post contains affiliate links which means if you make a purchase after clicking a link I will earn a small commission but it won’t cost you a penny more. Click here to see my full disclosure policy.
Materials for rustic fireplace mantel
- two 8′ long 1”x10” pine boards for the front and top of the mantel
- one 8′ long 1”x4” pine board for the bottom of the mantel
- 1”x2” scrap boards these help form the sides of the mantel and only need to be a few inches long
- two 12″x12″ squares of wood veneer – these will be used to make our inexpensive lumber look like one solid wood beam
- finishing nails
- wood glue
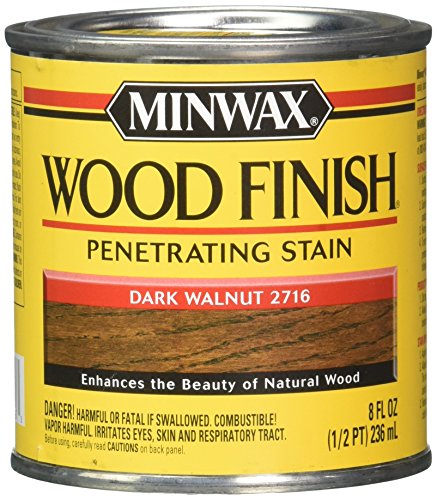
- dark walnut stain and rag to apply
- 220 grit sandpaper
Tools
- Hammer or nail gun – This is the nail gun I have and it is very easy to use.
- Saw – A circular saw works great for this.
How to make a DIY rustic fireplace mantel
This DIY mantel has the fabulous look of a huge old wooden beam, but in reality, it’s a hollow box made from inexpensive lumber.
Before beginning, remove your old mantel.
Pay attention to how it was attached to your fireplace. This will likely be the easiest way to attach your new mantel as well.
Build the mantel face.
I chose to use 10 inch wide boards for my mantel because the top of my fireplace already sticks out pretty far, but if you have a more reasonably sized fireplace, 8 inch boards would work great.
The two 10” boards form the top and front of the mantel.
First cut the 10″ boards to the appropriate length. I decided to have my mantel extend two inches past the brick on each side so this is the length I cut my boards.
Use wood glue and finishing nails to attach the two boards together. The nails will technically be visible from the front of the mantel but they are so tiny, they will never be noticed.

Build the underside of the mantel.
The bottom of the mantel is slightly trickier. You don’t want a big gap underneath, so you need a board that will extend exactly to the brick fireplace facing.
To find this number, subtract the thickness of your fireplace from the width of your top board.
I used a 10 inch board for my mantel top and my brick extend 6 inches from the wall at the point where the bottom of my mantel hits, so I used a 4 inch wide board to fill the gap.
Cut this board to the length of your mantel and attach it with wood glue and finishing nails. It definitely helps to have an extra set of hands to keep everything lined up as you are nailing the mantel together.
Build the mantel ends.
For the ends, you can use the scrap wood left over from cutting your two wide boards to length.
Mark where you need to cut the wood so that it will fit snugly into the opening at each end of your mantel. Cut the wood and then attach it with wood glue and finishing nails.

Finally, there will be a small space at the bottom of the mantel on each side. Cut a 1” x2” board to fit this area and attach it with finishing nails.
Stain the mantel.
I stained everything using Minwax Dark Walnut stain. I think the dark color is perfect for that rustic wood beam feel I was going for.

Attach the veneer.
This last step is the key to helping the mantel look like one massive slab of wood rather than a bunch of boards nailed together. I attached wood veneer to both ends to cover all of the wood cuts.
You don’t need a huge amount of veneer since this is such a small area. You can buy small sheets of veneer at Amazon or at woodworking supply stores like WoodCraft.
I went to my local WoodCraft for my veneer and the person working there was so helpful.
They didn’t have small sheets of inexpensive wood veneer in stock. They did have some larger, more expensive sheets but I’m really trying to keep costs down on this fireplace makeover.
When I explained I was on a tight budget, he pulled a pile of wood veneer scraps from their workshop and sold it to me for $5. Perfect!

I attached my veneer to each end of my mantel. I had to use two pieces for each end since I was working with scraps but once it was stained, the small seam isn’t noticeable at all.
Some veneer comes pre-glued, some needs to be ironed on, and some needs to be glued, so attach your veneer in whatever way is recommended for the type you are using.
When you attach it, leave at least a 1/2 inch of extra wood along each side.
Once the glue is fully dried, use a utility knife to carefully cut away the excess wood.
Then gently sand the edges of the veneer with 220 grit sandpaper to smooth them out.

Then stain the veneer with the same dark walnut stain.
Install your mantel.
The last step is to attach the new mantel to your fireplace.
My previous mantel was attached to 2 wood blocks that fit into empty spaces in my brick fireplace.

I removed these wood blocks from the old mantel and attached them to my new mantel using wood glue and nails.
Then I fit the mantel into place.


Oh my goodness, so gorgeous.
The veneer on the ends really helps the whole think look like one massive chunk of old wood.


Even without any other changes, this new mantel makes such a difference! It just fits the style of the fireplace so much better!
And this is how it looks today with a DIY TV frame and a few accessories.

This fireplace makeover is just one step in a larger (long overdue) makeover of our family room.
I’m participating in a challenge to make over one space in our home in only four weeks with a $100 budget. It’s a tough challenge, but so far I’m feeling pretty confident I can pull it off.
This time around I’m fixing up our family room and you can see the before pictures and my overly ambitious plans right here.
That’s why it was extra important for me to keep this mantel update inexpensive.
Here’s the cost breakdown for this project.
Cost of DIY Mantel
- Wood boards: $44
- Wood veneer: $5
- Wood glue: $4
- Wood stain, nails, tools: $0 (already owned)
Total: $53
Already over half the budget spent! But that’s ok, because this mantel makes such a huge impact in the room. Totally worth it.
How to build a DIY rustic fireplace mantel
This DIY rustic fireplace mantel has the look of a gorgeous old wooden beam but it's actually made from inexpensive lumber.
Materials
- Two 8′ long 1” x 10” pine boards
- One 8′ long 1” x 4” pine board
- 1” x 2” scrap boards
- Two 12″ x 12″ squares of wood veneer
- Finishing nails
- Wood glue
- Dark walnut stain and rag to apply
- 220 grit sandpaper
Tools
- Hammer
- Circular Saw
Instructions
- Cut the 10″ boards to the length your finished mantel will be. One of these boards will be the top of the mantel and the other will be the front.
- Use wood glue and finishing nails to attach the two boards together.
- Cut a board to size to fill the gap on the bottom side of the mantel.
- Attach to the front of the mantel with wood glue and finishing nails.
- Cut scrap wood into a square to fit snugly into the opening at each end of your mantel.
- Attach with wood glue and finishing nails.
- Cut a 1”x2” board to fit the small space at the bottom of the mantel.
- Attach with finishing nails.
- Stain everything with Minwax Dark Walnut stain.
- Attach wood veneer to both ends to cover the wood cuts using wood glue.
- Cut the wood veneer to size and sand the edges of the veneer with 220 grit sandpaper.
- Stain the veneer with the same dark walnut stain.
- Attach the new mantel to your fireplace.
Recommended Products
As an Amazon Associate and member of other affiliate programs, I earn from qualifying purchases.
-
 SKIL 5280-01 15-Amp 7-1/4-Inch Circular Saw with Single Beam Laser Guide
 -
Ryobi P320 Airstrike 18 Volt One+ Lithium Ion Cordless Brad Nailer (Battery Not Included, Power Tool Only)
-
Norton Co. 2616 Norton 02616 3X Handy Aluminum-Oxide Sandpaper 220 Grit, 9 x 11-Inch, 3-Pack
-
Minwax 22716 - 8 fl oz (1/2 pint) Wood Finish Interior Wood Stain, Dark Walnut 2716


Wow!! The new mantel is gorgeous!!! I have a similar style fireplace and would love to do this too!
Thank you Tracy! I am so happy I did this!
The mantel is amazing! I have wanted to do this to my fireplace also and your plans and approach look so easy. Great job!
Thanks Liz! It really was so much easier than I thought it would be.
That mantel is a game changer. I love it. Can’t wait to see what else you do.
Thanks Gabby!
That’s a sneaky mantel. I bought it was solid when I first saw the photo. Great work!
Ha, yes it is sneaky!
I have a fireplace and I’m dying to install a mantel. Your project is really inspiring! And it makes such a difference!
Thanks Natalie! You totally should install a mantel on your fireplace – I wish I had done this years ago!
bravo for you for spotting the problem with scale. The new mantle improves it so much!!
Thanks Morgan!
Wow, you’re right -this is exactly what your fireplace needed! It looks great and I love how you show your process. I don’t have any mantle over my fireplace, so I’m adding this to my inspiration list!
Thanks Meredith! For so many years I couldn’t figure out the problem – so glad I finally did!
Wow! What a difference and yes so worth the ‘big’ chunk of your budget – it’s amazing!
Thanks Kristi!
I love that big, chunky mantle so much!! It looks great!
Thank you!
Looks amazing and you made that look so easy! Love the blue with the wood stain of the mantel.
Thanks Maria!
Wow, this is impressive. I love the veneer, you can’t tell at all what it is! Very nicely done. I can’t wait to see the finished room. I love the color of the brick by the way!
Thank you Wendy! I know navy brick isn’t common but I love it too. It gives the room a little bit of edge!
That change was TOTALLY worth 1/2 your budget! It looks incredible and makes such a statement. The before and afters are a complete night and day difference. LOVE THIS!!!
Thanks Erin! I love it too!
Wow, the mantel makes a huge difference. I love it!! I can’t wait to see what you do this week!!
Thanks Sheena!
This looks amazing!! I can’t believe what a difference it makes in your fireplace. Your directions are perfect too and good call on the veneer! Can’t wait to see the rest of the room!
Thank you Melissa!
This is beautiful! I’d like to do this to my fireplace but have a question. My current one isn’t brick but is drywall and the current “lip” that sticks out is falling apart because of heat. I wish I could attach a picture to explain this a little better….Anyways, do I need to cover this with something that is heat resistant? Is there any concern about the wood getting overly heated and catching on fire? Thanks so much!! Beautiful fireplace!
Thanks Katie, As far as your question, I really don’t know for sure. I’m not an expert on fireplaces and safety. It does seem like if the drywall isn’t a fire risk, that wood wouldn’t be either. But again, don’t take my word for it because that isn’t my area of expertise. Sorry I can’t be more help!
What color did you paint the fire place I love it
Thank you! It is Sherwin williams blue mystery. I had mine mixed at Lowes – it’s part of the sherwin williams hgtv line there. But I am pretty sure you can get it at the sherwin williams store as well.
I love the paint color on the fireplace! What is it?
Thank you Kerry! It is Valspar Blue Mystery. There’s more info about it here if you are interested: https://www.lovelyetc.com/how-to-paint-a-brick-fireplace-the-right-way/
Did you nail to the boards underneath through the top? Thanks!
Yes I did.
How was this attached to the wall? I think I missed something….
It is actually attached to the brick fireplace, not the wall itself. It sits on top of the brick and is attached using two wood blocks which fit into holes in the thick brick fireplace. If you are replacing a mantel, I would recommend looking to see how it is attached and trying to copy the same method. And if you do need to hang it from the wall, a french cleat would work well – these are special hardware that allows you to have heavy objects flush against the wall.
Did you do anything to cover the nails?? And did you attach it before staining the boards or after?
I didn’t do anything to cover the nails. I used finishing nails so they really aren’t noticeable unless you are very close to the mantel and looking for them. And I chose to stain the mantel before attaching it just to make it easier. That way I didn’t have to worry about getting stain on the wall or bricks of the fireplace.
Now that it has been hanging for a while are you happy with your choice of pine wood or has that been too soft and you’d recommend a harder wood? Look great regardless though!
The pine hasn’t been a problem at all! Since it’s a mantel, it doesn’t get scuffed and bumped into the way a table would. And even if it did, I think it would still look fine since it’s a more rustic look.
Amazing transformation!! Love the blue and love the stain color. I’m having a brick fireplace built as I type. Lol. Can I ask the width of your mantle and the width of your actual brick fireplace. I’m trying to scale mine similar to your look. I saw that you cut your 8’ length so that 2” were past the brick on either side….. but what was your total length of mantle. And if you could the size of your brick fireplace. (Height/width) Thanks a million!!!!!
Hi, I just measured and the fireplace is 79″ wide and the mantel is 83″ wide. And the whole thing is 58″ high. I hope that helps! Good luck with your fireplace!
Oh wow thanks so much. Our mantles are super similar. Mine is 82”. My fireplace is 80”. My concern is my mantle is going to come off wall 7”(deep”) and it’s 9.5” high. I’m worried about it almost looking too large. I appreciate you measuring for me. Love yours!!!! ☺️
Glad I could help!
Hi Carrie !
Thank you so much for this wonderful tutorial ! I watched every one I could find to get inspiration on redoing my mantel and tiled fireplace. It was hideous and I am half way through right now. I had to chisel out tile around the fireplace as well as the floor and the mantel ! Tile everywhere. It was horrible. Your instructions are so right on and it’s coming out beautiful ! I’ve re-tiled the floor and around the fireplace and stained my boards. Just need to finish the mantel and put it up. Can’t thank you enough !!!
karen
I’m so glad my tutorial helped! It sounds like you’ve done a ton of work on your fireplace and I bet it looks beautiful!
It looks beautiful! I love the wood holder. Where did you get it?
Thank you! It is an old vintage radio that I got at an estate sale. The ‘guts’ were already removed so I just turned it around backwards and put the wood in.
I LOVE THIS idea!!! We had planned to move last year but with the pandemic and the market making home prices SO much higher, we opted to rent until it all leveled out. SO with this rental, our mantel and fireplace are just really not cute, so this seems like it would be an easy and cost-effective way to cover our current mantel (if you can even call it a mantel lol – it is way too narrow). Any ideas on how we could “attach” this to what is currently there without damaging for when we move out? We can always nail into walls and fill/paint over when removing but not exactly sure how to go about that!
Yes, the housing market has gotten crazy! This sounds like a great idea for updating your fireplace while you wait out the market. If you have enough room around your existing mantel, you could attach L shelf brackets to the wall (try to attach them to studs). Then you can attach the mantel to the brackets with screws from above. The screws would be on top of the mantel but shouldn’t be too visible. This way the mantel would cover the existing smaller mantel and the brackets. There could also be other ways to attach it.
I love this so much. My parents have been updating their house, I saw this and they are very interested this in their living room. Their fireplace mantel is all brick and runs the entire length of the wall. My dad and I have been trying to figure out how to attach the boards to the top (flat surface) of the fireplace. Obviously it needs to be sturdy. Any suggestions?
Good question. It sounds like the brick wall is completely flat with no connectors. You could use masonry screws to attach a 2×4 the length of the mantel directly to the wall and then screw the mantel into the 2×4. Or take it a step further and create an internal frame similar to what you would use for DIY floating shelves. You could also use sturdy shelf brackets or L brackets – screw them securely to the fireplace and then attach the mantel to them. I also found this post from a blogger I know that looks helfpul – https://www.runtoradiance.com/how-to-install-a-floating-mantle/ Good luck!
What did you use to paint the fireplace insert? Mine is gold and needs updating too!
Yours is beautiful!
Thanks,
Dawn
Thanks! I used high heat spray paint to paint the fireplace doors. You can get it at most home improvement stores and it often has a picture of a grill on the front. It does give off more fumes than any other paint I have used, so be sure to open the doors/windows and use fans if possible.
I love your mantle and it has inspired me to do the same to my very warped mantle that needs to come down. I have stone under mine and it’s flat all the way up to the mantle so I feel it will be very easy to do this. I do have a question though, I would like to hang my tv as well over the mantle but we do not have an outlet up there. Did you already have one there, or did you install one yourself?
We don’t have an outlet over our fireplace either. We do have one right next to our fireplace though. I have our TV plugged into a simple white extension cord with the cord tucked up behind the TV. Then I used white cord covers to hold the extension cord in place next to the mantel as it goes down the wall to the outlet. It doesn’t look perfect, but it isn’t very noticeable. One day I would like to replace our old wood paneled walls with drywall and have an outlet installed above the fireplace.
I just came across this post from 2017 and your fireplace looked nearly identical to mine….also with a very thin mantle. So, I just wanted to let you know that I followed your steps, and now it has a chunky pine mantle that came out brilliant! Thanks so much!
Awesome, thanks for sharing!
Hello. Where did you get the firewood storage container? I can’t find anything like it.
It is actually the outside of an old wooden radio – the guts of the radio were already gone so I just turned it around and put firewood in the back. I found mine at a yard sale – you may be able to find something similar on Facebook marketplace or craigslist.
Thanks for the tutorial! Been looking for a makeover like this, as we found a home we’d love to buy from the 80’s and has this same style of fireplace. I could see the idea in my head, but couldn’t find the right tutorial for how to do it. Yours looks beautiful!
I’m so glad it helped – good luck with your fireplace!