How To Remove Glued-Down Carpet
After testing five different methods, I’m sharing the fastest, most effective way to remove stubborn glued-down carpet.
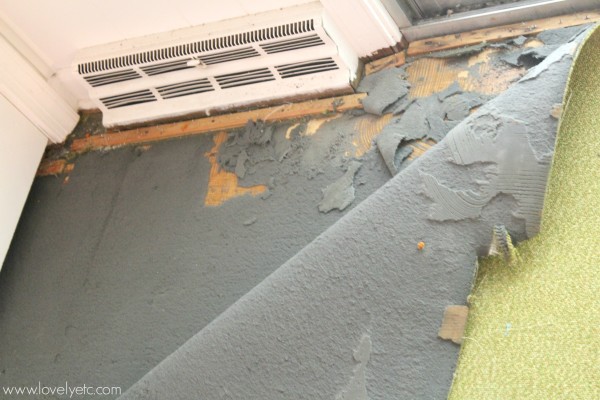
When we began pulling up the carpet in our family room, we were met with a most unfortunate surprise – under the carpet and carpet pad was another layer of carpet.

This carpet was a very stiff carpet with a black foamy backing. It was almost like indoor/outdoor carpet and it was glued firmly to the plywood subfloor.
How to remove glued down carpet
This post contains affiliate links which means if you make a purchase after clicking a link I will earn a small commission but it won’t cost you a penny more. Click here to see my full disclosure policy.
It turns out it is very difficult to remove glued down carpet. It does not come up easily. In fact, it does its very best to remain firmly in place.
First, we used a utility knife to cut the carpet into strips and peeled each strip of carpet up. This effectively removed the top layer of carpet and padding, but left behind a pretty thick layer of black foam.
Of all of the things I tried, the best way to deal with this foam was simply to use elbow grease and a scraper and scrape it off. Luckily, other than giving me a pretty good arm workout, it wasn’t particularly difficult.
The real test was the black adhesive residue that was still left behind, stuck to the subfloor. I turned to the Internet and immediately got started researching the most painless way to get the nasty stuff up.
I found lots of suggestions:
- Boiling water/steam
- Murphy’s Oil Soap
- Mineral Spirits
- Paint stripper and other various chemicals
- Scrapers
- Dry Ice
I started out testing all of the recommended materials I already had on hand: boiling water, Murphy’s soap, Citristrip paint stripper, and mineral spirits.
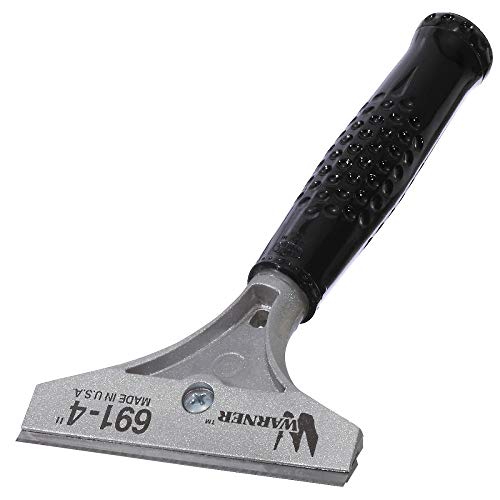
Along with these I used a hand scraper with a razor type tip (similar to this one from Amazon).
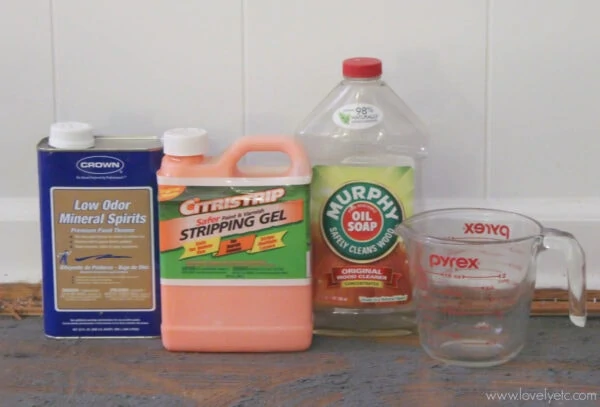
Murphy’s Soap
I mixed the Murphy’s Soap with some water and wiped it on with a rag and then scraped.
When it did not come up well, I waited half an hour and then scraped some more.
It really didn’t seem to make any difference. The Murphy’s soap did not help at all. I didn’t really expect it to, but someone had recommended it and I figured it was worth a try.
Verdict: The Murphy’ soap was a complete fail.
Citristrip and Mineral Spirits
I applied each of these to different areas with a rag, waited half an hour and then scraped.
These gave very similar results and they both definitely made a difference. I was able to scrape the adhesive off, but it still required a lot of time and elbow grease. Doing the entire room this way would have taken days, maybe even weeks.
Verdict: Citristrip and Mineral Spirits both worked to remove the adhesive, but it was painfully slow.
Boiling Water
First I tried just pouring the boiling water on the floor and scraping. No difference.
Then I read a tip to pour the boiling water on a towel on the floor and let it soak for about an hour.
When I tried it this way, the results were much better. This actually worked even better than the chemical strippers. Add that to the fact it involves no harmful chemicals and was free and I was sold.

Steam
After my original test, I decided to go with the boiling water method. I brainstormed a little more and decided I could probably tweak my method a little and get faster results.
So I tried using my iron on the steam setting to loosen the adhesive before scraping and also borrowed a Shark steam mop to try.
Both of these worked pretty well. However, even though it was working, I had a really large room to do and it was going really slowly.
I was starting to wonder if I would ever finish… so I decided to try another method I hadn’t been able to test out originally – a chemical adhesive remover called Sentinel 747. It is available at Home Depot for around $20.
Sentinel 747
I tried the Sentinel 747 out on a small area of the floor and it was amazing.
It worked much better and faster than the steam method so this is the method I decided to use to finally complete the rest of the room.
My room is around 250 square feet so I ended up needing three jugs for a total of around $60 but it was definitely worth the expense.
Successfully Removing Carpet Adhesive
Materials:
My final method looked something like this: After scraping up the foam backing, I poured some of the Sentinel on a small area of the floor and spread it around with an old mop.
After letting it soak for 15-20 minutes, I scrubbed it lightly with a wire brush and then used my scraper to scrape all of the adhesive off.
Wherever there were stubborn areas that didn’t come off right away, I just repeated the process.
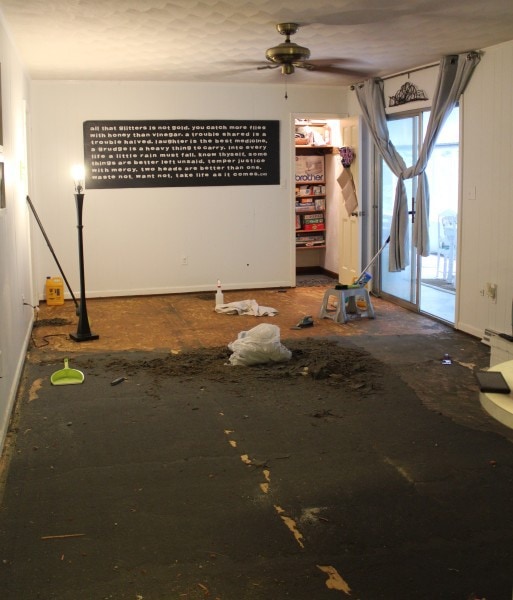
Yay for that job being over!
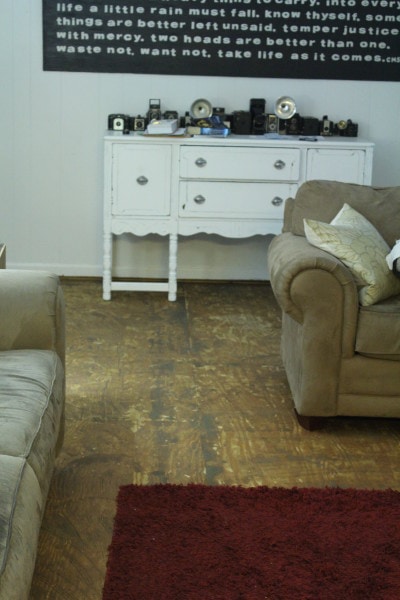
As you can see, we went ahead and moved our furniture back into the room as well as a rug we had in storage. We still had a few more problems to tackle in adjoining rooms before laying our new floors and not having anywhere to sit was getting pretty old.
Now to work on bringing the kitchen floor down to the same level so that our wood floors will be seamless between the two rooms. Nothing is ever easy in DIY, that’s for sure.

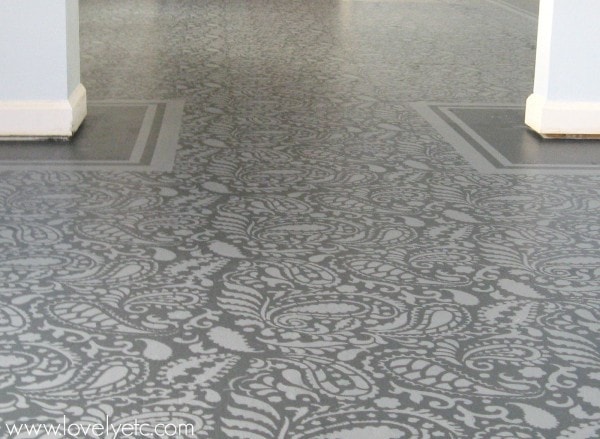
And if you are looking for a super cheap flooring idea, you’ve got to check out my painted subfloors.
How To Remove Glued-Down Carpet
Learn how to remove glued down carpet using the fastest method. After testing five different methods, I found this to be the best way.
Materials
- Sentinel Adhesive Remover
- Old Mop
Tools
- Hand Scraper
- Utility Knife
- Wire Brush
Instructions
- Use a utility knife to cut the carpet into strips and peel each strip of carpet up.
- Scrape up the foam backing using a hand scraper.
- Pour some Sentinel on a small area and spread it around with an old mop.
- Let it soak for 15-20 minutes.
- Scrub it lightly with a wire brush and use your scraper to scrape all of the adhesive off.
- Repeat the process until it is all removed.
Recommended Products
As an Amazon Associate and member of other affiliate programs, I earn from qualifying purchases.


Being short of money is one thing, being short of time and desire is another. Basically its’ a question of elbow grease. Chip off what you can and sand the rest. There is no lazy way to remodel. Sweat equity means exactly that. If its’ a rental unit, schmooze your landlord or learn to live with it. This kind of built-up crap has no simple chemical solution. Even not any Industrial Equipment in market.
This was definitely one of those cases where sanding is not the answer. I have attempted to sand a somewhat similar substance before with a power sander. Instead of becoming smooth, it simply gummed up the sander and melted the adhesive. In this case, sanding would have most definitely been the lazy, incorrect way.
such a huge project! It must tooked several hours to finish it!
Great! Post. I also have the problem that how to remove my carpets I tried my method but I can’t able to found. After reading this post I got a idea how to replace it.
Be cautious. I removed something similar sbout 20 years ago and ended up with a full-body rash. Had to go to the emergency room and was given an epinephrine shot. I don’t have many environmental allergies, so something in the black bscking or the glue used was very dangerous for me.
Wow, that is terrible! I am sorry to hear that happened to you and glad I didn’t have a similar reaction. You are right – anyone doing this should definitely be careful. Always ventilate the area well and keep your skin covered with long sleeves and gloves.
How old was the adhesive? You actually need to be careful about some of the really old stuff as it may contain asbestos; definitely have questionable flooring tested before doing anything where you might stir particles into the air and, consequently, into your lungs. Generally newer flooring won’t have that issue but it is worth noting.
Very good point! Thanks for sharing.
I know it’s an old post but I thought I’d ask if you were installing new wood floors over the plywood, why go through the hassle of removing every trace of the adhesive? I understand of course needing a smooth surface – I’ve installed all too much hardwood flooring myself but wouldn’t think a film of adhesive would be an issue unless it was built up in some areas. I’m about to start scraping up glued down carpet myself.
Good question. Unfortunately when we removed the carpet, only the top layer came up, not the glued down backing. I removed the adhesive because it was very thick and built up with plenty of the carpet’s foam backing still stuck to it. Even after I removed it all, there was still a film of the adhesive in a lot of areas but as long as it was smooth I didn’t worry about it. The main point was to get everything smooth. Hopefully, your process will go much more smoothly!
Good lord, what a huge, awful project! I’m glad your persistence paid off.
To level the floors for wood. You will have to remove plywood in kitchen or add another layer in the other room to have it be flat. Kitchen just hope the built up floor was not done before the cabinet bases were put in( can you see the problem here) It can be a real bear to level floors. Done it before. Might be easier to add plywood to the other room to level it off. Just take the path of least resistance. Just use circular saw, cut a little lower into plywood cutting thru, pry bars to get the ply up hopefully it wasnt glues down( horror story) Old homes may have asbestos in the flooring and they just plyed over it. Can you see the possibilities multiplying.
Thanks Peter – we ended up removing the extra level of plywood in the kitchen. And you are right – it was a huge pain, mainly because we had to cut it around the cabinets. So glad that job is behind us.
Great post, Carrie! We have to do a 250 sq ft. space ourselves (well, me, ’cause hubby can’t get down on his knees). Yikes! I better get moving.
Thanks Joan! Good luck! I had to do our whole room as well because at the time my hubby was dealing with reactive arthritis. It was NOT fun but I was so happy to get it finished!
Question:
Why did you choose to use Sentinel 747 instead of 626? Going to do this exact project this week and was wondering which one is best to buy!
Kari, I chose the 747 for a couple of reasons. I saw it mentioned by name on several forums and I liked that it specifically mentioned working on both black cutback adhesive and carpet foam backing which seemed to be what I had. Also, it was available at my local Home Depot so it was convenient.
We had the same black foam adhesive on our carpeted stairs. We used the 747 product you recommended and it worked great. Thank you so much! We were stumped on what to use because the things we had tried were not working.
I am so glad to hear that! That carpet can really be a beast to remove, so finding the right trick to get it taken care of was a huge relief for me. I’m glad it worked just as great for you.
I need to get the carpet squares up from my kitchen and bathroom (carpet, really?). there’s linoleum(?) Tile underneath. it’s a 65yr old mobile home. Should i worry about asbestos? Would there be a chemical reaction btwn paint remover and asbestos?
Good question Jeannine, First of all – sounds like you have a real mess. Carpet tiles over linoleum – not fun! I cannot say for sure whether you need to worry about asbestos. Luckily I haven’t run into this, but I do know that you can get an asbestos test kit at Home Depot or Lowes fairly cheaply. For peace of mind, it would be worth trying one before working on those carpet tiles.
Carrie, thank you for your recommendation. We just stumbled upon your post today via Pinterest and are glad that our product worked well for you!
Thanks Kim! It was a real life-saver!
I loved your suggestions and how you went about your project. If you have another that is coming along I would suggest using adhesive remover. I had a similar issue with old carpet padding. After attempting the same methods as you i went to ACE hardware and asked them they pointed me to a metal can of Adhesive remover and it was a glory! 30 min per application and the gunk on my hardwood came right up with a puddy knife. Good luck with future projects and i’ll keep an eye on your blog for more hints.
Thanks Shanna! Thankfully I’m not dealing with any glued-down carpet right now, but I will definitely keep that in mind in the future. I’m always looking for new tricks!
My floor has a lot of adhesive left over on it, after I pulled up the carpet. I have tried water like you and have had little success. Thank you for sharing how using boiling water worked even better than chemical strippers. I am also considering finding a service that can help me remove the adhesive quickly because I need my floor done in a week for guests coming over.
Reviews of the Sentinel product mention an oily residue. That wouldn’t be a problem for some floor coverings but would it would present a problem for others.
Possibly. I didn’t have any problem with a residue. After scraping off the last of the carpet adhesive and foam, I cleaned the floor thoroughly and it seemed fine after that.
I am reupholstering my teak dining chairs. Having quite a time trying to remove the stuck on foam when the material is removed. I don’t have a lot of strength in my hands. ( I am 81 years old). Any ideas?
Hi Barbara, That’s a tough one. If you are replacing the old foam with new foam, you might be able to cut away the top layers of foam and simply cover what remains stuck with the new piece of foam. Of you might be able to loosen the old adhesive using heat from a blow dryer or boiling water, although that might be tough if the foam is very thick. Good luck! I really hope that I am DIYing when I am 81 as well!
I wish I had seen this earlier. I had the exact same situation. I wanted to remove the carpet to expose the old tongue and groove flooring. I used a steamer. It was mostly effective but a slow tedious (pain in the back) process. It also emitted a nasty odor with the steam. I still have a few patches to go. For $20 I will need to see if I can pick up a jug of this.
Ugh, I feel for you. This is one of my least favorite tasks ever. Good luck with the last few spots.
As a seasoned fixer upper…. here are is most effective method I’ve used BE PATIENT!!!.ALWAYS WORK IN SMALL AREAS ! Approximately 3′ x 5′
1. Remove as much of black backing as possible…good tome to saturate with very hot water covered with old towel let sit 30 minutes . Use 3″ putty knife at this stage to scrape . Put residue in box scraping blade on box edge to keep blade clean . This is the easiest step.
2.Purchase a gallon of ADHESIVE/MASTIC stripper. Use a very inexpensive or ruined( one not cleaned soon enough) 3″ paintbrush. Purchase a WINDOW GLAZING tool. It has a very narrow blade. This is the BEST tool I’ve used. It has a bevel on the blade. Wear safety goggles and heavy rubber gloves. Paint the stripper on heavily, using extra pooling of product on black areas. Place painters plastic over wet area. Sweep with angled broom to make contact to stripper. This forms a seal. Then put a small throw rug on top of plastic. NOW BE PATIENT WAIT AT LEAST ONE HOUR. Test small patch…if it comes up easily roll back plastic one board…scrape…you can reveal up to 3 boards . You don’t want it to dry out. If you are ready to scrape this area, put stripper on next section then note time. This allows you to continue. IT IT DIFFICULT TO WAIT BUT TIME IS YOUR BEST FRIEND IN THIS PROCESS, You can wait up to 3 hours before scraping. Now for the last step. There will be heavy areas of thick adhesive. Get them the best you can. Puddle stripper on these areas for another stripping . It is amazing what this second cleaning removes. The reason you want as much removed as possible is so when you sand to varnish with a belt sander it doesn’t gum up the sand paper. Hope this helps someone.
I am currently removing this nasty black padding from my 1890 house I bought. It’s only in the upstairs hallway thankfully but it’s a pain! We scraped off the thicker stuff but it was still stuck to the wood floors. We used citrus strip gel and it came off nicely but we are thinking we have to go over it again to get more off before painting the floors.
I am sorry you are having to deal with this – removing glued down carpet may be my least favorite DIY job ever!
I have the joy of shag carpet by itself no pad or anything being glued straight to concrete the carpet itself will come up but I have thick layer of dried glue to contend with. I’ve tried almost everything and finally broke down and bought a household steamer because that seemed to work the best. It’s going so slow. I can only work in hour increments because of the steamer cooldown time before it can be refilled and the small amount of area that gets done is discouraging. I’m almost to the point of throwing down another wall to wall carpet to sell the house. I’m open to suggestion though.
edited to add we are talking my entire downstairs around 700 square feet i need to get this mess off of….
Oh man, I am so sorry. Glued-down carpet is the absolute worst! If the dried glue looks like the black mastic pictured in my post, I would definitely recommend trying the Sentinel 747 adhesive remover. If it’s a different type of glue, I dont’ know for sure if this will work, but I feel your pain. If you are just doing this in order to sell the house, covering it up with new carpet might seriously be more worth it. Good luck!
This is exactly what I’m getting ready to do in my small bedroom. The glue looks the same. Thanks for sharing your experience on what worked the best. I’m going right for the Sentinel first!
Good luck! It isn’t a fun project but it’s so worth it!
I’m going through this right now. What a surprise to see olive green carpet under the laminate I need to replace. I think I have 500 sq ft in my living room. :/ thank you for your post. I’m going to try the boiling water method to get the first layer of foam up.
What a terrible surprise – carpet under laminate! Good luck removing it!