DIY Vintage Metal Stencils
A few months ago, I came across an awesome find at a big yard sale – a big stack of vintage metal alphabet stencils. I grabbed them up for a steal and then decided to use them to spell the names of the month in my command center.
Only, there was a problem. I didn’t have the right letters to spell each month. I didn’t even have the right letters to spell the very first month. So I made DIY vintage metal stencils to fill in the gaps. And while the real thing is always better, I bet you couldn’t pick out the fakes in a line-up, so I’d call that a success.
See for yourself – can you spot the two fakes?

Making these was extremely easy and you only need a few simple things that you probably already have laying around. (Unless you don’t hoard craft supplies, then you might need to spend five bucks on supplies. Still a good deal.)
This post may contain affiliate links – you get to buy stuff you need and support future DIY projects on Lovely Etc. at the same time. See my full disclosure here.
Materials needed for DIY Vintage Metal Stencils

Cardboard
Black, gray, and silver craft paint
DIY Vintage Metal Stencils
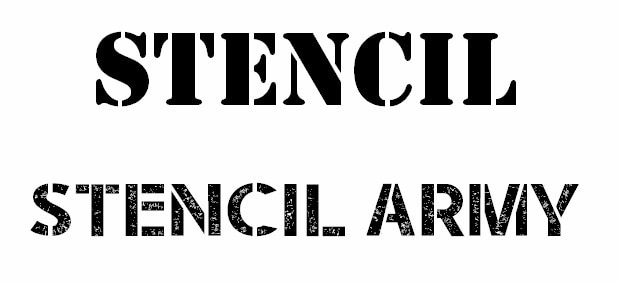
These really are super simple. First you need an outline for your stencil letters. I traced some of the real metal letters I had so that they would all match, but I have an easy solution for you as well. There is a serif font included in Microsoft Word called Stencil. Or there is a free sans serif font called Army Stencil that is quite similar to the font on my stencils. You can follow Army Stencil it for free; then just print out the letters you want. (The font originally published in this post was not working so Army Stencil is a replacement – I have tested it and it works.)
Trace the letters onto your cardboard and then cut them out using the craft knife. You could use scissors, but it would be really tough to get the inside parts.

The F is a real aged metal stencil; the E is my cardboard cutout.
Then you paint. Put a small amount of gray, silver, and black paint on a painter’s palette (or my favorite substitute – a paper plate).

You can use any brush for this, but a round brush or a chip brush works really well. Paint your letter gray.

Use your brush and mix together the three paints to make a charcoal gray color with a little shine. (You will need just a few drops of black for this – black likes to take over other colors if you use a lot.)

Use your brush to dab the paint all over the letter – you are going for texture here, not an even coat of paint.

Finally, add some more silver to the paint mixture and use it to highlight a few areas of the stencil.

The beauty is, if you don’t think it looking good, just add a little more paint until you are satisfied.


And if you are into metal typography (which I clearly am), you have to check out this DIY version as well.