How to Paint Aluminum Windows and Door Frames
This step-by-step tutorial will show you how to paint aluminum windows and door frames. It’s a quick and easy way to update your old doors and windows for just a few dollars.
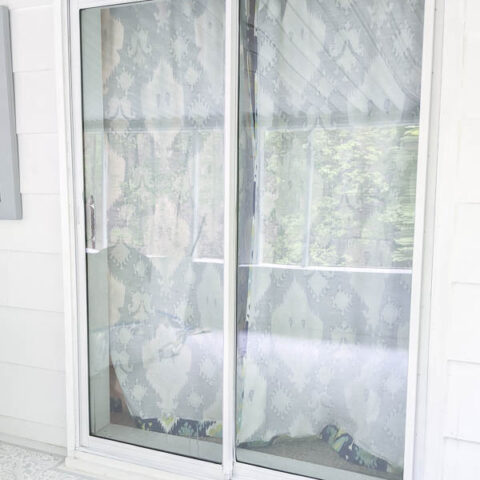
While we’ve made lots of improvements and updates to our home over the last several years, replacing the aluminum windows and sliding glass doors just isn’t in the budget right now.
We have two sets of sliding doors that lead out to our huge screened porch and as much as I love all the light they let in, the bare metal finish really just made them look a bit cheap and unfinished.

I painted the interior of the sliding doors several years ago and the paint has held up really well.
There is a bit of chipping on the door handle, but everything else still looks pristine.
I’m in the middle of updating our screened porch so this seemed like the perfect time to tackle the exterior of the doors.
And while I was at it, I also painted the aluminum windows on our porch as well as all of the metal outlet covers.

Today I’m sharing step-by-step instructions and photos as well as a video tutorial of the entire process.
This post contains affiliate links which means if you make a purchase after clicking a link I will earn a small commission but it won’t cost you a penny more. Click here to see my full disclosure policy.
Materials
- Vacuum (for cleaning sliding glass door tracks and window sills)
- All-purpose cleaner
- Painter’s tape ( 2-3 inch thick tape is best for this project)
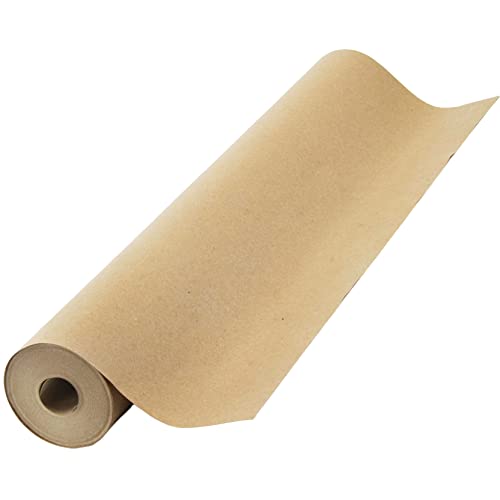
- Roll of kraft paper or wrapping paper
- Spray paint
How to paint aluminum windows and door frames
The first step of any painting project is cleaning. Our sliding doors had accumulated quite a bit of pollen and dust in the door track so I started by vacuuming it out.
Then I used an all-purpose cleaner and rag to clean everything I was going to be painting.
Spray paint is definitely the best paint for painting almost anything metal.
It adheres well and goes on quickly. Most general use spray paints will work for this project.
Just double-check that your paint says it is appropriate for use on metal and can be used outdoors.
I used Rustoleum Semi-Gloss Protective Enamel in white for my own doors and windows.
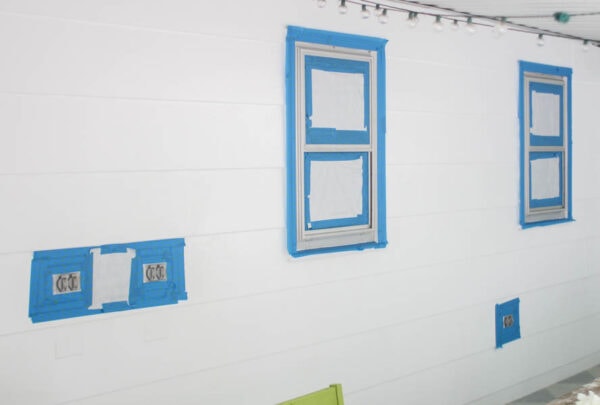
You will need to do a bit of extra prep when using spray paint to make sure the overspray doesn’t mess up anything nearby.
Start by using painter’s tape to tape all along the edges of where you will be painting.
This would be a great time to use 3″ Painter’s tape to provide more protection.
I only had the regular 1″ painter’s tape on hand, so I did a few rows of tape around my windows and doors.
I also covered the entire glass section of the windows and doors. This isn’t completely necessary but I like the extra protection it gives.

My money-saving trick is to use any old rolls of wrapping paper if you don’t have brown kraft paper on hand.
I always seem to have an excess of wrapping paper somehow and this is a great way to repurpose it.
Once you have everything prepped, you can start painting.
Any time you spray paint, start by shaking your paint thoroughly for about a minute and then shaking it every few minutes as you work.
It’s also a good idea to wear a protective mask when working with spray paint.
Hold the spray paint 6 to 8 inches from the surface you are painting and slowly move it over the surface with a steady back and forth motion.
Make sure you keep the can moving to avoid thick, drippy areas.
You want to do 2-3 thin coats of paint. Don’t be tempted to try for one very thick coat, you’ll just end up with drips and uneven coverage.
Check the instructions on your can of spray paint to see how long you need to wait before adding a second coat of paint – usually, it is only a minute or two.

When you’re done painting, turn the paint upside down and spray for five seconds.
This will make sure the can doesn’t clog and will work just as smoothly for your next project.
Once the paint is mostly dry, you can carefully remove the painter’s tape and paper.
If you find any little spots where paint managed to sneak through your barrier onto the glass, it’s easy to remove using a razor blade scraper.
Painted Metal Doors and Windows
Here are some before and after photos so you can really see the difference the paint made.
Even though the color difference from bare aluminum to white is subtle, the windows and doors look so much nicer (and less cheap) now.
I love how they blend in with everything else instead of standing out.


I also built new shutters for the windows, but even without the shutters, I was really surprised at just how much better those windows look.

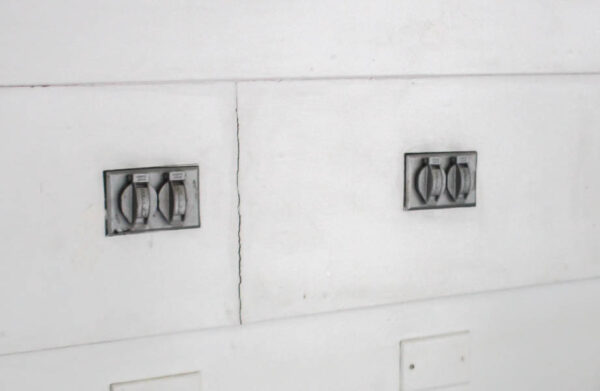
And the metal outlet covers to blend in nicely now. Which is great, since we have at least a dozen scattered around our porch.

This project was particularly quick and easy. I used three cans of spray paint to paint two sets of sliding glass doors, two windows, and a dozen outlets.
And the entire project was done in a couple of hours.
The majority of that time was spent cleaning and taping everything.
The actual painting took less than ten minutes.
Video Tutorial
I’d love for you to subscribe to my Youtube channel!
Please share this post on Pinterest!

How to Paint Aluminum Windows and Door Frames
It’s quick and easy to update your old doors and windows by simply painting them. The best part is it costs just a few dollars!
Materials
- All-purpose cleaner
- Painter’s tape
- Roll of kraft paper or wrapping paper
- Spray paint
Tools
- Vacuum
Instructions
- Start by removing any pollen and dust in the door frame by vacuuming it out.
- Use an all-purpose cleaner and rag to clean the surfaces you will be painting.
- Secure painter’s tape all along the edges of the surfaces you will be painting.
- Cover the entire glass section of the windows and doors with kraft paper or wrapping paper.
- Shake your paint thoroughly for about a minute and then begin painting.
- Hold the spray paint 6 to 8 inches from the surface and move it with a steady back and forth motion.
- You will need 2-3 thin coats of paint.
- Once the paint is dry, remove the painter’s tape and paper.
Recommended Products
As an Amazon Associate and member of other affiliate programs, I earn from qualifying purchases.
-
 Rust-Oleum 338945 Stops Rust Advanced Spray Paint, 12-Ounce, Semi-Gloss White
 -
Made in USA Brown Kraft Paper Jumbo Roll 17.75” x 1200” (100ft) Ideal for Gift Wrapping, Art, Craft, Postal, Packing, Shipping, Floor Covering, Dunnage, Parcel, Table Runner 100% Recycled Material
-
ScotchBlue Original Multi-Surface Painter’s Tape, 2.83 inch x 60 yard, 1 Roll


A few other posts I think you will like:
The Best Paintbrushes for a Perfectly Smooth Paint Finish
Caulk or Wood Filler: Choose the Right One for Every Project
Painting Sliding Glass Doors: One Less Eyesore

Google Web Story: Painted Aluminum Windows and Door Frame
Wow! That made a huge transformation! I too have orangey brick, I wanted to lime wash or German smear it but my husband was totally against it. Instead the stucco got a refresh. I painted all of the pop out a charcoal gray. That made all the difference.
That’s awesome! It really is true that changing up small details makes a much bigger difference than we’d think!
Did you paint the inside of the track? If so, how’s that holding up with use of the door?
Yes, I did paint the inside of the track as well and so far it still looks great, but it has only been a few months. I also painted the inside of the sliding doors several years ago and over time about half of the paint has worn off of the track where the door rubs as it opens. The rest of the paint inside still looks great, just the track is pretty worn. Because of where it is, it really isn’t noticeable on my doors unless you are looking at it specifically, but I think it might bother some people.
Do you have a tutorial on how to paint the inside? Did you spray paint inside too?
I didn’t paint the insides of my windows. My own windows are wood on the insides and just the storm windows and screens have aluminum frames. Painting them would be a pain and they aren’t very noticeable from inside. I did paint the insides of my sliding doors using pretty much the same method and it has held up well! I have more info on that in this post – https://www.lovelyetc.com/painted-sliding-glass-doors-one-less-eyesore/
Hey there, just curious on how the exterior windows are holding up ? I am contemplating doing this to my windows. But I do not want to do it if they are going to scratch.
So far they are holding up great! No problems or scratches at all. The great part about painted windows is that while they do have to hold up to weather, they actually aren’t touched or handled so scratching isn’t the paint isn’t as likely as with more high-traffic surfaces.
Hi! I have these same windows. How did you go about painting the metal parts that slide in the window? Or did you juat paint whats on the outside?
Great question – I just painted the outsides. I know everyone’s windows may be a bit different. Mine have several parts – screen windows, storm windows, and the inner window casing. The actual inside of my windows is wood and is already painted white and now the outside metal is also painted white. I didn’t paint all of the other bits because it would make it so much more time-consuming and difficult. Luckily, the metal color really isn’t noticeable from the outside or inside.