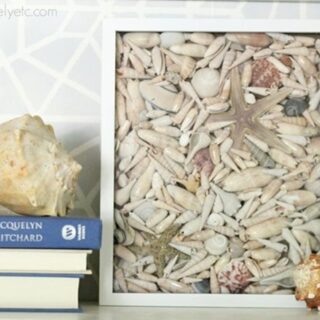
Simple seashell shadowbox
This seashell shadowbox is a great, simple way to display all those shells you gathered at the beach. Works great on a shelf or hanging on the wall.
 craft for all those seashells you collect on vacation.")
I’m at it again – crafting away with my seashell collection. The danger with seashell crafts is it is so easy to go too far.
The more simple the project, the less likely it is to end up looking like tacky décor from a 1980s beach condo.
This project is so simple I almost feel silly sharing a tutorial.
Except that I do have some tips to make it turn out gorgeous and effortless.
Because we all know most effortless things – from hair to makeup to décor – actually require a bit of planning.

- Gather all of your shells. Take out any that are too thick to fit in your frame when it is closed.
- Separate your shells into a few piles – tiny ones, bigger ones, and extra special ones.
- Start with the extra special ones – lay them on the glass first (face down). Fill in around them with bigger shells.
- Fill in all the little cracks and holes with tiny shells. Shake your frame a little to spread everything around.
- Put the backing on your frame and stand it up. As the shells settle, you will see bare spots at the top of the frame.
- Open the frame back up and fill in the bare spots with more shells.
- Duct tape the back of your frame closed just to be safe.
So…the duct tape thing. A few years ago I made a similar shell shadowbox using a different type of shadowbox.
No duct tape. One day as I was rearranging things on my shelves, this happened.

Lesson learned. Luckily, my new version is completely secured and ready for action.

Hope you are enjoying your summer! Does anyone else have any awesome seashell crafts to share?
I’m always on the lookout for more ideas.
Simple seashell shadowbox
Create a beautiful DIY seashell shadowbox using collected shells. It's a simple project that looks beautiful and is a wonderful way to remember your beach vacation.
Materials
- Seashells
- Shadowbox
- Duct tape
Instructions
- Gather your shells, leaving out any that are too thick to fit in your frame.
- Separate your shells by size. Also set any extra special ones aside.
- Lay the special ones on the glass first face down.
- Fill in around them with bigger shells.
- Fill in the little cracks and holes with tiny shells.
- Shake your frame a little to spread everything around.
- Put the backing on your frame and stand it up. This will probably cause the shells to settle, creating a few bare spots.
- Open the frame back up and fill in the bare spots with more shells.
- Duct tape the back of your frame closed to make it extra secure.
Recommended Products
As an Amazon Associate and member of other affiliate programs, I earn from qualifying purchases.


LOVE this!
Thank you so much!
Isn’t this sea shell art so PRETTY! I love what you’ve done and will no doubt be using this as inspiration to display my own shells. Beautifully done.
Thanks Ann! I think sometimes the simplest things are the most beautiful.
What a great idea! I would never have thought to do this with shells. Thanks for the inspiration!
Thanks Melanie!
Ok, so I tried to make this today with a shadow box I already had at home. This particular box had a magnetic open, so it was like a “case” and I had to put my shells on the backing. Well, as soon as I lifted it up, the shells started spilling out! I think I’ll need to find another frame to make this work. You didn’t need to hot glue the shells in or anything? Where did you place the duct tape so that it wasn’t visible from the sides of the frame?
Yes, the same thing happened to me the first time too! (The photo in the post with all the shells spilling out, lol). The winning version was using a frame that is more similar to a regular photo frame, just with a thicker ‘box’. I didn’t use any type of glue, just packed the shells in tight and filled in bare spots until it was totally filled in. Then I put the duct tape all along the back edge. I believe I cut the duct tape in half to make two long thinner strips and then just secured it all along the edges where the backing attaches to the frame. There’s usually a bit of a ‘lip’ there so the tape doesn’t have to extend onto the sides of the frame. I was just careful when lining it up so it wouldn’t be visible from the sides/front. Good luck!
I picked up an 8×10 shadow box from hobby lobby. This particular shadow box has the back of a picture fram with the metal tabs that you can fold down behind the backing. I feel like this box is secure enough without needing any duct tape. Thank you for the motivation. My shell box turned out perfectly!!! :)
I’m so glad! This was such a fun, simple project.
I purchase a shadow box that opens from the front so I could lay them exactly how I wanted and not worry about flipping over
Such a great idea! Just be sure it closes securely. :)