How to make gorgeous 3D paper bag snowflakes
This step-by-step tutorial will show you exactly how to make the most beautiful paper bag snowflakes including how many bags to use, the best snowflake patterns to cut, and how to hang them when you’re done.
I was the queen paper snowflake maker back in elementary school, so when I started seeing pictures of big 3D paper bag snowflakes online I knew I had to make some.
These snowflakes are super cheap to make and they are absolutely beautiful.
And because they’re big, they make a huge impact in your space, unlike a lot of other fiddly little Christmas crafts.
These snowflakes are actually pretty easy to make but there are a few things you need to know to get the absolute best results.
Since this was my first time making this type of snowflakes, I did a deep dive into all the tutorials I could find to make sure I knew the best possible way to do things. And while they were mostly the same, I did see a few differences of opinion on how to get the best results.
So I decided to put them all to the test and I’m pretty confident I now I have the absolute best possible paper bag snowflake tutorial to share with you.

This post contains affiliate links which means if you make a purchase after clicking a link I will earn a small commission but it won’t cost you a penny more. Click here to see my full disclosure policy.
Materials
- Paper lunch bags – You can use regular super cheap brown lunch bags or you can also buy white bags pretty inexpensively. You can also use large grocery size bags or smaller snack sized bags. For most of my snowflakes, I used these white bags from Amazon along with these smaller favor bags from Michaels.
- Hot glue gun – for gluing the bags together, regular Elmer’s glue is another option
- Scissors
- Craft knife and cutting mat – this is optional but gives you a lot more options for your designs
- Tape – for attaching the two edges of your snowflake together at the end
- Fishing line – for hanging your snowflakes
- Clear command hooks – for hanging your snowflakes
How many bags do you need to make Paper bag snowflakes
For each snowflake, you will need 9-10 bags.
When I was diving into all the different tutorials I could find, I saw posts recommending you use 7 bags, 9 bags, 12 bags, even 15 bags. So my first step was to do a quick test to see how many bags actually works best.
I made snowflakes from standard brown lunch bags using 7, 9, and 12 paper bags.
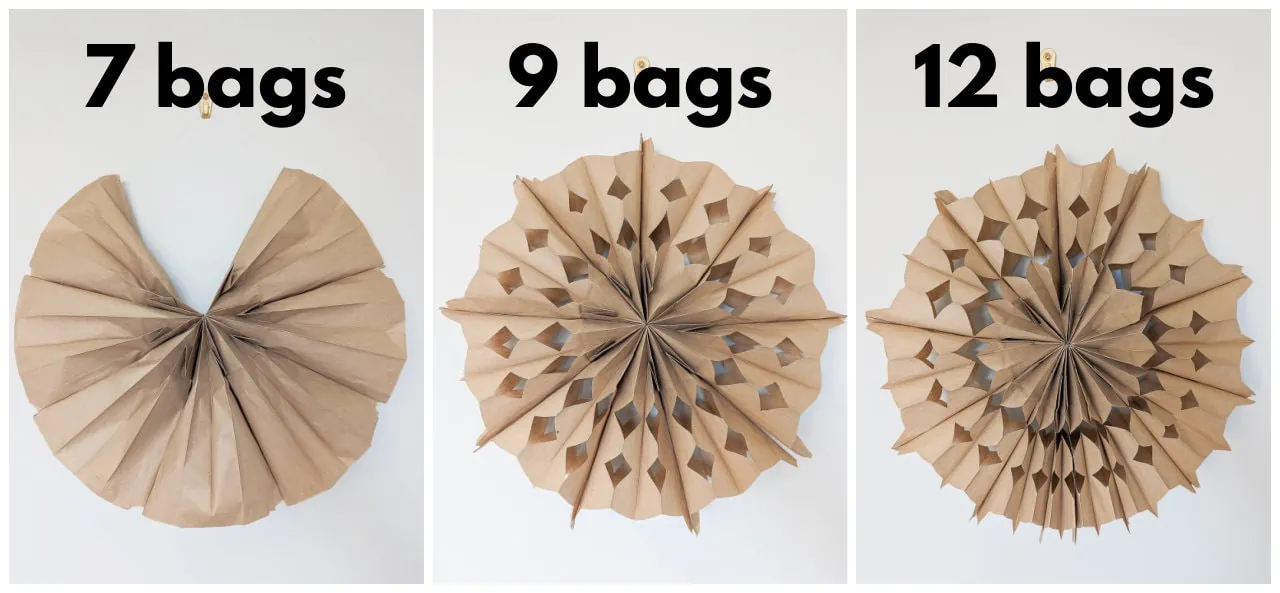
As you can see, seven wasn’t nearly enough. Twelve was just a bit too much as the extra weight of the bags sagged down to the bottom, making the overall pattern not as symmetrical. Nine was just right.
If you are using bags that are larger or smaller than traditional lunch bags, you might need to do a few more or a few less. When I made snowflakes from smaller favor bags, I needed ten bags to make a perfectly symmetrical circle.
How to make Paper Bag Snowflakes
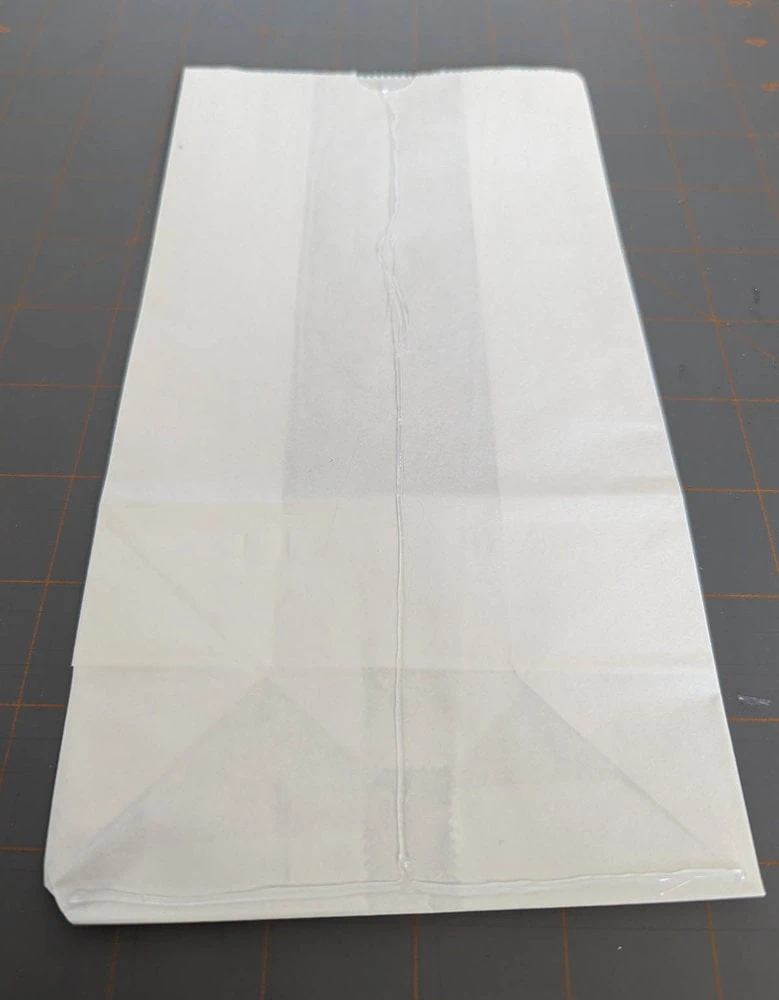
Glue the bags together
Start with one bag and run a line of glue down the center and then across the bottom like an upside down T.
Then place the next bag directly on top of it, making sure the bags are facing the same way. Repeat until all 9 bags are stacked.
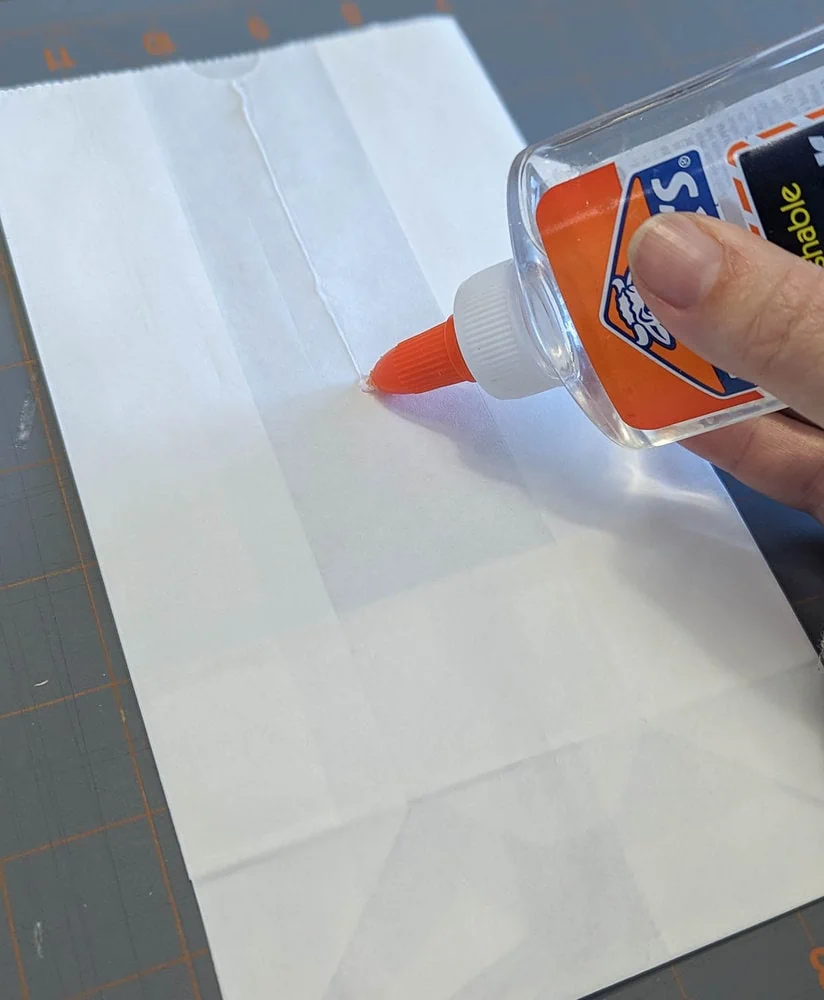
You can use hot glue or regular Elmer’s glue for this.
After trying both, I prefer using hot glue simply because it dries instantly so you can immediately move on to cutting out your snowflakes. If you use school glue or craft glue, you’ll need to let it dry for a bit first.
But either glue holds just fine.
Once the glue is dry, you can fan out your bags to double check that they look okay before moving on to drawing the designs.
Paper bag Snowflake Patterns
Now you’re ready to design your snowflakes.
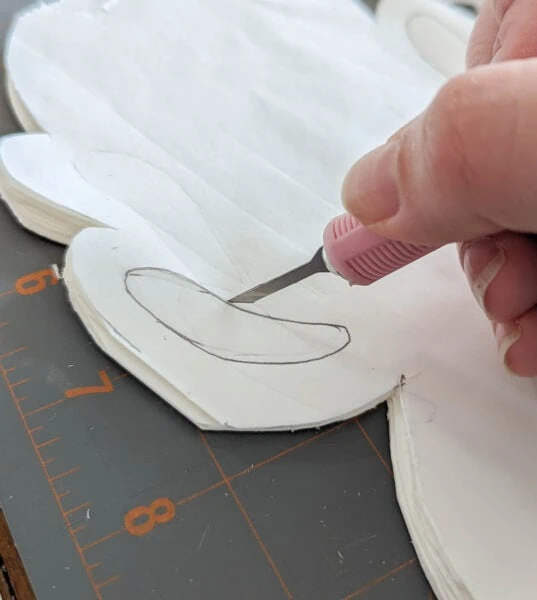
When you are cutting your designs, you want to keep your cutting to the top and sides of the bag. Be sure not to cut along the lower edge. You wouldn’t really see any cuts there and they would just make the whole thing less stable.
I experimented a bit with different types of designs on some spare paper bags and figured out a few helpful guidelines.
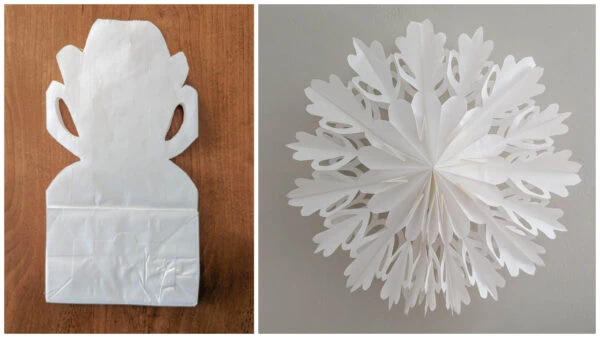
- It works best to make your designs symmetric so you can see all the way through the cut away portions.
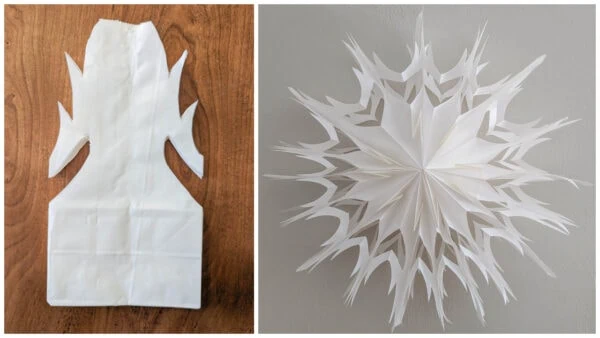
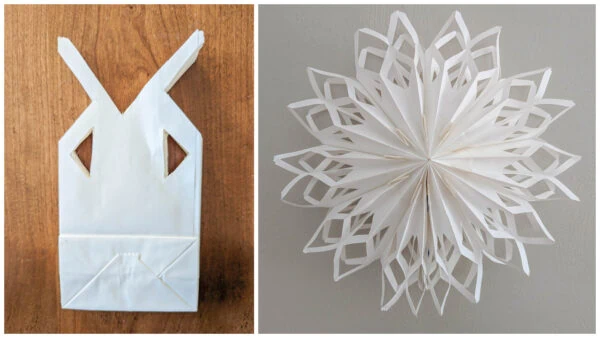
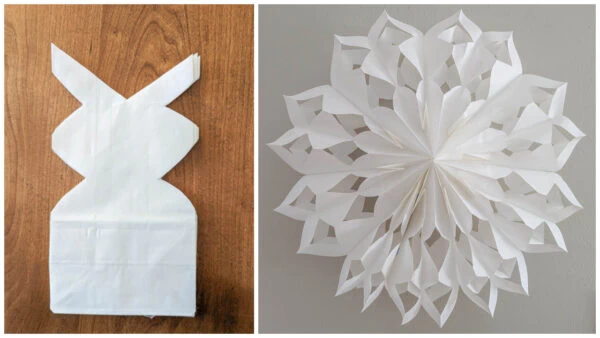
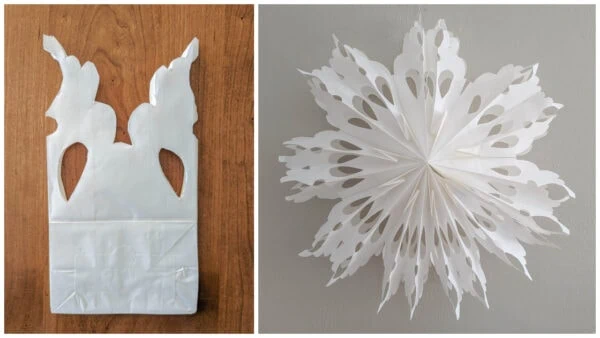
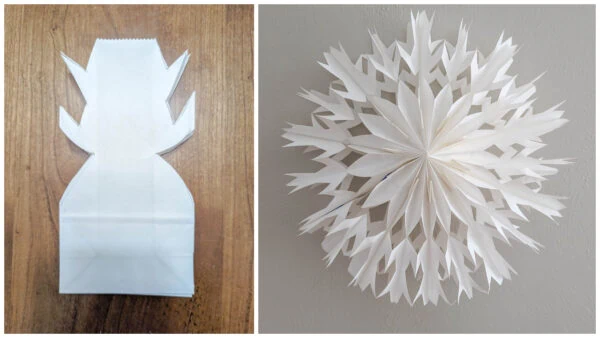
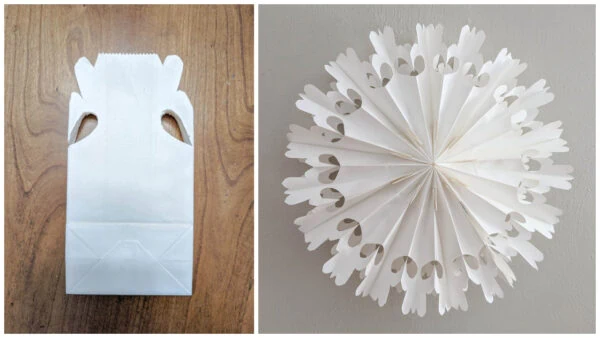
- Designs can come to a ‘point’ in the center of the bag or can be shaped more like a ‘V’ with a point at each corner.
- Using a craft knife to cut out a shape or two that isn’t connected to the side of the bag really makes the design look more intricate. If you decide to do this, keep these cuts to the outer fourth of the bag where they will be seen more when the snowflake is unfolded.
- Designs with either a lot of curved lines or a lot of more pointy bits look the best and most like snowflakes.
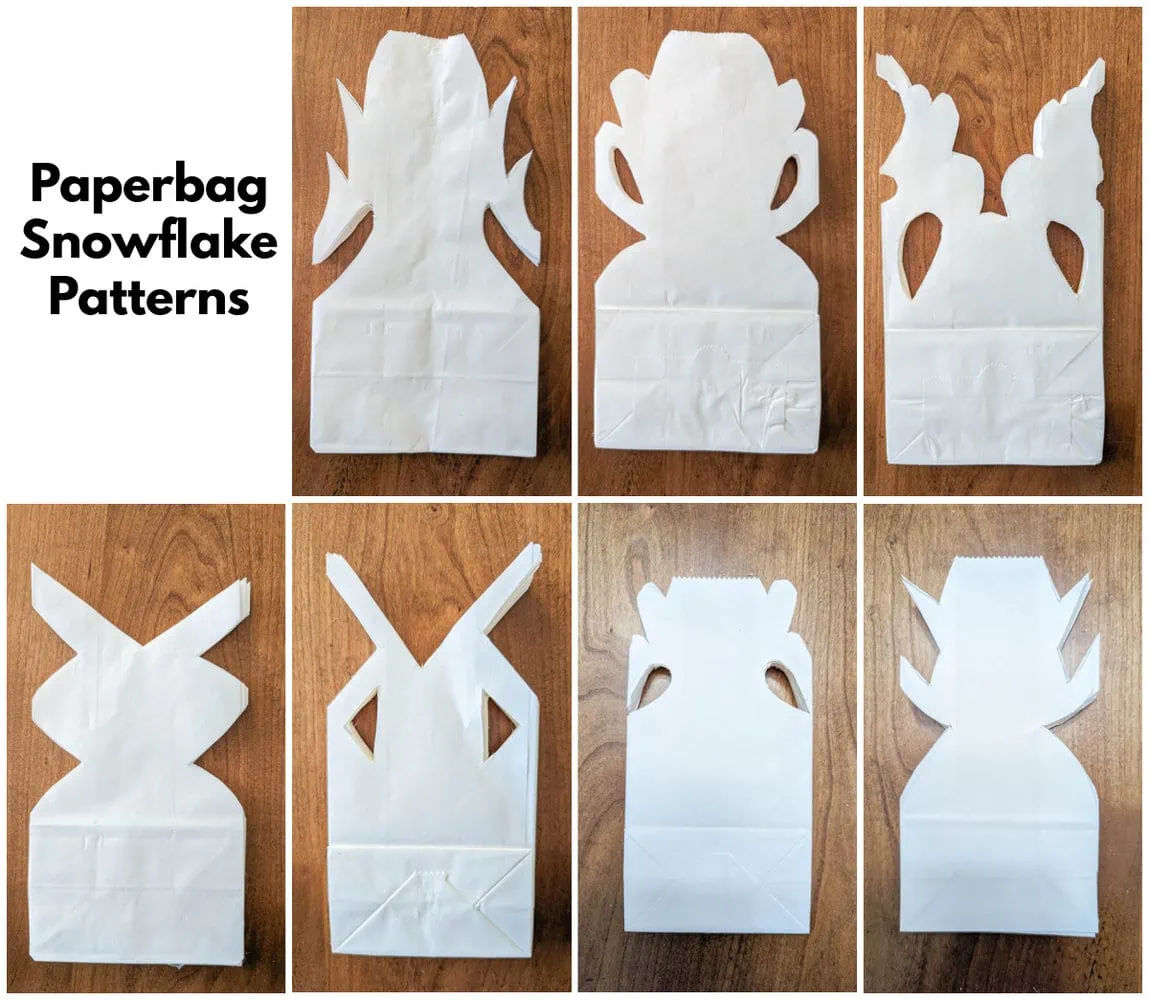
I recommend drawing your snowflake design onto the bag first rather than just going at it with the scissors. This makes it a lot easier to make sure things are spaced well and are symmetric.
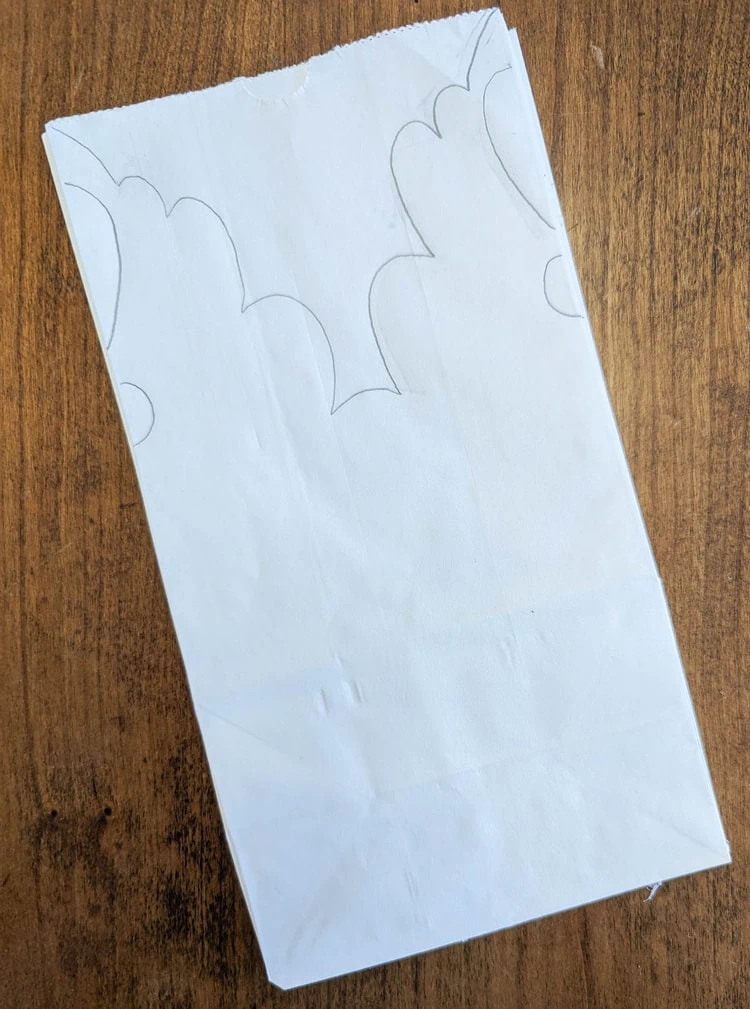
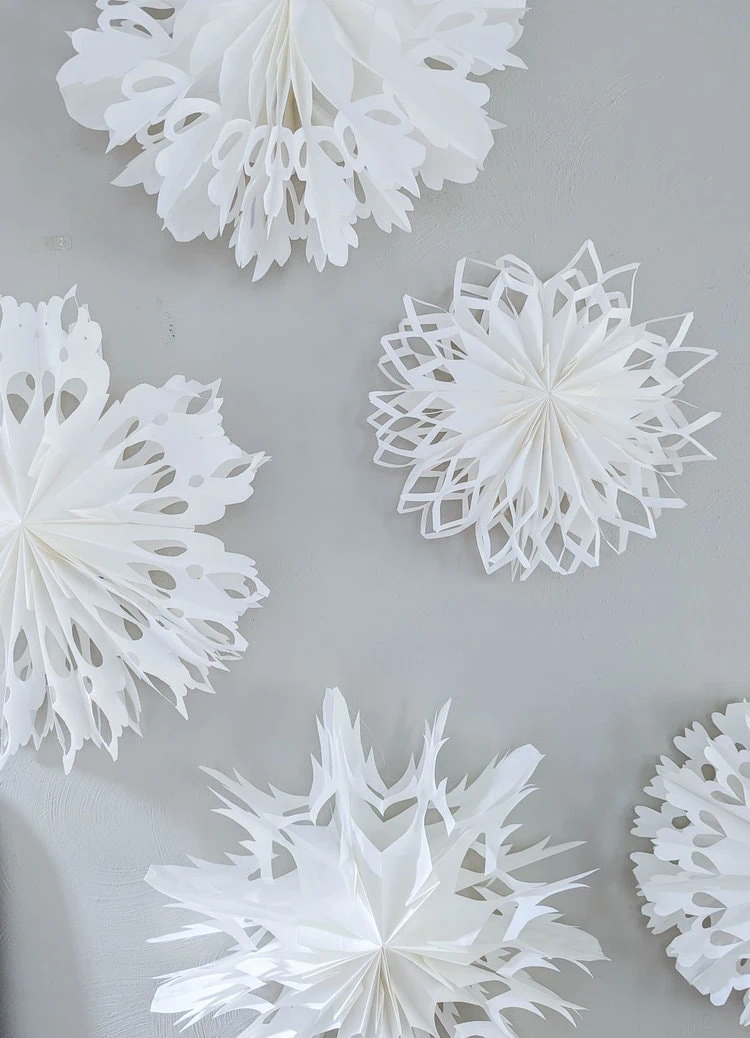
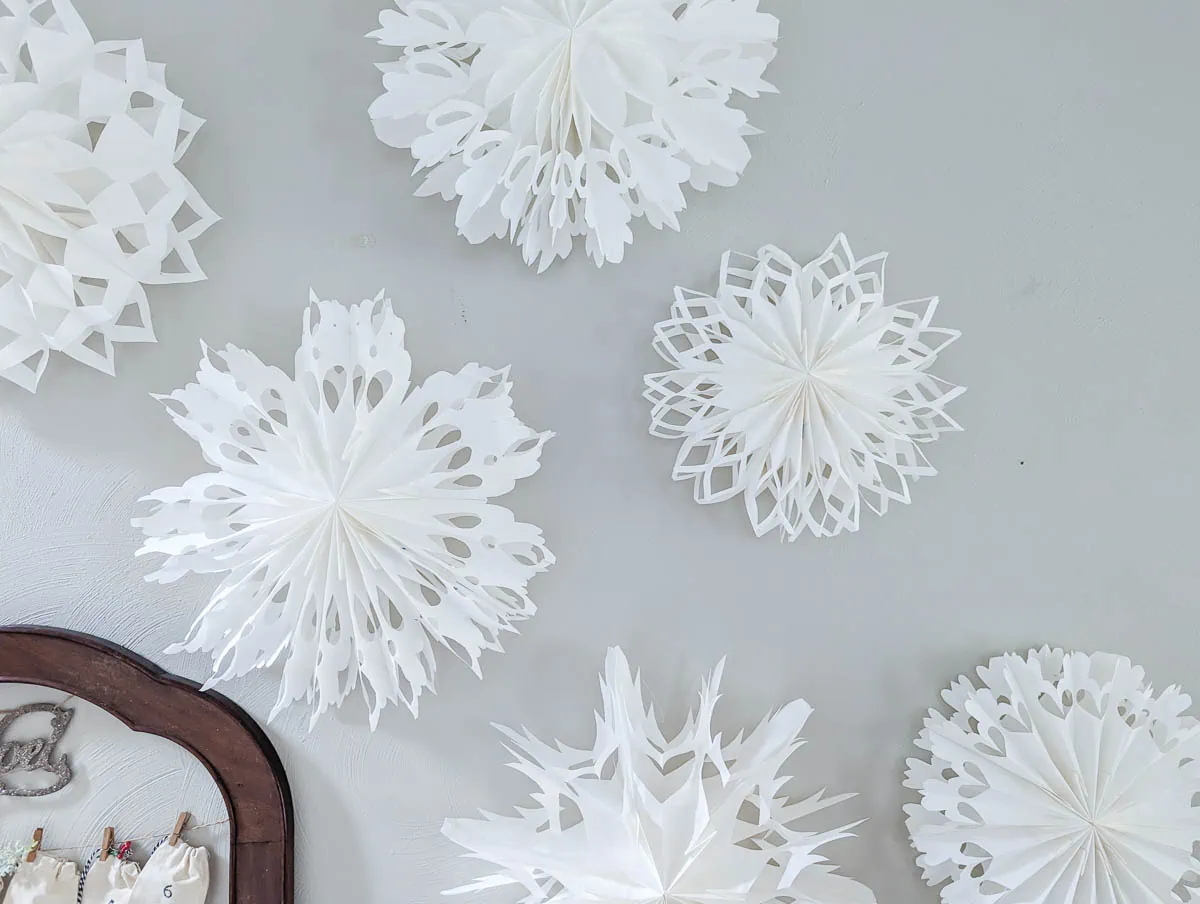
Below are photos of the snowflake patterns I used next to the completed snowflakes.
Cut the snowflake patterns out
Once your design is drawn out, it’s time to start cutting.
This is the only part of the whole process that isn’t super easy. In fact cutting out my snowflakes was much harder than I imagined. Each bag has several layers of paper and each snowflake has 9-10 bags which means there are many, many layers of paper to cut through.
Several tutorials I saw implied you could just cut right through all those layers. That did not work for me. I tried cutting them with regular scissors. I tried cutting them with heavy duty scissors. No matter what I did, cutting through all the layers at once was not happening.
Instead, I had to work in layers, cutting through a few bags at a time. This worked fine but did take a lot more time.
The same was true for the parts I cut using a craft knife. It helped a lot to use a fresh, new blade in my craft knife, but I still needed to cut each section a few bags at a time.
Unfold your snowflakes and hang
Now you get to open up your snowflake and see how it looks!
You can glue the two outer edges together to keep your snowflake open, but I prefer to use something temporary. That way after the holiday season, you can just fold your snowflakes back up and pack them away to reuse next year.
I attached my outer edges using a paperclip and then used a few folded pieces of tape to keep them laying open nicely.
I punched a hole in the top of each snowflake and strung fishing line through to hang them. You could also use other types of string, but I love how fishing line just disappears.
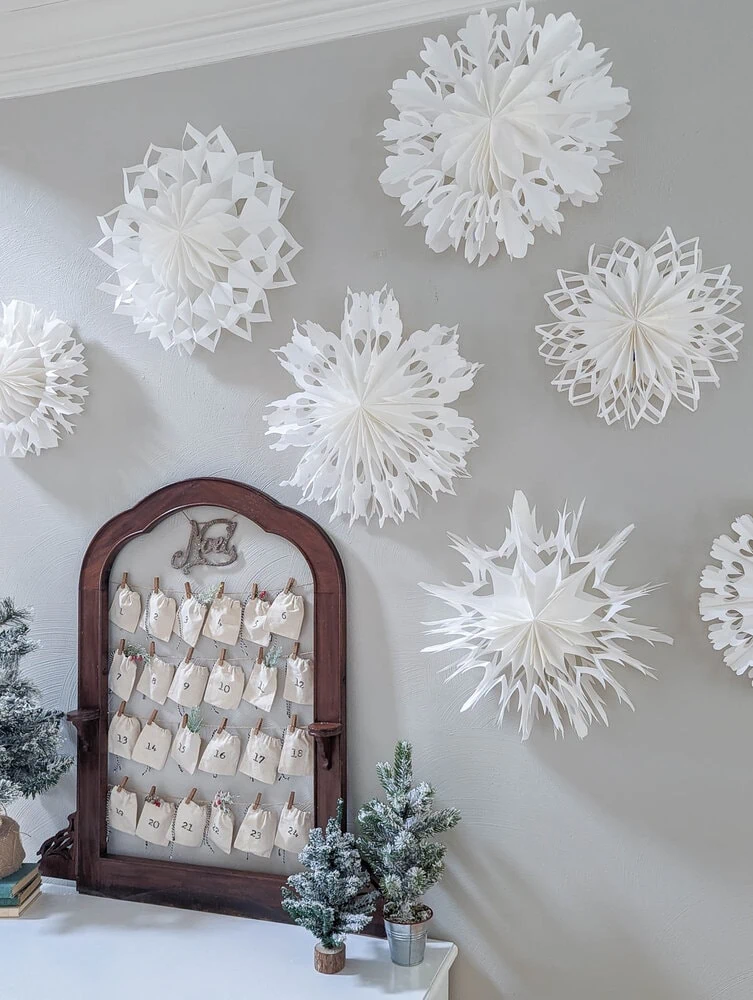
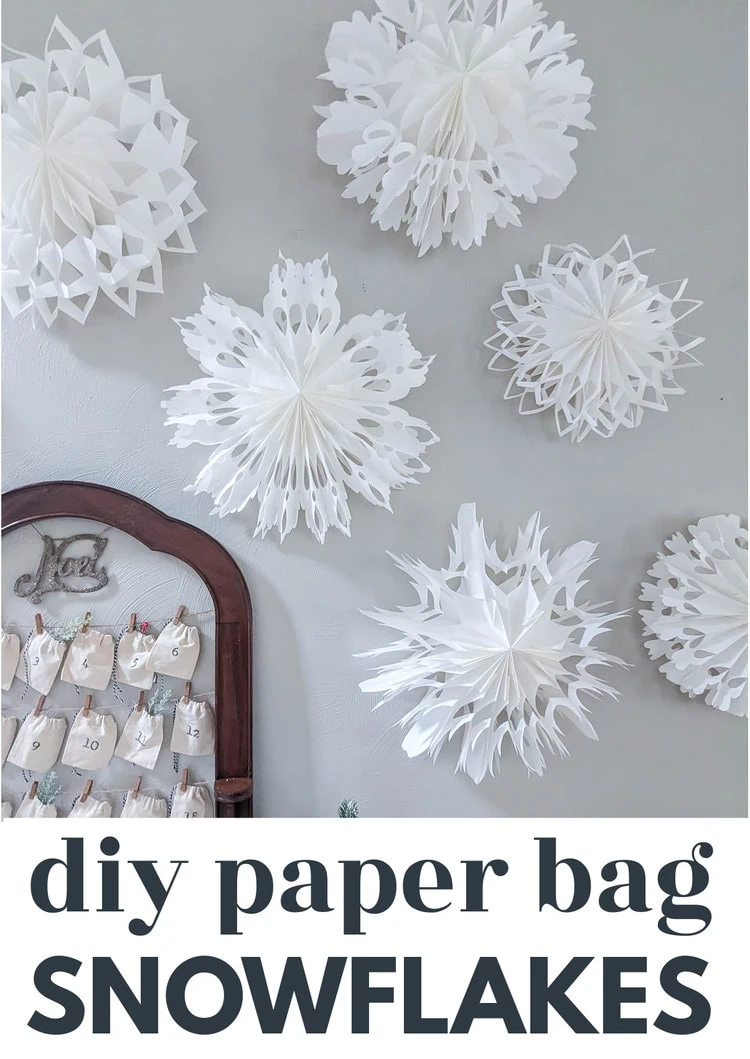
I decided to hang my snowflakes in our entryway around our Christmas countdown calendar.

To hang them, I placed small clear Command hooks on the wall and hung the fishing wire from the hooks. You can also hang the snowflakes themselves directly from the hooks, by hooking through one of the cut-out sections on the back.
I absolutely love how my snowflakes turned out! Coming up with designs and then opening them to see how they turned out was a lot of fun and I think they look absolutely beautiful.
It’s kind of funny. I spent a lot of effort trying to figure out the best way to make these paper bag snowflakes and I think I accomplished that.
But I also discovered that they’re kind of hard to mess up. If your glue lines get a little wobbly, if your design isn’t totally symmetric, if your kid gives up and only cuts out half the design…once you unfold your bags, they still look cute.
Can kids make paper bag snowflakes?
Which brings us to the question of how kid-friendly this project is.
This can be a great project for kids to make. My own kids are ages 6-11 and they were all excited to make these with me…until they realized how tough it was to cut through the bags. They still enjoyed making their own snowflakes but none of them wanted to make more than one.
I think these can be a fun project to do with kids who are around 7/8 and up who enjoy craft projects. As long as they keep their snowflake designs very simple and you’re willing to give a bit of help with cutting, they should do fine.
And since these snowflakes tend to look cute even if a few things aren’t done exactly right, they’ll probably be really happy with how they turn out.
Want more DIY Christmas ideas? You can see all my Christmas posts here or you might want to check out these posts next:
I’d love for you to pin this post on Pinterest!

We’ve been playing around with the paper bag snowflakes and I really love the way yours turned out Carrie. They are so beautiful!! I can’t wait to try some of your patterns.
Love this❣️
Thank you so much for posting and giving us All these tips and tricks. I will make both brown & white and hang a bunch – no ‘less is more’ vibes here this Christmas
Marry Christmas ,Snowflake Queen❄️✨
You’re welcome – and when it comes to Christmas, I’m with you. More is more!
Couldn’t you draw the pattern on one bag without gluing all the bags together to start with, so that you could cut the pattern on the first bag and then run the glue down it and marry it to second. That way while it dried, you can cut out the next bag and so on and so on.
Yes, this is a great suggestion! It would probably take longer in the end, but cutting out the pattern would be much easier. Great idea!
Oh my gosh, I love making these. They are so beautiful and easy. Thank you so much for sharing this.
Shirley
Thank you!