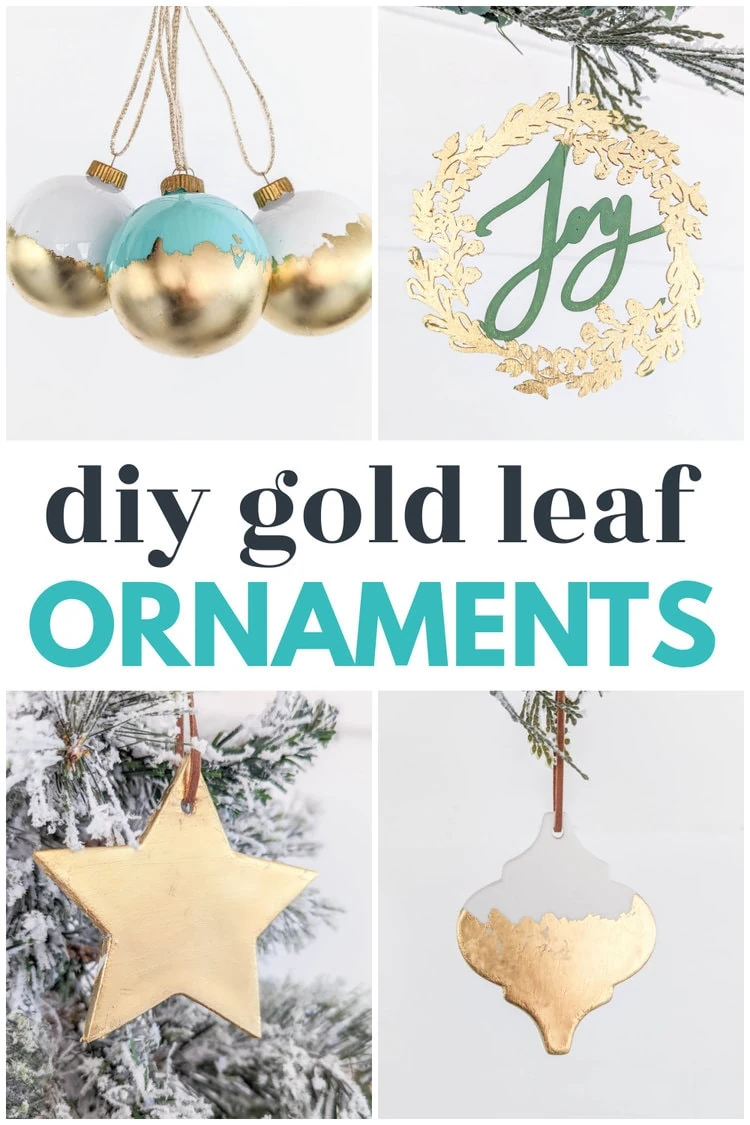
How to Make Easy and Beautiful Gold Leaf Christmas Ornaments
Learn how to make four different DIY gold leaf ornaments along with the easiest gold leaf to use and how to make sure your ornaments look beautiful for years to come.
If there’s ever a time I’m drawn to all the pretty shiny things, it’s at Christmas.
Most of the year I prefer more muted, aged metal finishes, but at Christmastime, I’m here for all things glittery and glam.
And I especially love how beautiful shiny gold ornaments look on the Christmas tree with the glow of the Christmas lights making them sparkle.
So this year when I started thinking about what kind of handmade ornaments I wanted to make, I knew I really wanted to try making gold leaf ornaments.
I’ve used all kinds of metallic paint through the years and as beautiful as some of them are, none can hold a candle to the shine of gold leaf.
This was actually my first time working with gold leaf and to be honest, I was a bit nervous it wasn’t going to go great. But luckily it was way easier than I had imagined and now I’m ready to start gold leafing anything and everything!
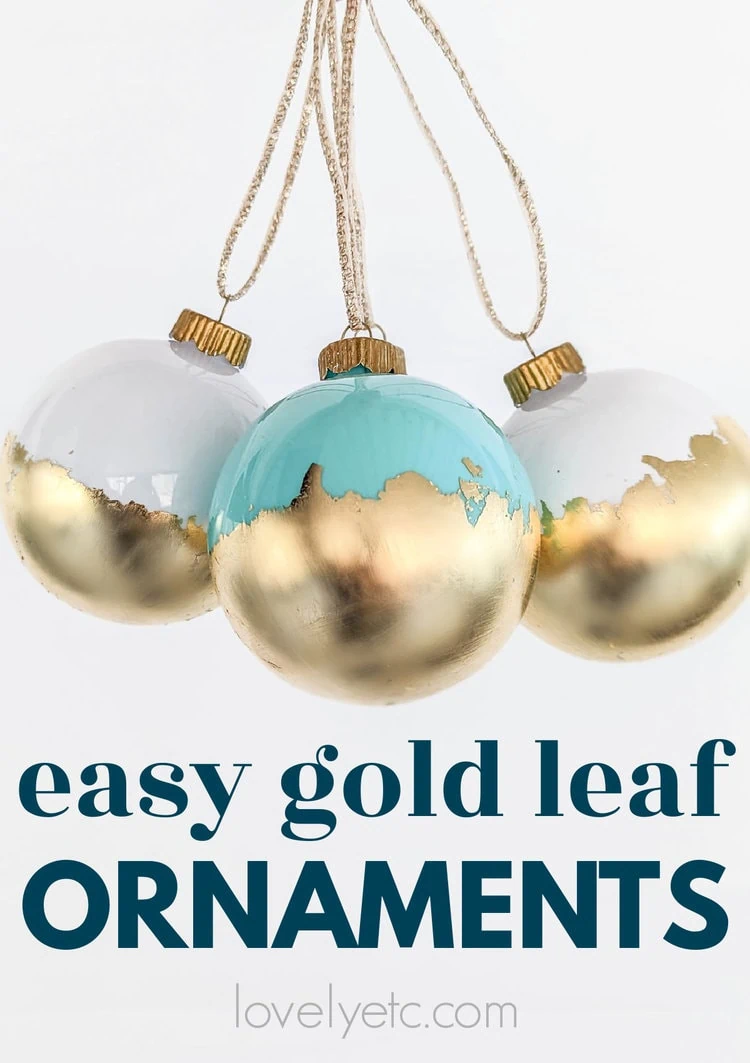
I made four different types of gold leaf ornaments and they all look amazing on our Christmas tree.
In this post I’m sharing how to add gold leaf to a variety of Christmas ornaments, what type of gold leaf works best, and how to seal it so it lasts for years.
Want to see more beautiful DIY gold Christmas decor? Check out this gold Christmas tree star or this gold DIY Christmas tree collar next. Both projects look gorgeous and were super cheap to make.
This post contains affiliate links which means if you make a purchase after clicking a link I will earn a small commission but it won’t cost you a penny more. Click here to see my full disclosure policy.
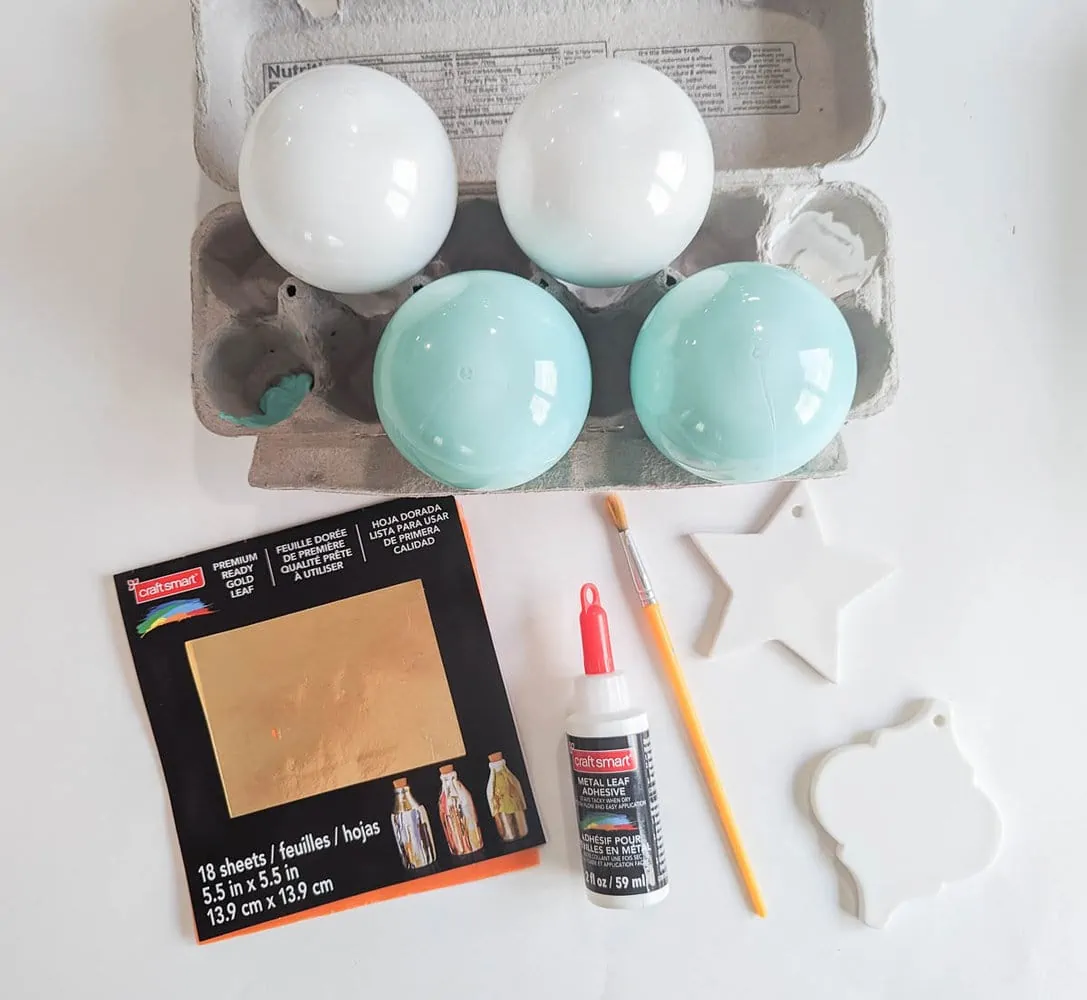
Materials
- Blank ornaments – you can gold leaf just about any type of blank ornament – glass ornaments, plastic ornaments, wooden ornament shapes, wood slice ornaments, ceramic ornaments, pretty much anything. I gold leafed several clear shatterproof ornaments filled with paint, a ceramic star ornament, a ceramic tile ornament, and a wooden wreath ornament, all purchased from Michaels.
- Gold leaf – I used this ready-to-use gold leaf and it was super easy to work with.
- Metal leaf adhesive – you’ll need this to adhere your gold leaf to your ornaments
- Metal leaf sealer – to protect your gold leaf and keep it from tarnishing.
- Soft paintbrushes – for brushing on the glue and also smoothing out the gold leaf. Foam paint brushes or paintbrushes with very soft bristles work best for this so you can avoid brushstrokes.
- Paint for ornament – this is completely optional. I painted the inside of my clear ball ornaments before adding gold leaf. I used DecoArt Americana paint in the colors Sea Breeze and Snow White; any inexpensive craft paints will work.
How to Make Gold Leaf Christmas Ornaments
If you are making gold leaf ornaments using clear ball ornaments, the first step is painting the background of your clear ornaments.
If you are gold leafing a different type of ornament, you can skip ahead to the next step.
Painting clear ornaments
For several of my gold leaf ornaments, I started by painting clear ornaments.
You could, of course also just use colored ball ornaments, but I didn’t have any on hand.
Plus the huge advantage to painting your own ornaments is you can use absolutely any color you want.
I prefer painting the inside of clear ornaments rather than the outside. It keeps the paint from ever peeling off and the final ornament looks much neater and retains the shine of the glass (or plastic).
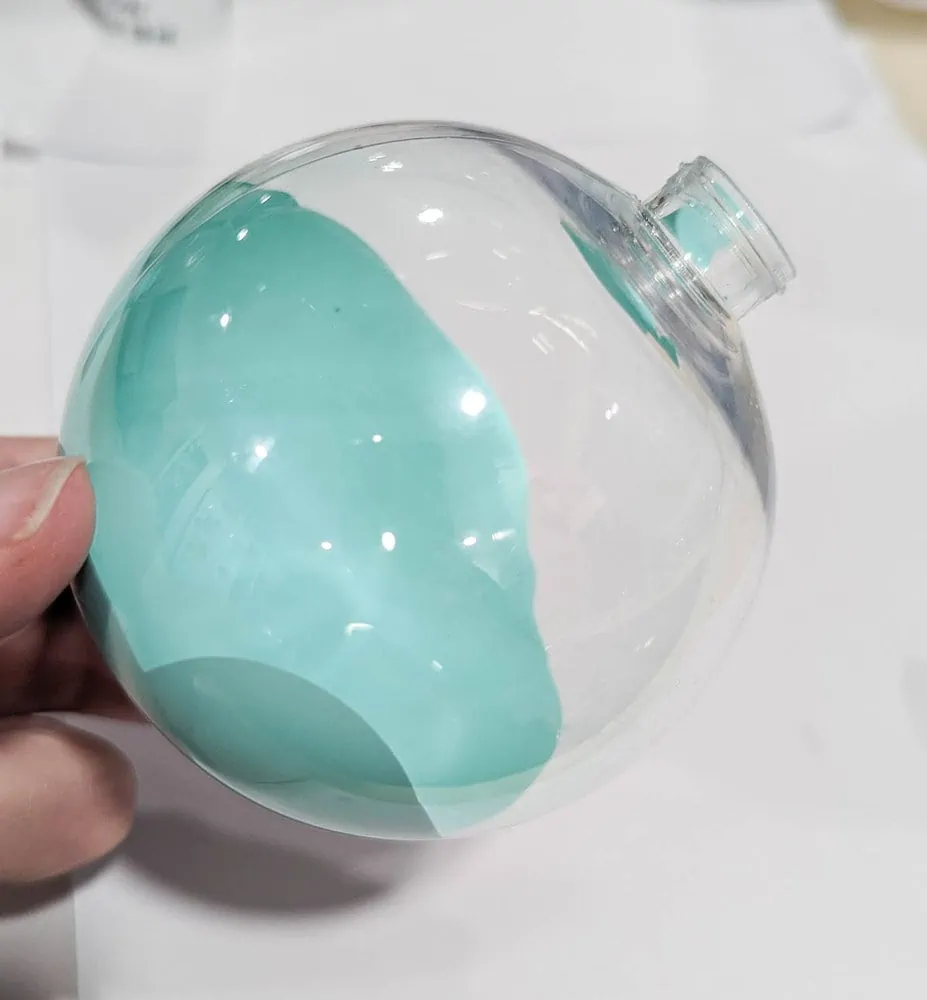
To paint clear ornaments, start by pouring about a teaspoon of paint inside the ornament. Then swirl the ornament around until the entire inside is covered in paint.
You can also cover the ornament opening with your thumb and shake the ornament to help spread the paint.
It helps if the paint isn’t too thick. It should be about the consistency of milk – if it is thicker, it will be hard to swirl it around to cover the entire ornament.
If your paint seems too thick, you can simply mix in a bit of water.
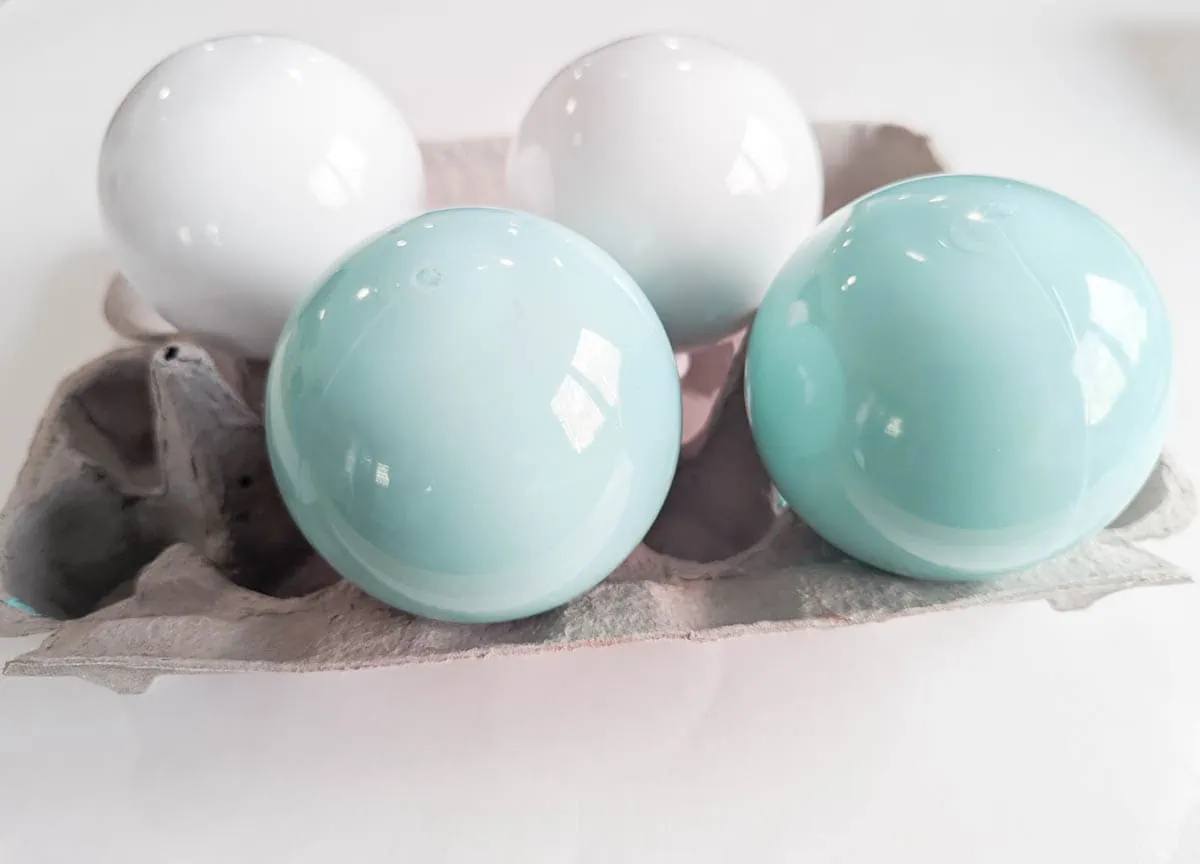
Once your ornaments are covered, turn them upside down somewhere the excess paint can safely drip out. An ornament box, egg carton, or even plastic cups work well.
Let the ornaments dry well before adding your gold leaf.
Types of Gold Leaf
There are a few things to keep in mind when choosing your gold leaf.
First, not all ‘gold’ leaf is actually made of gold. Inexpensive gold leaf meant for crafts like this is typically made of less expensive metals like copper and zinc and colored to look like gold. But even though it isn’t 24K gold, it still looks quite beautiful.
You can also get actual genuine gold leaf, but it will be more expensive.
Whether real or imitation, gold leaf can be purchased as either loose sheets or with transfer paper already attached.
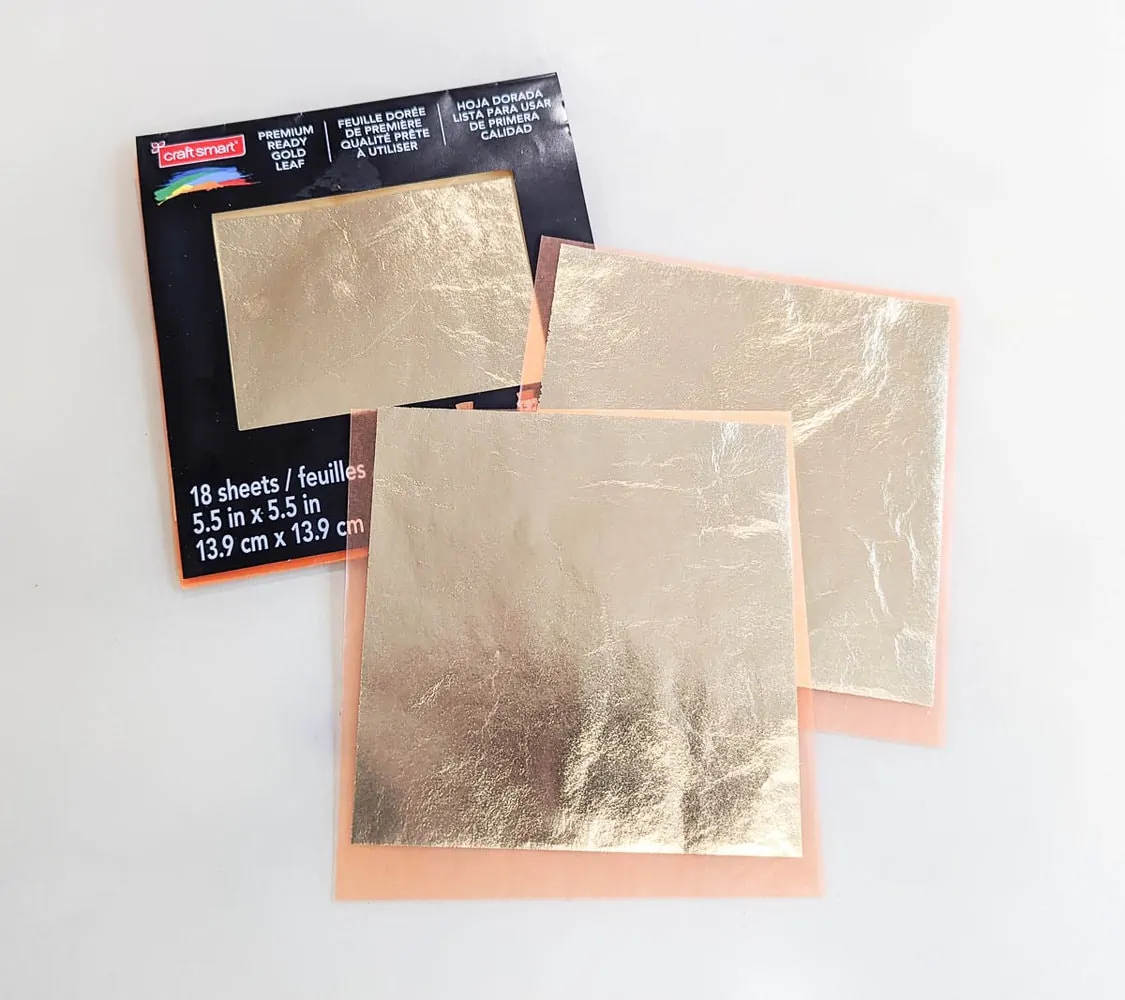
Because it is so fragile, the transfer paper makes it much easier to position the gold leaf. This type of gold leaf is often labeled as ready or ready to use.
For my own ornaments, I used this ready-to-use imitation gold leaf from Michaels which is super affordable at around ten dollars for 18 sheets. I made seven ornaments and still have over half the pack left for a future project.
How to apply gold leaf
Applying gold leaf is quite easy.
First use a foam paint brush or other soft brush to spread metal leaf adhesive wherever you want the gold leaf to go.
Wherever you apply adhesive is where the gold leaf will stick, so this step really determines how covered your ornament will be.
If you want your ornament to have very smooth, complete coverage with the gold leaf, be sure to spread the adhesive over the entire surface.
If you want a more random pattern, leave some spots of your ornaments without adhesive.
For my own ball ornaments, I wanted the entire lower half covered with gold leaf but with a more random edge where the gold leaf ends.
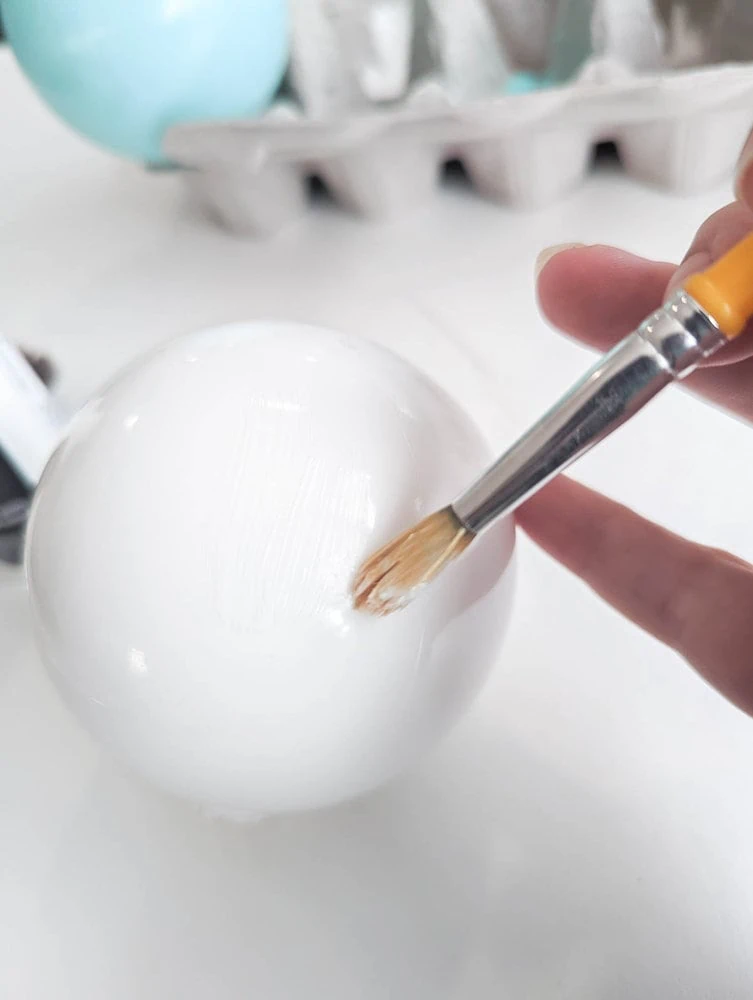
Any brushstrokes in the glue will show through in the final gold leaf, so try to keep the glue as smooth as possible.
Before applying the gold leaf, you need to wait for the adhesive to dry and become tacky.
Follow the instructions on your adhesive as far as how long to wait; my adhesive instructions said to wait thirty to sixty minutes.
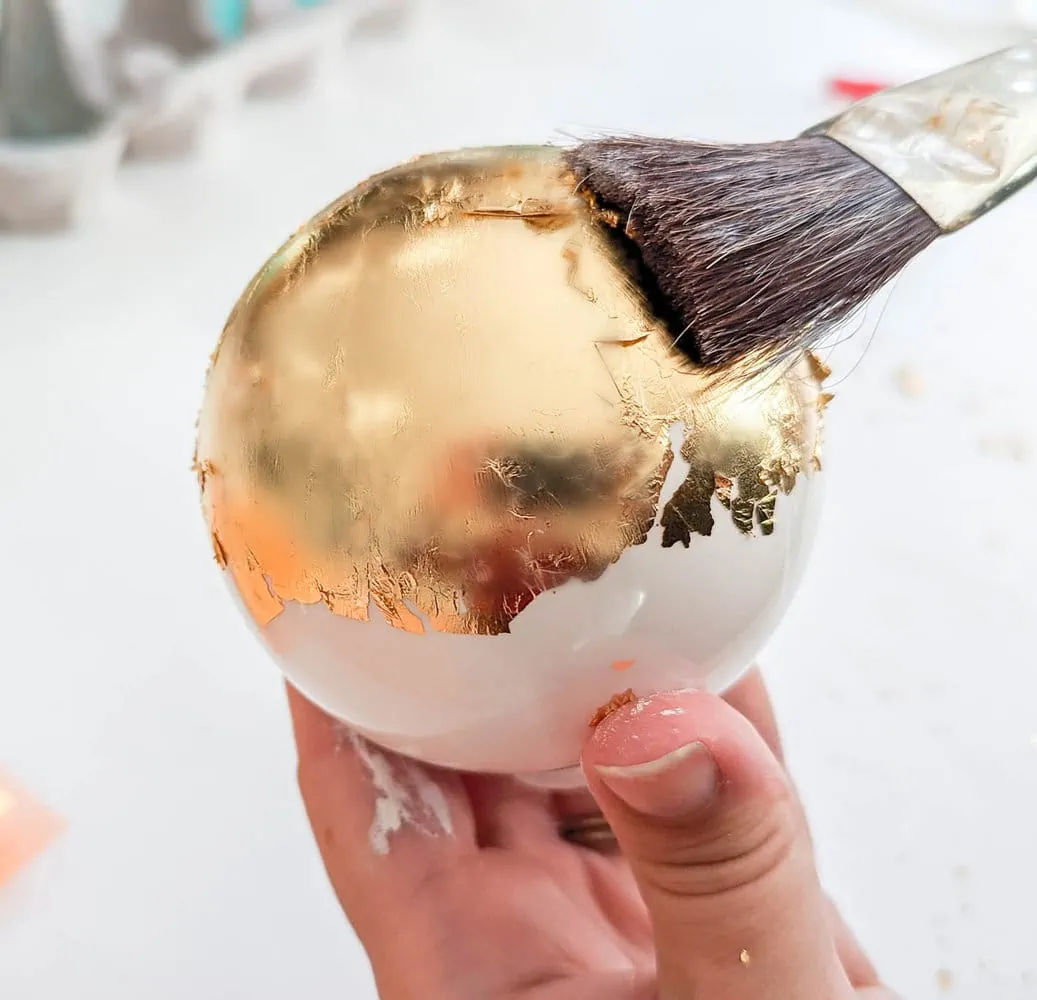
When it’s time to apply the gold leaf, gently lift your gold leaf onto the surface of your ornament where you’ve already spread your glue.
If you are using loose gold leaf sheets without transfer paper, be extra gentle because the gold leaf is quite fragile.
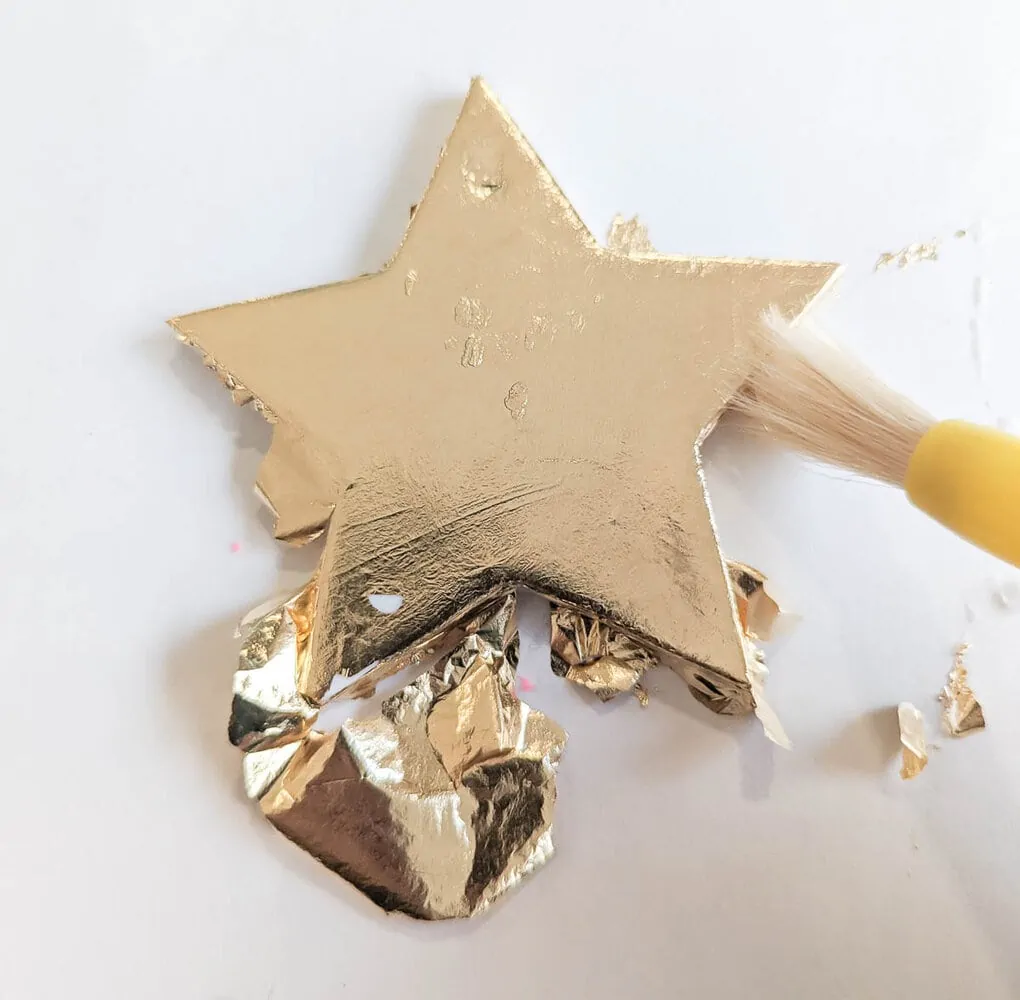
If you are adding gold leaf to a flat ornament, you can simply lay it on top. Then use your fingers or paintbrush to fold the edges over to cover the sides.
Use the paintbrush to brush gently all over the back of the transfer paper to make sure the gold leaf is adhered well.
If you are adding gold leaf to a round ornament, set it in place over the ornament and fold it so that it adheres all around the ornament. Then gently brush your paintbrush all over the transfer paper to make sure it is adhered well.
Carefully remove the transfer paper and use your paintbrush to gently brush all over the gold leaf again. This will help ensure the gold leaf sticks well while also brushing off any loose bits of gold leaf.
Keep in mind that gold leafing is not meant to look perfect. There will be small cracks and wrinkles and that is okay.
The imperfections and slight texture is part of the beauty of gold leaf.
Filling in gaps in the gold leaf
There may be a few big bare spots on your gold leafed ornaments that you aren’t loving.
If that’s the case, don’t worry because it is quite easy to fill in any gaps and holes in your gold leaf.
Simply lay an unused section of gold leaf over the bare spot and brush over it with your paintbrush. Remove the transfer paper and brush over it again. You typically don’t even need to add more adhesive first.
Do you need to seal gold leaf ornaments?
It is usually recommended that you seal gold leaf for a few reasons.
- It is very fragile and will last much longer if properly protected with sealer.
- If you use imitation gold leaf which is made from copper and zinc, it will tarnish over time if not sealed.
Since we are using gold leaf on ornaments and not something like furniture, I’m not too worried about it being fragile.
But tarnishing could be a real issue. If you want to ensure that your gold leaf ornaments continue to look beautiful for years to come, sealing it with metal leaf sealer is a very good idea.
I wasn’t originally planning to seal my ornaments, but after doing a little research into whether it is needed, I decided it’s worth the extra step.
How to seal gold leaf
Sealing your gold leaf ornaments is super easy.
You do need to use metal leaf sealer which is specifically formulated to protect the metal leaf from tarnishing.
You should follow the instructions on your particular metal leaf sealer as far as how to apply it.
But in general, you will gently brush sealer over your gold leaf, being careful not to overbrush it.
It will go on milky at first but should dry to a clear, glossy finish.
Paint your ornament tops to match
If your ball ornament tops weren’t already gold, you can either gold leaf them or simply paint them with gold paint.
And finally add a string and you’re ready to hang them!
DIY gold leaf ornaments
Here are the various finished gold leaf ornaments I created.
I think this group shows a bit of the variety of looks you can achieve with gold leaf, but of course, this is just a tiny fraction of the types of ornaments you could create.
Gold Leaf Ball Ornaments
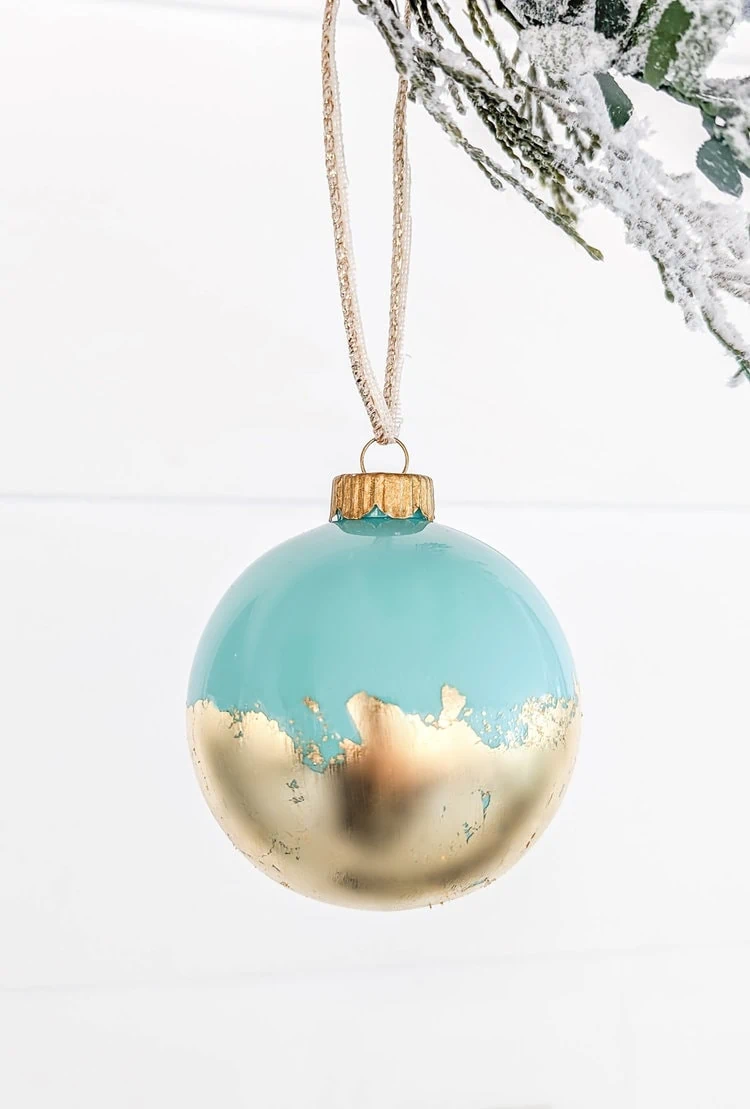
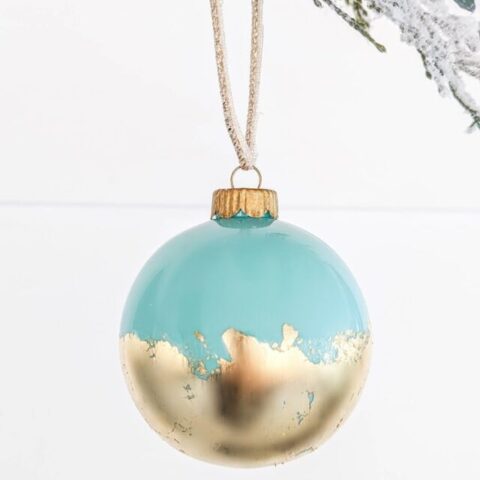
I painted clear ball ornaments with two different colors of paint and added gold leaf to the lower halves. I love how elegant these turned out.

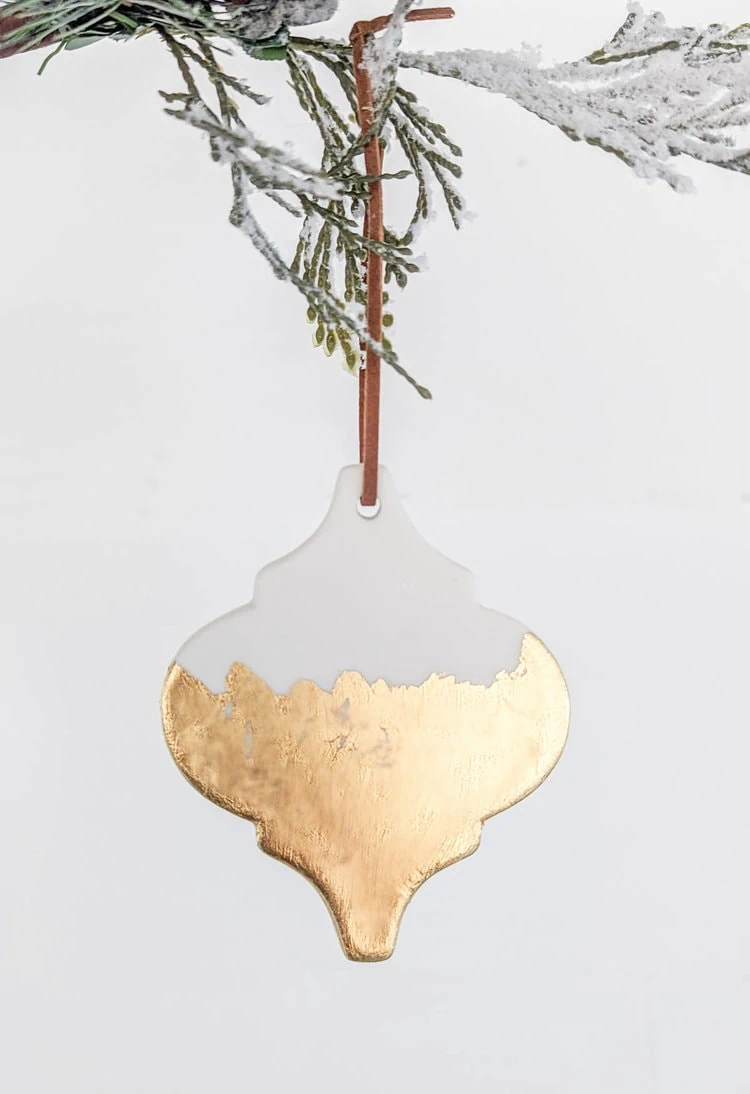
Gold Leaf Tile Ornament
I made this ornament using a ceramic tile ornament from Michaels, but you could also use actual tiles. I love how this ornament turned out and definitely want to make more DIY ornaments using these tile shaped ornaments.
Gold Leaf Star
I gold leafed the entire star ornament rather than just one section. On it’s own it doesn’t look as interesting as the others, but this ornament really shines on the tree when the Christmas lights hit it.

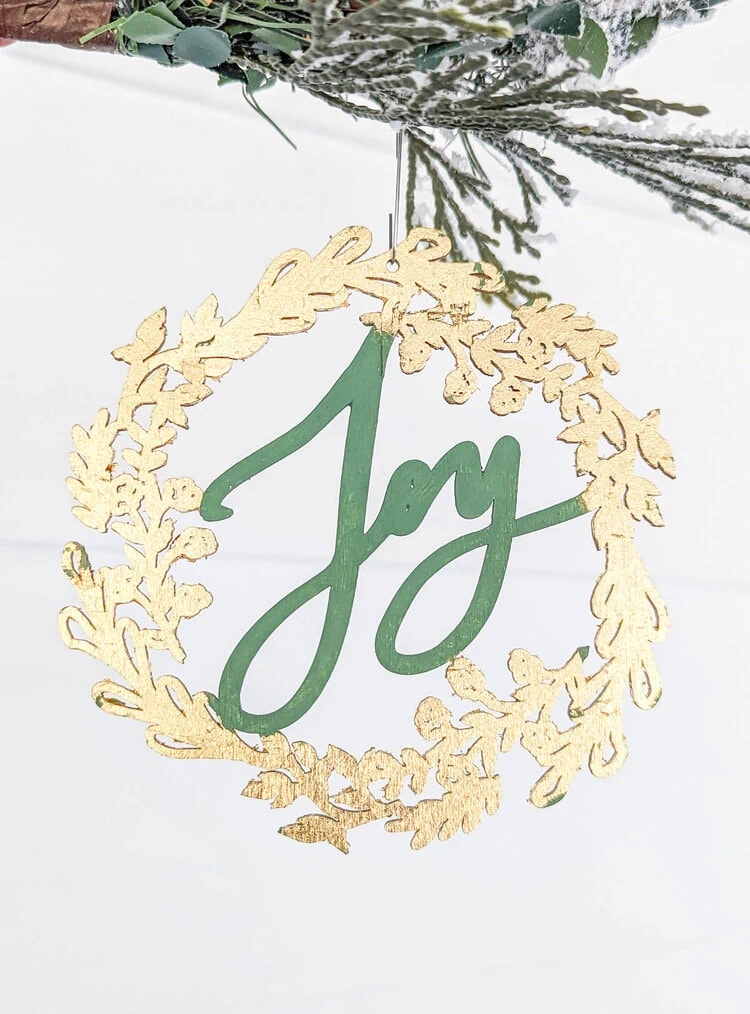
Gold leaf wood cutout ornament
Finally, I gold leafed the wreath on this wood cutout ornament. Craft supply stores typically have a variety of these wood cutout ornaments that are ready to paint and I love how the gold leaf really took this one to the next level.
I love how all of these ornaments turned out and I really think gold leaf would probably look beautiful on pretty much any ornament shape and style.
If you love handmade ornaments like I do, I have so many more fantastic ornament ideas for you! You can see all my DIY ornaments right here and here are links to a few favorites:
I’d love for you to pin this post on Pinterest!

How to Make Easy and Beautiful Gold Leaf Ornaments
Create a gorgeous gold leaf Christmas ornament for a beautiful gift idea, or to decorate your own tree. It's easier than you think!
Materials
- Blank ornaments
- Gold leaf
- Metal leaf adhesive
- Metal leaf sealer
- Soft paintbrushes
- Paint for ornament
Instructions
- Paint the background of your clear ornaments by pouring about a teaspoon of paint inside the ornament.
- Swirl the ornament around until the entire inside is covered in paint.
- Turn them upside down somewhere the excess paint can safely drip out.
- Use a foam paint brush or other soft brush to spread metal leaf adhesive wherever you want the gold leaf to go.
- Wait for the adhesive to dry and become tacky.
- Gently lift your gold leaf onto the surface of your ornament where you’ve already spread your glue.
- If you are adding gold leaf to a flat ornament, you simply lay it on top.
- Use your fingers or paintbrush to fold the edges over to cover the sides.
- Use the paintbrush to brush gently over the back of the paper to make sure the gold leaf is adhered well.
- For a round ornament, set it in place over the ornament and fold it so that it adheres all around the ornament.
- Gently brush your paintbrush over the paper to make sure it is adhered well.
- Remove the transfer paper and use your paintbrush to gently brush all over the gold leaf again.
- Fill in any gaps and holes in your gold leaf using small gold leaf pieces and this same process.
- Seal with a metal leaf sealer.
Recommended Products
As an Amazon Associate and member of other affiliate programs, I earn from qualifying purchases.