How to Make Easy DIY Photo Ornaments
These DIY Photo Ornaments are quick and easy to make and a fantastic way to celebrate favorite Christmas memories or milestones like baby’s first Christmas.
I love photo ornaments. One of my favorite parts of Christmas is remembering all of the warm, happy memories of Christmases past and photos are such a fun way to do that.
I actually shared a diy photo transfer ornament several years ago but I just didn’t love the way it turned out. So I decided to make some new DIY photo ornaments.
This time I decided to skip the complicated transfer process I used last time and keep things clean and simple. And I love how these turned out so much better!

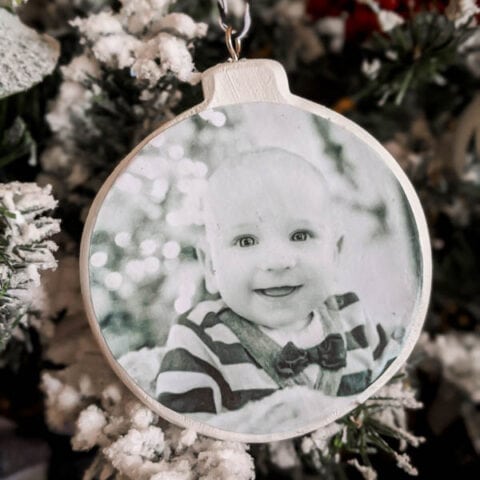
I chose to make photo ornaments to celebrate my babies’ first Christmases. Even though I love making handmade ornaments and my boys are now 2, 4, and 6, somehow I never made them first Christmas ornaments!
I figured it’s better late than never, so I chose my favorite photos from each of their first Christmases to use for my ornaments.
I have full step-by-step directions for you below as well as a video tutorial at the bottom of this post for those who prefer to watch.
This post contains affiliate links which means if you make a purchase after clicking a link I will earn a small commission but it won’t cost you a penny more. Click here to see my full disclosure policy
Materials for DIY Photo Ornaments
- wooden ornament shapes – ceramic or even plastic ornament shapes will also work, just look for 3.5″ or 4″ ornaments with a smooth texture. The ones I used are from Michaels. You can also buy them in bulk on Amazon.
- white paint
- paintbrush
- 3.5″x5″ photos printed on regular copy paper – no need for photo paper or fancy laser printers, I used black and white photos but color photos will also work just fine
- pencil
- scissors
- matte Mod Podge – you can also use glossy if you like, but I prefer the look of the matte finish
- black oil-based paint pen – for adding names or dates to the back of the ornament, these Sharpie paint markers are the best for writing on wood
- black and white baker’s twine
Want more photo ornament inspiration? I put together a collection of 19 awesome DIY photo ornament ideas with all different types and styles of ornaments.
How to Make Easy DIY Photo Ornaments
Start by painting both sides of your wooden ornaments with white paint. Acrylic craft paint works well, but so does any other white paint you have on hand.

Print the photos you would like to use in 3.5″x5″ size. These should NOT be photo prints; just print them on regular paper using your home printer.
I chose to print my photos black and white because I love the look, but color photos will also work great.

Once the paint has dried, trace the ornament shape onto your photos. Be sure to center the photo the way you want it to look on your finished ornament.
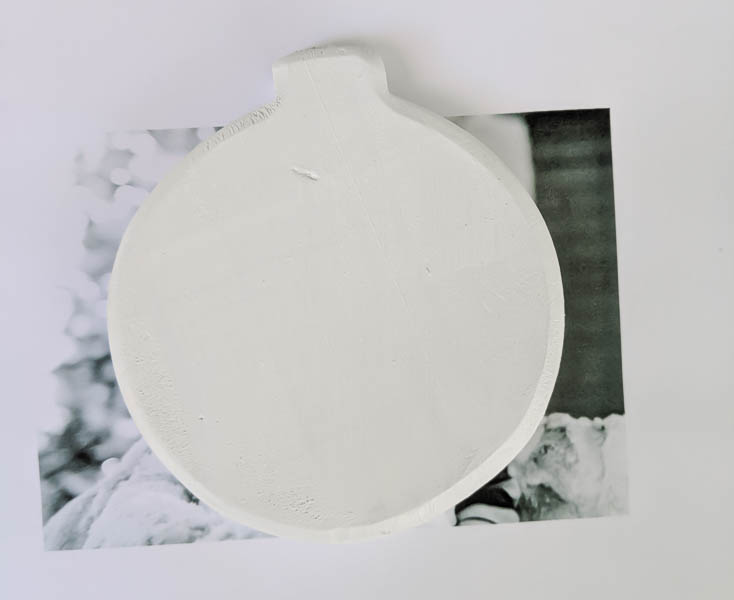
Cut out the circle you traced.
I chose to cut my photos slightly smaller than the circles I traced so there would be a white border on my ornaments for a cleaner look.
Lay your photos on your ornaments to make sure the cropping looks good. Remove the photo and use a paintbrush to spread a thin layer of Mod Podge all over the front of the painted ornament.

Place the photo on top of the ornament and smooth it down with your fingers, being careful to press out any air bubbles.
Allow the Mod-Podge to dry thoroughly and then use a paintbrush to spread another thin coat of Mod-Podge over the top of the photo, pressing down firmly on the edges to make sure they are adhered well.
Personalizing your Ornaments with Names
You can stop there, but I chose to personalize my ornaments on both sides.
I wanted to add a little something to the back to commemorate my babies’ first Christmases, but I also wanted to keep it simple. So I decided to simply add each of my little boys’ first and middle names and the year they were born.
For other types of photo ornaments, you could add the names of those in the photo, the year it was taken, or even the location if it is a special memory.
To add the words, I used my favorite DIY trick get absolute perfect lettering.

I printed the names and years out in a font I like and then did a simple pencil transfer to transfer the designs to the back of my ornaments.

Then I used a black Sharpie oil-based paint pen to fill in the names and years. It’s such an easy way to get beautiful, perfect ‘hand-lettering.’

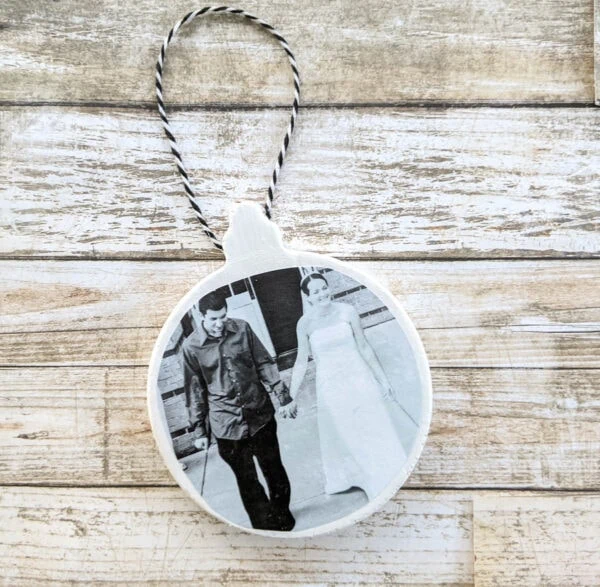
I finished each ornament off with black and white bakers twine for hanging.

And here’s how the photo sides look.

All ready to hang on the tree!

After making first Christmas ornaments for all my kids, I decided to make one with one of my wedding photos as well. (15 years late, but hey, it’s never too late to celebrate life’s best days!)
Video Tutorial
Want more ideas for using your favorite photos to celebrate the holidays?
- I shared a collection of 21 of the best DIY photo gift ideas right here.
- I used favorite Christmas photos from years past to make a Christmas memories photo book for my grandmother and it’s one of my favorite gifts I’ve ever made.
- I shared three fun ideas for using photos in your gift wrap right here and these are still my favorite wrapping ideas ever.
- And I have lots more awesome handmade ornament ideas if you’re looking for more ideas.
I’d love for you to pin this post on Pinterest!

Easy DIY Photo Christmas Ornament
These DIY Photo Ornaments are super quick and easy to make. Nothing complicated - just easy handmade photo ornaments.
Materials
- wooden ornament shapes
- white paint
- 3.5"x5" photos printed on your home printer
- matte Mod Podge
- black Sharpie oil-based paint pen
- black and white bakers twine
Tools
- small paintbrush
- pencil
- scissors
Instructions
- Paint both sides of the wooden ornament white.
- While the paint dries, print your photos in 3.5"x5" size on regular copy paper.
- Once the paint is completely dry, trace the ornament onto the photo. Be sure to center the photo the way you want it to appear on your finished ornament.
- Cut out the circles you traced on your photos. I cut my photos slightly smaller than the circles I traced to leave room for a small white border around each photo ornament.
- Spread a thin layer of Mod Podge on the front of each ornament using a paintbrush. Place your photo on top of the Mod Podge and use your fingers to firmly press it into place. Smooth out any air bubbles.
- Allow the Mod Podge to dry thoroughly. Then spread another thin layer of Mod Podge on top of the photo. Press the edges of the photos down firmly to make sure they are adhered well.
- If you want to add words to the back of the ornament, print the wording out in the font of your choice.
- Cut out the words and lightly rub pencil all over the back of the printed words. Tape into place on the back of your ornament.
- Trace around each letter firmly with your pencil. When you remove the paper, a pencil outline will remain on the ornament.
- Color in the pencil outline with a black paint pen.
- Add bakers twine to hang the ornament.
Recommended Products
As an Amazon Associate and member of other affiliate programs, I earn from qualifying purchases.


Merry Christmas!

Could you tell me what font you used on the above ornament?
Yes! I used the font Bloomishly Broad Italic. I subscribe to picmonkey.com for creating graphics and it is available free in pickmonkey. But it looks like you can also buy it on Creative Market and then you would be able to use it with Microsoft Word or any program on your computer.
I really like these. Simple, but effective. No cricut, no special transfer paper, just stuff we all have. My kids are all grown, but I might make a bunch of these for my husband for Christmas. Thanks!
Yes, I love to keep things simple! And I love the idea of making some for your husband – I think I need to do that too.
What did you use for the hanger?
Great quesion – I need to add this to the post! The ornaments I used came with a small eyehook screwed to the top. But if you are using an ornament without one, you can just screw in a small eye hook – you can buy a bag of them at Lowes or Home Depot for a few dollars. Just screw one into the top of each ornament and tie on some twine or ribbon.
Love this! Where are your wood ornaments from? I like that they look thicker than most.
They are from Michaels and I was just there last week and they had similar ones back in stock this year! I will see if I can find them online and link them in the post.
How do you store these from year to year? Some of my Modge Podge products end to sticking together or to other things.
I haven’t had any problems with them sticking, but I do try to protect them a bit in storage. I wrap all of my handmade ornaments lightly in tissue paper and pack them away in shoeboxes.
When I apply the mod podge over my photos the ink runs and my ornaments turn pink. I have tried it a few times and it is still turning a pink hue. Any tips?
Thanks!
Oh no! Make sure you are using print outs of your photos printed with a regular inkjet printer. Also be sure to print them on regular cardstock without a glossy finish. Photo paper doesn’t work as well for these ornaments. That should hopefully solve the problem.
Hi! Do you use card stock when printing your pictures? Your pictures look so vivid compared to the pictures I’ve tried to print with my printer.
Thanks! I can’t wait to try these!
No, I printed mine on regular printer paper. I’m not sure if the printer matters for print quality. We have a Canon printer but it isn’t anything fancy. The other thing is to make sure your pictures are clear and as high quality as possible before printing. I usually edit mine a bit to brighten them up and convert them to black and white. I use Adobe Lightroom which is a paid photo editing software, but there are also lots of great free photo editing apps out there that can do this like canva. Good luck!
Just had to mention my surprise when looking at your tutorial. My sons names are Griffin and Oliver!
Ha! Great names!
Thanks for sharing