Repainting a dresser: third time is the charm
Repainting furniture isn’t quite the same as painting it for the first time. I’m sharing what makes them different and how to successfully repaint painted furniture.
I absolutely love how a bit of paint and some imagination can turn a bland piece of furniture into a work of art. And I like to think that’s exactly what I did with the cute dresser I just repainted.
That’s right: I didn’t just paint a dresser; I repainted a dresser. This isn’t the first time I’ve painted it or even the second. This is actually the third time I have made over this same dresser in the past five years!
Ok, that might sound a little crazy, but I actually have a good reason I’m sharing below. And anyway, I see no problem with repainting your stuff for no good reason other than you want to!
(Looking for info on how to paint a dresser the first time around? I’ve got step-by-step dresser painting instructions for you.)

Also, be sure to stick around because today I’m joining up with a bunch of my favorite furniture painters, The Furniture Flippers, to share our latest furniture transformations. We’re going to be sharing our furniture DIYs once a month and you can drool over the first round at the end of this post.
This post contains affiliate links which means if you make a purchase after clicking a link I will earn a small commission but it won’t cost you a penny more. Click here to see my full disclosure policy.
But first, back to my own ‘third time’s the charm’ repainted dresser. Here’s what this sweet little dresser looked like when I first got it. It was a basic little dresser that was the perfect height for a changing table in the nursery I was putting together for our first baby. There was absolutely nothing wrong with it as it was; it was just a bit bland for my taste.

So I whipped out some chalk paint and got to work. Paint job number one involved Annie Sloan Chalk Paint in the color Provence and some fabulous new hardware. I had found a pile of antique glass doorknobs at a yard sale for only $10 and decided they would make sweet drawer pulls. (I have a great tutorial on using door knobs as drawer pulls right here if you are interested.)

When baby boy number 2 came along a couple of years later, I refreshed the nursery with a new color scheme and style but kept all the same furniture. The blue color was no longer working with the rest of the room, so I repainted the dresser gray using DecoArt Chalky Finish Paint in the color Yesteryear.

Well last summer, baby by #3 joined the mix. I knew I wanted to give the nursery one last update so he could have his own special space just like his brothers. Plus, I love decorating nurseries and I’m pretty certain this is going to be my last chance so I decided to update the room one last time starting with this dresser.
Materials used in this painted dresser makeover
- Rustoleum Chalked Paint in Linen White
- Rustoleum Chalked Paint in Charcoal
- Sandpaper in 150 and 220 grit
- Wood Filler
- Paintbrushes (These are some of my favorite paintbrushes for a smooth finish. And these are great for adding texture.)
- General Finishes High Performance Top Coat, flat finish
- Foam brush for applying topcoat
- Cordless Drill
When I decided to do a mini nursery makeover, I knew I wanted to repaint this dresser because painting furniture is such a simple way to completely change the feel of a space. Also, as much as I’ve loved these old glass door knobs, I was ready for a change. So I started by removing the glass knobs and putting them away for safe keeping. (You’d better believe I’m going to find some other awesome use for those!)

Of course, removing those bulky doorknobs left some pretty hefty holes in the drawer fronts, so my first step was to use wood filler to fill in the holes. I applied wood filler, let it dry and then sanded it down with 150 grit sandpaper. Because these holes were pretty big, I went back and filled them a second time and then sanded them smooth.
In general repainting furniture that has previously been painted is pretty simple, but you can run into problems if you don’t know what products were used previously – particularly with wax or oil-based finishes. I’m planning to write a post soon outlining exactly what to do in any situation where you are repainting furniture.
But in this case, since I was the crazy girl repainting the same dresser over and over, I knew that I had used DecoArt chalky finish paint followed by their Ultra Matte Varnish. The finish wasn’t shiny so I probably could have skipped sanding, but I wanted to smooth out the old finish anyway before painting. So I started by sanding the entire dresser lightly using 150 grit sandpaper, followed by 220 grit sandpaper. I wiped all of the dust off and then it was time to get painting.

This dresser was a bit of an experiment for me. In the past, I have typically painted furniture one solid color – maybe with some distressing – but all one color. Well, lately I have been seeing all kinds of beautiful, interesting painted furniture pieces with ombre finishes and multiple layers of color and all kinds of fun texture. So I decided to try something a little different. I didn’t get too funky this first time around, but I did go for a faded gray and white two-toned finish.
I started by painting the top third of the dresser including the drawers white. (I used Rustoleum Chalked paint in Linen White.) The lower 2/3 of the dresser I painted a custom light gray that I mixed by combining the Linen White with Rustoleum chalked paint in Charcoal. (My super special tools for mixing custom paint colors? Red solo cups and plastic spoons. :) This first coat of paint really helped me to see where exactly I wanted the two colors to meet. In design, photography, architecture, pretty much anything, there are certain proportions that look better to the eye. In general, dividing things visually in thirds looks better than any other proportion and that is definitely true on this dresser.
This gray looks pretty similar to the color the dresser already was in pictures, but it’s actually pretty different. The previous gray had a very blue undertone. That might not seem like a big deal, but the blue undertones of the paint weren’t meshing well with the other colors in the room.

I painted a second coat of the same two colors, but this time I painted a much more free flowing ‘line’ between the two shades.

I don’t have a lot of pictures of this next step because I was trying some things I’ve never done before, so I messed up a few times before I got it right. I started out trying to blend the gray and white colors where they meet in the middle but I hated it. So instead I loaded up my brush with white paint and dragged it down slightly into the gray area. Then I added more paint and repeated this all along the border between the two colors. This is one of those times when you want to use a brush with rough bristles – a chip brush or stiff oval brush work well.
When you do this step, you also have to let go of all perfectionist tendencies and just let it do what it wants!

After painting, I used my 220 grit sandpaper to distress the whole thing. I distressed the gray areas pretty heavily to let some of the old blue and gray paint colors show through as well as bare wood. The upper white section, I distressed much more lightly, only around the edges and corners.

I sealed this dresser using General Finishes High Performance Topcoat in flat. This is a sealer that I really like. It goes on smoothly and holds up well. It is important to know, however, that it’s not actually a flat finish but has more of a satin sheen. General Finishes also has another matte top coat called General Finishes Flat Out Flat. I haven’t had a chance to try it yet but I’ve heard great things.
Next up was hardware. At first I considered putting the original hardware from way back 5 years ago back on. (Yep, I still have them. I may be a bit of a hardware hoarder.) But it wasn’t quite what I wanted so I checked the rest of my furniture stash and decided to go with these French Provencial style pulls on the bottom with small round knobs on the smaller two drawers.

Because this dresser already has a lot going on, I decided to do something a little different and paint the hardware the same colors as the drawers. I painted them each with 2 coats of paint. To distress them, I simply wiped them down gently with a wet paper towel. Typically, chalk paint can easily be distressed with a wet rag this way – which is one reason using a good sealer to protect your paint finish is so important! I finished these off with a coat of the same General Finishes topcoat as the rest of the dresser.
Once the hardware was dry, I used my cordless drill to drill new holes and screwed them on.

What a difference! I love everything about the new look. It’s funny, this sweet dresser even looks longer somehow. Something about the wider drawer pulls and two toned paint makes the whole proportions of the dresser look better.


This dresser is going back in the nursery once again as a changing table, but the lighting in there is terrible for photos so I grabbed these pics to share before moving it back. Plus I’m planning to share the whole nursery update next week and I didn’t want any spoilers! (It’s not a moment too soon either considering the baby is 9 months old. Better late than never. Luckily, baby Lincoln seems to be oblivious to the fact his nursery hasn’t been redecorated just yet!)

Now you’ve got to see the furniture makeovers below! These are the befores – just click the links below to see the afters. I’d love to know which is your favorite!
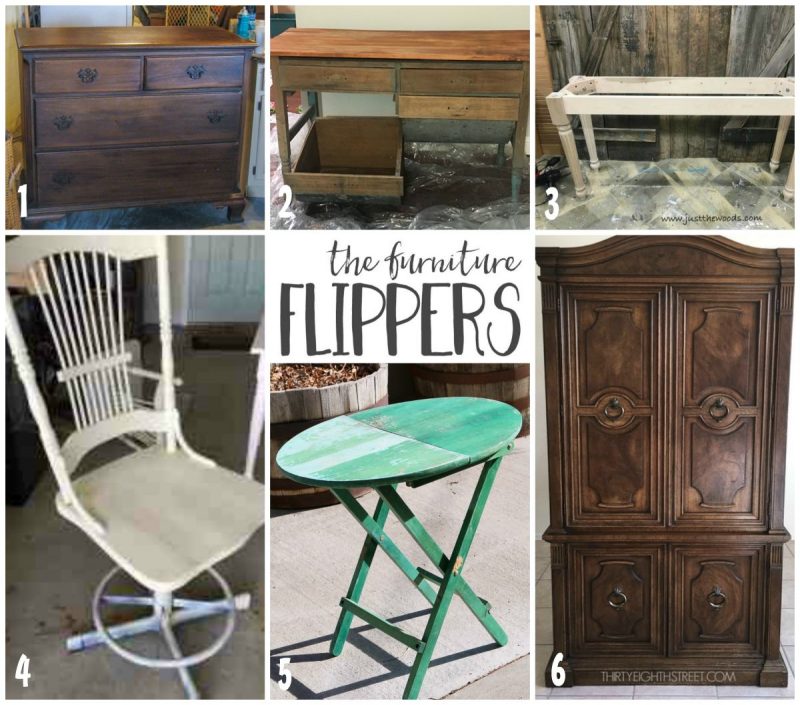
1: Two-Toned Dresser with a Blended Finish from Lovely Etc.
2: Modern Desk from an Antique Baker’s Table from Refresh Living
3: How to Build a DIY Wood Table and Layering Paint Technique from Just the Woods
4: Modern Vintage Style Chair Makeover from Repurpose and Upcycle
5: Small Painted Table with Graphic from A Fresh Squeezed Life
6: Refinished Armoire and Tips for a Rustic Finish on Furniture from Thirty Eighth Street

Carrie that is gorgeous. I love the look of the brush two tone. I don’t even know how to call it. Third times the charm indeed!
Thanks Mary! I just went for it this time and I’m so glad I did!
This finish is seriously the coolest!! It was great to read your tips and what worked best with your experimentation. And, let me tell you, there is nothing wrong with repainting a piece multiple times (although that is coming from someone that would repaint stuff every month if I could) ;)
Thanks Jenny! I agree -part of the joy of paint is it’s so easy to change!
third time is a charm for sure. I love this one the best
Thanks Kandice!
Hi Carrie I think this is.called ombre.like the look am looking forward to seeing more furniture flips
Thank you Mary!
Hi Carrie! Love it! Don’t know if I would have thought of doing this! Never painted any furniture yet. I’ll sure look up to you when I do!
Thanks Natalie! Painting furniture seems intimidating at first but it’s really not. Especially because if you mess up, you can always just paint back over it!
Love this version!! A true testament that painting furniture is not only easy, but it’s a practical way to update your space!
Thank you Carrie – you are so right!
I love it! I am thinking of using this sealer on a table I just did white on bottom gray stained on top. Have you had any problems with it yellowing your white paint?
No, none at all! This sealer is really great for not yellowing.