How to make a herringbone table top with paint sticks
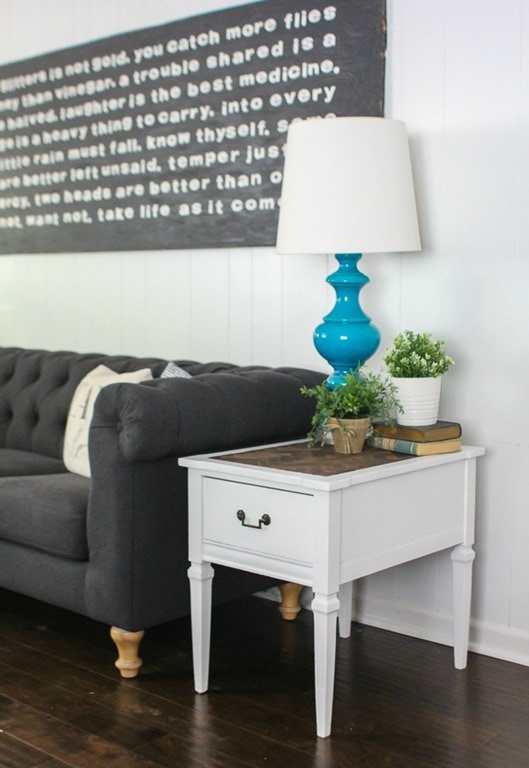
I have a pair of fantastic herringbone tables to share with you today. I love a great furniture transformation and this one definitely doesn’t disappoint.
These end tables underwent a pretty serious transformation. They got a fresh coat of white paint, a new hardware configuration, and fabulous new herringbone table tops.

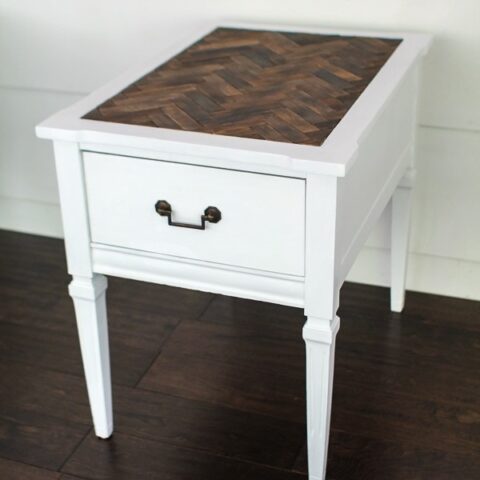
My favorite part of this furniture makeover is that herringbone top. Can you believe that beautiful table top is made from plain old paint sticks? You know, the ones you stir your paint with? Who knew paint sticks could look so classy!
If you’ve been reading Lovely Etc. for awhile, these end tables might look vaguely familiar.
Last October I made over our family room as part of the $100 room challenge, but I ran out of time to refinish these tables.
So they sat in our room half-finished for the past, oh, six months. (If you’re wondering, yep, that’s totally normal for me. I’m not proud of it, but, that’s reality.)
But finally, finally they are finished and they turned out better than I ever imagined!
This post contains affiliate links which means if you make a purchase after clicking a link I will earn a small commission but it won’t cost you a penny more. Click here to see my full disclosure policy
Materials
- Primer – this is my favorite primer for any furniture painting project. It blocks wood tannins to prevent yellowing and will stick to pretty much any surface.
- Paint – I used DecoArt Satin Enamels Pure White Paint). This paint is great for painting furniture with a smooth, satin finish.
- wood filler
- sandpaper – 150 and 220 grit
- paintbrush – these are my favorite paint brushes for painting furniture.
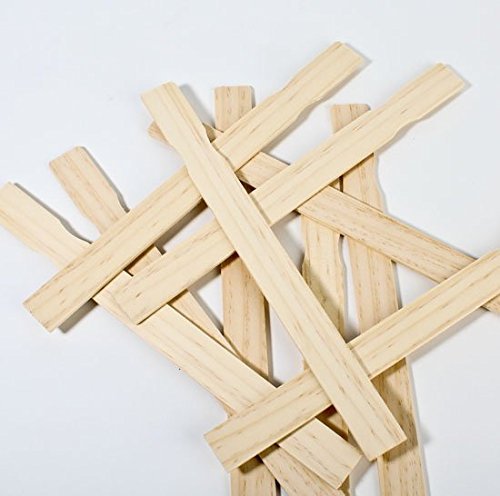
- paint sticks – also called paint stirrers
- Miter saw
- Jigsaw
- Brown paint or stain – there’s more info on this below. If your paint sticks are made from high quality wood, you can stain them with wood stain. My own paint sticks weren’t stainable, so I used brown craft paints to create a wood look finish.
- General Finishes High Performance top coat – this is my favorite sealer for painted furniture. It’s easy to apply, goes on smoothly, and gives a durable finish.
- Foam Paintbrush – for applying the sealer
- pencil and straight edge – for marking the herringbone pattern
- wood glue
Prepping the tables
These tables started out in pretty rough shape. I loved the shape of them right from the start, but there were also some major problems.
If you know me at all, you know I love to save old worn out stuff that nobody else seems to want so I knew I could make these tables gorgeous again.
The mahogany color really wasn’t bad, but the finish had gotten really grimy and crackled with age.
Also, that particle board top had to go and something had to be done about the missing hardware.


The first thing I did was work on those drawer fronts. They were fine the way they were, but I really wanted to simplify the look by eliminating the double handles.
Plus, by only using one drawer pull on each table, I was able to reuse the original hardware without having to worry about finding a replacement for the missing pull.

I removed the drawer pulls and used wood filler to fill in the center line as well all of the grooves around where the handles had been.
Once the wood filler was dried, I sanded it down with 150 grit sandpaper.
Because that groove was so deep, I went back with a second layer of wood filler and then sanded everything smooth again using 150 grit sandpaper followed by 220 grit. (The higher grit at the end just helps make sure everything is silky smooth for painting.)

Next, I dealt with that hideous table top. It was supposed to look like leather, but in reality it was basically thick cardboard with a shiny top layer.
I considered simply painting over it, but I wanted these tables to be something special. So I came up with the idea of creating a herringbone table top instead.
Finally, I sanded all of the gunky build-up off of the old finish and cleaned each table well.
I know it can be tempting to skip cleaning and go straight to painting. I mean, obviously, cleaning isn’t the most fun step; but paint won’t stick to dirt and oily buildup so never skip the cleaning step!
Painting the end tables
Next it was time to paint.
Even though there are lots of fabulous furniture paints available these days that don’t require primer, there are some times where you really have to use primer anyway. Especially if you are using white paint or another light color.
This was definitely one of those times when primer was required.
Any guesses how I know?
Well, even though I should definitely know better with that red mahogany finish, I thought I would save myself some time and go straight to the paint.
Bad, bad idea.
After the first coat, there was yellow bleed through everywhere. So I stopped and went back to the step I had skipped. I used Zinsser oil based cover stain primer.
This is my favorite primer for furniture because it sticks to everything and is great for stopping bleed through.
If you ever find yourself in this situation, do not keep adding coats of paint. It isn’t going to work. Just save yourself some time and bring out the primer/sealer.
And I’ve got a whole post with lots of details on painting furniture white without bleed through, if you need a little more help.
After priming, I painted the tables with DecoArt satin enamels paint in pure white.
Herringbone Table Top
Now for the fun part! Transforming these plain jane tables into gorgeous herringbone tables.
I chose to use paint sticks to make my table top for a few reasons.
I wanted to use thin wood so that it would fit into the inlay area and also not add a lot of bulk to the table.
Also, I didn’t want to spend a lot of money. :)
And no, I did not go to Home Depot and ask for 100 free paint stirrers when I bought a gallon of paint. I’m cheap but I’m not a mooch.
I actually ordered my paint sticks from Amazon. I bought a pack of 100 for an okay price but I can’t recommend the ones I bought because the wood was lower quality than most paint stirrers I have used before. The texture was more like pressed board than solid wood, which is why I wasn’t able to stain them.
You can buy packs of paint stirrers from Home Depot even cheaper though so that is what I would do if I were starting this project all over.
Before starting my herringbone table top, I did a bit of research into how to do a nice herringbone pattern. I decided I wanted my wood pieces to be four times as long as they are wide to give a nice, even pattern.
So I simply measured the width of my paint sticks and then multiplied it by four to determine the length. I cut my paint sticks to the correct size using our miter saw and then sanded any rough edges.
To make this go a bit faster, I used painter’s tape to tape several paint stirrers together and cut them as a bundle.


My original plan was to stain the paint sticks but because my paint sticks were low quality, they didn’t take stain well. (I have seen other bloggers stain paint sticks and they were beautiful, so I know it can be done with the right materials.)
So instead I used a couple of shades of brown paint to create a stained wood effect.

I did make sure to paint the sides as well as the top of each piece and I also painted the surface of the table top brown to match the wood. That way any small slivers that showed through wouldn’t stand out.

Then I started playing around with how I wanted my pattern to look.
Once I knew about where I wanted my lines to go, I drew a straight line down the tabletop. As I added pieces to my herringbone pattern, I aligned the corners of the first piece with that line to keep everything straight.

I filled in the pattern, gluing down each piece, until I got too close to the edges to use whole pieces.

Then I used a pencil and a straight edge to mark where each edge piece needed to be cut and then cut them to size using my jigsaw.


I finished painting all of the cut pieces and then glued everything into place using wood glue. So beautiful!

The final step was sealing the herringbone table top with General Finishes High Performance Top Coat.
I brushed on four coats using a foam brush and let it dry thoroughly before setting anything on top.


And here they are in our family room. Better late than never!
And the best part of any makeover – the before and after shots!

And those gorgeous tops!

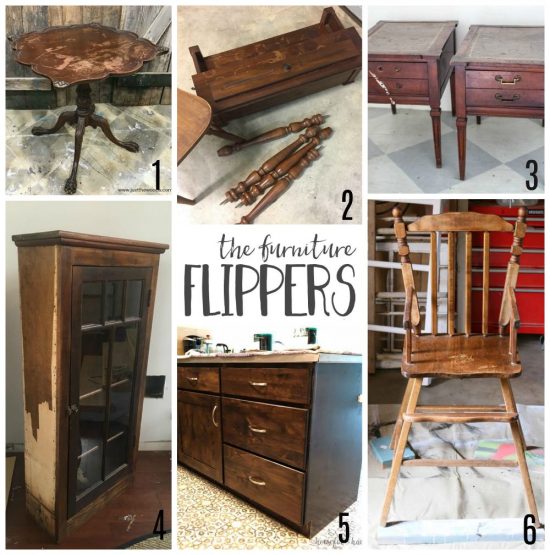
Ready for some more killer furniture makeovers? Below are the before pictures of all of the worn out furniture The Furniture Flippers took on this month. Just click the links to see the afters along with the tutorials! Enjoy!
- How to Get Beautiful Results with Black Furniture Wax – Just the Woods
- A Beachy Desk Makeover with Chalk Paint – Repurpose and Upcycle
- How to Make a Herringbone Table Top with Paint Sticks – Lovely Etc.
- Refinished Antique Cabinet with Black and White Decorative Paper – Refresh Living
- Farmhouse Kitchen Island Makeover – Houseful of Handmade
- 5 of the Best Furniture Pieces to Buy and Flip – A Fresh Squeezed Life
I’d love for you to pin this post on Pinterest!


How to make a herringbone table top with paint sticks
Update a worn out table with a gorgeous DIY herringbone table top using paint sticks.
Materials
- Primer
- Paint
- wood filler
- sandpaper
- paint sticks
- Brown paint or stain
- General Finishes High Performance top coat
- Wood glue
Tools
- Miter saw
- Jig saw
- Paintbrush
- Foam paintbrush
Instructions
- Remove the drawer pulls.
- Prime with Zinsser oil based cover stain primer.
- Once the primer has dried, paint with several thin coats of white paint. Allow the paint to dry thoroughly between coats.
- To make the herringbone top, cut the paint sticks four inches long using a miter saw.
- Sand rough edges.
- Paint or stain the paint sticks to get your desired finish..
- Paint the surface of the table top brown to match the wood.
- Draw a straight line down the tabletop.
- Align the corners of the first piece with the line to keep everything straight.
- Fill in the pattern, gluing down each piece.
- When you get to the edges of the tabletop, use a pencil and a straight edge to mark where each edge piece needs to be cut.
- Cut to size using a jigsaw.
- Paint or stain the freshly cut edges to match the tabletop and then glue everything into place using wood glue.
- Seal the entire table including the herringbone table top by brushing on four coats of topcoat using a foam brush.
Recommended Products
As an Amazon Associate and member of other affiliate programs, I earn from qualifying purchases.
-
 General Finishes High Performance Water Based Topcoat, 1 Quart, Satin
 -
DEWALT 12-Inch Miter Saw, 15-Amp, Single Bevel, Compound (DWS715)
-
Toolman Electric Jig Saw 3.6A For Heavy Duty carpentry, sawing and cutting jobs LT5502
-
Sandpaper, 90 Pcs 400 to 3000 Grit Wet Dry Sandpaper Assortment 9x3.6 Inch for Automotive Sanding - Wood Furniture Finishing - Wood Turing Finishing and More by VERONES?
-
DecoArt Décor Americana Decor Satin Enamels 8oz PureWht, 8 Fl Oz
-
Zinsser 03504 Cover Stain Interior/Exterior Oil Primer Sealer, 1-Quart, White
-
Box of 100-12" Inch Premium Grade Splinter Free Woodman Crafts Paint Stir Sticks, Ideal for DIY Wood Craft Projects - Paddle to Mix Epoxy Or Paint - Garden - Library (Pack of 100)
-
Titebond 5063 Original Wood Glue, 8-Ounces
-
Pro Grade - Foam Brushes - 4 Inch - 24 Piece Poly Foam Brush Set


these are amazing, carrie!! what a fabulous idea!
Thanks Cassie! I’m so happy with how they turned out!
Wow! I’m so impressed by these. Such a lot of work, but they really do look wonderful!
Thank you Terri! It was sort of tedious but I love puzzles and this turned out to be a similar thing!
They are so lovely! Such a creative idea.
The blue lamp on your table–where do you have luck finding affordable lamps that are so tall? I’m looking for some that won’t break into a gazillion pieces if some toys (or clumsy grown-up like myself) happens to accidentally knock one over.
Thanks Charlotte – I actually found those lamps at the Goodwill. They didn’t have shades, but I basically ran over and snatched them up. I’ve bought pretty much all of our lamps secondhand so that probably isn’t much help. But seriously, they are so crazy expensive in stores!
This is genius! I love anything herringbone, and it looks so good on your table top. Who would have thought to use paint sticks.
Thank you Lindsey! I’m a sucker for herringbone too!
Really really looks terrific. Great job. Thx for sharing.
Thank you Jane!
What an an amazing design you did with all that wood.
Maria
Thank you Maria!
The tables are.gorgeous love the herringbone
Thanks Mary!
I can’t believe how amazing these look now! I must say, they were not the prettiest pieces to start with, but you completely brought them back to life. Job well done, and thanks for all the tips on creating the herringbone pattern with the wood!
Thank you Jenny!
I love the new wooden tops they look fabulous.
Thank you Claire!
Wow! These are spectacular, and with paint sticks! Fist bump through the screen! What would you say your start to finish project time was?
Thank you so much! It’s so hard to estimate time spent because I usually end up working on projects in lots of short bursts when I get a chance. I would say it probably took at least 5 hours.
Love, love these tables! What a great idea. A beautiful table for a low price. This gives me an idea for my end table at our cottage. Thank you Carrie for these beautiful ideas!
Thank you so much! I love how they turned out!
Someone had posted this on FB and I was intrigued as I have one of the same tables. However, I am a wood nut and could not bare paining my grandfathers table. so we stripped ours and restained. I used narrower sticks to do the herringbone top.
It turned out beautiful. thank you for the idea. I now have a table that was ugly and ashamed to a beauty. Wish I had a way to share the pictures with you;
That sounds wonderful – I wish there was an easy way to share a photo as well! I bet it is beautiful refinished with wood stain.