Trash to Treasure: Dining Room Table
I’ve done it! I have completed a furniture redo! Not to mention we finally have a dining room table again after an entire year with an empty dining room. If you are wondering why in the world we haven’t had a table for so long, it all started with our painted floors.
We were using a table and chairs I had rescued from a roadside trash pile. They were nice enough but not exactly what I wanted. When I decided to paint the floor in the dining room, I figured I might as well go ahead and Craigslist them since I knew I was going to be replacing them anyway. Yeah, sounds a bit lazy – don’t feel like moving your furniture out of the way? No problem, just sell it instead. At the time it made perfect sense.
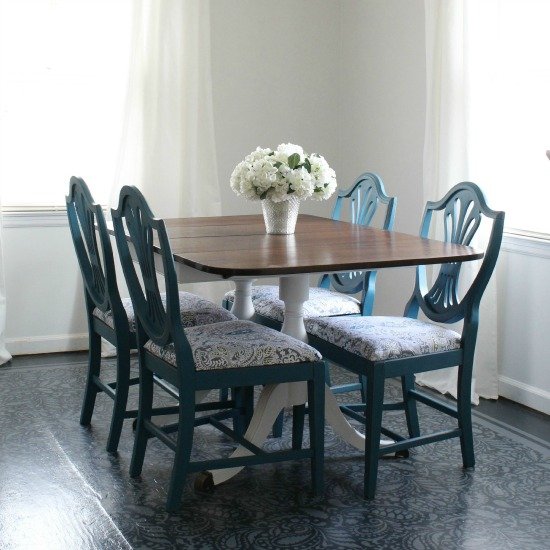
Luckily, because of my former hoarding ways, I had another table waiting in the basement. It was also a free find, courtesy of Craigslist. However, it was in need of some serious help. This is how it looked before.

Not too terrible until you get a good look at the top – peeling, scratched, orange, gross.

This post contains affiliate links which means if you make a purchase after clicking a link I will earn a small commission but it won’t cost you a penny more. Click here to see my full disclosure policy.
The hubs helped me sand down the table top and restain it with Minwax dark walnut stain. Then we sealed it with several coats of wipe-on polyurethane. We used lots of elbow grease but it was pretty simple to do.
The legs were a different story. This was one of my earliest furniture painting projects and it soon turned into one of those never-ending DIYs that just refuses to go right. I started out painting the legs with Annie Sloan Chalk Paint in pure white. I was having a hard time getting good coverage so I added a couple more layers. (Big mistake.) Soon I realized this was one of those horrible finishes that refuses to be painted. This is the first time ASCP wasn’t able to get the job done for me.
The more time passed, the more the old finish showed right through the paint. So I gritted my teeth and started over by painting a coat of latex primer right over all my hard work. (This was mistake number two). A few hours later when I came back to paint, I saw that once again the old finish had broken right through.
So I broke out the big guns – Zinsser oil based primer. I should have just gone with it to begin with. Lesson learned. I followed it up with a coat of white latex paint and voila: A graceful little table.
Since painting this table, I’ve learned a LOT about painting furniture including when you absolutely need to use primer and when you can get away with skipping it. You can read my step by step furniture painting guide here if you want to save yourself a lot of extra trial and error work!

What an improvement! Even though it was a huge headache, I love how the table turned out. And those brass feet just give it the perfect touch of class.
I paired it with these great chairs I got at a yard sale last summer – $30 for all four, woohoo. The chairs got their own makeover with some fun paint and new upholstery (from a shower curtain!) You can see all the details of that makeover right here.
And now we have a functioning dining room again! Hooray!

you know, i see these all the time and pass them up, but i totally love the clean and elegant look you created! pinned!
you know, i see these all the time and pass them up, but i totally love the clean and elegant look you created! pinned!
love the brown “toes”!!! Great idea, fabulous makeover.
Cheers!
What a wonderful find! Your makeover is beautiful…can’t wait to see what you do with the chairs!
Love double pedestal tables! What a great makeover! As soon as I saw the last picture with the upholstered chairs, I had a thought – LOVE those chairs, but perhaps you could add casters to set them up a bit higher. As a parent to three toddlers my husband and I do a lot of getting up during meal time. It’s so nice to be able to roll out for a quick hop up! Just an idea…I am sure they’ll turn out gorgeous whatever you do!
Chelsea
chelseasgarage.blogspot.com
I love how the table turned out! And I always love the idea of upholstered arm chairs at a dining table. But I think you are right- not quite tall enough. I like Chelsea’s idea about adding casters- that might just do the trick. I’m a hoarder of all things vintage furniture related and happen to have quite a collection of random casters. Let me know if you are interested- I love the idea of my collections being put to use!
I wish I were lucky enough to find a freebie like that! I would go with higher back chairs :) Great job and thanks for sharing!
Really nice work with the dining table. Your dining room just looks awesome.
Good info to know about finishing the table – I have one very similar that I am planning to paint. I love how yours turned out! Beautiful.
Love the make over! I thought you had redone your floors though…
Vickie, Yep I did! But this post was from before the change. ;)
Pure white in AS is a pigment. Is is harder to build up and to cover because it is a pigment.
Anytime you get tannins it is a bleed through of old stain. We use shellac. If your shellac is over 6 months old throw it away. I find it easier and quicker to use and the drying time then what you used.
Thanks Sheryll, I definitely need to give shellac a try next time I tackle a piece like this!