How To Turn Old Jewelry Into Amazing Drawer Pulls
Nothing ruins an amazing furniture makeover more quickly than sticking the same old boring drawer pulls and knobs back on.
I love unique, attention-getting hardware – but it’s hard to find and super expensive.
As always I knew there had to be a way to get gorgeous one-of-a-kind furniture hardware at a tiny cost.

This is a Sponsored post written by me on behalf of Krazy Glue for SocialSpark. All opinions are 100% mine.
Whenever I go to a great yard sale or estate sale, I can’t help checking out the costume jewelry.
Even though it is probably about forty years out of style, it is usually only a dollar or two and is awesome for repurposing.
Particularly repurposing into fabulous drawer pulls.
This is one of those projects that takes five minutes but ends up looking like a million bucks.
In other words, one of the very best types of projects.
Materials

- Jewelry – anything really large will work: vintage pendants, those huge vintage earrings, or new pendants from a craft supply store
- Plain drawer pulls – the smaller and plainer the better
- Krazy glue
- Tin snips (optional)
Instructions
This is so simple, I almost feel silly giving instructions.
First, a note about choosing jewelry to use. The best pieces for this project are large and flat – like necklace pendants, brooches, or those huge round earrings ladies used to wear several decades ago.
You want to make sure your jewelry is larger than the drawer pull you are using and that it does not have cut-outs the pull will show through.
If you are using an earring, you will need to snip off the earring post.
You can do this very easily using tin snips. (Tin snips look like scissors but are specifically for cutting metal. They are only a few dollars at any home improvement store).
If you are using a pendant with an attached loop, you will need to carefully snip off the loop.
If you are using a brooch, you will need to remove the pin part.


Next you are going to attach your jewelry to your drawer pull. It is really important to use the correct glue for this.
You certainly don’t want to be pulling open a drawer and have your hardware come apart in your hands!
Plus, if that happened at my house, my 18-month-old would probably either eat the pieces or flush them down the toilet.
Neither is something I want.
For this project, I pulled out the Krazy Glue. Krazy Glue works super fast and the precision tip keeps the glue where I want it – even when working with tiny, delicate parts.
Krazy glue works on metal, porcelain, pottery, glass, plastic, rubber, vinyl…definitely, any material your jewelry pieces might include.
And I love when one little product can be reused for a bunch of different projects instead of buying new materials every single time.
Plus, the glue itself is a super thick gel – no dripping or getting all over the place, even when you are working on a vertical surface.
And Krazy Glue’s special Skin GuardTM formula delays skin bonding, so you’ll have plenty of time to work on your project without worrying about your fingers sticking together. :)

Just squeeze some Krazy Glue onto the face of your drawer pull and press it onto the back of your jewelry piece.
It will be dry in less than thirty seconds.


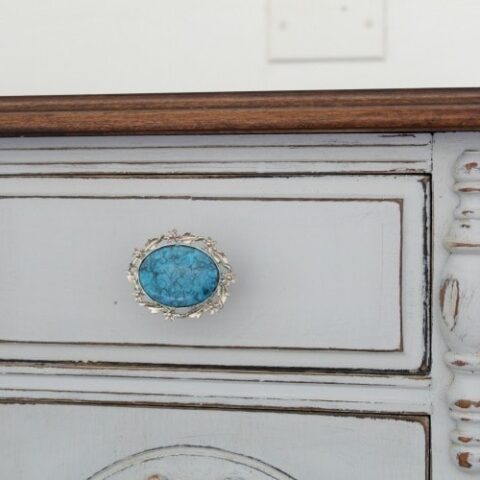
And you’re done! Seriously, so simple.


I screwed a few of my freshly made knobs onto some of my favorite pieces of painted furniture and they looked amazing.
These knobs are perfect for adding character to furniture pieces but they are also pretty special all on their own so I decided to try something a little different with my last jewelry knob.
I knew it would make a gorgeous necklace display.

I had some small scraps of wood leftover from the plank wall I installed in our foyer this spring.
I chose a pretty piece that I had painted aqua and then dry-brushed with white paint.
Normally, I would drag out the drill and drill a hole in the wood to screw on the drawer pull.
But I decided to take the easier way this time. I simply used a little Krazy Glue and glued my knob right onto my board.

And then when it was time to attach a wall hanger to the back, I decided to just use Krazy Glue for that too instead of messing with those tiny little nails that come with it. (You know – the ones that are way too tiny to actually hold in place while you hammer them. I hate that.)

And five minutes later I had a one-of-a-kind necklace holder – without using a single tool to construct it. (Well, other than the tin snips.)

This little necklace holder was the perfect addition to the gallery wall in our master bedroom; it fits in beautifully with the other jewelry display pieces and art.

I’ve gotta admit, my mind is kind of racing with ideas of other things I can turn into unique drawer pulls!
Ready for more fun upcycled projects? I’ve gathered my top 20 trash-to-treasure upcycles right here.
How To Turn Old Jewelry Into Amazing Drawer Pulls
Create unique, one-of-a-kind drawer pulls that are budget-friendly using old jewelry.
Materials
- Plain drawer pulls
- Krazy glue
- Old earrings, brooches, or pendants
Tools
- Tin snips
Instructions
- Snip off the back of the earring post, pendant loop or brooch pin.
- Glue your jewelry to the drawer pull with Krazy Glue.
- Attach the drawer pulls to your furniture.
Recommended Products
As an Amazon Associate and member of other affiliate programs, I earn from qualifying purchases.


Great idea Carrie, so beautiful!
~Sarah
Thanks Sarah!
carrie, I’m wondering, you surely didn’t krazy clue right to the wall right? and, if I may add my 2 cents about those tiny nails in picture hanging kit, I use needle nose pliers to hold while I hammer them in. works for me, after a few trys of course.
Haha, no definitely not. I did need to use my hammer and nail to hang it on the wall! And thanks for the tip on those tiny picture hanging kit nails!
i love these, carrie! so fun!
Thanks Cassie!
So cute and simple!! I love it!
Thanks! I think the simple projects may be my favorite!
So pretty and feminine. Even at 63 yrs old, I love girly things like this. Thank you for teaching me something I never thought of.
Thank you Denise! I live in a house with four boys so I have to make sure to work in some feminine touches where I can!
Beautiful! Love them all :) Thanks for sharing at Inspiration Monday!
Debbie
Thanks Debbie!
Thank you for sharing. Now I need to find some old jewelry to use, haha. :)
Thanks Yvonne – just hit a few estate sales on the last day. You will be in jewelry heaven. :)
Hi! Stopping by from Enchanting Inspiration and just love this idea!! I will have to keep my eyes open for big fun jewelry!!
Thanks Selene! I think finding the right jewelry pieces is half the fun!
Hi There! Visiting from the Enchanting Inspiration Link Party. What a great idea! I repurposed old furniture and am always looking for fun new hardware. I’m definitely going to need to try this out :)
Thanks Breanna! I love to repurpose old furniture too – which is why I came up with this whole idea! Definitely stopping by to check out some of your projects!
Cool! Great selection of jewelry! I can totally see doing this on a chest in my house or my vanity cabinets! Love it! ~Amber
Thanks Amber!
Wow! Such a super cute idea. The jewelry really adds character to a piece. I might try this on my desk makeover. My only concern would be that each of the knobs might not match….a little picky right? LOL
http://www.mysimplesignificance.blogspot.com
Thanks Danielle! And you are right – the not matching is the tricky part. You could look for things that coordinate. Or if you are able to find a pair of nice old earrings, you will have two that match.
Lov’n this idea! I have a bag full of old earrings somewhere that I must go through and make interesting drawer pulls. Thanks for the inspiration!
Thanks Marie! Good luck with your bag of earrings! I actually found an earring a few days ago that I had lost last summer. Was still holding onto its match and was soo excited.
This is SO crazy clever! I love bling, and bling used as knobs is just such a great idea. Thanks for sharing! (If you want to, I’d love for you to link this project up to Motivational Monday: http://thediymommy.com/motivational-monday-2/)
Thanks Christina! You are right – bling anywhere is good!
How fabulous! I’m looking forward to trying this. I also think if the furniture piece were very simple, like a nice plain white, that you could totally jazz it up with the knobs all different.
I agree – sometimes a bit of mismatch is just the thing.
I love your knobs! I finally figured out the easiest way to nail the picture hanger hooks. First I mark the center of the frame. The heck with fractions and a ruler! I take a piece of scrap paper and “measure” the width, fold the paper in half and mark that center point on the frame with a pencil! No math! Being right handed, I hold my nail in the tips of my needlenose pliers in my L hand, then hammer with my R. Sometimes I don’t hammer the nails in all the way so the hooks can grab onto the nail head on the wall.Easy peasy!
Thanks Kathy! And thanks for sharing your tip for nailing – that can be so tricky to get right!
What a fun way to make some unique pull knobs. Love this idea!
Thanks Linda!
HI, Carrie, I just wanted to let you know about something I learned. When you use any kind of super glue, after you glue your item, then, shake a little bit of baking soda around it and it will seal even that much faster. Then you just wipe away the extra baking soda. Crazy glue and super glue are fast but the baking soda makes them that much faster with not waiting. I hope you try it to see.
Thanks for the tip – I have never heard that but I am definitely going to try it next time! Thanks for sharing!