How to Paint an Amazing Painted Plywood Subfloor
The complete guide to painting a beautiful subfloor that will last for years.
Several months ago I started plotting how to get beautiful floors for not much money.
I was fed up with my nasty, stained carpet but didn’t have the money for the hardwood floors I was dreaming of … or any other decent flooring for that matter.
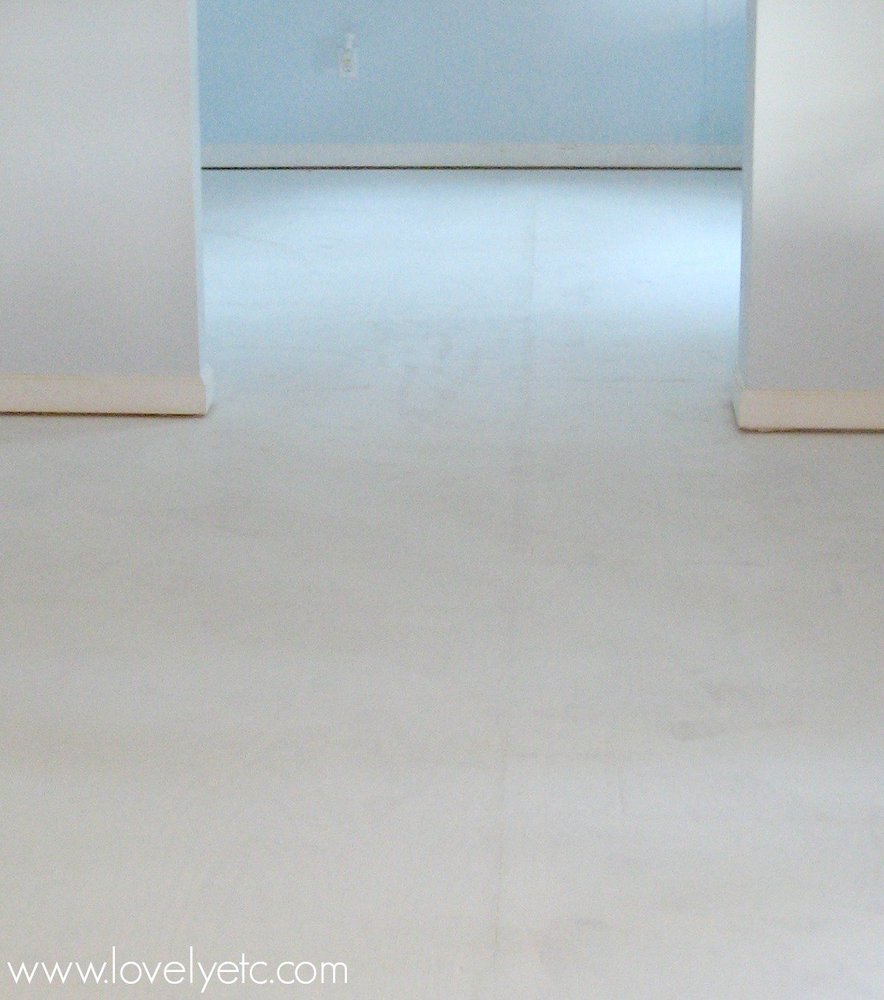
But that gross carpet had to go, so I decided to paint the plywood subfloor in my living and dining rooms.
Many months later, I am finally done and I think I’m kind of in love with these painted floors!
This was not a quick and easy project but it was incredibly inexpensive. And it was sooo worth the effort.
Today I’m sharing everything you need to know to paint your own subfloor with gorgeous, durable results.

This post contains affiliate links which means if you make a purchase after clicking a link I will earn a small commission but it won’t cost you a penny more. Click here to see my full disclosure policy.
Supplies needed to Paint Plywood Subfloors
- Utility knife, hammer, pry bar – for removing old carpet
- Needle-nose pliers, flat head screwdriver, heavy-duty staple remover – for removing the millions of staples left after removing old carpet. You don’t absolutely have to have a staple remover but it makes the job much faster and easier.
- Sander
- Zinsser oil-based primer
- Porch and Floor Paint – I used Valspar Porch and Floor Paint in the colors ‘Chimney Smoke’ and ‘Crucible’.
- Paint roller and tray – a regular 9 inch roller works best for applying primer and the base layer of paint
- painter’s tape
- Stencil – A stencil is optional but does look really beautiful. I used this Allover Paisley Stencil. I also have a list of other great floor stencils here.
- Small foam paint roller (to use with the stencil)
- Rust-Oleum Varathane Crystal Clear Water-Based Floor Finish in Satin
- Varathane floor finish applicator – this makes applying the floor finish so much easier, but you could also use a regular paint roller if you prefer.
How to Paint a Plywood Subfloor

Remove your old flooring
First step, rip out your old carpet and carpet padding. Remove all of the tack strips using a hammer and pry bar.
There will probably also be hundreds of staples left in the subfloor from the carpet padding.
You can remove these by prying them up with a flat head screwdriver and then pulling them out with needle-nose pliers. Or you can use a heavy-duty staple remover. Either way will get the job done but the staple remover makes the job much easier and will save you tons of time.

Prepare the subfloor for paint
Once the carpet and staples are gone, it’s time to fill in the seams and staple holes.
This is the only part of my own floors that I really wasn’t pleased with. I used Flexible Floor Patch and Leveler to fill in the seams between boards.
This was not the right choice. It is good because it flexes with the floor and all that stuff. But it is horrible because you can’t sand it smooth.
If I were painting my floors today, I would use DAP Presto Patch Filler. When I was preparing our kitchen subfloors to lay new flooring, I used this to patch several dents and it was great.
It went on easily and I was able to sand it perfectly smooth. This is what I would recommend for preparing your subfloors for paint.
After filling the holes and seams, you are ready to sand the floor. We just used a small orbital sander but of course, a large floor sander would work much faster.
Just remember that this is plywood – it is not going to be silky smooth. The point of sanding is to smooth out major rough spots and smooth any wood filler you used.
Prime the floor
Before painting, you need to prime the floor with a quality primer. The quickest way to do this is to cut in around the edges of the room using a paintbrush and then use a roller with an extension handle to fill in the rest of the floor.
(Quick tip: if you don’t have an extension handle, most broom handles can do the exact same thing.
Just unscrew the handle from your broom and screw it into the handle of your paint roller.)
I used Zinsser Oil-based Primer. This is my favorite primer because it sticks to anything and is very durable.
Just beware, this is an oil-based product so you definitely want to make sure your space is well-ventilated because the fumes can be strong.
You will also need to clean your paintbrush and other supplies using mineral spirits when you are finished.
Paint your subfloor
And finally, it is time to paint the subfloor!
First, paint your base color onto the floor. I used Valspar latex porch and floor paint in ‘Chimney Smoke’.
(In case you are wondering latex paint works just fine over oil-based primer; you can’t do oil-based paint over the water-based primer.
I chose to use latex paint instead of oil because it is easier to work with and easier to clean.)
You will probably need to paint a couple of coats to get good coverage.
Painting a border
I chose to paint a double border around the edges of my room and I am so glad I did.
The border really makes the paint job look classy and it also made stenciling the floor much easier because I didn’t have to go all the way to the wall.
To paint the border, use painter’s tape to tape off the area you want to paint.
Seal the edges of the tape by painting over them with your base color. (Yes, first you paint over the tape using the paint color you already painted the floor. This will seal the edges of the painter’s tape so that none of the second color leaks under the tape. This is the secret to getting perfect lines when you use painter’s tape.)
Once that is dry, paint the border using your second paint color. I used Valspar latex porch and floor paint in the color “Crucible”.
 so that you get nice, clean paint lines")
Finally, carefully remove the tape before the paint fully dries. (Removing the tape before the paint dries will keep the fresh paint from peeling.)
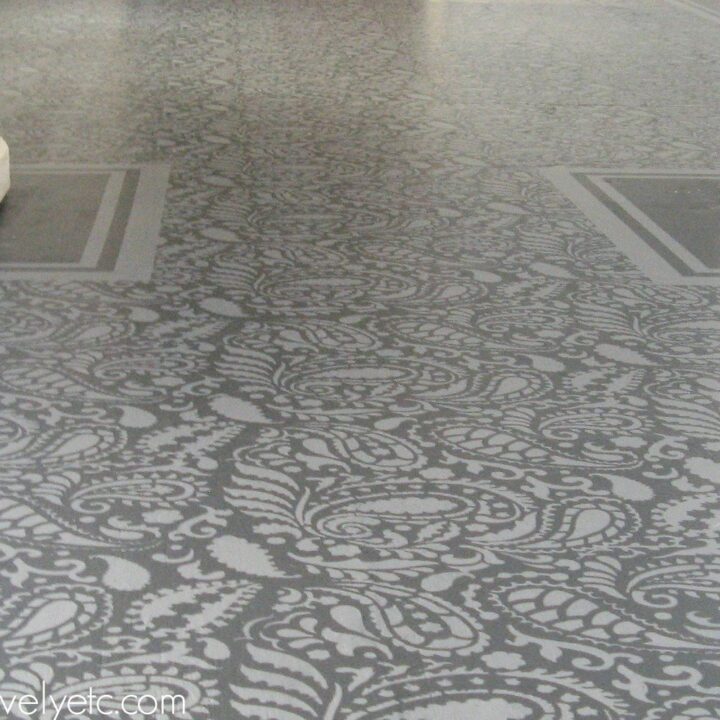
Stencil the floor
Time to stencil! Stenciling your floor is obviously optional; paint alone can make a huge difference.
But stenciling really looks beautiful and while stenciling a floor looks intimidating and incredibly time-consuming, it actually goes pretty quickly.
I used this gorgeous Paisley Allover Stencil from Cutting Edge Stencils, but if you are looking for other stencils that are perfect for floors, I shared a bunch of my favorite floor stencils here.
If you paint a border like I did, you only need to stencil inside the border. Place your stencil in one of the corners of the room and use a few pieces of painters tape to hold it in place.
Load a small amount of paint onto a small foam roller and roll it over the stencil.
You want to be careful not to put too much paint on the roller at a time – too much paint can cause your stenciling to look messy.
You should be able to paint the stencil with one thin coat of paint. It might take a couple of tries to figure out the perfect amount of paint to use each time, but then it will go very quickly.
Want more tips for perfecting your stencil technique? I’ve got lots of tips for choosing floor stencils and stenciling floors here.

Seal the floor
The final step is sealing the floors. Technically you don’t need to use a sealer over porch and floor paint, but I highly recommend it.
Sealing your floor makes it super durable and also gives it that beautiful, soft shine you expect from a nice floor.
Once the paint is fully dry, carefully remove any dust from the floor surface before sealing. (A microfiber cloth is great for this.) Then carefully apply your floor sealer.
I used Rust-Oleum Varathane Crystal Clear Water-Based Floor Finish in Satin and would highly recommend it.
I applied it using a Varathane floor finish applicator to get a really smooth finish.
I applied four coats of the sealer to make sure the floor was well protected, waiting the recommended amount of time between coats.
After the final coat, I waited an additional four days before moving my furniture back into the room.
That was probably longer than necessary, but I wanted to be extra sure everything was protected!

Cost and Time Involved
I painted the floors in my living and dining rooms which combined are around 400 square feet.
This process took me many weeks – mostly because it was around the holidays so I had a lot of other things going on and took lots of breaks.
I would say you would need at least a two-week window though, mostly because of the drying times for the various layers.
My total cost was between $300 and $400. (I already had some materials on hand so it really depends on if you count those.)
This total cost includes the filler, tape, sandpaper, primer, paint, and sealer.
So in the end these floors cost less than $1 per square foot start to finish.

Now that is a beautiful floor! And not only because it was so inexpensive!
Thinking about painting some floors of your own? Or just wondering if a painted floor can really last? I have lots more tips and updates than can help:
- Painted Plywood Floors Update: The Good, The Bad, and The Ugly
- The Absolute Best Floor Stencils and Tips for a Perfectly Stenciled Floor
- Painted Plywood Subfloor: Three Years Later, The Final Update
- 15 Gorgeous Painted Floors: Ideas for Every Type of Flooring
- How to Paint the Most Beautiful Porch Floor Ever
I’d love for you to share this project on Pinterest!

How to Paint a Plywood Subfloor
Create a beautiful painted plywood subfloor or other painted floor with this step-by-step tutorial.
Materials
- DAP Presto Patch Filler
- Zinsser oil-based primer
- Porch and Floor Paint (Valspar Porch and Floor Paint in ‘Chimney Smoke’ and ‘Crucible’)
- Painter’s tape
- Stencil (optional)
- Rust-Oleum Varathane Crystal Clear Water-Based Floor FInish in Satin
Tools
- Sander
- Hammer
- Pry bar
- Needle-nose pliers
- Flat head screwdriver
- Paint roller and tray
- Small foam paint roller (if stenciling)
- Floor finish applicator
Instructions
- Rip out your old carpet and padding.
- Remove all the tack strips using a hammer and pry bar.
- Remove any staples with a flat head screwdriver and pair of needle-nose pliers.
- Patch the seams and staple holes.
- Sand the floor with a small palm sander or a larger belt sander if desired.
- Prime the floor with a quality primer.
- Paint the floors with the base color first. (If you aren't adding a border or stenciling, you can skip to step 15.)
- Use painter’s tape to tape off the border area.
- Paint over the border with the base color.
- Once dry, paint the border using your second paint color.
- Remove the tape before the paint fully dries.
- Place your stencil in one of the corners of the room with a few pieces of painters tape.
- Load a small amount of paint on the foam roller and roll it over the stencil.
- Move the stencil to the next section and repeat until complete.
- Once the paint is dry, seal the floors with several coats of sealer.
- Allow the sealer to fully dry before moving furniture into the room.
Recommended Products
As an Amazon Associate and member of other affiliate programs, I earn from qualifying purchases.
-
 Paisley Allover Wall Stencil – Wall Painting Stencils for Easy Room Makeover – Large Stencil for Painting Walls – Stenciling Instead of Wallpaper Stencils for Walls
 -
 Clare 5 Piece Interior Paint Kit | Includes 2” Paint Brush, 9” Roller Frame, 9” Roller Cover, 11” Metal Tray, and a 11” Tray Liner
 -
 Rust-Oleum 3554 Zinsser High Hide Cover Stain Primer and Sealer, White

carrie- you have the patience of a saint, but it was all worth it! looks stunning!
carrie- you have the patience of a saint, but it was all worth it! looks stunning!
oh my goodness. I am in LOVE with your floors. You did SUCH an amazing job—-I have never seen anything quite like this on a floor and now I don’t know if I will be able to stop thinking about it! SO SO cool!!!!
Jaime
Im actually shocked at the final result! WOW… it’s lovely. So much effort and vision. How on earth do you know what to ‘do’ with the floor (sanding, priming, coating etc) You are one clever savvy lady. Im in awe actually.
Jennie. x
wow it looks amazing i love it xxx
This looks fantastic! All your hard work paid off! Beautiful!
WOW!!! That is gorgeous!!!!
Holy WOW! This looks fantastic! What a surprising project- and totally amazing! Best painted floors I’ve seen, the design you made up is A-Mazing!!
Oh. my. word! Those are STUNNING! What a lot of work. Well done!
Wow this looks amazing! I’m so impressed :)
That is amazing! I have a spare room soon to be turned into an office with plywood floors and I think I am going to have to try it. You did an incredible job.
Wow, this is amazing! I saw it on pinterest and had to check it out. I actually thought you had painted on concrete. Great job!!!
WOW, that is a.ma.zing!! You are so brave to try that. Great job!!
Looks fabulous! You cant even tell its painted on sub floors!
WOW! Your floor looks incredible!!!
Dee
Incredible!!!! it looks super!!!
Wow, what an amazing job! Looks great!
I knew about painting sub-floors from Bob Villa, once upon a time. I had never seen it done so beautifully! I love this! I am definitely inspired from your post!
That’s brilliant – I love it !
Holy cow! That is truly beautiful! Im wondering if I can do this on my plywood stairs? Hmmm, you have inspired me, Thanks for sharing!
AAaaaa Maze Zing!!!
AAaaaa Maze Zing!!!
This looks amazing. I can’t believe you sanded the whole floor with a palm sander. Talk about making it work! And you did!
I think these are the most gorgeous floors I have seen ! Fantastic job !
Love it! SO love it!
Incredibly clever. Love it.
Absolutely amazing! Just…WOW! Your hard work and patience definitely paid off.
How do you transfer the pattern to the floor? Do you have to use a bazillion stencils? I don’t get it, but I do love the results.
I featured your floor on my blog Addicted 2 Decorating today. Hope you don’t mind, but it’s just too beautiful not to share!! :)
Carrie, it turned out great! So nice… I’m jealous! LOL! How much time did it take you?
Carrie, it turned out great! So nice… I’m jealous! LOL! How much time did it take you?
Amazing! And inspirational. Who knew you could do that.
This is really amazing! What wonderful work
Oh. my. WORD! Gorgeousness Carrie! I’m adding this post to my inspiration file and will tell everyone to come over and check you out. Amazing girl. LOVE!
Wow Carrie! This looks amazing!! Love the pattern you chose too. And great tutorial.
I just came via Beth, WOW what a great job, thanks so much for the tutorial :), nice to meet you.
All the best,
Kathy :)
Oh my gosh this is absolutely stunning!!! I have painted my floors and I know that it is alot of work but this is so worth it!! Beautiful!!!!!
xo
This came out so great! I’m your newest follower!
http://www.ckandnate.blogspot.com
That floor is beyond gorgeous!! I am in awe of your talents and will be following along to see what else you get up to! Deb
stunning. you did such a fabulous job. love the stencil and colors you chose.
stunning. you did such a fabulous job. love the stencil and colors you chose.
This is by far the coolest thing I have yet to see on a DIY blog…outstanding!!
OMG! I found you on A2D and came on over to check out the how to!
I am so glad I did! My landlord has given me permission to yank out the smelly old carpet. We had hoped that there was hardwood under since the house was built in 1901 and there is hardwood in the hall but Sadly it is just a plywood sub floor. Today I was rather despondent over that fact. Tonight I am elated! My living room is not that large but this would allow me to get rid of the nasty carpet, create something beautiful, which I love doing, and not cost me an arm & leg.
Thank You for sharing!
Crystal, this response is too late for you, but someone else may benefit. My husband and I did one built in 1904. (Everyone who has ever renovated an “old lady” says these words nearly every day: What were they thinking? Why?) The entire house had hardwood floors, except for the tile in the bathrooms, which were in a 1940 addition. There was REAL lino in the kitchen using coal tar as the adhesive OVER the hardwood. That was BAD. But even worse, in the foyer they had installed 3/4″ plywood subfloor OVER the hardwood using ring shank nails. When you pulled them out, they left quarter sized holes in the hardwood. Point is, look under the subfloor if you have reason to think there is hardwood there, like the house was built in 1901. My question, if anyone is still reading this thread, is how do you prep if your subfloor is OSB and not plywood? And like everyone else, I’m totally impressed with the paint job.
OH MY ! Holy patience you must have had! :) Looks great!
Wowsa! That floor is gorgeous. Way to go, Sista!
Oh my wow! Your floor looks amazing!
truly stunning
Carrie, this is so so beautiful! I’m truly impressed at your patience and the final result is so gorgeous! Bravo girl! Bookmarking!
xo
Kate
Stunning does not begin to describe these floors! I am in awe! I only wish I could do that. Way to go!
Stunning does not begin to describe these floors! I am in awe! I only wish I could do that. Way to go!