How to Paint an Amazing Painted Plywood Subfloor
The complete guide to painting a beautiful subfloor that will last for years.
Several months ago I started plotting how to get beautiful floors for not much money.
I was fed up with my nasty, stained carpet but didn’t have the money for the hardwood floors I was dreaming of … or any other decent flooring for that matter.
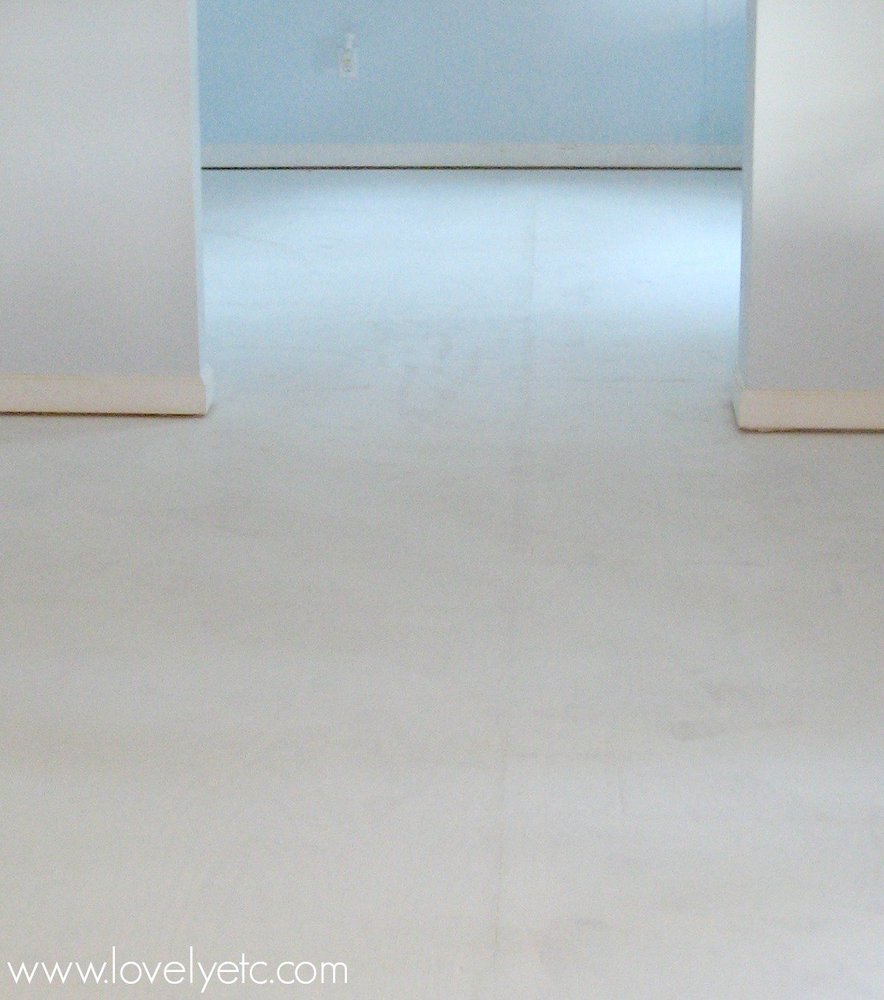
But that gross carpet had to go, so I decided to paint the plywood subfloor in my living and dining rooms.
Many months later, I am finally done and I think I’m kind of in love with these painted floors!
This was not a quick and easy project but it was incredibly inexpensive. And it was sooo worth the effort.
Today I’m sharing everything you need to know to paint your own subfloor with gorgeous, durable results.

This post contains affiliate links which means if you make a purchase after clicking a link I will earn a small commission but it won’t cost you a penny more. Click here to see my full disclosure policy.
Supplies needed to Paint Plywood Subfloors
- Utility knife, hammer, pry bar – for removing old carpet
- Needle-nose pliers, flat head screwdriver, heavy-duty staple remover – for removing the millions of staples left after removing old carpet. You don’t absolutely have to have a staple remover but it makes the job much faster and easier.
- Sander
- Zinsser oil-based primer
- Porch and Floor Paint – I used Valspar Porch and Floor Paint in the colors ‘Chimney Smoke’ and ‘Crucible’.
- Paint roller and tray – a regular 9 inch roller works best for applying primer and the base layer of paint
- painter’s tape
- Stencil – A stencil is optional but does look really beautiful. I used this Allover Paisley Stencil. I also have a list of other great floor stencils here.
- Small foam paint roller (to use with the stencil)
- Rust-Oleum Varathane Crystal Clear Water-Based Floor Finish in Satin
- Varathane floor finish applicator – this makes applying the floor finish so much easier, but you could also use a regular paint roller if you prefer.
How to Paint a Plywood Subfloor

Remove your old flooring
First step, rip out your old carpet and carpet padding. Remove all of the tack strips using a hammer and pry bar.
There will probably also be hundreds of staples left in the subfloor from the carpet padding.
You can remove these by prying them up with a flat head screwdriver and then pulling them out with needle-nose pliers. Or you can use a heavy-duty staple remover. Either way will get the job done but the staple remover makes the job much easier and will save you tons of time.

Prepare the subfloor for paint
Once the carpet and staples are gone, it’s time to fill in the seams and staple holes.
This is the only part of my own floors that I really wasn’t pleased with. I used Flexible Floor Patch and Leveler to fill in the seams between boards.
This was not the right choice. It is good because it flexes with the floor and all that stuff. But it is horrible because you can’t sand it smooth.
If I were painting my floors today, I would use DAP Presto Patch Filler. When I was preparing our kitchen subfloors to lay new flooring, I used this to patch several dents and it was great.
It went on easily and I was able to sand it perfectly smooth. This is what I would recommend for preparing your subfloors for paint.
After filling the holes and seams, you are ready to sand the floor. We just used a small orbital sander but of course, a large floor sander would work much faster.
Just remember that this is plywood – it is not going to be silky smooth. The point of sanding is to smooth out major rough spots and smooth any wood filler you used.
Prime the floor
Before painting, you need to prime the floor with a quality primer. The quickest way to do this is to cut in around the edges of the room using a paintbrush and then use a roller with an extension handle to fill in the rest of the floor.
(Quick tip: if you don’t have an extension handle, most broom handles can do the exact same thing.
Just unscrew the handle from your broom and screw it into the handle of your paint roller.)
I used Zinsser Oil-based Primer. This is my favorite primer because it sticks to anything and is very durable.
Just beware, this is an oil-based product so you definitely want to make sure your space is well-ventilated because the fumes can be strong.
You will also need to clean your paintbrush and other supplies using mineral spirits when you are finished.
Paint your subfloor
And finally, it is time to paint the subfloor!
First, paint your base color onto the floor. I used Valspar latex porch and floor paint in ‘Chimney Smoke’.
(In case you are wondering latex paint works just fine over oil-based primer; you can’t do oil-based paint over the water-based primer.
I chose to use latex paint instead of oil because it is easier to work with and easier to clean.)
You will probably need to paint a couple of coats to get good coverage.
Painting a border
I chose to paint a double border around the edges of my room and I am so glad I did.
The border really makes the paint job look classy and it also made stenciling the floor much easier because I didn’t have to go all the way to the wall.
To paint the border, use painter’s tape to tape off the area you want to paint.
Seal the edges of the tape by painting over them with your base color. (Yes, first you paint over the tape using the paint color you already painted the floor. This will seal the edges of the painter’s tape so that none of the second color leaks under the tape. This is the secret to getting perfect lines when you use painter’s tape.)
Once that is dry, paint the border using your second paint color. I used Valspar latex porch and floor paint in the color “Crucible”.
 so that you get nice, clean paint lines")
Finally, carefully remove the tape before the paint fully dries. (Removing the tape before the paint dries will keep the fresh paint from peeling.)
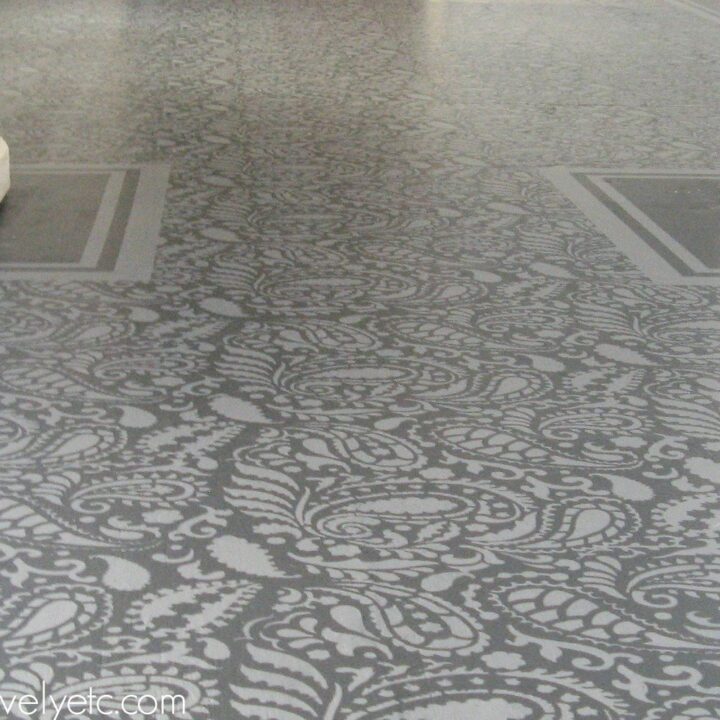
Stencil the floor
Time to stencil! Stenciling your floor is obviously optional; paint alone can make a huge difference.
But stenciling really looks beautiful and while stenciling a floor looks intimidating and incredibly time-consuming, it actually goes pretty quickly.
I used this gorgeous Paisley Allover Stencil from Cutting Edge Stencils, but if you are looking for other stencils that are perfect for floors, I shared a bunch of my favorite floor stencils here.
If you paint a border like I did, you only need to stencil inside the border. Place your stencil in one of the corners of the room and use a few pieces of painters tape to hold it in place.
Load a small amount of paint onto a small foam roller and roll it over the stencil.
You want to be careful not to put too much paint on the roller at a time – too much paint can cause your stenciling to look messy.
You should be able to paint the stencil with one thin coat of paint. It might take a couple of tries to figure out the perfect amount of paint to use each time, but then it will go very quickly.
Want more tips for perfecting your stencil technique? I’ve got lots of tips for choosing floor stencils and stenciling floors here.

Seal the floor
The final step is sealing the floors. Technically you don’t need to use a sealer over porch and floor paint, but I highly recommend it.
Sealing your floor makes it super durable and also gives it that beautiful, soft shine you expect from a nice floor.
Once the paint is fully dry, carefully remove any dust from the floor surface before sealing. (A microfiber cloth is great for this.) Then carefully apply your floor sealer.
I used Rust-Oleum Varathane Crystal Clear Water-Based Floor Finish in Satin and would highly recommend it.
I applied it using a Varathane floor finish applicator to get a really smooth finish.
I applied four coats of the sealer to make sure the floor was well protected, waiting the recommended amount of time between coats.
After the final coat, I waited an additional four days before moving my furniture back into the room.
That was probably longer than necessary, but I wanted to be extra sure everything was protected!

Cost and Time Involved
I painted the floors in my living and dining rooms which combined are around 400 square feet.
This process took me many weeks – mostly because it was around the holidays so I had a lot of other things going on and took lots of breaks.
I would say you would need at least a two-week window though, mostly because of the drying times for the various layers.
My total cost was between $300 and $400. (I already had some materials on hand so it really depends on if you count those.)
This total cost includes the filler, tape, sandpaper, primer, paint, and sealer.
So in the end these floors cost less than $1 per square foot start to finish.

Now that is a beautiful floor! And not only because it was so inexpensive!
Thinking about painting some floors of your own? Or just wondering if a painted floor can really last? I have lots more tips and updates than can help:
- Painted Plywood Floors Update: The Good, The Bad, and The Ugly
- The Absolute Best Floor Stencils and Tips for a Perfectly Stenciled Floor
- Painted Plywood Subfloor: Three Years Later, The Final Update
- 15 Gorgeous Painted Floors: Ideas for Every Type of Flooring
- How to Paint the Most Beautiful Porch Floor Ever
I’d love for you to share this project on Pinterest!

How to Paint a Plywood Subfloor
Create a beautiful painted plywood subfloor or other painted floor with this step-by-step tutorial.
Materials
- DAP Presto Patch Filler
- Zinsser oil-based primer
- Porch and Floor Paint (Valspar Porch and Floor Paint in ‘Chimney Smoke’ and ‘Crucible’)
- Painter’s tape
- Stencil (optional)
- Rust-Oleum Varathane Crystal Clear Water-Based Floor FInish in Satin
Tools
- Sander
- Hammer
- Pry bar
- Needle-nose pliers
- Flat head screwdriver
- Paint roller and tray
- Small foam paint roller (if stenciling)
- Floor finish applicator
Instructions
- Rip out your old carpet and padding.
- Remove all the tack strips using a hammer and pry bar.
- Remove any staples with a flat head screwdriver and pair of needle-nose pliers.
- Patch the seams and staple holes.
- Sand the floor with a small palm sander or a larger belt sander if desired.
- Prime the floor with a quality primer.
- Paint the floors with the base color first. (If you aren't adding a border or stenciling, you can skip to step 15.)
- Use painter’s tape to tape off the border area.
- Paint over the border with the base color.
- Once dry, paint the border using your second paint color.
- Remove the tape before the paint fully dries.
- Place your stencil in one of the corners of the room with a few pieces of painters tape.
- Load a small amount of paint on the foam roller and roll it over the stencil.
- Move the stencil to the next section and repeat until complete.
- Once the paint is dry, seal the floors with several coats of sealer.
- Allow the sealer to fully dry before moving furniture into the room.
Recommended Products
As an Amazon Associate and member of other affiliate programs, I earn from qualifying purchases.
-
 Paisley Allover Wall Stencil – Wall Painting Stencils for Easy Room Makeover – Large Stencil for Painting Walls – Stenciling Instead of Wallpaper Stencils for Walls
 -
 Clare 5 Piece Interior Paint Kit | Includes 2” Paint Brush, 9” Roller Frame, 9” Roller Cover, 11” Metal Tray, and a 11” Tray Liner
 -
 Rust-Oleum 3554 Zinsser High Hide Cover Stain Primer and Sealer, White

Wow, this is absolutely amazing! You started a revolution of how to get around expensive floors! I can’t believe those are stenciled plywood. It is absolutely gorgeous. I would be way in love if those floors were in my home! Visiting from AD2D
First, Donna @ Funky Junk painting her stairs, and now YOU re-doing an entire floor!!!
That was a LOT of tedious work, but dang it, a girl’s gotta do what a girl’s gotta do…and it turned out FABULOUS!!! REALLY!!! GREAT JOB!!!
Girl I had to come back and tell you that this is making ALL the rounds today. I think it’s popped up at least 25+ in my radar today alone :) woot!
Holy moly! Those floors are gorgeous! How did you get pictures of my carpet for your before picture? Ick. Mine looks just like that. I am praying for hardwoods!
Amazing ! No way I’d have the patience to do that. It’s beautiful. http://www.bargainfun.net Steph
As a long time floor painter ( I painted my first floors over 25 years ago–and have done it in every single house since then) I want to add a couple tips: I had the very best luck when I finally quit adding floor leveler. Just get the biggest baddest floor sander you can, and get it flat with that. Trust me. anything that goes thinly over the floor will ultimately chip away with heavy furniture placed over it. Don’t be afraid to wash the wood well…just let it dry completely before you paint. Also, had the best luck with ‘marine epoxy’ (boat paint) from any high-end paint store because it goes on and stays on…but it only comes in high gloss, a look I happen to love. Good luck!
Found your beautiful floor at Addicted 2 Decorating. I am planning on ripping up my ugly carpet and painting floor throughout my house. Thanks for the info and inspiration!
Your floors are fantastic. I started with my upstairs hall a while back but it is no where near as smooth and beautiful as yours. Glad I saw this before beginning my bedroom.
That floor is freakin amazing!!! I can’t believe that you stenciled all those paisleys, I’m not that patient. Thanks for some great inspiration.
You have absolutely “FLOORED” us all with your awesome, beautiful paisley floor!!! WHAT AN INCREDIBLE JOB YOU BOTH HAVE DONE–YOU DESERVE NOT ONLY TO CELEBRATE BUT TO BE “CELEBRATED” BY ALL OF US–YOUR ADMIRERS!
Carrie, I am happily now your latest FOLLOWER and whatsmore this is my very first time doing this! I have had you on my fav bar forever, but now I feel like a real FAN!!!
Carrie, do you think I can you essentially do the same thing on a countertop? I would love to paint my countertops until I can afford to refinish my kitchen!
Thanks! Teresa
This is fabulous. Love it!
OOOOOOOH MMMMMYYYYYY GOOOOOODNESSSSS!
Visiting from the shoutout at Homestories A to Z today—-
MOUTH GAPING OPEN! (no, I’m not kidding and yes I am SHOUTING!)
Amazing!
Suzanne in NW Illinois
Oh my heck! Your floor looks absolutely amazing! You definitely deserve a medal of honor for your patience!
Carrie, these are AMAZING. I shared them on my blog!
Projectect.org
Your floor looks phenomenal! Good work, I would say, it was worth all the work. Paula lusk
Amazing. I love it…thinking this would work great in my craftroom.
Amazing. I love it…thinking this would work great in my craftroom.
This looks AH-MAZING!
Very nice!! I can’t imagine the patience it took do the floors…well worth it though!
Oh wow! Your floor looks amazing! Very clever idea! Would love to try it myself!
Great job!
AMAZING!
I’ll be featuring you tomorrow during Sticker Time!
Girl, you are amazing! I’m am curtsying to you!
Blessings,
Angie @ Knick of Time
Incredible! Found you through 36th Avenue. Totally pinning this. The answer to my horrible kitchen floors has been found! Thank you so much for sharing this!!!!
I’m completely blown away! You did an amazing job.
I can not believe how fantastic this looks! Your colors are beautiful, the pattern is perfect and it does not look like plywood in the least. WOW! I would love if you linked up to my party I host on Fridays!
http://daysofchalkandchocolate.blogspot.com/2012/01/latest-and-greatest-friday-15.html
Hi! Visiting from tt&j. LOVE THIS! I love the color and the pattern. I love how easy you made this look! Pinning this for sure!!
Also.. I would love for you to link these up to my Friday party if you get a chance!
GORGEOUS, stunning and amazing! I want to run downstairs and rip out my family room carpet right now. I’m going to have to talk my hubby into this. I’m putting your gorgeous floor in the PoPP Spotlight. Thanks for linking up.
Wow, your floor is simply stunning!
Wow, your floor is simply stunning!
It’s gorgeous! I have several painted floors in my house. Even though I originally did it years ago because it was cheap (that was 3 houses ago) I have them now because I love them! I change my bathroom floor fairly often. A whole new floor for the price of a can of paint and a little labor. You can’t beat that! Yours turned out just beautiful! Great job. Lisa~
Your floors are gorgeous!! I have an office floor I painted aqua, but every chunk (literally) out of the plywood shows and catches dirt. Now I think I’ll try your amazing method! I’m not sure a sander would get rid of the problem on my floor, but maybe the leveler…it’s only an office…I’ll let you know how it comes out. (And become a follower! :)
What a great idea! It’s gorgeous! We lived with plywood floors for several years while renovating. Wish I’d seen this then! I landed on the Cutting Edge website a few days ago, and love their landscape mural kit. I think there’s one in my future!
You make me want to rip out my identical ugly carpet and paint my floor! I wouldn’t have much time to get it done though…my business is in my home. I really love how it turned out. Beautiful!
That looks incredible! How long before you could walk on it? I have considered this for my kitchen, but when you walk on it does it feel like weird? and Creaky?
ditto to what everyone else said. THat floor is kissable!
Found you through Tatertots and Jello
My best friend and I have been contemplating this in our town homes. We’ve never come across someone who had an explanation of how and a show stopping finish like yours did. I am INSPIRED!!! Thanks for all sharing all your hard work.
I addoooore your floor! I wish i could do it right now, but in the future! Thanks for the marvelous idea!!
http://munchtalk.blogspot.com/
oHHH my GOSH! these are totally Fabulous!! I have a guest room that i ripped the ugly carpet up and now am left with even ugly plywood floors i never thought it would look so pretty painted~ im so gonna do this! i love everything about yours hope ya dont mind im gonna have to copy it! :) THANK YOU!!!
I’m adoring the Boheme’ Essence of these painted floors! You did a fab job. And thanks for the Tutorial.
Blessings from the Arizona Desert… Dawn… The Bohemian
Came through Pinterest. You should SO be in love with what you’ve done. Kudos!!!!
Dixie
This comment has been removed by the author.
GORGEOUS!!! I’m seriously so impressed!
I used one of your pictures and linked to your blog at this post. Thanks for the wonderful inspiration!
http://www.ourhouseinpictures.com/2012/01/wow-factor-of-creativity-and-hard-work.html
I just found you through Dixie who just a comment above.
You’ve done everything right and ended up with a beautiful result. Taping off and putting a border on the edges was the perfect solution to prevent having to stencil along the walls. Also smart to use two colors that are just a shade or two off. It prevents a busy pattern from getting too loud.
Perfect job!
You are one amazing lady, and you so deserve to be featured everywhere, This is truly the BEST DIY project I have ever seen…AMAZING take a bow
Enjoy your new floors and your home
Pattie
Very. Very. Very. Good. This project is right up my alley. Inspires me to do my kitchen floor. For once I’m thanking goodness my kitchen is very small!
I stumbled upon you from ProjectQueen. Your floors are truly amazing and beautiful. Everyone will want to have these from rich to poor. Wow-weeeee!
Absolutely stunning! You probably don’t want to hide them under any furniture or carpets, they’re that lovely!