How to paint the most beautiful porch floor ever
This stenciled porch floor is a gorgeous, inexpensive flooring solution that any DIYer can create with some paint and a stencil.
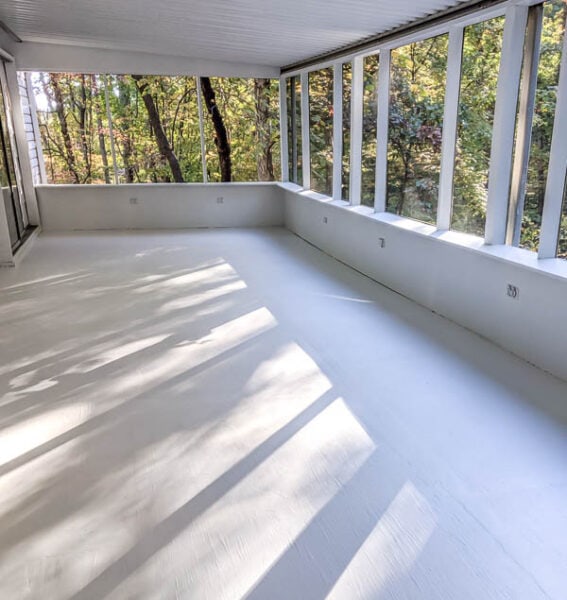
The best feature of our entire house is the huge screened-in porch on the back of our home overlooking the backyard and surrounding woods.
It is my favorite place to relax and it has been in need of a refresh for a few years now. The first step of our big screened-in porch update: gorgeous new painted floors.
When we first moved into this house 12 years ago, the screened-in porch was a major eyesore covered in peach paint and Astroturf.
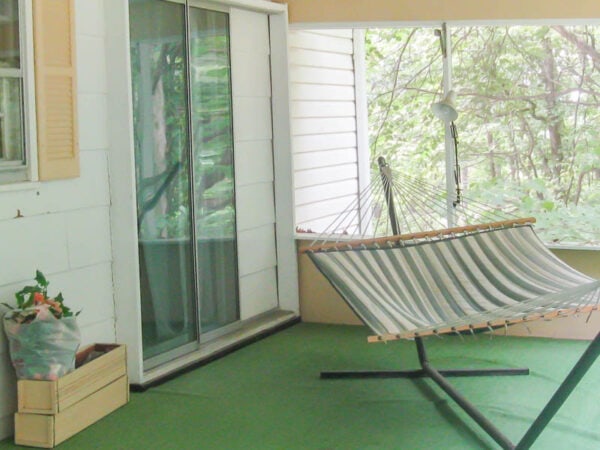
Underneath the Astroturf, it was not pretty!
The first summer we were here, I completely made over the entire space with fresh white walls and a cute painted checkerboard floor.
I love how that floor turned out, but after ten years of use and abuse, it had seen better days.
I had accidentally splattered wood stain on the floor. The paint was starting to chip and peel in a few areas, and it was generally looking tired, dingy, and ready for an update.

I strongly considered just redoing the checkerboard design I had originally painted since I loved it so much. But honestly, repainting something exactly the same way sounded pretty boring so I decided to go a different route this time.
I’ve been a huge fan of stenciled floors ever since I stenciled the plywood subfloors in our living room way back in 2012. Stencils can make the most humble (i.e. ugly) floor look gorgeous and expensive.
Even better, the pattern on a stenciled floor is fantastic for hiding imperfections, dust, and dirt.
Today I’m sharing a step-by-step tutorial for painting your porch floors along with tips for choosing paint colors and stencil and a video tutorial.

This post contains affiliate links which means if you make a purchase after clicking a link I will earn a small commission but it won’t cost you a penny more. Click here to see my full disclosure policy.
Choosing the right paint and paint colors
Choosing what type of paint to use is pretty simple: you definitely need to use porch and floor paint. Porch and floor paints are self-leveling and they are made to stand up to the wear and tear our floors endure as well as the temperature fluctuations outside.
Every line of paint has a porch and floor paint. This time I decided to try Sherwin-Williams porch and floor paint. When it comes to colors, there are hundreds of possible color combinations.
Keep in mind that if you choose two high-contrast colors, the stenciled pattern will be much bolder and if you choose two similar colors, it will be more subtle.
Also, keep in mind that you won’t want to change again for several years so in many cases neutral colors work best. But, that being said, if you want a fun pop of color, go for it! It’s just paint after all.
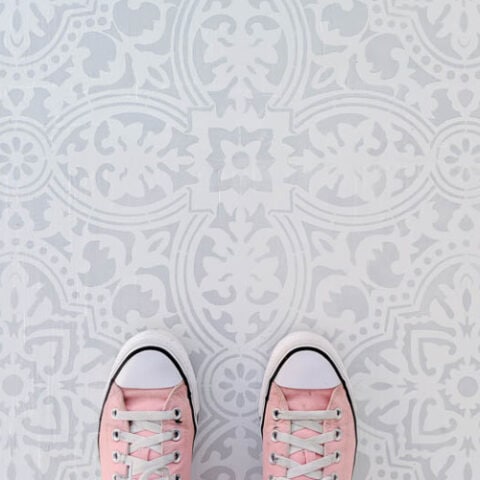
Our porch is quite large – 12′ x 35′ so I decided I wanted a more subtle, neutral pattern that wouldn’t be too in-your-face. I chose to use Sherwin Williams colors Snowbound and Grey Screen to create a white background and light gray design.
Before painting my floor, I did a test run by stenciling with my gray color onto a piece of white posterboard. I originally wanted to use a darker shade of gray, but when I did my test run, I decided it was too dark for me and chose a lighter shade instead.

Of course the downside of using super light colors like the ones I chose is that it shows dirt and pollen more easily. I factored this into my decision but in the end I decided to go for it anyway.
My screened-in porch is more protected from the elements than an open patio or deck and I really love how the light floor and walls draw your eyes straight to the gorgeous view of the woods.
Choosing the right floor stencil
Any wall stencil can technically be used as a floor stencil, but the best floor stencils have a large repeating pattern with enough detail to mask any imperfections in your floors (or your paint job).
After looking at tons of choices, I decided to use the Anatolia tile stencil from Royal Design Studio. It has a large-scale pattern which is important for a large porch like mine.
And it has enough detail to keep your eye moving. Another option I strongly considered was the Alatera tile stencil from Cutting Edge Stencil.
I also have an entire post on how to choose the best floor stencils along with a dozen of my favorites if you want to see more options.
Materials for Painting your Porch Floor
- cleaner and rags or mop to clean floor with
- paint scraper – if you have any peeling paint to deal with
- sandpaper and small sander – if needed to remove old paint and smooth the floor
- primer – I highly recommend Zinsser oil-based primer. It adheres very well and is extremely durable – both important when painting a floor.
- paint roller and tray – a regular full size paint roller for painting the base coat of paint
- paintbrush – for painting in corners and along edges. These are my favorite paintbrushes for general DIY. They hold up great and give a nice smooth finish.
- mineral spirits – for clean up after using the oil-based primer
- measuring tape – this will come in handy if you decided to paint a border around your floor like I did. It will also help you decide where to start your stenciled pattern
- painter’s tape – for painting your border as well as holding the stencil in place while stenciling
- two colors of porch and floor paint – I used Sherwin Williams porch and floor paint in the colors Snowbound and Grey Screen
- small foam roller – this is the fastest way to stencil large areas like a floor and still get crisp stencil lines
- stencil – this is the one I used, for more options check out my list of awesome floor stencils
- paper towels – for clean up, painting’s a messy job!
How to paint and stencil a floor
Start by clearing the furniture, rugs, and everything else from your porch. If you don’t have anywhere to store them, you can just push everything to one side while you paint the first half of the floor.
Then carefully move everything to that side while you paint the second half.
Clean the porch floor
The first thing you need to do before any paint job is clean the surface well. And when we’re talking about a porch floor, it needs an extra thorough cleaning to make sure all of the dirt, dust, pollen, and other mess is removed.
At a minimum, sweeping and mopping is a good idea. If a simple mopping isn’t enough to get your porch clean, it’s a good idea to give it an old-fashioned scrub down with some soapy water and a rag or brush.
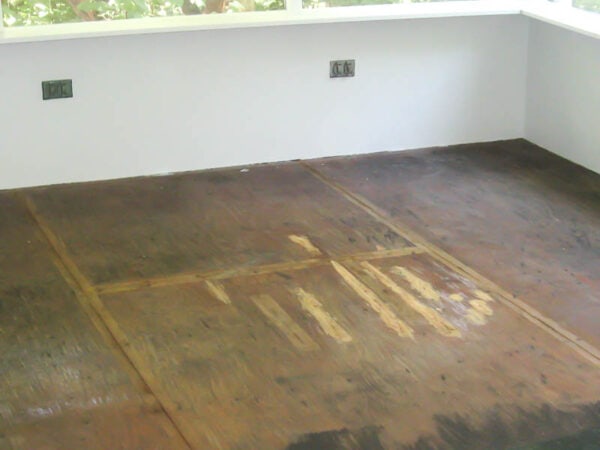
Remove any loose, peeling paint
If you are painting a wooden porch floor that has been painted before, there’s a very good chance you have some old, peeling paint to deal with. As tempting as it is, to just paint right over that mess, it’s not worth it.
Trying to make new paint adhere to peeling paint is a losing battle. You’ll save yourself lots of time and trouble by taking care of the peeling paint the first time around.
It’s easiest to start by using a paint scraper to scrape away any large loose bits of paint. The use a sander to smooth rough areas and smaller bits of loose paint.
You don’t need to remove all of the old paint or sand the entire floor. You just want to be sure to remove and smooth any paint that is loose, flaky, and peeling so you have a stable surface for the new paint to stick to. I used a small orbital sander for this.
If you notice any damage like rotten wood or missing boards, be sure to fix the damaged areas before moving on to painting.
When you’ve finished scraping and sanding the loose paint, clean your floor one more time to removed the dust and loose paint bits.
Prime the porch floor
The next step is primer. Primer helps seal the floor and helps your paint adhere well.
I’m a big fan of Zinsser Cover Stain oil-based primer. It seals in stains, sticks to pretty much anything, and works well over bare wood, oil paint, or latex paint. (I’ve got lots more info about when to use primer and how to choose the best one if you’re interested.)
 way to turn a tired floor into a gorgeous focal point. Learn how to totally transform your own floor.")
Use an angle brush to cut in around the edges of your porch and then use a paint roller to paint the rest of the floor. This step goes really quickly.
Paint the porch floor
Once the primer has dried, it’s time to start painting.
Start by painting two coats of your base color. I used Sherwin Williams Snowbound.
Again, use an angle brush to cut in around the edges of your porch and then use a paint roller to paint the rest of the floor.
Allow the paint to dry fully between coats. If you are painting your porch floor but not stenciling, you are done after this step!
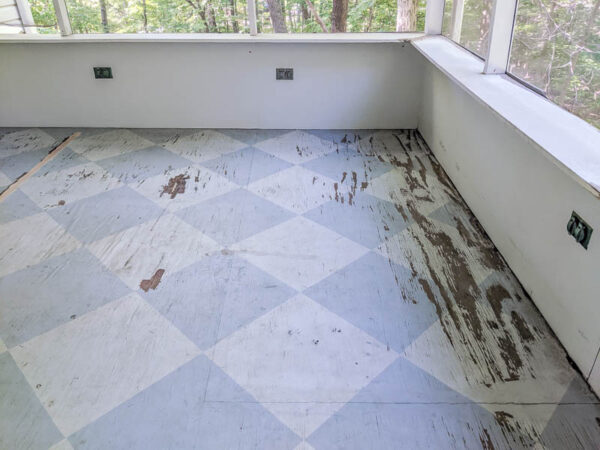
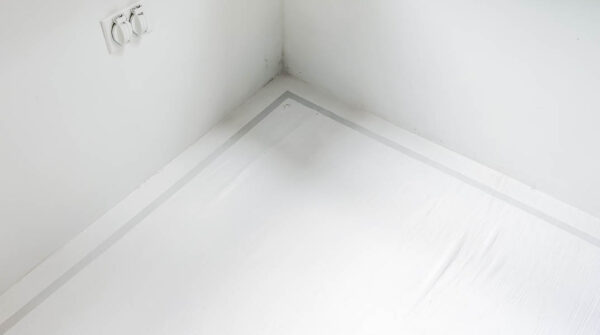
Painting the border
I chose to paint a border around the stenciled area of my porch floor for a couple of reasons.
One, I think it gives a nice finished look. And two, it makes the stenciling process much, much easier.
By ending my stenciled design at the border rather than flush with the wall, I don’t have to worry about bending my stencil to try to reach the floor next to the wall. (I figured out how crazy helpful a border is when I stenciled the plywood subfloors in our living room.)
Painting a border is pretty easy but there are a few tricks to getting perfectly crisp lines.
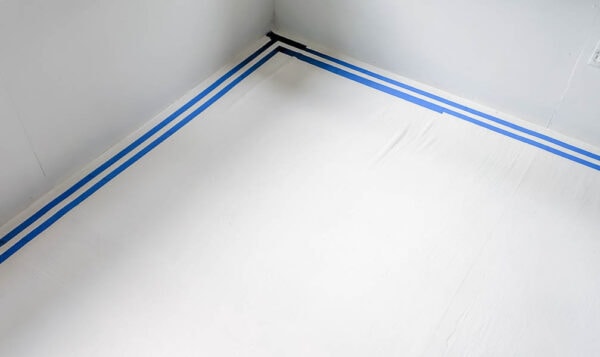
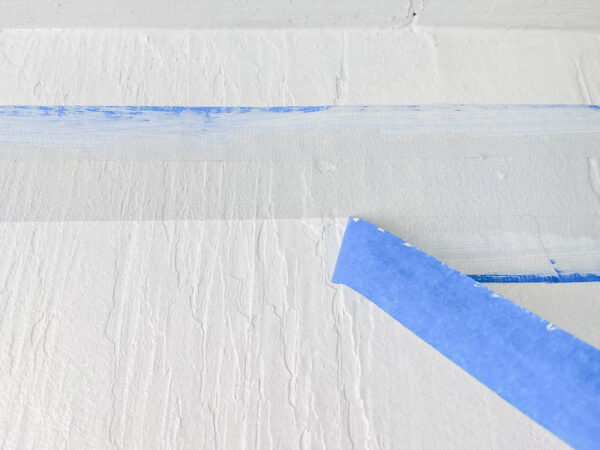
Start by taping off your border with painter’s tape. Use a tape measure to measure the distance you want from your wall or porch edge and mark that distance with a pencil every foot or so.
I chose to make my border an inch and a half from the wall on all four sides of the porch.

As you move along the porch measuring, lay long strips of painters tape along the marks you measured. I chose to make my border one inch wide for simplicity sake.
Since I was using 1 inch painter’s tape, I was able to easily use a piece of tape to mark where my border will be and then use a second piece of painters tape to tape off the inner edge of the border. (Confused? Check out the video to see what this looks like in action.)
Be sure to press each piece of painter’s tape down firmly with your finger.
Now for the secret to getting absolutely perfect paint lines.
Paint the border you just taped off using the same base color you already painted your porch. So in my case, I painted my border the same white as my base coat of paint.
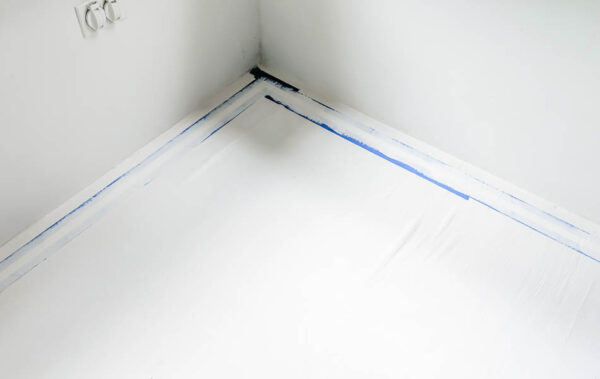
Why? Because the fresh coat of matching paint will very effectively seal the edges of the painter’s tape.
This way if there are any tiny air bubbles under the tape, matching paint will seep into them and seal them up before you paint a contrasting color.
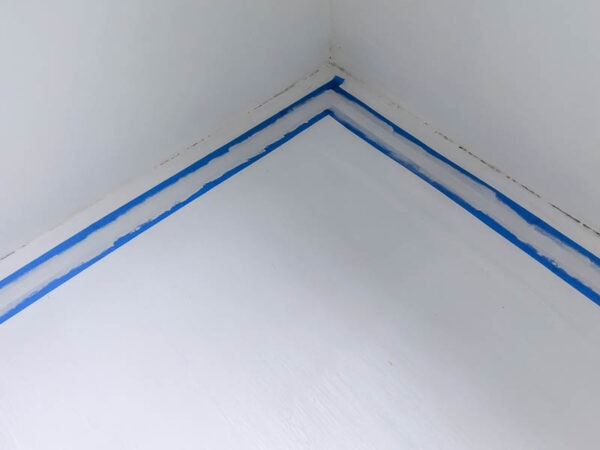
When your matching paint has fully dried, you can paint your actual border color. I used a small foam roller to paint this but a brush will also work well.
Be sure to remove the painter’s tape before the paint fully dries. This helps keep dried paint from peeling off with it.
Stencil the floor
When the border has fully dried, it is time to start stenciling.
It is easiest to start your stencil in one corner of the floor. Lay your stencil flat on the floor, slightly overlapping the border you painted.
Be sure that your stencil is straight and then use a couple of pieces of painter’s tape to keep it in place.

The fastest, easiest way to stencil a floor is with a small foam roller.
Roll a bit of paint onto your roller and then roll the excess off onto a stack of paper towels. You want your roller to be slightly damp but not dripping with paint.
Then gently roll your roller over the entire stencil design. Do not press down hard on the roller or paint can squish out and seep under the stencil.

You’ll get the hang of how much paint to use and how firmly to press very quickly, but if you’ve never stenciled before, it’s a good idea to do a practice run on a piece of posterboard or scrap wood before starting your floor.

Gently pick your stencil straight up and move it to the next section. Then line up the pattern with the previous stenciled area, tape it down, and paint. Keep doing this until the floor is finished.

A few tips for stenciling
The stenciling process goes much more quickly than you might think because you should only need one coat of paint for your stenciled design.
It works best when you don’t stencil immediately next to a section you just finished stenciling. At the beginning, you will need to stencil right next to your first square as you start a line of stenciling.
Whenever you do this, you need to wait five minutes or so for the paint to dry before moving on since the stencil will have to overlap the fresh paint.
As you continue to stencil, you will have more options of where to place the stencil next so that you never have to place it immediately next to wet paint.

Just make sure you never place the stencil in an entirely new area that doesn’t connect to what you have already stenciled. No matter how carefully you measure, it is pretty much guaranteed not to line up correctly.
Cleaning your stencil
You do not have to clean your stencil after every section, but eventually you will need to clean it.
So how do you know when it’s time? After awhile paint will start to build up on the stencil and your stenciled design will start to look less crisp. When that happens, you know it is time to clean all of the paint from the stencil before continuing.
For years I’ve dreaded cleaning my stencils, but recently I decided enough was enough and did some experimenting to find the fastest, easiest way to clean stencils.
It turns out if you use the right cleaner, cleaning stencils really isn’t so bad. And of all the cleaners I tested, Goof Off Household Cleaner was by far the best.
I like to clean my stencils in the bathtub. Apply Goof Off and then gently scrub off the paint with a scrub brush.
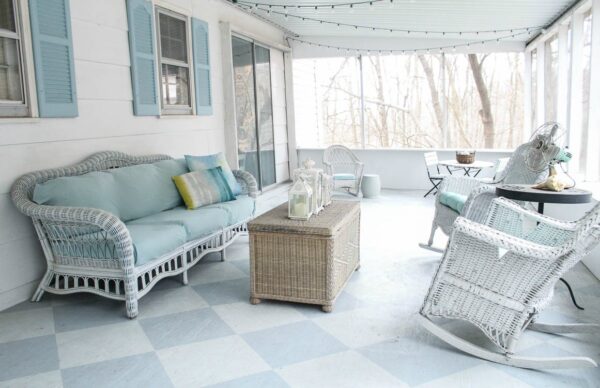
Stenciled Porch Floor Reveal
Once your floor is finished, be extra gentle with it for the first few days or even weeks. Even once paint is dry to the touch, it still takes up to 30 days to fully cure or harden.
After the first 24 hours, you should be safe to walk on your floor; just be really careful about moving furniture around. Or in my case, I had to make a no riding scooters on the porch rule for the first few weeks!
Here’s how my fabulous porch floor looks now.

It is so beautiful!


And I’ve since finished pulling together the rest of this space. I absolutely love how it came together! You can see the entire super-budget friendly screened-in porch makeover here.
Video Tutorial
I’d love for you to subscribe to my Youtube channel!
How to paint a stenciled porch floor
Create a beautiful DIY stenciled porch for an inexpensive flooring solution that any DIYer can create. You just need paint and a stencil.
Materials
- Cleaner and rags
- Primer
- Mineral Spirits
- Painter’s Tape
- Porch and Floor Paint - 2 colors
- Stencil
Tools
- Measuring Tape
- Paint Scraper
- Sandpaper and Small Sander
- Paint Roller and Tray
- Small Foam Paint Roller
- Paintbrush
Instructions
- Use a paint scraper to remove any large loose bits of paint.
- Use a sander to smooth rough areas.
- Clean the porch to remove any dirt, dust or pollen.
- Fix any damaged areas before painting.
- Use an angle brush to cut in around the edges of your porch with primer, and then use a paint roller to prime the rest.
- Allow the primer to dry.
- Start by painting two coats of your base color again using an angle brush to cut in, and then a paint roller.
- Allow the paint to dry fully between coats.
- If you are adding a border, tape off the border with painter’s tape. Measure the distance you want from your wall or porch edge and mark that distance with a pencil. Lay long strips of painters tape along the marks you measured.
- Paint the border using the same base color of your porch. This helps create perfect paint lines.
- Once paint has fully dried, paint your actual border color with a small foam roller or brush.
- Remove the painter’s tape before the paint fully dries.
- Start stenciling in one corner of the floor. Lay your stencil flat slightly overlapping the border you painted. Gently roll your roller over the entire stencil design.
- Carefully remove your stencil straight up and move it to the next section.
- Repeat until the floor is finished.
Notes
- If your stenciled design starts to look less crisp, that means it is time to clean the stencil.
- Always line up your stencil with a previously stenciled section. Don't try to start stenciling in a new section because it will not line up correctly.
Recommended Products
As an Amazon Associate and member of other affiliate programs, I earn from qualifying purchases.
-
 Anatolia Tile Stencil for Painting Floors - Large Tile Stencils - Modern Farmhouse Tile Floor Stencils - DIY Wallpaper Tiled Wall Stencils
 -
Scotch Painter's Tape 2093EL-24E ScotchBlue TRIM + BASEBOARDS Painter's Tape, 0.94-Inch x 60-Yard, 1 Roll, Width, Blue
-
CRAFTSMAN Tape Measure, Self-Lock, 25-Foot (CMHT37225S)
-
Purdy 140853100 XL Brush 3 Pack
-
Zinsser 03504 Cover Stain Interior/Exterior Oil Primer Sealer, 1-Quart, White
-
TACKLIFE Orbital Sander, 3.0A 5-Inch Random Orbit Sander with 12Pcs Sandpapers, 6 Variable Speed 13000RPM Electric Sander Machine, High Performance Dust Collection System, Ideal for DIY - PRS01A


I’d love for you to pin this post on Pinterest!

Other porch DIYS and stencil info you may want to check out:
- How to paint outdoor furniture
- Painted outdoor cushions: the good, the bad, the ugly
- Painted checkerboard porch floor
- The best floor stencils and tips for a perfectly stenciled floor

Google Web Story: Gorgeous Painted Porch Floor
Ok, so some legit questions: how do you not “paint yourself in” on a floor? :) Really though. Where did you start? And would this work on a concrete porch floor? Our screened porch has something more like that (or a garage type floor).
Haha, good question. It’s not too hard as long as you plan your exit strategy from the beginning. I started in one corner and then painted myself toward the door. And you can definitely do this on a concrete floor.You would just want to use a concrete primer before the porch and floor paint.
I have a concrete front porch, or rather a walkway. Is this something I could stencil? Any suggestions? We currently have a “runner ” there, but it keeps bunching up and is a pain to clean, sweep, etc. Thank you!
Yes, you can stencil a concrete porch too! Just clean it really well and start with a concrete primer before the porch and floor paint.
Oh my Carrie, this turned out so beautiful. I love the subtle color. Very peaceful!
Thank you so much!
I love this! It really brightened the entire area. I love how you put the border around it, too. Such a beautiful space!
Thank you so much Michelle! We have been enjoying it so much. And I think the border looks great and it made the whole process much easier!
Do you need to seal the floor once you are done painting it? Or just be careful when scrubbing during weekly cleaning?
So I have done a lot of research on this. When I painted an interior floor in the past, I did use a saeler to seal the floor and it worked beautifully and made it so easy to keep clean. But I used Sherwin Williams porch and floor paint for this porch and their reps are pretty adamant that a clear coat should NOT be used on top of this paint so I am not using a sealer for now. I actually painted this floor at the end of October but just shared it this spring and so far it has held up well. Regular cleaning definitely won’t damage the paint and moving furniture and things around doesn’t seem to be a problem either.
Great! Thanks for the tutorial and the step by step pictures. I think I might try this!
Is your floor plywood and is this a covered screened porch? I am looking into using plywood for my screened in porch but wasn’t sure if it was a good option. Thank you in advance for your input!
Yes this is a screened in porch and the floor is plywood. When we moved in, it was covered in an Astroturf rug. I removed the rug and painted the plywood with porch and floor paint. I originally painted the plywood more than ten years ago and the plywood floor has held up great! Of course the paint was getting pretty worn so I just repainted it.
My experience in the past is that latex paint does not hold up well for porch floors and have used oil-based paints for this reason. The reviews for that Sherwin Williams porch paint were very mixed. I like the idea of using stencils on my covered porch floor, but for all that work I would want it to oats a few years. I take it that the stenciling would need to be done with latex paint because of the drying time, but could it be done over an oil base paint as the first coat?
Great question. It has been a little more than two years since I stenciled my porch floor and so far it has held up extremely well. It still looks basically the same as when I finished painting it. Oil paint does tend to last longer than latex paints, although latex paints have really come a long way in the last decade or so as far as durability. Unfortunately you can’t paint with latex paint directly over oil paint – it won’t adhere well and will easily peel off.