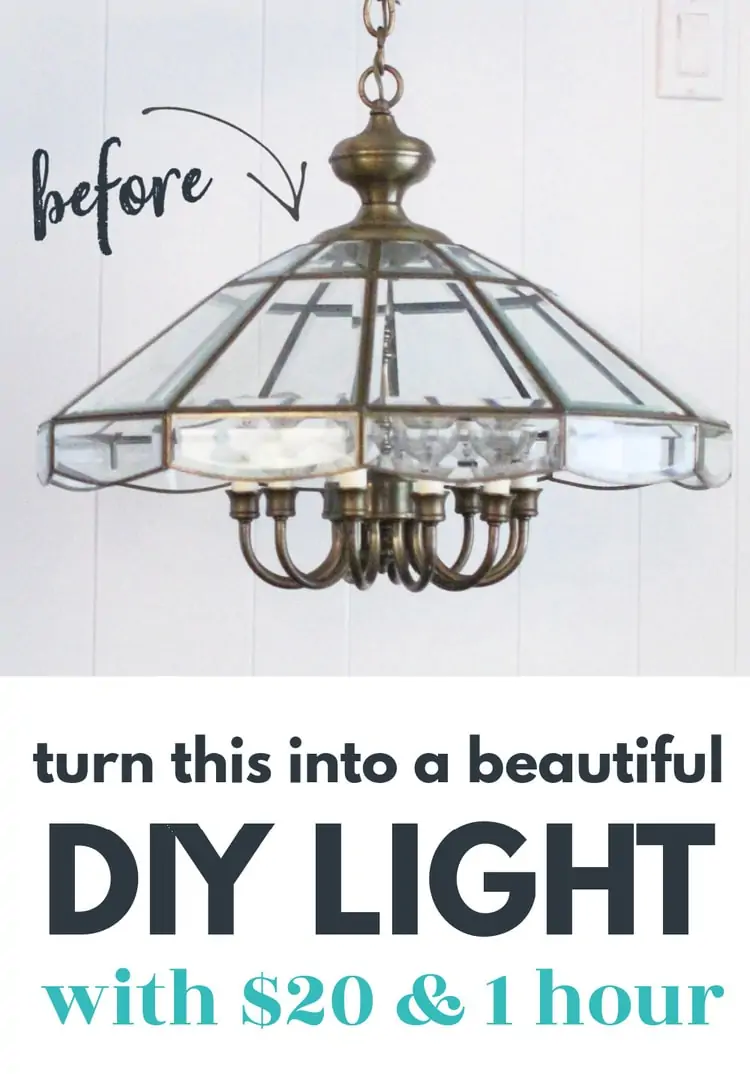
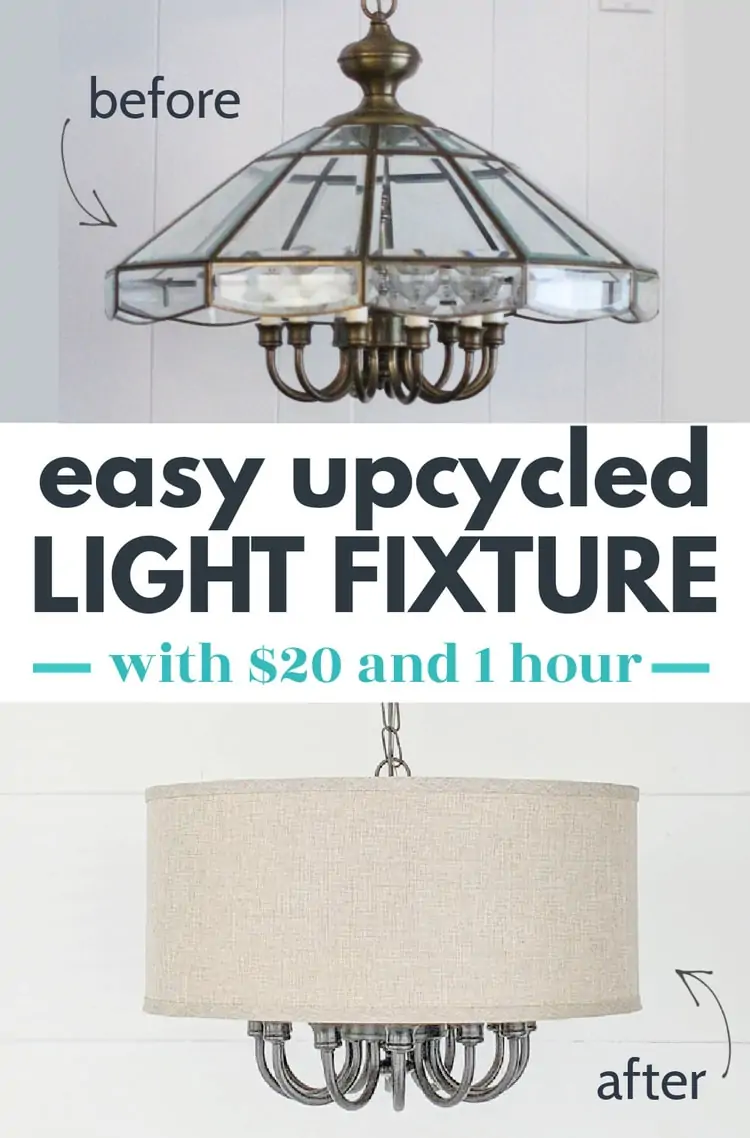
How to Completely Transform an Ugly Light Fixture
This easy step-by-step tutorial shows exactly how to update an old dated light fixture into a classic, beautiful DIY light.
Today’s project actually started with a light fixture I upcycled several years ago.
There are some DIY projects that I 100% love when they are finished. There are some projects that take a wrong turn and turn out terrible. And then there are the projects that land somewhere in between.
This light was one of those projects. I liked it when it was finished. It was super budget-friendly and I thought it was a big improvement over the before. But something was off and I just didn’t love it.
Even so, I knew there was a great idea there and with a few tweaks, this could be a fantastic way to make a super cheap light.
So now, five years later, I’m finally sharing an updated version. And this time, it’s perfect! (At least in my opinion.)
Today I’m sharing the original tutorial for transforming a dated light fixture along with the update I made that really turned this project into a home run.
This post contains affiliate links which means if you make a purchase after clicking a link I will earn a small commission but it won’t cost you a penny more. Click here to see my full disclosure policy.
Materials
- Old brass light fixture – the Habitat Restore usually has tons of these for cheap. You can also find them on Craigslist or Facebook Marketplace.
- Lampshade – I have lots more details about where to find this later in the post.
- spray primer and spray paint – if you choose to paint your light.
- light canopy kit – a basic light canopy kit from any home improvement store should work.
How to Upcycle a Light Fixture
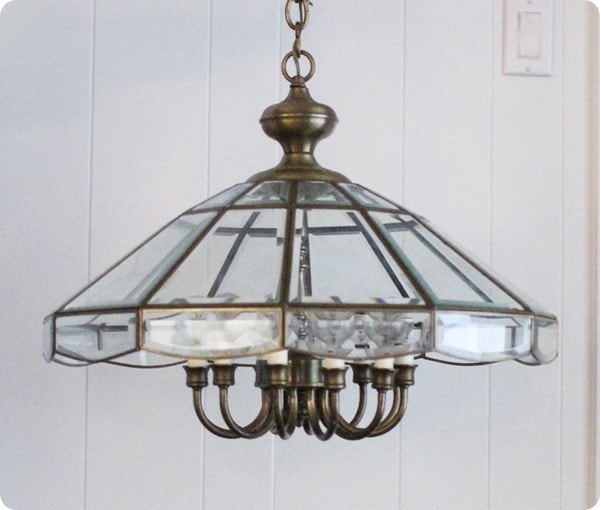
I started with this huge brass and glass light fixture I found at the Habitat ReStore for $15. (Man that thing was heavy!)
These old brass lights are pretty common and there were several there for me to choose from that day. Some had more of a lantern shade and some were more chandelier-like. We’re going to be totally removing the glass shade portion, so don’t worry too much about that part.
Instead, pay attention to the interior portion where the actual lights are. I chose this particular light because I liked the curved shape of the inside portion.
Once I got my light home, I started taking it apart. Most light fixtures and lamps are pretty easy to deconstruct just by unscrewing the various parts. I started at the top, unscrewing and removing one piece at a time.
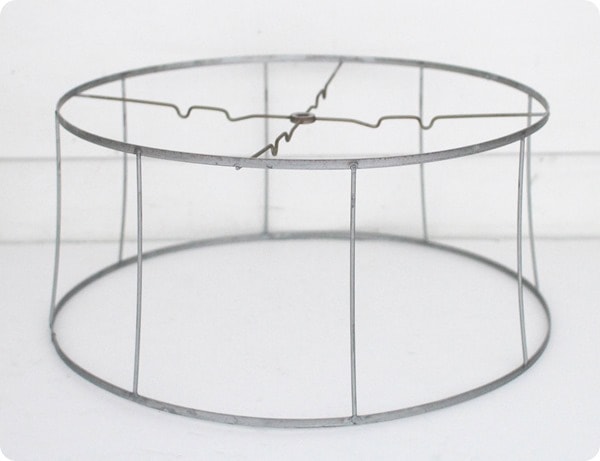
Once I had stripped off the heavy glass shade, I was left with this.

The next step was spray painting the whole thing black.
Honestly, the finished light would also look really nice with the original brass finish. But when I first refinished this light several years ago, I wasn’t a fan of the color.
To make sure that paint didn’t mess up any important electrical parts, I taped off the ground wire and balled up aluminum foil to protect the inside of each light socket.

I painted it with several light coats of spray primer. (Remember to always do several light coats of spray paint, rather than one thicker coat for good coverage and no drips.)
I followed that up with a few thin coats of oil-rubbed bronze spray paint.
Once the paint was dry, I started looking for a fitting lampshade. I was dreaming up all kinds of wood and metal concoctions, when I spotted this old metal lampshade frame in my stash of thrifted finds. It still had a few pieces of the old torn lampshade fabric attached, but I easily cut those off.
All it needed was a few coats of the same primer and paint I had used on the chandelier.
Once the lampshade finished drying, it was time to put it all together. I slipped the lampshade into place on top of the light fixture.
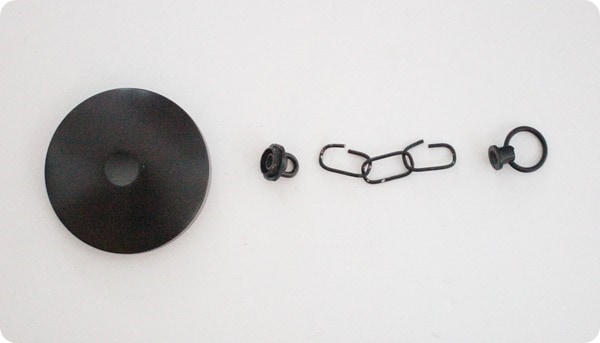
The final step was putting the top part of the light back together. I reattached the ring and chain that were originally part of the light (after painting them with the same spray paint). And then I used a basic light canopy kit to finish off the light and get it ready to hang.
One of the great things about upcycling a light this way is that you really don’t have to alter the wiring of the light fixture at all. As long as the light worked before, it will work exactly the same now.
You just install it like any other new light.
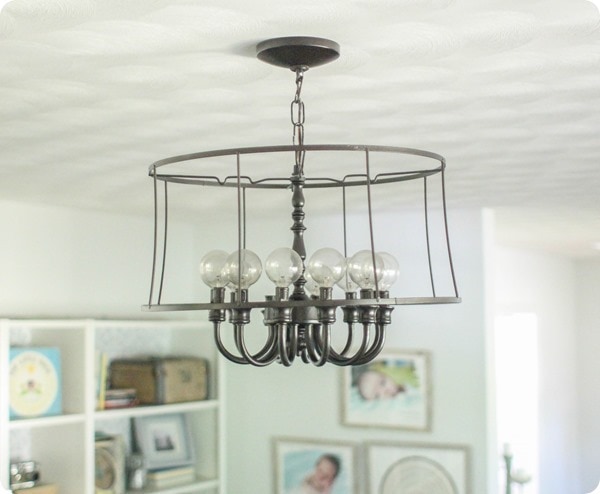
So that’s how my light looked when I shared this project five years ago.
At the time industrial lighting was really popular and I liked the updated light well enough, but I didn’t love it.
I knew the lampshade was the problem. The proportions were great but the open industrial look just wasn’t working.
It was too industrial to look homey, but it wasn’t industrial enough to look authentic. It just wasn’t quite right.
Updating the light fixture
So I took it apart and switched out the lampshade and that tiny change was all it took to completely change the feel of this DIY light.
I stumbled across the ‘new’ lampshade at a yard sale for $5. It even had it’s original price tag still and it was priced at $279! I really hope nobody paid that much for this simple shade!
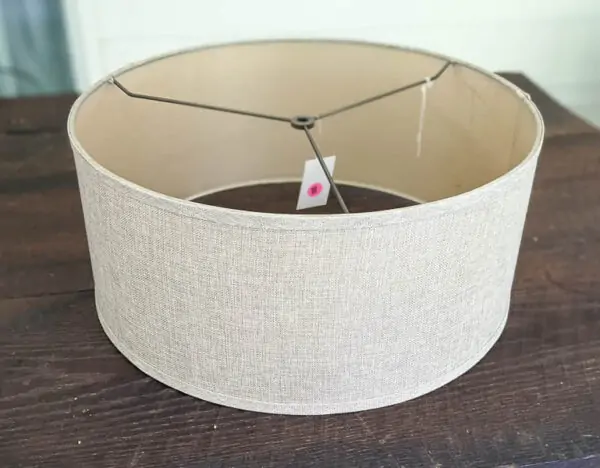
This shade is 18″ in diameter and 8″ high and I think that short, wide shape is perfect for a chandelier.
Good lampshades are one of those things I almost always pick up if I find them at a rock bottom price. Buying them new gets really expensive and I also love to buy good vintage lamps, so I’m constantly playing lamp/lampshade matchmaker.
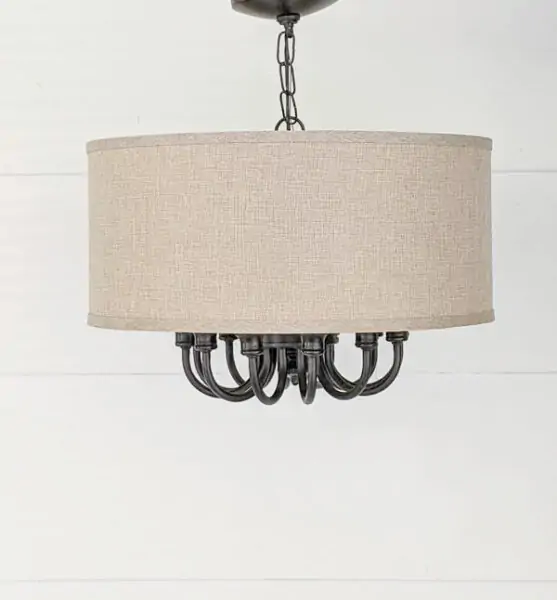
Once I’d reassembled my light fixture with this new more classic shade, it truly felt like a whole new light.
Where to find a Drum Shade for a Chandelier
I got really lucky finding my lampshade for super cheap, but of course I realize not everyone is going to be so lucky.
So how can you find a decent deal on a shade to make a light like this? I have a few ideas.
Buy a Secondhand Shade
First, there’s the way I did it – buying secondhand. This is definitely the best way to find a really killer deal, but it also depends a lot on luck. You can always search Craigslist or Facebook Marketplace, just know it may take weeks to find the right shade.
Buy a New Drum Shade
If you don’t have all the time in the world there are other options. You can buy a large drum lampshade. It won’t be $5, but it will still be less than buying a whole new light fixture.
I did some searching and found a few good lampshade options that are similar in size to the one I used. Just click the pictures below for more info. (I reallly love the size of this one.) These start at around $50.

I also found quite a few really cute options at IKEA, especially if you are interested in maybe going a less traditional route. I especially love this shade with a brass interior and perforated design. (Plus it’s one of the cheapest of the whole bunch!)
Make a DIY Lampshade
You can also make your own lampshade. I made a pair of DIY lampshades a few years ago and they turned out absolutely beautiful. But I will warn you that this is one instance where DIY isn’t necessarily cheaper.
If you are making your own lampshade, you will need lamp rings and a styrene sheet in addition to whatever fabric you are using. The cost of all that will be pretty close to the cost of just buying a new lampshade.
But this is a great option if you just cannot find the right size lampshade or want to use a special fabric beyond plain white.
One of the best things about this light is this same idea can be used to make all different styles of lights, depending on what type of shade you use. You could add a basket shade for a bohemian look or add some crystals to the bottom if you like a romantic style. Anything goes.

I really love how this light fixture turned out. I think it looks absolutely beautiful – and not at all like it was put together with $20 of secondhand finds and some paint.
Even better, this whole project can be done in an hour or two and doesn’t require a single tool.
In fact, if I hadn’t painted my light, it would have been done in about twenty minutes. (Plus, you know, an additional five years to figure out what wasn’t quite right and fix it, lol.)
Ok, I’d love to hear which version you prefer – the original (no shame in that!), the old industrialish version, or the new drum shade version?
Please share this post on Pinterest!
And here are a few other DIY lighting ideas I think you might love:
- Easy and Inexpensive DIY Orb Chandelier
- How to Make a Lampshade with your Favorite Fabric
- How to Turn a Lantern into a Lamp

Google Web Story: DIY Upcycled Lighting Project
Wow! Nice job And congrats to you for choosing to add an overhead fixture to your living room. A lot of designers would say that’s a no-n0, but I love having one in my living room, in fact, in all my rooms. Sometimes you just NEED more light when you’re doing a project or a crossword puzzle, or when you’re cleaning the room. So, enjoy your great DIY project
Thanks Pat. I totally agree – sometimes you just really need more light. And I a firm believer in creating a home that works for you – not the designers!
Yes – I agree that the transformed light is an improvement – however, I feel that it is not quite the correct light for your particular space. Lights should match your furniture style – but on the other hand – if you feel happy with your achievement – – why not enjoy what you have.
Thanks Rita, that is what I am debating as well. I love an eclectic mix in a room – but I’m not sure this is striking quite the right balance. Still love the light though!
The upcycled chandelier is perfect for your space. It has the right balance of old & new ideas put together to achieve a new look.
Thank you Cheryl! You are so kind.
This light looks just like the newest chandeliers I have seen in the fancy stores. Good job!
I have an old shade form too and now I know what to do with it. Thanks.
Thanks Joan! That is what I was thinking too.
Why not paint it copper? Copper accents are all the modern rage at the moment also gold and silver and these colour’s will go with any other fixtures you would have in your home. And the open shades are all the go.
Good idea Lorraine, I have been thinking about adding some copper somewhere.
The only comment I would give is I think if it were just a tad lower it would for your area better. Just a little more chain?
Hmm, that is a good suggestion – I just want to be careful not to make it so low it is a hazard to tall people!
I love the look that you achieved with just using the wire from a lampshade! The room looks great!
Thanks so much Erika!
Hey Carrie,
If you decide to sell it – Please let me know. I have a very modern dining room, that would fit this to a tee.
I will Linda!
Have you considered doing a new fabric on the wire shade? love the plain wire but it might soften it and give a less industrial feel you seem to be looking for?
Thanks for the suggestion DeAnn! I agree that would definitely soften the look. I think I’ve decided to live with it this way for right now but I am filing all of these ideas away for whenever I decide I am ready for a change!
Awesome job Carrie. I love, love, love how it looks now. All steampunkish and just perfect
Thank you Michelle!
Wow great job
Thanks Bernice!
Great job with creating your own light fixture! I have an old lamp shade just waiting for such a project!!!
Thanks Jane!
Just moved into husband’s childhood home and guess what light fixture is in the kitchen! My new lampshade arrived yesterday, so tomorrow is painting day. You saved me so much money by sharing this! Thank you!!
I’m so glad it could help! This light really works so well with just a new shade!