How to make a custom DIY lampshade with your favorite fabric
Let me show you how to make a gorgeous custom DIY lampshade using your favorite fabric.
There have been so many times I’ve found a beautiful lamp that I love – but it doesn’t come with a lampshade.
Thrift stores and yard sales are my favorite place to find really awesome lamps. A lot of new lamps are crazy expensive, but you can find really beautiful and unique lamps secondhand for super cheap. The problem is they usually have either ugly, outdated shades or no lampshades at all. That may not sound like such a big problem but it can turn into a huge headache.
A couple of years ago I found a gorgeous pair of turquoise lamps at a thrift store. I was so excited because not only were they beautiful, but finding a matching pair is a total score! Of course they had no shades, but I figured I’d pick up a pair of new lampshades at Target, and problem solved.
Except for problem not solved. All the cute drum shades I found at Target and my other usual spots were the wrong size. In the end it took me over a year to find a pair of lampshades that would work with my beautiful vintage lamps!
Well a few weeks ago, I found another fabulous pair of vintage lamps at a local thrift store. Of course, there were no shades, but they were tall and curvy and beautiful. And only $7 for the pair!

It seemed like the perfect time to learn how to make a lampshade.
I wasn’t totally sure how it was going to turn out. I’ve tried to make my own DIY lampshade once in the past and it didn’t turn out so great. It looked good from a distance but up close, it was kind of a mess.
But I wanted to give making a lampshade another try and this time I had two huge advantages – I was using real lampshade parts and I actually did research into the best way to construct a lampshade.
So yeah, it’s probably no surprise that it turned out 1000 times better. This time around my DIY lampshades look exactly the way I pictured them.
In this post I’m sharing a step-by-step tutorial for making DIY lampshades the real way along with tips for figuring out what size your lampshade should be and what size materials you need to order.

This post contains affiliate links which means if you make a purchase after clicking a link I will earn a small commission but it won’t cost you a penny more. Click here to see my full disclosure policy.
Update! In this tutorial, I demonstrate how to make a lampshade using fabric and adhesive styrene sheets which are basically sheets of thin plastic. I have to warn you that the cost of styrene sheets has risen a lot since I originally shared this tutorial. It’s still a great option for making a custom lampshade, but if you’re looking for a cheaper alternative, you can also find an inexpensive (possibly thrifted) lampshade in the size you need and use these instructions to cleanly cover it with new fabric.
Choosing the right size lampshade
Before you start making your lampshade or even order your supplies, you need to measure your lamp to figure out the correct size. It may seem like a small detail, but the right size lampshade makes a huge difference in the look of the finished lamp.
It’s actually really easy to figure out what size lampshade you need.
First, measure the width of the widest part of your lamp base. Your lampshade should be two times as wide as the base of your lamp.
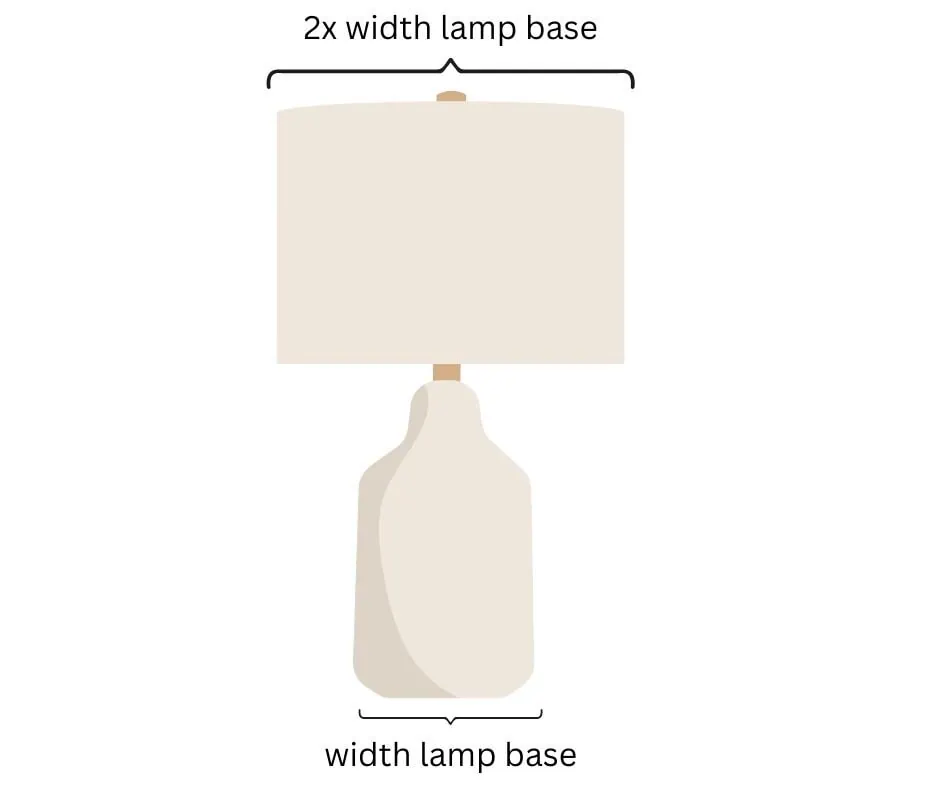
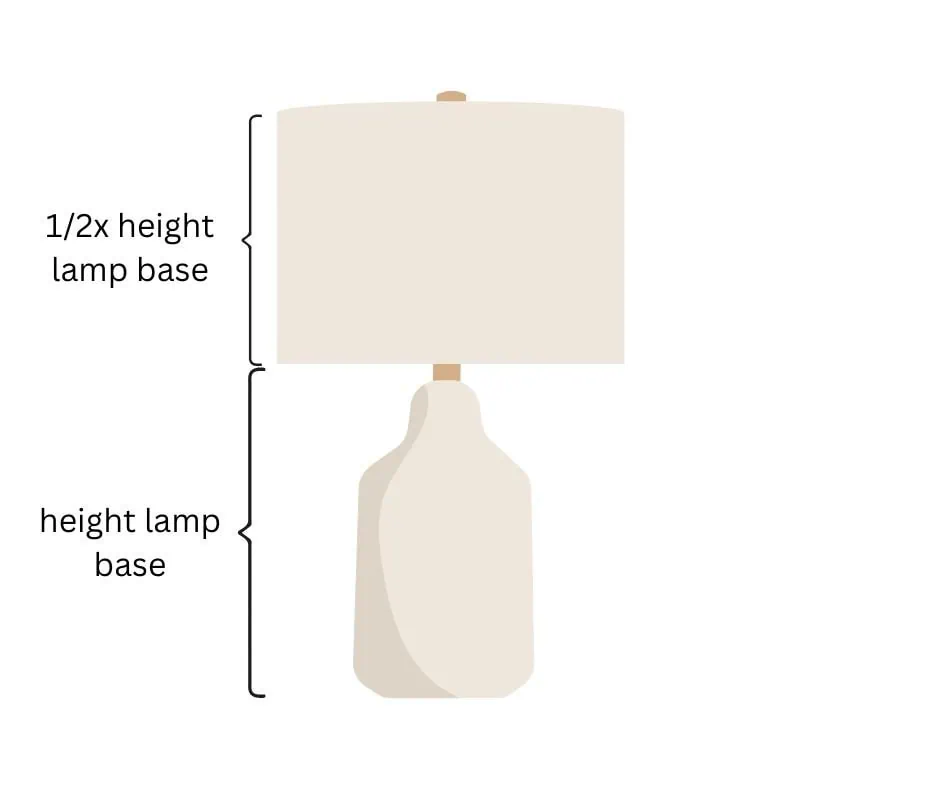
Next, measure the height of your lamp base from the bottom to where the shade will end, typically just below the light socket. Your lampshade should be half the height of your lamp base.
Those measurements will look great on the majority of lamps, but of course you don’t have to follow these size rules. There are times when an odd lampshade size can also make an impact, like when you have a small lamp with a super tall and skinny shade.
If you are recovering an old lampshade, simply look for one that’s pretty close to the measurements you found.
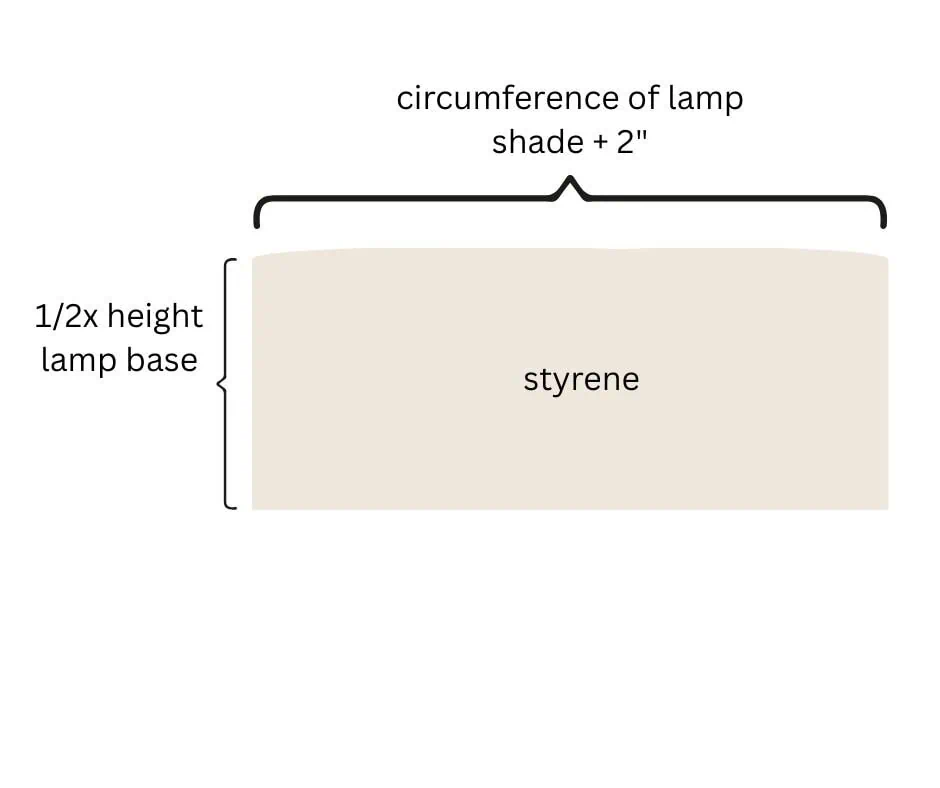
If you are creating a new lampshade, you will need to figure out the circumference of your lamp shade to know how much styrene you need. Styrene is sold in large sheets of various sizes. You’ll need to know the height and the circumference of your lampshade to know how much styrene to purchase.
To find the circumference, you can calculate 3.14 x the lampshade width (also called diameter) that you determined earlier. (Or you can also just plug the diameter into google and it will tell you the circumference.)
Add 2″ to the number you get. That is how long your styrene will need to be. The height of your styrene will be equal to the lampshade height you figured out earlier.
Materials for making a DIY lampshade

- Adhesive styrene sheet for making lampshades – this is the kind I used. It comes in several sizes. This is another option that’s a bit cheaper but I don’t have personal experience with it.
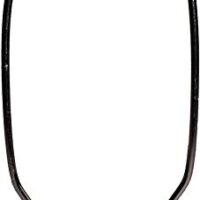
- set of wire lampshade rings – if you are recovering an old lampshade instead of making a new one, you won’t need these.
- Rotary cutter and cutting mat or fabric scissors
- fabric glue – be sure to use a glue that dries clear and gives a permanent hold
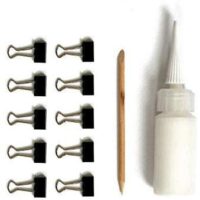
- small binder clips – these don’t need to be anything fancy, you can use the type you’d have in your home office
- small paintbrush – for brushing on the glue
- lamp harp set – if your lamp doesn’t already have one
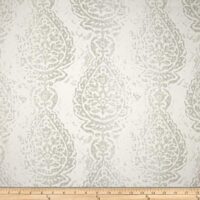
- fabric of your choice – I used Premier Prints Manchester fabric in french gray.
- measuring tape
- spray adhesive – you’ll only need this if you are recovering an old lampshade rather than starting from scratch
How to make a lampshade
Now that you’ve figured out what size lampshade you’re making and have your materials sorted, let’s dive in to the tutorial.
Before you begin, you need to iron your fabric. (I hate ironing and never iron my clothes, but I did iron my lampshade fabric because nobody wants a wrinkly lampshade.)
Attach your fabric to the styrene
(If you are recovering an old lampshade, you can skip these first two steps.)
If your styrene sheet is not the exact size you need, you should trim it to size before you begin. You can do this using sturdy scissors.
Lay your fabric out on a flat surface and stick the styrene sheet to it.
One side of the styrene is sticky so you can simply peel the protective layer off the styrene slowly while unrolling it and sticking it onto the fabric.

Trim the fabric so that there is a half inch border of fabric above and below the styrene.
Also leave a half inch border on one of the short ends but cut the other short end of the fabric flush with the styrene.
Fold the extra fabric from the short end over the styrene and glue it there with fabric glue.
Attach your fabric/styrene to the lampshade rings
Fold the fabric/styrene into a loop and use a binder clip to secure it together. The short end with the fabric border should be on top.

Set the lampshade up vertically. Slide the top lampshade ring (the one with the center section) into the lampshade.

You’ll need to adjust the size of your lampshade so that it fits snugly around the ring, then secure it in place using binder clips.

Attaching fabric to an existing lampshade
If you are recovering an existing lampshade instead of starting from scratch, you’ll start by laying your fabric out facedown.
Set your lampshade on top of your fabric and roll it over the fabric, tracing the outline as you go. Cut your fabric out, leaving 1/2″ above and below the outline you traced. You’ll also want to leave 1/2″ extra on one end of your fabric.
Fold the extra 1/2″ of fabric on the end over and glue it in place. This will give your lampshade seam a nice clean edge.
Spray the lampshade you are recovering with spray adhesive. With your fabric facedown on a table, roll your lampshade over the fabric, attaching it as you go. Be careful to maintain a border along the top and bottom of your lampshade. You can use a few binder clips to hold the fabric in place until the spray adhesive dries.
Glue the lampshade together
Add glue to the excess fabric around the top of the shade in small sections. Then use a small paintbrush to spread the glue to cover the fabric as well as the metal of the ring.

The glue will become tacky after a few seconds and then you can fold it over the ring.
Use the binder clips to help hold it in place while you move on to the next section.

Flip over the shade and repeat the same process on the bottom using the plain wire ring.
Finally add a little glue to the seam going up the side of the lampshade to keep it securely in place.

And that’s it! Your lampshade is ready to be installed on your lamp.
This whole process took about an hour for my first lampshade. Once I knew what I was doing, the second went a bit faster.
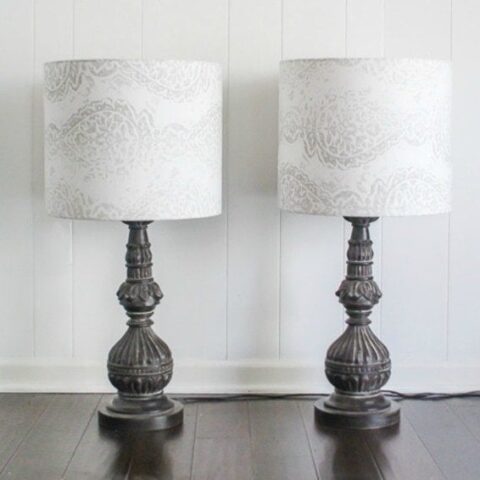
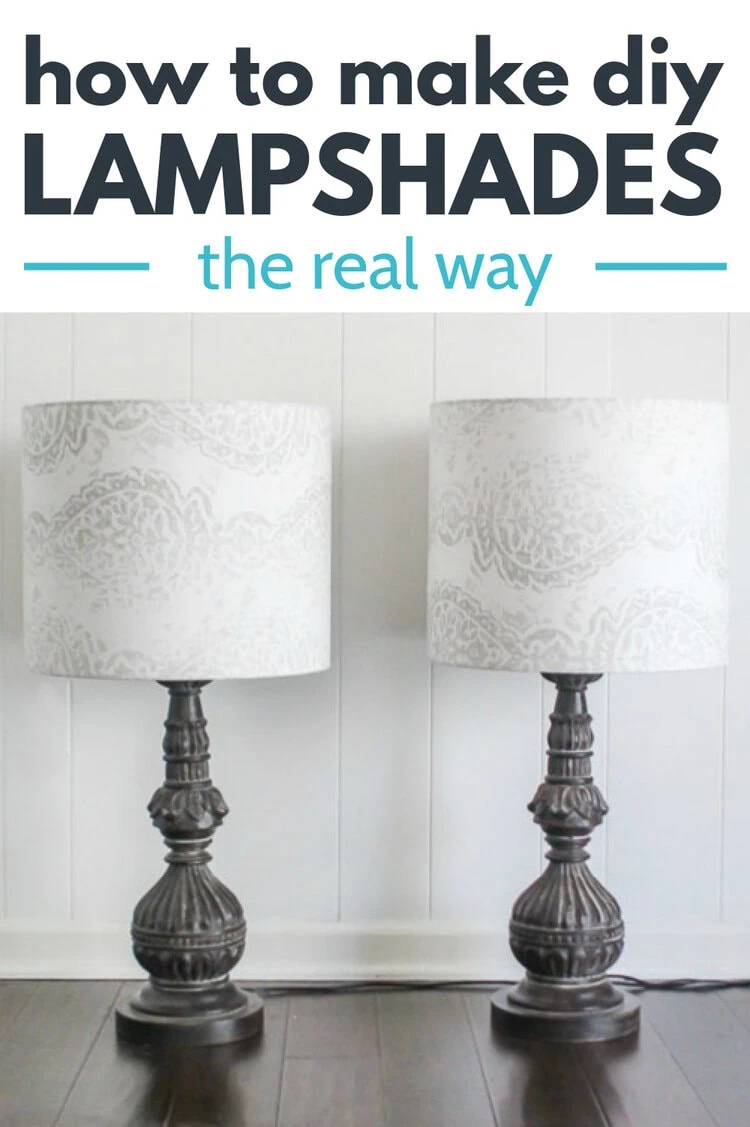
Finished Lampshades
Here’s the finished product! I am so happy that I learned how to make my own lampshades.

Now I have a pair of completely custom lampshades and my $7 lamps look like a million bucks.
Originally I was planning to paint the lamp bases, but once the new shades were on, they really didn’t need any other updates.

These lamps came at the perfect time since I stole the lamps that were in here for my $100 family room makeover this fall. This pair is perfect in here.

How to make a lampshade with your favorite fabric
Create the perfect custom DIY lampshade with this easy to follow, and inexpensive tutorial.
Materials
- Adhesive styrene sheet
- Small binder clips
- Set of wire lampshade rings
- Lamp harp set (if your lamp doesn’t already have one)
- Fabric of your choice
Tools
- Rotary cutter and cutting mat
- Small paintbrush
- Measuring tape
- Lamp glue
Instructions
- Iron your fabric.
- Lay it on a flat surface and stick the styrene sheet to it.
- Trim the fabric leaving a half inch border above and below the styrene.
- Fold it from the short end over the styrene and glue it with lamp glue.
- Fold the fabric/styrene into a loop.
- Secure with a binder clip.
- Slide the ring with the washer into the lampshade.
- Add glue around the top of the shade in small sections.
- Spread the glue to cover the fabric, as well as the metal of the ring, using the paint brush.
- Hold it in place with the binder clips.
- Repeat the same process on the bottom using the plain wire ring.
- Add glue to the seam on the side of the lampshade.
Recommended Products
As an Amazon Associate and member of other affiliate programs, I earn from qualifying purchases.
-
 Premier Prints French Grey Manchester, Yard
 -
Nickel Silver Lamp Harp Set - Attachment for Table and Floor Lamps, Includes Harp, Saddle (Base) and Finial, 1-pack
-
Lamp Shade Ring Set to Make a DIY Drum Ring Lamp Shade
-
Lampshade Glue Kit - Includes Tacky Glue + 6 Binder Clips + Moulding Stick
-
Adhesive Pressure Sensitive Styrene Sheet Making DIY Lampshades in a Pre-Cut Length

Here are a few more DIY lighting projects I think you should check out next:
I’d love for you to pin this post on Pinterest!

I have serious lamp shade issues at my house! Long story! But my lamp shades are smaller at the top and larger at the bottom. How do I do that?
I have always had lampshade issues too! I think it’s because I love to find cool thrifted lamps and the shades are never very nice. You could always switch to a drum shade style where the top and bottom are the same size. But if you don’t want to change the style, it looks like I Like That Lamp only sells the rings in sets of two of the same size. Possibly you could buy different sizes somewhere else. If it was me, I would be tempted to dismantle the shades I have and reuse the rings, although that make it difficult to use a straight piece of styrene/fabric.
I am attempting to make a lampshade. As above the bottom ring is larger than the top.
Circumference top: 115 cm
Circumference bottom: 159 cm
How do I cut the material?
Thanks
I haven’t made a tapered lampshade, but I did find this tutorial on ilikethatlamp.com that looks helpful. I have followed their tutorials before and trust them to be helpful – https://makely.shop/blogs/inspiration/how-to-make-a-tapered-lampshade
Like you, I had no idea there were lamp-making kits. Thanks for the tip. Yours turned out beautifully.
Thanks so much Jane! I seriously want to make new lampshades for every lamp in my house now – but I’m trying to show some self-control!
Gorgeous ~gorgeous ~gorgeous! Absolutely gorgeous! ❤
Thank you so much!
Lovely. I will start on mine 2morrow. Guess it will take me much longer!
Can i just use a glue gun for it, instead of lamp glue?
Greetz from Belgium
Hi Maidy, I don’t know why but I have always struggled with glue guns – half the time I just end up with a big lumpy pile of glue! But any glue that works on fabric should work fine.
The lampshades that I have are a bit bland and old. I’m looking at going with some new ones here soon. I’ll probably see about attempting to make some first before I decide if I want to buy some.
Making your own really is easy and worth looking into!