How to make a reclaimed wood wreath
I don’t usually do a lot of fall decorating, but this year I really wanted a homey and rustic wreath to hang on the front door. I love less traditional wreaths and I came up with the crazy idea of making a wreath from reclaimed wood.
And I absolutely love it!
My new rustic fall wreath has all of the cozy fall charm I was looking for, but I think it will work just as beautifully in spring and summer.

This gorgeous, farmhouse wreath really isn’t hard to make either. If you can cut along a line, you’ve got this!
This post contains affiliate links. See my full disclosure here.
Materials for Rustic Fall Wreath
- piece of 1/4 inch plywood (at least 20 inches square)
- scrap wood in various widths and finishes
- 5/8” wood screws
- pencil or marker
- wood glue
- jigsaw
- drill and drill bits
- faux Chrysanthemum or other flower and leaves (optional)
- fishing line (optional)
How to make a Rustic Fall Wreath
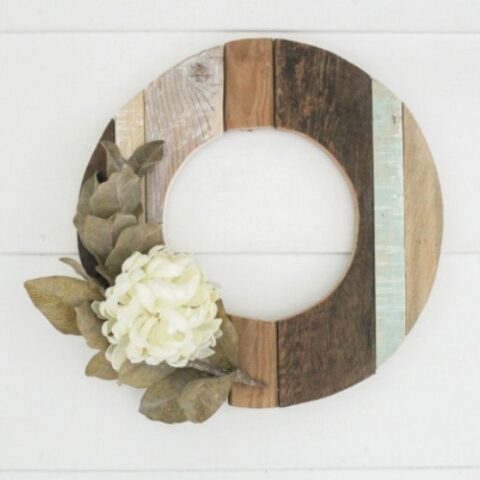
Gather up your wood. Reclaimed wood is basically a fancy word for any old wood laying in your scrap pile. When I started this project, I didn’t really think I would have any good vintage-looking wood to work with, but when I started really looking around my workshop, there were plenty of choices. I ended up using a few old bed slats, a piece of a vintage vanity I repurposed, an old drawer support, and some random boards that paint had dripped on. They didn’t look like much separately, but all together they look awesome. I tried a few arrangements of my boards until I found one I liked, making sure to include wood in different widths and different finishes.

And if you really don’t have any reclaimed wood or great scrap wood, you can also use paint or stain to give any scrap wood the look of reclaimed wood. (If you aren’t sure how to make new wood look old, there are a few methods in this post and this one.)

I traced two circles onto the wood to make the outline of my wreath. The outside of my wreath is 18 inches wide and the inner hole is 9.5 inches wide, but you can use any size that looks good to you.

Then I pulled out my jigsaw and cut each board along the lines I had traced.

I used a piece of sandpaper to smooth any rough edges and splinters off. I also sanded off some stray marks from when I drew my circles.

I wanted to add a little more character to a few of my boards. I stained one of the raw wood scraps with weathered oak stain. And I dry-brushed some light aqua paint onto the other one, lightly sanded it, and wiped weathered oak stain over top of everything.

Then I cut a backing for my wreath from a scrap of 1/4 inch thick plywood using my jigsaw. I made my backing slightly smaller than my wreath so that I wouldn’t have to worry about it showing along the inner or outer edges.

To cut the inner circle, simply drill a pilot hole using a drill and your largest drill bit. Slip the jigsaw blade into the hole and then cut as usual.

I made sure all of my boards were lined up well and then used wood glue and screws to attach the backing to the boards and hold everything in place. (In case you are wondering, the Xs were already on my wood – they aren’t part of the project.)
And you have a rustic reclaimed wood wreath!


I think it looks pretty cool just like this but I really wanted to try softening it up a bit. First I cut a strip from some scrap burlap fabric and tied on a bow. (You can also buy burlap ribbon that’s all ready to go if you don’t have any fabric scraps.)


Pretty cute.
Then I decided to try adding some greenery and it was love at first sight. I added a small leafy branch and layered a faux Chrysanthemum flower in the center.

I didn’t want to attach them permanently because I love the idea of changing this wreath up with the seasons. So I simply used some fishing line to tie the flower and leaves to the wreath. The fishing line is clear so it is nearly invisible but it holds everything on nice and secure.


Gorgeous!

I’m loving it on my front door but I think it would look just as beautiful hanging on a wall inside or even as part of a rustic gallery wall.
Here are a few other posts I think you just might love:
How to make a stunning DIY plank wall 


How to make a rustic fall wreath from reclaimed wood
Create a homey and rustic wreath to hang on the front door using reclaimed wood.
Materials
- piece of 1/4 inch plywood
- scrap wood in various widths and finishes
- 5/8” wood screws
- pencil or marker
- wood glue
- faux leaves and flowers
- fishing line or hot glue
Tools
- Jigsaw
- Drill and drill bits
Instructions
- Gather scrap wood in various finishes and lay the boards next to one another.
- Trace two circles onto the wood to make the outline of your wreath.
- Use a jigsaw and cut each board along the lines you traced.
- Use a piece of sandpaper to smooth any rough edges and splinters off.
- Stain or paint any of the wood scraps if needed or leave them as is.
- Use a jigsaw to cut a backing for your wreath from a scrap of 1/4 inch thick plywood.
- To cut the inner circle in the plywood, make a pilot hole using a drill and your largest drill bit.
- Slip the jigsaw blade into the hole and cut as usual.
- Use wood glue and screws to attach the backing to the boards.
- Use fishing line or hot glue to attach greenery and flowers if desired.
Recommended Products
As an Amazon Associate and member of other affiliate programs, I earn from qualifying purchases.


Carrie, I love, love this!!!!!
Thank you! Me too! I bet you guys could make one!
I really like this! It would also look great with a round mirror behind it for the wall.
Liz
Thanks Liz! I think you’re right – a mirror would be awesome.
Love your wreath! I’d have to get my husband to make me something like that since I’m power tools shy. Love the addition of the flower. Totally makes it! Visiting from Remodelaholic.
Thanks Victoria! I think the flower adds a lot too. Definitely put hubby to work!
You are so creative and handy with the wood! love the way it turned out!
Thank you Maria!
How sis you hold the boards together before you put them on the plywood? I Really love this, everyone has scrap lying around and don’t know what to do with it.
Hi Kathleen! This wreath is one of my favorites too – and such an awesome way to use scrap wood. The plywood is the only thing holding the wood pieces together. Before attaching the plywood to the back, I laid the pieces out together but they weren’t yet attached. I hope that makes sense.