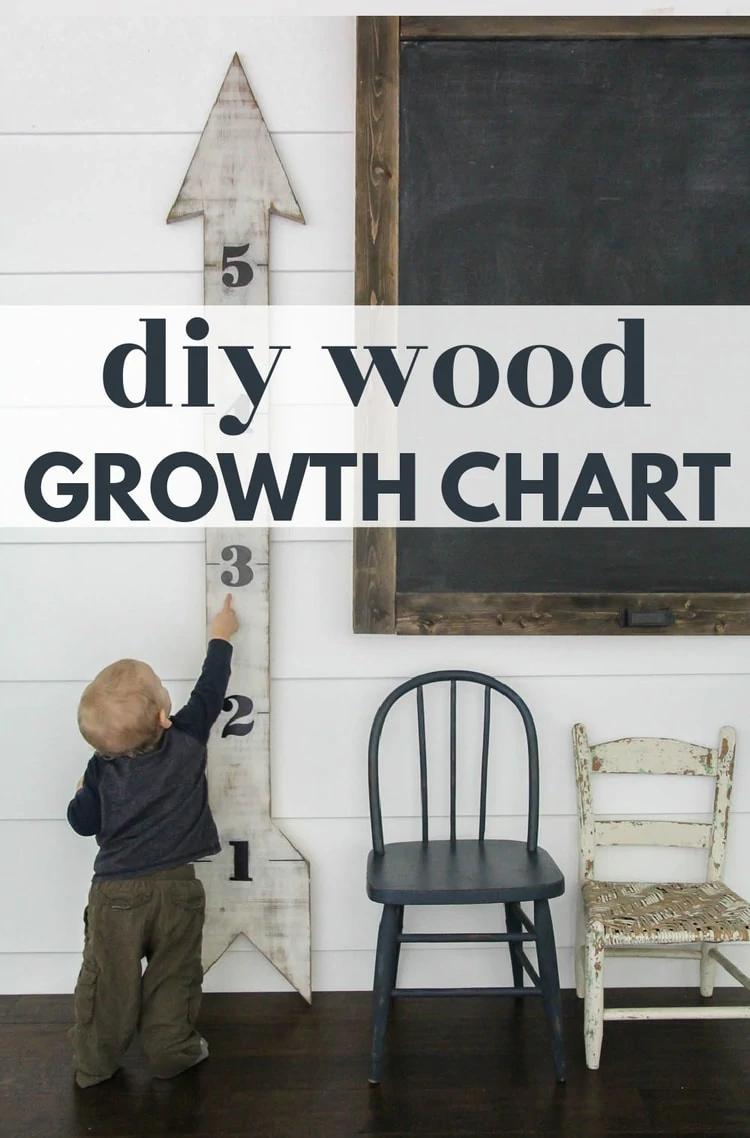
How to Make a DIY Wooden Arrow Growth Chart
This DIY wooden growth chart is inexpensive, easy to make, and the perfect way to keep track of your growing family. And unlike many other growth charts, it is stylish enough to work in any room in the house.
I have been wanting to make a DIY growth chart for Griffin for awhile now.
But I didn’t want anything cutesy or childish. I wanted this to be something our family will have around for a long time – to keep track of future children too, even grandchildren – so it needed to be something classic. But I also wanted it to have some personality.
Kind of a tall order for a simple DIY growth chart but I love how it turned out!
This post contains affiliate links which means if you make a purchase after clicking a link I will earn a small commission but it won’t cost you a penny more. Click here to see my full disclosure policy.
Materials
- 1′ x 8′ wood plank – these are often labeled as shelf boards and cost around $15.
- pencil
- number stencil or printout of numbers in a pretty font
- white paint and paint brush
- dark stain and clean rag to apply it with – I used Minwax dark walnut stain to give my growth chart a weathered white finish.
- mineral spirits – if you are doing a weathered wood paint finish
- oil-based paint marker – Sharpie oil-based paint markers are the best paint markers for wood. I used both black and white on my growth chart and they worked beautifully.
Tools
- jigsaw – this is the jigsaw I have and it’s super easy to use.
- tape measure
How to Make a DIY Arrow Growth Chart
Dimensions
You can make your own arrow any size you like, but I am sharing the dimensions I used in case that helps you draw your own arrow shape.
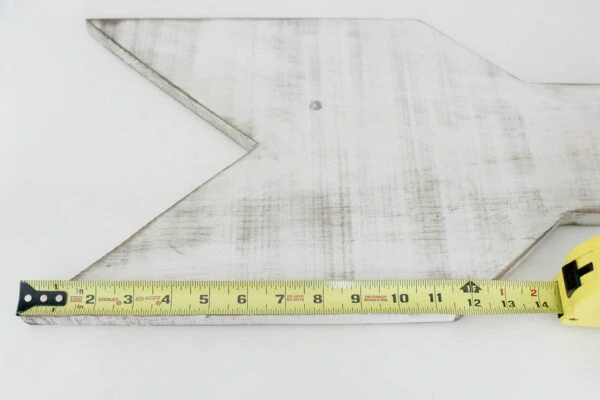
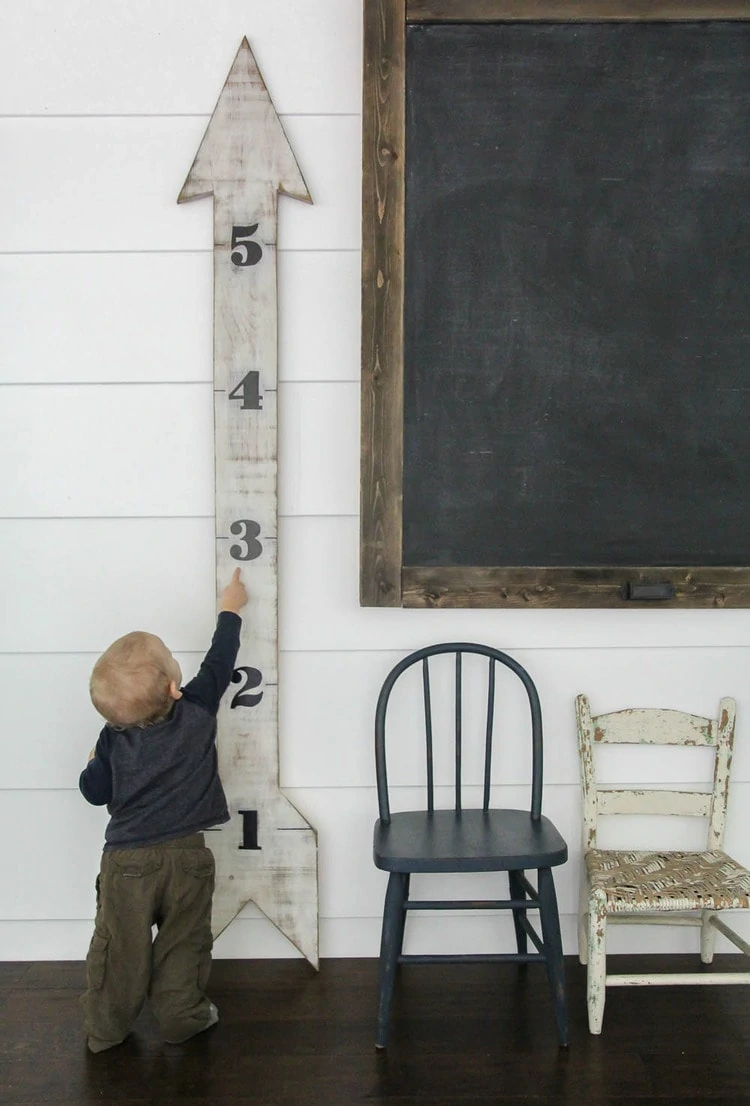
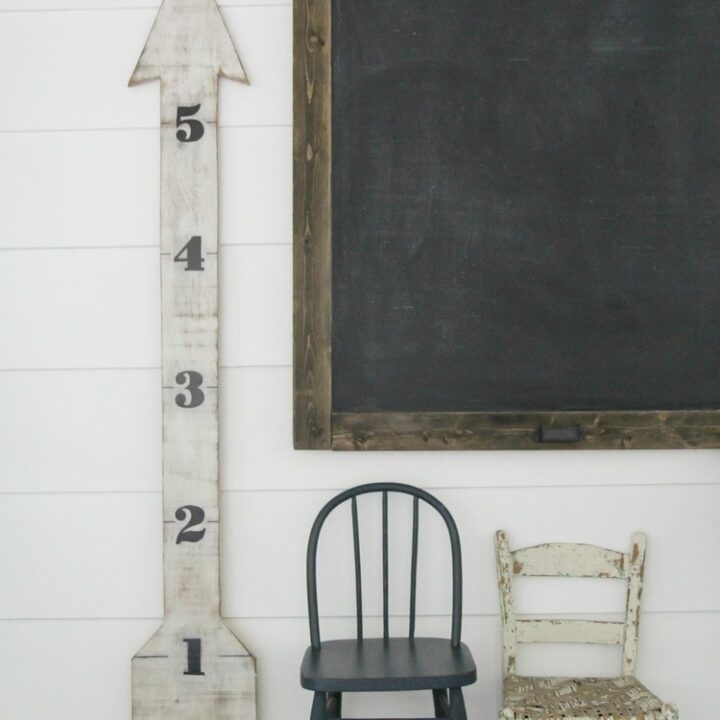
My finished arrow is 6.5 feet high and 11 1/4 inches wide at the widest part of the arrowhead and the arrow’s tail. The arrowhead is 14 inches tall and the tail section is 15 inches long. The skinny shaft of the arrow is 5 inches wide.
Cut the arrow shape.
Start by drawing an arrow shape onto your wood plank using a pencil and a straight edge.
Then cut it out with a jigsaw and sand any rough edges smooth.
Word to the wise: Before you go any further, lean you arrow against the wall so you can tell if it is standing straight.
If it is a bit crooked, you can just trim one of your arrow ‘tails’ until it straightens out. (Yep, my arrow started out totally crooked but was easily fixed.)
Or if you want to keep things really simple, you can skip the arrow altogether and just cut your board to 6.5′ long. If you stick with a rectangle shape, you will end up with more of a ruler style growth chart.
Paint the growth chart.
You can finish your arrow with any color stain or paint you want. This weathered white finish is really easy but does require several steps.
First paint the entire arrow with one coat of the white paint of your choice and let it dry.
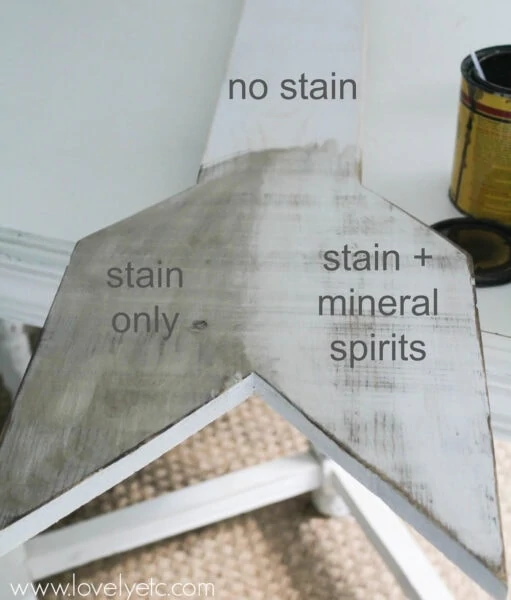
Lightly sand the arrow with 100 grit sandpaper to expose some of the raw wood and wood grain. Use a clean rag to wipe on a coat of dark stain.
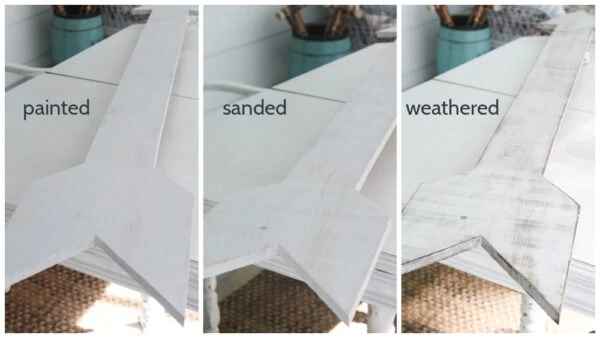
Pour a little mineral spirits onto a second clean cloth and wipe as much stain as possible off . Use a clean section rag each time you wipe it.
This will leave you with a perfectly weathered finish.
Add the numbers.
Use a tape measure and a pencil to mark every 12 inches from the bottom.
There are a few different ways you can add the numbers to your growth chart.
You can draw your numbers on freehand if you want.
But even if you don’t have great handwriting, you can still get perfect numbers on your growth chart.
You can stencil your numbers on using a large number stencil like this one. (If you go that route, I have tips for getting perfect stencil lines on wood right here.)
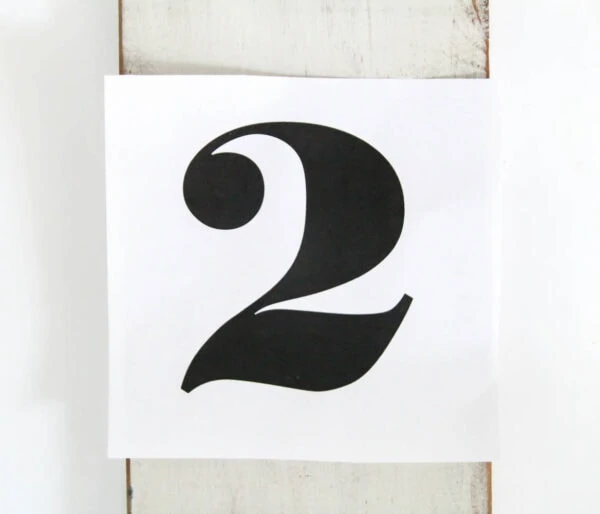
Or you can print out the numbers in a font you like and do a simple pencil transfer. This makes it really easy to use any font in any size you like.
To do a pencil transfer, print out your numbers and then rub pencil all over the back of each number. Carefully tape them onto the arrow where you want them placed and then trace each number with the pencil. When you remove the paper, a faint pencil outline of the number will remain.
Use a Sharpie paint pen to fill in each of your numbers and also add tic marks next to each number at the exact measurement mark.

Once the paint pen dries, if you would like to soften it a bit, you can sand it lightly with 220 grit sandpaper.
Growth chart with white numbers.
Originally I went subtle with my growth chart numbers. I added them with a white paint marker and I really liked the white on white numbers. You could see the numbers perfectly but they weren’t all in your face.
Growth chart with black numbers
But a few years later, I decided I wanted my numbers to stand out a bit more, so I redid them with a black paint marker.
And I think I like them this way even more. It isn’t quite as subtle, but it still looks beautiful.
Be sure to secure your arrow to the wall to prevent tipping and you are ready to start taking measurements!
I love how it turned out and can definitely be happy having this hanging around the house for years to come.
DIY Wooden Arrow Growth Chart
Make a DIY growth chart that can be a part of your home decor for years. This is a classic style that you will be happy to display, while also keeping track of your children's milestones.
Materials
- 1’x 8’ shelf board
- Pencil
- Straight Edge
- Sandpaper 100 grit
- White Paint
- Dark Stain
- Clean Rag
- Mineral Spirits
- Sharpie Paint Pen
Tools
- Jig saw
- Tape Measure
- Scissors
Instructions
- Draw an arrow shape onto the board using a pencil and a straight edge.
- Cut it out with a jig saw.
- Sand any rough edges.
- For a weathered white paint finish, paint the entire arrow with one coat of white paint and let it dry.
- Lightly sand with 100 grit sandpaper.
- Wipe on a coat of dark stain. Wipe the excess stain off using a clean rag dipped in mineral spirits.
- Use a tape measure and pencil to mark where each number should go.
- Print an outline of the numbers 1 through 6 in the font of your choice. Or use a number stencil if you prefer.
- Trace each number onto the wood with a paint pen.
Recommended Products
As an Amazon Associate and member of other affiliate programs, I earn from qualifying purchases.


I’d love for you to pin this post on Pinterest!

Oh this is gorgeous! I never would have thought to make something like this!
Thanks Brittany! I’m pretty in love with how it turned out myself!
Can you tell me was your arrow 8 feet tall once you were finished with it? What I’d the name of the stain you used?
My arrow is a little more than six feet tall. I cut off a little of the length when I cut it into an arrow shape. My husband laughed at me for making a growth chart that is six feet tall but I said, hey what if our kids are really tall and I want to keep measuring their heights when they are teenagers! No reason to limit the possibilities! And the stain I used was dark walnut by Minwax – it is my go to stain and color.
I love this so much! The Sharpie Paint Markers are so easy to use too!
Thanks Sonya! And you are so right – they are incredibly easy to use.
This turned out incredible! I love it!
Thanks so much Lara!
That is fabulous. Oh how I wish my kids were little enough to make one of these.
Thanks Tonya! You can always wait for grandkids ;)
What a great idea. I love how the weathered wood turned out. I’m going to have to borrow that technique. :-)
~jenise
Thanks Jenise! I love how it turned out too and it was soo simple to do – love when that happens.
I love this, Carrie! Such a fabulous project! Pinning and sharing.
Thanks Tasha! Always love pins and shares!
This is so beautiful! I’d been wanting to make an oversized ruler like the one from Pottery Barn. I love how different this one is though. I might be copying you later instead. :)
Thanks Lauren! I love those huge ruler ones too. I was planning to make one for the longest time until inspiration struck for an arrow growth chart!
This growth chart is too cute! I would’ve never thought of making something like this. It’s great!! I would love it if you linked this up to my Motivate Me Monday linky party at IT’S A ginger SNAP.
Thanks so much Katie! My brain seems to be constantly thinking DIY!
I LOVE this!!! Pinning it.
Thanks Cheryl!
What a fun and beautiful idea for decor!! Love it. Pinning.
Thanks Elizabeth! Always love pins!
This turned out so lovely! Much better than the store-bought vinyl one that I have!
Thanks Melanie! Although the upside of vinyl is it’s a little easier to transport for sure. I’m just happy to have finished this in a fairly timely manner – who knows when the baby book will be complete!
Wish I had thought of this when my kids were small! Cute idea – and you can take it with you if you move!!
Thanks Susan! Big and unwieldy as it is, this will definitely be coming with us whenever we move!
Love how the numbers just kind of blend in! It looks perfect in that space!
Thanks Ashley! I love how the numbers blend in too – they are definitely there but they aren’t in your face at all.
This is adorable! I love it. Such a beautiful piece of decor.
Thanks Taryn! I’ve always loved your wooden growth chart too!
This is so amazing! I’ve seen other growth charts that I like but I LOVE this one! I’m adding this to my “to do” list! :)
Thanks!
Anna
askannamoseley.com
Thanks Anna! I’m pretty thrilled with how it turned out myself!
I just LOVE this. So glad i “stumbled” onto your site. I will try making this for a baby gift. I also LOVE the subway art over the table. Have you ever shared this? I would love to try making it..the ‘you get more flies with honey than vinegar’ I have heard all my life.
I am bookmarking your page.
Have a great 4th of July.
Malinda in Mississippi
Thanks Malinda! The growth chart would be an awesome baby gift! I mentioned a little bit about the subway art in this post: https://www.lovelyetc.com/2011/11/favorite-nook_14/. But I am thinking I may share more about it in the next few weeks with a better tutorial.
What a cute growth chart!! Love the numbers on it too! Would love for you to share it at our link party on my blog please (or any other DIY). Love it!
Thanks Kendra!
This is really neat, Carrie! I love the arrow idea!
Thanks Kristi! Arrows just seemed like the perfect thing for a growth chart!
Loving arrows right now. This is fabulous & I need one in my new house! I’m not the crafter and am wondering how I can get my hands on one? Do you take orders?
Karissa, Thanks so much! I hadn’t really considered selling these but I am definitely looking into it now. My biggest question is about shipping since this is pretty large. I will look into it and get back to you.
That is really adorable. Great job!
Thanks Sarah! I’m pretty excited about how it turned out myself!
Do you have a site where you would be selling the growth chart arrow?
Amanda, I am considering making a few of these to sell. I need to look into shipping options and costs first. If I decide to sell them, I will let you know!
This is adorable!
Thanks!
I’m absolutely loving this, and yes I’m still loving arrows!
Thanks Cindy! Glad I’m not the only one still in love with arrows!
Ah! I lovvvve this! I have been wanting to make a growth chart for ages and this is absolutely perfect!! Thank you SO much for sharing!
Thanks Stacey! Good luck with your own version!
LOOOOOVE this cute idea! I love arrows so much. Saw this over at Lolly Jane!
Thanks Kristen! Arrows are definitely the best!
wow love this growth. I like that is a really cool home decor piece and growth chart in one. The numbers aren’t too noticeable so I like that too. I will be featuring this over at Hawthorne and Main.com for my favorite things friday.
-shonee
http://www.hawthorneandmain.com
Thanks Shonee! That is exactly why I love it too – it works great for recording heights but for all the rest of the time, it just looks really cool. And thanks for the feature – I’ll have to be sure to stop by and check it out!
Just finished
mine.. for my grand daughter love it –
That is wonderful!
Do you have the dimensions? I am looking into making this, and am unsure as to where to start with the shape dimensions. Thanks!
Mollee, I started with a board that was 8′ x 1′. The final arrow is a little more than six feet tall. The bottom (feathers) of the arrow are the entire width of the board and the skinnier (shaft) part of the arrow is five inches wide. The length of the arrow head is close to fourteen inches. Hope that helps – good luck!
Hi!
I was hoping to may be ale to tell me what font you used for the numbers. I really love this!
Thanks
Thanks Jessica, I believe I used the font Bodoni Black (which is standard on my computer with Microsoft Word). Good luck if you decide to make one!
Where did you buy the shelf board?
I just bought it at Lowes – it was in the aisle with lots of smaller pieces of plywood and cut boards.
Found this via Pinterest and absolutely LOVE this growth chart!! I’ve been meaning to make one of the popular giant ruler growth charts, but I do love this arrow one so much more! I mean, how perfect is an arrow for a growth chart?! Thanks for sharing this great idea!
Thanks Jen! I thought the same thing – you can’t get more appropriate for a growth chart than an arrow. We have absolutely loved ours so far.
Do you remember how large your numbers were – what font size? Thanks so much!!
I’m sorry I don’t remember what font size I used. But I measured the numbers on my growth chart and they are 3.25 inches high. You should be able to figure out the right font size by printing a few samples and measuring them. Hope that helps!