How to Stencil on Wood with Beautiful Results Every Time
Learn how to stencil on wood without bleeding or other imperfections; I’m sharing my best tips and tricks for getting perfect stencil lines every time.
I’m a big fan of stenciling. It’s one of the quickest ways to create beautiful signs and designs even if you aren’t artistic or don’t have great handwriting.
In fact, when I used to sell wood signs on Etsy, I made stencils of all my designs so I could speed up the sign-making process.
But even though stencils are a great, fast way to create gorgeous signs and other projects, there are a few tricks you really need to know to get perfect stencil lines.
Nothing ruins a project faster than pulling back your stencil expecting to see a gorgeous design and finding a smeary, blobby mess instead!
And if you’re a perfectionist like me, stenciling unpainted wood is even more nerve-wracking than stenciling other surfaces. When stenciling an unpainted surface, it’s a lot harder to fix stenciling mishaps since you can’t just paint over any mistakes you might make.
Over the years I have stenciled a lot of things – floors, furniture, signs, and more – and I’ve learned what really works when it comes to stenciling wood so you can get those perfect stencil lines every time.
I’ve got a step-by-step tutorial for you below as well as a full video tutorial for those who prefer video.

This post contains affiliate links. If you make a purchase using those links, I may receive a small percentage at no additional cost to you. See my full disclosure here.
Materials for stenciling on wood
- A wood surface to stencil – this can be painted wood, stained wood, or unfinished wood
- A great stencil – this is the one I used for this project and here is a list of my favorite sign stencils
- Repositionable spray adhesive – this is one of the tricks to getting those perfect lines and it absolutely must be repositionable.
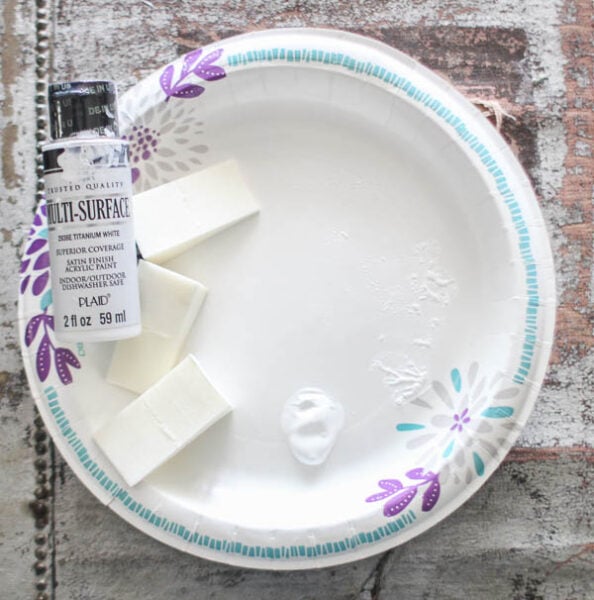
- Paint – almost any kind of paint will work for stenciling including chalk paint, craft paints, and latex paint
- Paper plate or Painter’s palette
- Makeup wedges
- Toothpicks (optional)
- Mod Podge (optional)
How to Stencil on Wood
Choosing a wood surface
You can use this method to stencil anything wood, from furniture to wood planks to custom signs.
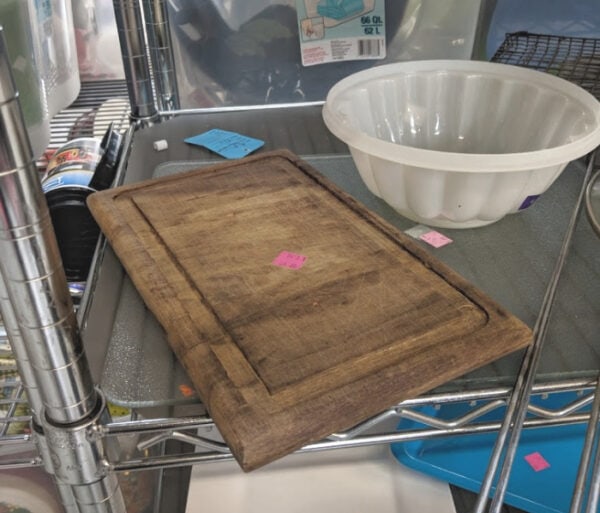
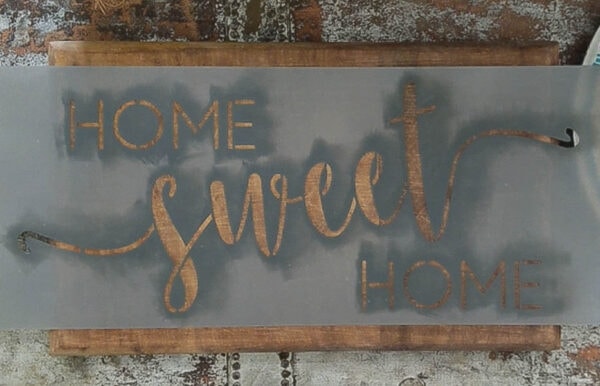
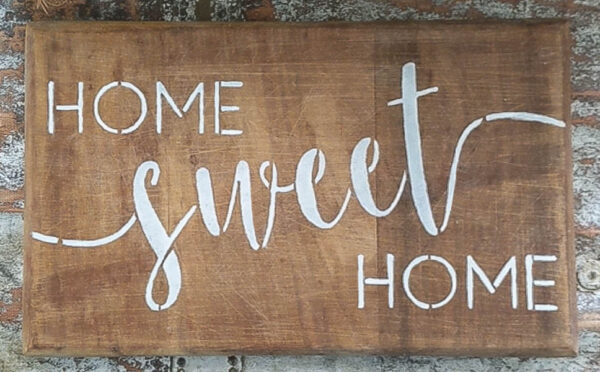
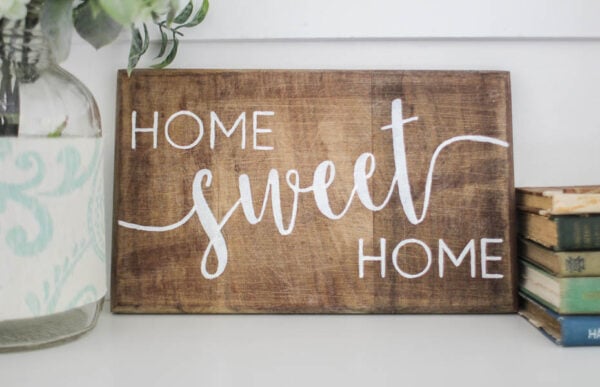
For this project, I’m stenciling the back of an old wooden cutting board I found at a thrift store a few months ago for super cheap.
It has a great patina and I think it will make a really cute little sign.
When choosing your wood surface, remember it is much easier to stencil a smooth wood surface rather than a highly textured one.
When there is a lot of texture under the stencil, that means lots of little grooves for the paint to seep into.
If your surface is rough, you can sand it smooth before beginning. If you would rather stencil a more rustic board, you can still get clean lines, but it will definitely be trickier.
Repositionable spray adhesive
Before putting your stencil in place, spray the back with a repositionable adhesive.
The adhesive will keep your stencil firmly in place and will also help keep any small details of the stencil design adhered to the wood surface while you painting.
Make sure the spray adhesive you are using is repositionable. If you use a permanent adhesive spray, you’ll just be gluing your stencil to the wood permanently – not what you want. Repositionable spray adhesive stays tacky so it can be attached and detached multiple times.
Be careful when spraying the adhesive because it will make a sticky mess of everything around. I usually spray it over an old piece of posterboard or wrapping paper to catch any overspray.
You can also use a few pieces of painter’s tape to keep your stencil in place instead, but spray adhesive will make sure the entire surface is held in place rather than just a few small areas where the tape is.
(If you are using a one-time-use vinyl stencil with an adhesive back, you won’t need any other glue or tape.)
After spraying the back of your stencil, set it in place, smoothing it firmly onto the wood surface. Make sure your design is centered exactly where you want it and straight.
What to use instead of a paintbrush
Now you’re ready to start painting! My number one tip for perfect stenciling is to not use a paintbrush.
Not even a ‘stencil brush’. It is very hard to get clean lines with paint brushes.
A foam brush is slightly better than a regular bristled brush, but there is actually something that works even better for stenciling.
A makeup wedge sponge. It might sound strange, but those inexpensive little makeup applicator sponges are perfect for stenciling.
As far as paint, almost any paint will work, but paints with a flatter sheen are the best.
My favorite paints for stenciling signs are inexpensive acrylic craft paints. They work well, are super cheap, and come in hundreds of great colors.
Once you are ready to stencil, pour a small amount of paint onto an artist’s palette or a paper plate.
Dab the end of your makeup sponge into the paint and then gently blot any excess paint off onto the paper plate or some paper towels.
You want the sponge to be damp with paint but not thickly covered. Instead, you want a very thin layer of paint on your sponge. Excess paint will squish under the stencil and cause messy blobs.
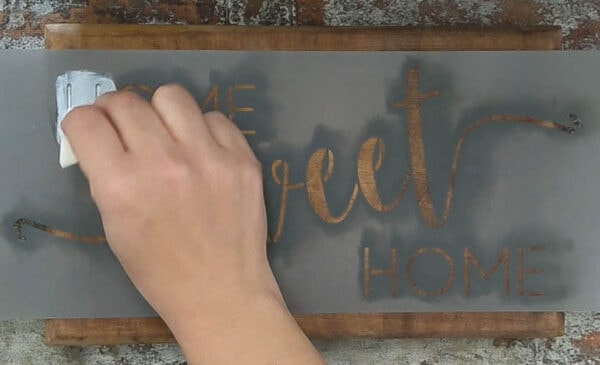
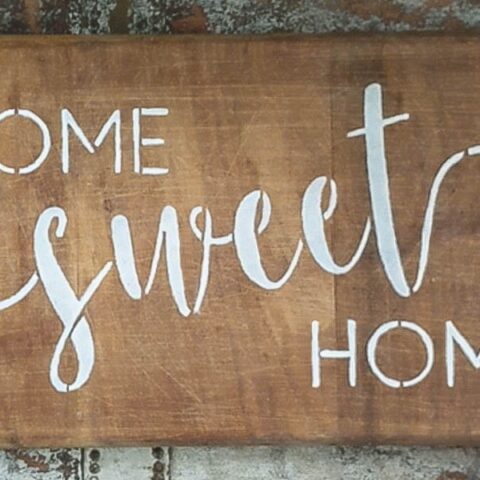
Lightly dab the sponge onto the stenciled design, using an up and down motion.
You don’t want to slide it back and forth like you would with a paintbrush, because again, paint squishing and blobs.
If you are painting a very light color like white onto a dark background, you will probably need to do two coats of paint.
Allow the first coat of paint to dry for a few minutes and then repeat the process.
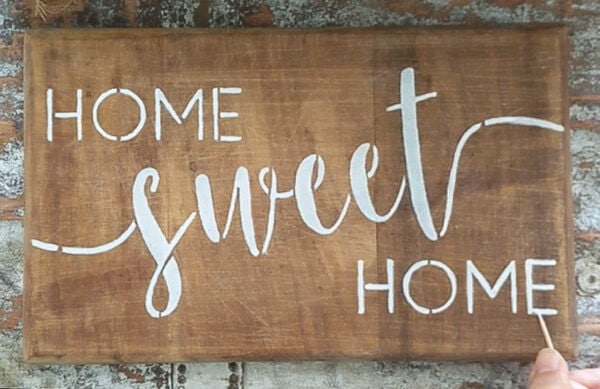
Then you can carefully pull the stencil off the wood.
The Mod Podge Trick
I have always had great success using the above method. But if you are still struggling, there is another trick you can try.
After putting your stencil in place but before stenciling, you can paint a thin layer of Mod Podge over the top of the stencil.
The Mod Podge will create a seal around the edges of the stencil so that no paint can seep under the stencil.
Just be sure to use the Mod Podge sheen that most closely matches your wood – either matte, satin, or gloss finish.
This trick can be especially helpful if you are stenciling on rougher, more rustic wood or if your stencil design is especially intricate.
How to get the Hand-painted Look
If you would prefer your stenciled sign without stencil marks for more of a hand-painted look, there’s an easy way to clear up all of those little stencil marks.
Just dip a toothpick in your paint and carefully fill in each of the gaps. The toothpick is much easier to control than a paintbrush and holds just enough paint.
And if despite your best efforts, the stenciling isn’t perfect in a few spots, you can also use your toothpick paintbrush to carefully clean up any messy stencil lines.
And once you’re finished stenciling, I’ve got a super helpful post about the easiest way to clean paint and spray adhesive from stencils.
Video Tutorial: How to Stencil on Wood
Here’s the full video tutorial for those who would rather watch than read. :)
I’d love for you to subscribe to my Youtube channel!
Please share this post on Pinterest!

How to Stencil on Wood with Beautiful Results Every Time
Learn how to stencil on wood with these tips and tricks for getting perfect stencil lines every time.
Materials
- Wood surface
- Stencil
- Repositionable spray adhesive
- Paint
- Paper plate
- Makeup wedges
- Toothpicks (optional)
- Mod Podge (optional)
Instructions
- Spray the back of the stencil with repositionable adhesive.
- Put your stencil in place, smoothing it firmly onto the wood surface.
- Pour a small amount of paint onto a paper plate.
- Dab the end of your makeup sponge into the paint then gently blot any excess paint off.
- Lightly dab the sponge onto the stencil with an up and down motion.
- Allow the first coat of paint to dry for a few minutes and then repeat the process.
- Carefully pull the stencil off the wood.
- Dip a toothpick in your paint and carefully fill in any gaps in the lettering.
Recommended Products
As an Amazon Associate and member of other affiliate programs, I earn from qualifying purchases.
-
 Swisspers Premium Pro Cosmetic Wedges, Latex-Free Makeup Wedge, Jumbo Size, 16 Count Bag
 -
Aleene's Repositionable Tacky Spray, 10-Ounce
-
Home Sweet Home, Grateful, Welcome Stencil Set - Word Stencils for Painting on Wood + More – Set of 3 Reusable Script Stencils – Sign Stencils Make Modern DIY Signs + DIY Wall Decor - Phrase Stencils
-
Mod Podge CS11305 Waterbase Sealer, Glue & Decoupage Finish, 4 oz, Matte


Here are a few other helpful projects I think you’ll love:
- How to make easy DIY wood signs (with a frame)
- How to easily transfer letting and designs onto any surface
- The best stencils for signs plus how to choose one

Hi Carrie, I used your suggestion of spray adhesive on my stencil- worked great! I painted acrylic paint over exterior stain. How do I get the adhesive off before I varnish my sign?
I’m so glad it worked well! Usually the spray adhesive doesn’t stick to the surface you are stenciling, but I have had it leave a sticky residue a couple of times. I would try just gently wiping it with a damp rag first. If that doesn’t work, scrape off any thick areas first. Then soak a cotton ball in vinegar diluted with water. Test it first to make sure it doesn’t affect the color and then gently wipe off the residue. Hopefully that takes care of it!
Thank you so much for the awesome tips, Carrie! Love your blog!!!!
Thank you so much!
How do i get the stencil to no longer be sticky though since using the adhesive
Usually alcohol will clean the adhesive from the stencil. I have also heard that adhesive removers like Goof Off work well but haven’t tried it myself yet.
My paint is peeling off the wood. I’m using acrylic paint. When I pull the stencil off, my paint is coming up with it. Can you advise me on what I should do?
Oh no! It sounds like something is causing the paint not to adhere to the wood. Most likely the wood has a slick surface, possibly from polyurethane or another sealer. If that is the case, you can try very lightly sanding the are you are going to be stenciling with 220 grit sandpaper. This will rough it up a tiny bit so that the paint will stick better. Another possibility is that the paint is drying completely before you are lifting the stencil. Make sure you remove the stencil as soon as you finish painting. If you leave it in place until the paint dries, it can lead to peeling when you remove it. Hopefully one of those things solves the problem!
Well done video with good explanations. I have learned and going to try this….was wondering how to get the paint consistent and even through the stencil.
Thanks!
Thank you! The paint should end up pretty consistent using the makeup sponge. If you are painting with white on a dark color background, you may need to do two coats of paint.
I tried your suggestions today as I was stenciling the words “Merry Christmas” on a wooden box that my husband made to go around the bottom of our Christmas tree. I had the repositionable adhesive, so I was good to go on that, but I had to go out and get the makeup wedges. Best idea ever! Everything worked like a charm and I am thrilled with the results. Thanks so much for your great tips!
I’m so glad they helped!