How to Paint an Amazing Painted Plywood Subfloor
The complete guide to painting a beautiful subfloor that will last for years.
Several months ago I started plotting how to get beautiful floors for not much money.
I was fed up with my nasty, stained carpet but didn’t have the money for the hardwood floors I was dreaming of … or any other decent flooring for that matter.
But that gross carpet had to go, so I decided to paint the plywood subfloor in my living and dining rooms.
Many months later, I am finally done and I think I’m kind of in love with these painted floors!
This was not a quick and easy project but it was incredibly inexpensive. And it was sooo worth the effort.
Today I’m sharing everything you need to know to paint your own subfloor with gorgeous, durable results.

This post contains affiliate links which means if you make a purchase after clicking a link I will earn a small commission but it won’t cost you a penny more. Click here to see my full disclosure policy.
Supplies needed to Paint Plywood Subfloors
- Utility knife, hammer, pry bar – for removing old carpet
- Needle-nose pliers, flat head screwdriver, heavy-duty staple remover – for removing the millions of staples left after removing old carpet. You don’t absolutely have to have a staple remover but it makes the job much faster and easier.
- Sander
- Zinsser oil-based primer
- Porch and Floor Paint – I used Valspar Porch and Floor Paint in the colors ‘Chimney Smoke’ and ‘Crucible’.
- Paint roller and tray – a regular 9 inch roller works best for applying primer and the base layer of paint
- painter’s tape
- Stencil – A stencil is optional but does look really beautiful. I used this Allover Paisley Stencil. I also have a list of other great floor stencils here.
- Small foam paint roller (to use with the stencil)
- Rust-Oleum Varathane Crystal Clear Water-Based Floor Finish in Satin
- Varathane floor finish applicator – this makes applying the floor finish so much easier, but you could also use a regular paint roller if you prefer.
How to Paint a Plywood Subfloor

Remove your old flooring
First step, rip out your old carpet and carpet padding. Remove all of the tack strips using a hammer and pry bar.
There will probably also be hundreds of staples left in the subfloor from the carpet padding.
You can remove these by prying them up with a flat head screwdriver and then pulling them out with needle-nose pliers. Or you can use a heavy-duty staple remover. Either way will get the job done but the staple remover makes the job much easier and will save you tons of time.

Prepare the subfloor for paint
Once the carpet and staples are gone, it’s time to fill in the seams and staple holes.
This is the only part of my own floors that I really wasn’t pleased with. I used Flexible Floor Patch and Leveler to fill in the seams between boards.
This was not the right choice. It is good because it flexes with the floor and all that stuff. But it is horrible because you can’t sand it smooth.
If I were painting my floors today, I would use DAP Presto Patch Filler. When I was preparing our kitchen subfloors to lay new flooring, I used this to patch several dents and it was great.
It went on easily and I was able to sand it perfectly smooth. This is what I would recommend for preparing your subfloors for paint.
After filling the holes and seams, you are ready to sand the floor. We just used a small orbital sander but of course, a large floor sander would work much faster.
Just remember that this is plywood – it is not going to be silky smooth. The point of sanding is to smooth out major rough spots and smooth any wood filler you used.
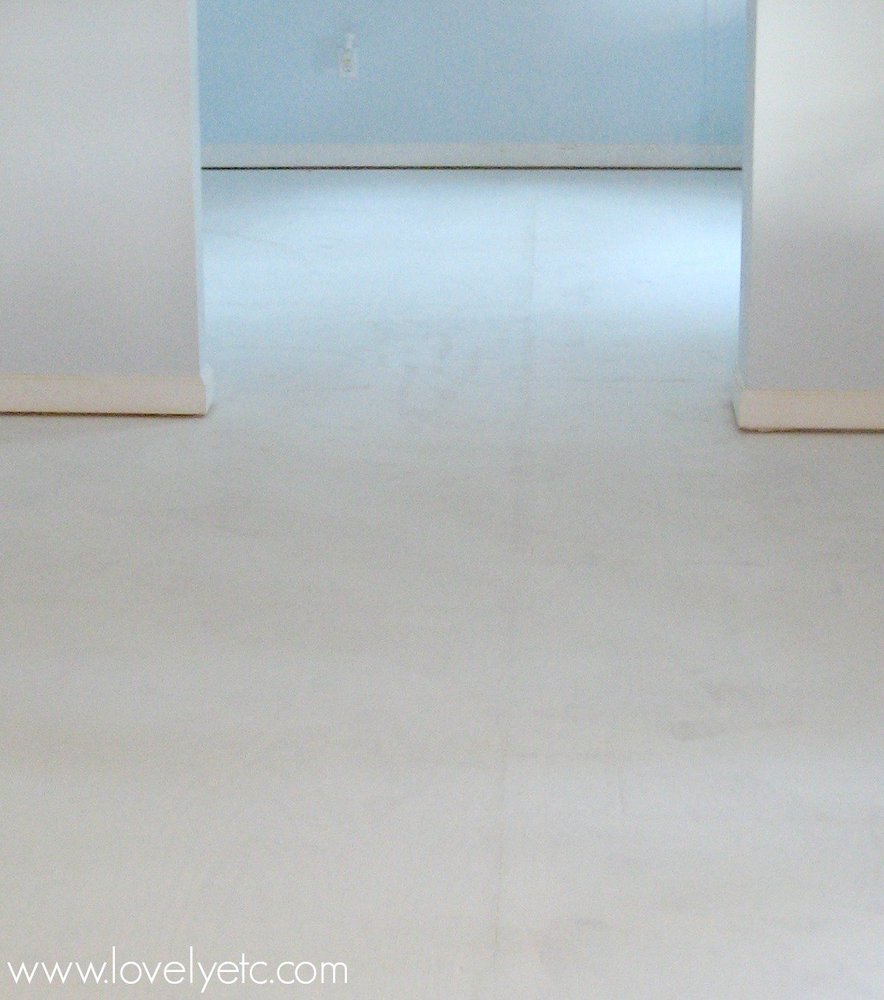
Prime the floor
Before painting, you need to prime the floor with a quality primer. The quickest way to do this is to cut in around the edges of the room using a paintbrush and then use a roller with an extension handle to fill in the rest of the floor.
(Quick tip: if you don’t have an extension handle, most broom handles can do the exact same thing.
Just unscrew the handle from your broom and screw it into the handle of your paint roller.)
I used Zinsser Oil-based Primer. This is my favorite primer because it sticks to anything and is very durable.
Just beware, this is an oil-based product so you definitely want to make sure your space is well-ventilated because the fumes can be strong.
You will also need to clean your paintbrush and other supplies using mineral spirits when you are finished.
Paint your subfloor
And finally, it is time to paint the subfloor!
First, paint your base color onto the floor. I used Valspar latex porch and floor paint in ‘Chimney Smoke’.
(In case you are wondering latex paint works just fine over oil-based primer; you can’t do oil-based paint over the water-based primer.
I chose to use latex paint instead of oil because it is easier to work with and easier to clean.)
You will probably need to paint a couple of coats to get good coverage.
Painting a border
I chose to paint a double border around the edges of my room and I am so glad I did.
The border really makes the paint job look classy and it also made stenciling the floor much easier because I didn’t have to go all the way to the wall.
To paint the border, use painter’s tape to tape off the area you want to paint.
Seal the edges of the tape by painting over them with your base color. (Yes, first you paint over the tape using the paint color you already painted the floor. This will seal the edges of the painter’s tape so that none of the second color leaks under the tape. This is the secret to getting perfect lines when you use painter’s tape.)
Once that is dry, paint the border using your second paint color. I used Valspar latex porch and floor paint in the color “Crucible”.
 so that you get nice, clean paint lines")
Finally, carefully remove the tape before the paint fully dries. (Removing the tape before the paint dries will keep the fresh paint from peeling.)
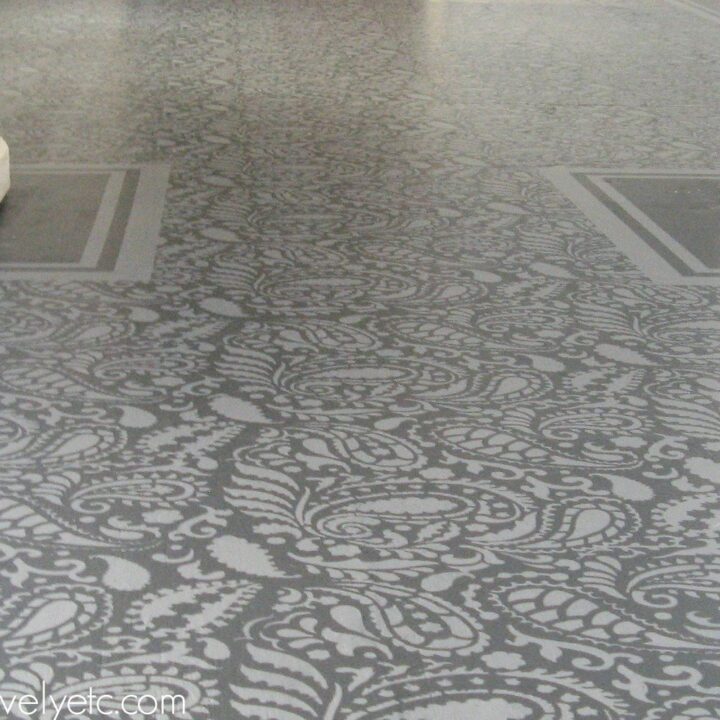
Stencil the floor
Time to stencil! Stenciling your floor is obviously optional; paint alone can make a huge difference.
But stenciling really looks beautiful and while stenciling a floor looks intimidating and incredibly time-consuming, it actually goes pretty quickly.
I used this gorgeous Paisley Allover Stencil from Cutting Edge Stencils, but if you are looking for other stencils that are perfect for floors, I shared a bunch of my favorite floor stencils here.
If you paint a border like I did, you only need to stencil inside the border. Place your stencil in one of the corners of the room and use a few pieces of painters tape to hold it in place.
Load a small amount of paint onto a small foam roller and roll it over the stencil.
You want to be careful not to put too much paint on the roller at a time – too much paint can cause your stenciling to look messy.
You should be able to paint the stencil with one thin coat of paint. It might take a couple of tries to figure out the perfect amount of paint to use each time, but then it will go very quickly.
Want more tips for perfecting your stencil technique? I’ve got lots of tips for choosing floor stencils and stenciling floors here.

Seal the floor
The final step is sealing the floors. Technically you don’t need to use a sealer over porch and floor paint, but I highly recommend it.
Sealing your floor makes it super durable and also gives it that beautiful, soft shine you expect from a nice floor.
Once the paint is fully dry, carefully remove any dust from the floor surface before sealing. (A microfiber cloth is great for this.) Then carefully apply your floor sealer.
I used Rust-Oleum Varathane Crystal Clear Water-Based Floor Finish in Satin and would highly recommend it.
I applied it using a Varathane floor finish applicator to get a really smooth finish.
I applied four coats of the sealer to make sure the floor was well protected, waiting the recommended amount of time between coats.
After the final coat, I waited an additional four days before moving my furniture back into the room.
That was probably longer than necessary, but I wanted to be extra sure everything was protected!

Cost and Time Involved
I painted the floors in my living and dining rooms which combined are around 400 square feet.
This process took me many weeks – mostly because it was around the holidays so I had a lot of other things going on and took lots of breaks.
I would say you would need at least a two-week window though, mostly because of the drying times for the various layers.
My total cost was between $300 and $400. (I already had some materials on hand so it really depends on if you count those.)
This total cost includes the filler, tape, sandpaper, primer, paint, and sealer.
So in the end these floors cost less than $1 per square foot start to finish.

Now that is a beautiful floor! And not only because it was so inexpensive!
Thinking about painting some floors of your own? Or just wondering if a painted floor can really last? I have lots more tips and updates than can help:
- Painted Plywood Floors Update: The Good, The Bad, and The Ugly
- The Absolute Best Floor Stencils and Tips for a Perfectly Stenciled Floor
- Painted Plywood Subfloor: Three Years Later, The Final Update
- 15 Gorgeous Painted Floors: Ideas for Every Type of Flooring
- How to Paint the Most Beautiful Porch Floor Ever
I’d love for you to share this project on Pinterest!

How to Paint a Plywood Subfloor
Create a beautiful painted plywood subfloor or other painted floor with this step-by-step tutorial.
Materials
- DAP Presto Patch Filler
- Zinsser oil-based primer
- Porch and Floor Paint (Valspar Porch and Floor Paint in ‘Chimney Smoke’ and ‘Crucible’)
- Painter’s tape
- Stencil (optional)
- Rust-Oleum Varathane Crystal Clear Water-Based Floor FInish in Satin
Tools
- Sander
- Hammer
- Pry bar
- Needle-nose pliers
- Flat head screwdriver
- Paint roller and tray
- Small foam paint roller (if stenciling)
- Floor finish applicator
Instructions
- Rip out your old carpet and padding.
- Remove all the tack strips using a hammer and pry bar.
- Remove any staples with a flat head screwdriver and pair of needle-nose pliers.
- Patch the seams and staple holes.
- Sand the floor with a small palm sander or a larger belt sander if desired.
- Prime the floor with a quality primer.
- Paint the floors with the base color first. (If you aren't adding a border or stenciling, you can skip to step 15.)
- Use painter’s tape to tape off the border area.
- Paint over the border with the base color.
- Once dry, paint the border using your second paint color.
- Remove the tape before the paint fully dries.
- Place your stencil in one of the corners of the room with a few pieces of painters tape.
- Load a small amount of paint on the foam roller and roll it over the stencil.
- Move the stencil to the next section and repeat until complete.
- Once the paint is dry, seal the floors with several coats of sealer.
- Allow the sealer to fully dry before moving furniture into the room.
Recommended Products
As an Amazon Associate and member of other affiliate programs, I earn from qualifying purchases.
-
 Paisley Allover Wall Stencil – Wall Painting Stencils for Easy Room Makeover – Large Stencil for Painting Walls – Stenciling Instead of Wallpaper Stencils for Walls
 -
 Clare 5 Piece Interior Paint Kit | Includes 2” Paint Brush, 9” Roller Frame, 9” Roller Cover, 11” Metal Tray, and a 11” Tray Liner
 -
 Rust-Oleum 3554 Zinsser High Hide Cover Stain Primer and Sealer, White

I happen to be in the middle of a low budget kitchen makeover, and I am GOING to do this.
Problem: I have lots of littles, and will need to set aside a full day, and get child care.
How long between coats of paint were you able to stencil, and then how long after to apply the sealer, aaannnnd then how long after that before you could move everything back into place and step on it?
THANKS! It’s beautiful!
Can’t wait to try this!!
When doing the border. You said to pull up the tape on the second coat, before it dries. This means the first/base coat that you paint right over the tape on is completely dry when you do the border coat and pull that one up while its still wet? I want to do the border in my room :)
[email protected]
Your floor looks AMAZING!! Great job :-)
Thanks! Hopefully you can see it in person soon.
you have a lot of interesting ideas and i love your pretty tastes always , thank you
Thanks!
What is the maintenance and upkeep on this kind of floor?? How do you keep it shiny? etc….?
Upkeep is pretty easy – I just sweep and occasionally mop. The sealer keeps it shiny though I imagine after more time has passed, it may need to be resealed. The pattern makes the floor great at hiding dust.
Carrie,
This is the coolest project ever! We are building a house and I will be painting and sealing the concrete floors so that we can save to put bamboo in the entire house (2000sf = $$$$ yikes). I have this stencil. Paisley is my favorite. Check out my blog you will see it everywhere. I would really like to feature this post and your blog on my blog. Let me know what you think. Great job. Now I just have to convince my husband that this design will not look too busy. Thanks again for the great tutorial.
Kathleen,
Please feel free to feature my floors and me as long as you link back! Painted concrete floors sound like a lot of fun – there are so many cool things you could do with them. As you can see I love paisley too though I haven’t used it a ton in my house since the floors alone make such a statement. Heading over to check out your blog now!
I have most of my kitchen floor in plain ply wood and this summer i will be trying to do this. How long does it take for the paint to dry because i have 5 small house dogs that are my children. I am going to do this i hope on a very hot day.
It takes several hours for the primer and each coat of paint to dry. You will have to check the directions on the floor sealer to see how long it has to dry – I can’t remember exactly. I think I let it dry twenty-four hours between coats for four coats to be safe. Maybe you could just block off that area while you are working on the floor? That is what I have to do when I paint things to keep my one year old out of the wet paint. :)
Everything is very open with a really clear explanation of the issues.
It was truly informative. Your site is very helpful. Thank you for sharing!
Hi Carrie,
This is the most amazing floor transformation and so ingenious! I wanted to let you know that I’ve featured this project (and your second tips post) on my website: http://www.DIYFunIdeas.com. It’s a hub for all kinds of fun & creative DIY ideas. The direct link to the featured post is: http://diyfunideas.com/how-to-paint-stencil-your-floors/.
Feel free to let your readers know you’ve been featured and thanks so much for your wonderful creativity!
~Jenise
Great, thanks!
Is it possible to make such a type of flooring at my home? I live in a flat, and all examples are shown only in house :)) And is it the same- Epoksidinės grindų dangos as you proposed? :) Thank you in advance for your answer :)
I don’t know if this is possible in a flat. You would definitely have to talk to your landlord because it involves completely changing the flooring. Good luck!
Spectacular job and nice to see someone addressing a question I’ve seen asked for years! Can I paint a sub floor. Great taste and elegant look.
Thanks Victoria! For anyone else who asks that question, the answer is definitely yes!
The entire time I’m reading this I’m thinking, she’s crazy!! LOL and I mean that in the nicest way!! That floor is gorgeous!!!!
But, you stenciled it by hand, the entire thing? WOW, you have some patience!!!!
Wish I could do this…I’m not inclined, not that I “couldn’t”, I don’t have that kind of patience. I think you might need to farm yourself out and make a living out of this.
Thanks Vicki! I may just be a little crazy…but it was definitely worth it!
Gorgeous floor! I’m getting ready to paint & stencil my guest bedroom plywood floor. Did you use Zinsser Oil-based Primer/Sealer Cover Stain? It is not labeled for use on floors. I was wondering how it is holding up?
Cyndy, that is exactly what I used. It is my favorite primer and it is holding up fabulously! Good luck on your floor project!
Carrie, Thank-you! I’m starting today! You are very talented! I’m doing a simply stencil to start with.
Awesome Cyndy! Good luck!
Do you have any guidance on painting OSB sub-floors?
Sorry, I do not have any experience with this. What little I have read implied painting OSB in general is rather difficult though.
Ooh! I had seen the photo of your stenciled subfloor on Pinterest before, but I had no idea that you had made it when I commented on your stenciled bookcases. :) Wishing I had read your article before tackling our own stenciling project, now. =D
This is just beautiful! I am about to pull the trigger and do this to a house we are moving into in 2 weeks. My big question is how do you keep it clean? Mop it? We would be doing it in the kitchen and dining room. Would you recommend this? Thank you so much!!!
Thanks Jenny! Congrats on the new house. The floor is actually super easy to keep clean. I just sweep it and Swiffer/mop it to clean. I think it would work great in a kitchen/dining area.
Hi, Great effect. Can you elaborate on the step 6 below as i’m wanting to know how to apply the stencil. i see it’s plastic film, but a little confused at this step.
thanks,
6. Stencil the design inside the border. (Paisley Allover Stencil from Cutting Edge)
Sure Jo, the stenciling is pretty simple really. Just lay your stencil out starting in one corner of the room. Load up some paint on a small foam roller and roll off the excess on some paper towels. Then roll it over the stencil. Then pick up the stencil and move it to the next spot, making sure to line up the pattern. If you would like to see this in action, there are some great videos showing tips on stenciling at http://www.cuttingedgestencils.com
Absolutely gorgeous. Yes, a lot of work, but worth every effort. Fantastic job.
Thanks so much Olivia! I definitely agree.
Not too sure on how the stenciling worked – do you put it down/paint over/then remove? Would this process work on concrete? My house has a slab (no basement).
Yes, you put the stencil down, paint over it, and then carefully move it to the next area. There is more info about how to do this in this post: https://www.lovelyetc.com/2013/10/tips-painting-stenciling-floor/ Also, this should work on concrete – just make sure to read all labels and make sure your primer and paint are suitable for concrete.
OH my gosh – these are spectacular!!!
I ordered the paisley stencil for a floor I want to paint and then decided to google it to see if anyone else had ever attempted it – I’m completely blown away by this –
Far exceeds how beautiful I imagined it could be.
AND I was able to show my better half exactly what I meant ( he kept saying it was a ridiculous idea until I showed him this )
THANK YOU for sharing –
Beyond gorgeous – I’m pinning now!
Have a wonderful day
Hugs
xoxo
great tips
Your painted sub floor looks nice…. but plywood, (or OSB) sub floors are not meant to be lived on, that’s why it’s called a ‘sub’ floor. While carpeting, padding and laminates don’t add any strength, they do have cushioning and acoustic properties that add to the livability of a space, plus they help cushion any deflection that might be felt with only a sub floor in place.
A finished wood floor installation will add stiffness and acoustic properties that will make your space infinitely more comfortable and livable. That said, a ‘common’ grade of solid maple, or oak wood strip flooring could be installed somewhat economically and painted, if that was the desired finished look. Plus, you’d still have the option to sand and refinish it naturally, when you grow tired of the painted look. Natural wood never goes out of style and goes with everything.
Very true, but for us this was a great solution. This floor is not meant to be a permanent solution but a temporary fix. We have had these floors for two years and have not been bothered at all by lack of cushioning or acoustics. I certainly would not recommend this type of flooring long term, but it is infinitely better than the nasty carpet we had and incredibly more affordable than even the cheapest hardwoods.
also meant to add: the gaps at the ends of the sheets of plywood sub floor are there for a reason and is the approved method of installation. Filling them in with a floor patching compound is not a good idea.
I painted my kitchen floor years ago – all has gone well – a couple of seams popped when the washing machine overflowed (and I wasn’t around to shut it off) and saturated the kitchen and adjoining dining room. But I’m the only one who really notices the “ugly” part of that disaster.
Want to paint the den; a quick peek shows that the subfloor is not plywood, but that ugly ugly OSB stuff. I always called it chipboard but was corrected.
Do you think this subfloor will can be satisfactorily painted?
OH, My approach to the kitchen was similar to your’s, but instead of stenciling I sponged on 3 colors.
Joyce, It is always good to hear from others whose painted floors are still going strong! I do not have any personal experience with painting OSB, but have heard from some that it is not ideal. (Although to be fair, plenty of people would also say that painting subfloors in general is not ideal). I did a quick google search and found this article which may be helpful – they certainly make it sound possible! http://www.doityourself.com/stry/how-to-paint-osb
Hi, I just came across your blog while googling “painted floors”. I was looking for the “how to”. I want to paint our little boys bedroom floor. Well let me just say FABULOUS !! Fancy and LOVE it !! Brilliant it’s clean & so fresh looking. By far the best I have seen yet !! Very inspirational. I will definitely be a follower now !
Thanks Lynn – good luck with your boys room!
Your floor looks amazing. I also love the wall and that chandelier!
Thanks! Everything is a huge work in progress but I am loving where things are headed!
We painted ours with Oil base porch and floor. The smell stayed inside for weeks, months even. I think I may get some laytex and paint over it next time after it dries to try and contain the smell.
Oil-based paint is great but you are right. The smell can be intense!
I always add a tsp clear vanilla extract to a gallon of paint and it almost 100% eradicates paint odors. Just used enamel oil paint in kitchen cabs. Worked great. Also, the dark vanilla doesn’t effect color if that is all you have.
This is an amazing paint tip! Thanks for sharing!
very cool looking, great idea. I did the floor in my studio with plywood. I ripped ½in plywood in 8inx8ft strips and laid them done in a staggered arrangement and simply sanded the corners a bit and painted them white- turned out rad. The plywood was cheap so there are knot holes and the grain shows- I love the character. SUPER cheap too. My wife’s idea:) (@foundrentals)
Photo: https://instagram.com/p/BAvdGImhCTi/
Love that idea! Sounds beautiful!
Just saw the pic – so pretty.
Beautiful! I love the paisley pattern. I am wondering if I could do this on some concrete that I have outside.
Sandra, I haven’t painted a concrete floor before but I know that you definitely can!
I have 15″ ceramic tile floors with a little bit of texture in my living room. Have you ever known anyone to successfully refinish/paint them?
I’ve seen lots of tutorials for painting tile but I don’t remember off-hand if any of them were for tile floors. I am pretty sure it can be done – even linoleum can be painted! – I just don’t know what the best primer and paint to use would be.
Hi Carrie
Love these floors, recently purchased a cottage and plan on painting the plywood to save on costs. Just wondering, when you painted the border, you painted the base coat over the tape, this must of had to dry before painting the second color therefore was the tape hard to remove? Thanks
Lori, great question and congrats on your cottage purchase! The tape wasn’t hard to remove at all. As long as the final coat of paint is still wet when you remove the tape, it should come off fine.
Hi, Carrie. I’m so happy to have found your site. I’m always looking for ways to utilize tiny spaces, as we’re fulltime RVers, living and traveling in our motorhome. (We’re living our retirement dream and crossing things off our bucket list.)
The motorhome floor is carpeted, and I hate it. There’s simply no way to keep the carpet clean, and I desperately want to get rid of it. I’ve thought of putting laminate on the floor but as you may know, almost everything in an RV is built in. Putting new flooring down would mean tearing out all the furniture, then replacing it when the floor is finished. We’re not willing to tackle such a project in our mid-70s!
My question to you is…Do you know of anyone who has used your painted-plywood-subfloor method in an RV? I am pretty sure it would work well, but I’m wondering about sanding, painting, etc., in a relatively small, enclosed space like this. Any special tips on doing this while continuing to live in the motorhome? It’s our home, after all, and we can’t just move out while completing such a job. One good thing is that it’s just the two of us old folks, with no kids or pets to be harmed by the fumes, etc.
Thanks so much…Bev
Bev, First of all I love that you are living in your motor home! I think this is definitely my husband’s dream too. I’m not there now but maybe one day – there are definitely a million places around the country I want to see. I don’t personally know of anyone who has used this in a motorhome/RV, but as long as there is some decent plywood under the carpet, it should work. The good part is it wouldn’t take a huge amount of time in a small space like that. The downside is, like you said, it would be difficult to still live there while working. I think it would be doable – the main problem would be not walking on the floor during drying times but if you were able to do the painting/sealing parts fairly early and stay outside or go somewhere for a few hours while each layer dries, it could work. And I’m sure it would look beautiful! Another option would be to try some of the peel and stick tiles out there. I have seen some that look really similar to real wood or tile floors and you could just stick them down around the built in furniture and cabinetry. I am pretty sure you can just cut them with a utility knife which would make working around things pretty easy. Whatever you decide, good luck!
How long did it take for you to do all the coats and for the floors to cure? Poly has a faster curing time than regular porch paint, right? We are planning on painting our subfloor before we move into our new house.
This was a project I was only able to work on in the evenings after work so it took me a lot longer than it could have. I let each coat of primer/paint dry for an entire day since I was only working in the evening, but you could potentially do a couple of coats a paint in a day. You do want to let it dry a bit longer than you necessarily would with paint on the wall since you will have to walk on it to paint the next coat. I believe the sealer I used could be recoated in four house and I did a total of four coats. But then I left it for several days to let it fully cure. Start to finish, you could definitely get it finished in a week if you really timed things just right.
I also am in need of flooring which isn’t in my budget. I mentioned painting the subfloors to my husband and he thought I was crazy. I can’t wait to show him this, great job!
Thank you! My husband also thought I was crazy but luckily he wanted our carpet gone as much I did!
Great stuff! Were you planning on doing anything with the floor trim? Like lowering it?
Thank you Ed. I did eventually add shoe molding to the base boards at the correct height. It definitely helps the room look more finished.
Carrie, Your floors are absolutely BEAUTIFUL!!! Beyond belief and I’m so glad that you aren’t letting the neigh sayers get to you. The floors are SO STUNNING!!! There are no words actually to describe how BEAUTIFUL the floors are!! WOW!! Is as close as we can get. I’d love to do this to my floors, and we’re renting. But our landlords already given us permission to remove the carpet that’s on the floors as it’s so old that it’s coming apart in chunks. He gave us permission to put in laminate floors and he’d pay for it, but we’re going to do the labour to help save and not have strangers in our home going through our stuff. SO BEAUTIFUL!!
Thank you so much Kim! I’m glad your landlord is letting you get rid of your carpet and put in laminate floors. Nobody should have to live with gross carpet!
Absolutely love it! Do you think it’s possible to do this project with chalk paint to avoid needing a primer?
Leah, possibly. I know some other bloggers have painted their floors with chalk paint. Personally I probably wouldn’t choose chalk paint for such a high-traffic surface. But you possibly could with a good sealer.
I copied almost every detail on my bedroom floor and it came out great. Thanks for the excellent tutorial.
Yay, I’m so glad it worked well for you!
Any suggestions for covering unwaxed commercial tile? Getting ready to start and I’m nervous LOL.
Good question Rebekah! I haven’t painted tile so I can’t say for sure what products to use but I know it can be done. Good luck!
This is amazing! What a transformation. The color is my favorite.
Maria
Thank you so much Maria!
Hey!! Love this post! I want to rip up our nasty carpet (we have 2 large dogs and a red clay/dirt yard) and stain the subfloor. Eventually, we will get hardwood but that’s not an option right now. My husband is worried about the lack of insulation without the [old, dingy, gross, orange] carpet affecting our heating and cooling bills. Have you seen any major changes in that area?
We didn’t see any changes in our heating/cooling bills. We have electric heat and have a full unheated basement under this floor. We also live in VA where the temps vary quite a bit. I hope that helps.
How well did these hold up over time? I’m thinking of doing something like this on the house I’m buying as a temporary measure to avoid dropping $800 on flooring right away. Did you find it to be excessively noisy or otherwise annoying to walk on?
They held up really well – better than I expected! I didn’t find it noisy or annoying in any way. The floors were smooth to the touch and similar to working on any hardwood type of flooring. I also have more details of how they were holding up three years later right here: https://www.lovelyetc.com/painted-plywood-subfloor-three-years-later-the-final-update/
Great post, pinning this amazing floor project.
Maria
Thank you Maria!
Hi Carrie,
I am about to embark on this type of projects a temporary fix after carpet removal in my bedroom.
is it essential to use oil based primer? I need to keep this as “green” as possible, with low VOC.
Thanks
No, the oil-based primer isn’t essential for this. I think a good latex primer would work find for painting floors. Good luck!
I happen to run across your web site & fell in love. I was looking for a way to make my own stencils & I saw the painted floors , I fell over to say the least! I have been wanting to try this for years! Now just to work up the courage. lol Thanks for sharing.
Lisa
Thank you Lisa! You can definitely do it – it isn’t as hard as it seems. And if something does go wrong, at least it’s just paint!
Thank you so much for sharing this! I used your tutorial in 2014 to paint over some 100 year old hardwood floors that were scraped beyond salvaging, it turned out great! And now I’m using it again to paint actual plywood. I bought my Grandpa’s house, and the bedrooms have the original 60-year-old shag carpet. That must go! But like you, not quite ready for the investment of real flooring. Your recommendations are so helpful! Thanks!!
Yay, I’m so glad this has come in handy twice for you! And how neat that you were able to buy your Grandpa’s house!
Really great article. Our livingroom carpet has been down for at least 25 years. It still looks great but I’m so tried of it. I thought about painting the sub floor because I don’t want carpet again and we can’t afford hard wood either. We have two dogs that are heavy shredders and I think painted floor might be easier to clean. My husband has zero vision when it comes to design so he’s going to be a hard sell on letting me try painting. I will have to look at hand sanders for the project. It’s one power tool I don’t have.
I totally understand what you mean about being so tired of your carpet. Hopefully this will help convince your husband. Mine has no vision either but luckily by this point, he’s learned to just trust me when I say it will work. :)
Hi
Thank you for your detailed information because it is very helpful. I am in the middle of the project . Can’t wait to see how it will look.
Good luck!