I am thrilled to be sharing our light, bright white kitchen makeover on a budget today! This kitchen makeover reveal has been a LONG time in the making.
This definitely isn’t one of those TV-perfect makeovers where everything is completely transformed in a week flat.
I actually did most of the work to transform our dark, dated kitchen two years ago!
But I never shared the finished room here because honestly, it never really felt completely finished.
Something was off. Finally this summer, I figured out which things weren’t quite right and got to work finishing the space.
And now I absolutely love it!
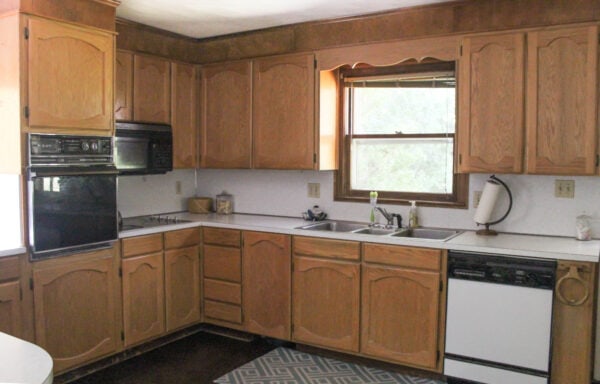
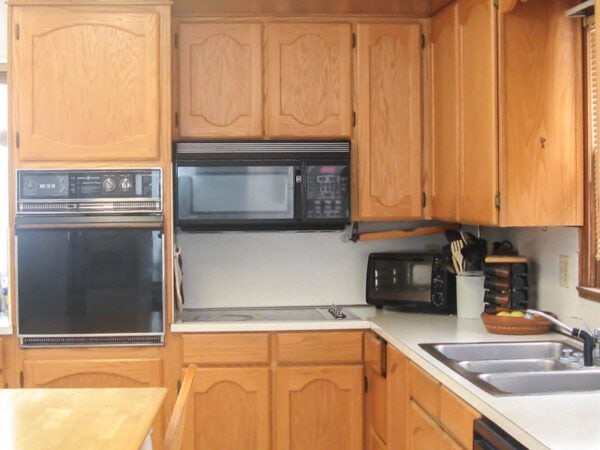
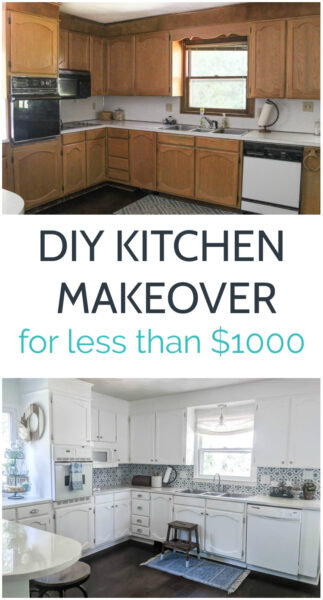
This is how our kitchen looked before I started the makeover two years ago.
I had already replaced the dated linoleum floors with hardwoods but the rest of the kitchen was very dark, very dated, and very brown.
And now, after a LOT of paint, a bit of elbow grease, and some thrifting magic, here’s how our bright and cozy kitchen looks now
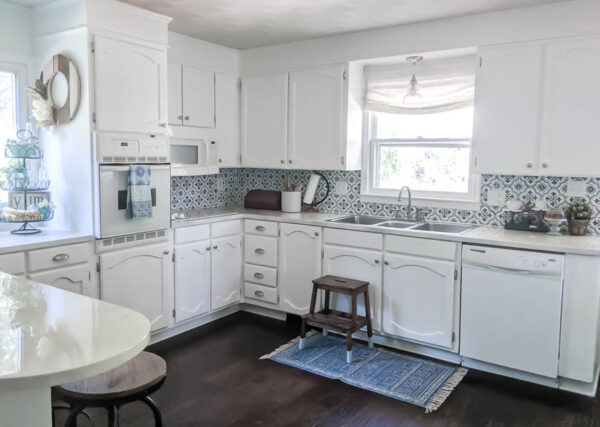
Now that is an amazing transformation if I do say so myself! And knowing that the entire thing including appliances costs less than $950 just makes it that much sweeter.
This post contains affiliate links which means if you make a purchase after clicking a link I will earn a small commission but it won’t cost you a penny more. Click here to see my full disclosure policy.
Work with What You Have
I know that the trend these days is to completely gut a kitchen and start over from scratch with a whole new layout, new cabinets, new stainless steel appliances, etc. But that’s just not my way.
And also, let’s be honest, there’s no way that was in the budget!
I think we are far too quick to decide we just need to burn it all down and start all over so we can have everything exactly how we want.
I may be in the minority, but to me, that just seems wasteful and silly.
I have absolutely no desire to spend tens of thousands of dollars to tear out our functional (but outdated) kitchen and replace it with a brand new kitchen that will likely be just as dated in a decade.
The absolute best decision I made with this kitchen remodel was to work with what we already had.
Yes, the cabinet door style was not my favorite. And you aren’t going to find this old kitchen layout with a tiny wall oven in any design showrooms.
But the cabinets were in great shape. And once they had a fresh coat of bright white paint, the dated door style really wasn’t a big deal.
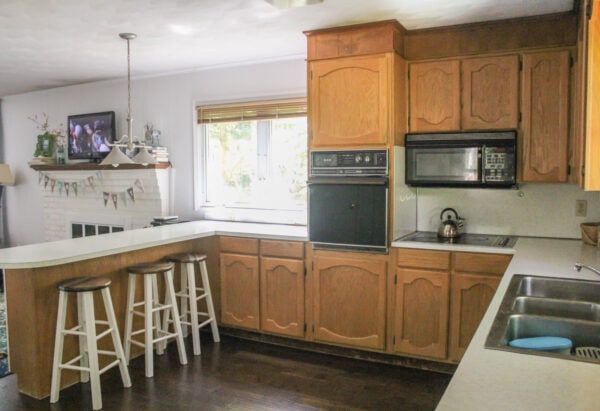
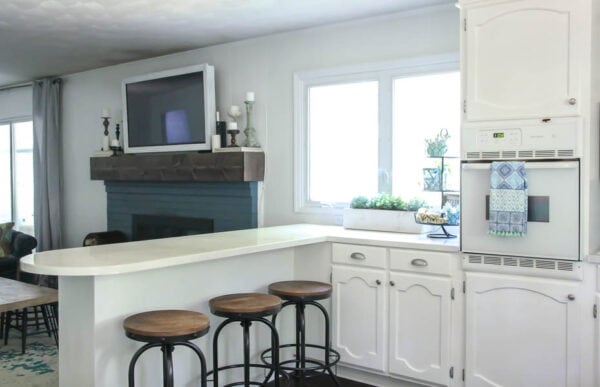
While this kitchen layout may not be the most popular at the moment, it actually works really well.
We’re lucky that our house has a pretty open layout for a 1970s ranch with the kitchen looking right into the family room.
That long peninsula is the perfect spot for our three boys to eat breakfast.
And I actually love having our little oven in the wall rather than a more traditional range/oven combo.
It is much easier to keep my two year old away whenever I open the oven door since it’s not so low to the ground.
And keeping it in place meant we could reuse our current cabinets rather than redoing the entire room.
Painted Cabinets
The most significant change in the entire kitchen was painting our oak cabinets white.
This room may look bright in photos, but most of the time it is very shadowy thanks to all of the wonderful trees around our home.
The bright white cabinets help reflect the little natural light this room does get.
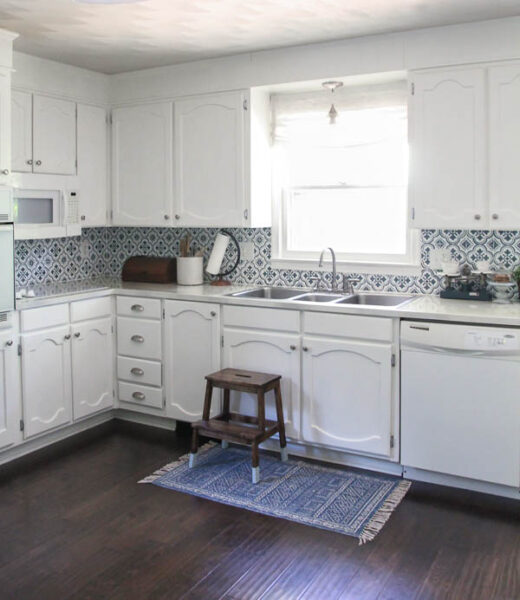
I’m also VERY glad that I took the extra time to do a few extra steps and completely eliminate the heavy wood grain from showing through the white paint.
The smooth paint finish definitely helps everything look more modern and fresh. (There are more details on that whole process here.)
I reused the hinges that were already on the cabinets, simply updating them with a bit of rub ‘n’ buff.
I also added new drawer pulls and cabinet knobs that I scored for a steal at a yard sale of all places! (I have a list of other great spots for budget hardware right here since I know we all can’t be so lucky!)
Painted Countertop
The other thing that was truly dating the kitchen was the old gold speckled laminate countertops and backsplash.
I’m sure you’ve probably seen similar laminate before – it was very popular at some point many years ago.
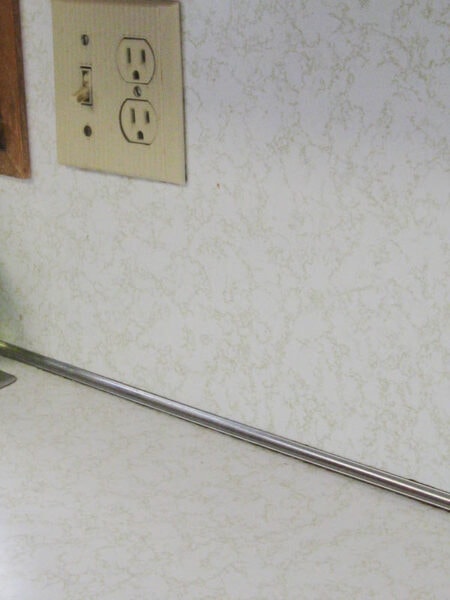
We are lucky enough to have tons of counter space which is wonderful for cooking but also means replacing our old counters would not be cheap.
I considered all kinds of options for replacing our countertops inexpensively: butcher block, new laminate, concrete.
But they were all still going to cost more than I was willing to spend, so I decided to keep things simple with paint.
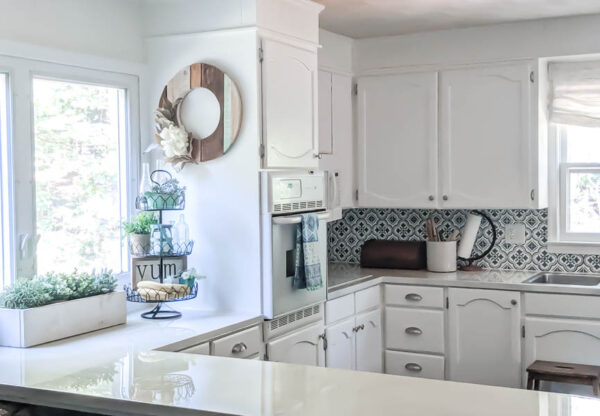
I did get a little fancy using a pour-on topcoat rather than regular old polyurethane.
This topcoat was more expensive than poly and I have some mixed feelings about whether that was the best decision and will be sharing an update on all the pros and cons soon.
But for now, I’ll just say that it looks beautiful and fresh and shiny and about a million times better than the old countertops.
It’s hard to tell from photos what a huge difference painting the countertops made but in person they look completely different.
The work of painting them was 100% worth it!
Stenciled Backsplash
Even though I kept the old countertops in place, the old backsplash had to go.
It was over an inch thick and was basically swallowing the outlets and window frame in a weird way.
So I pried the old laminate off the wall and was left with plain drywall underneath.
Again, I considered various options including tiling. I may be in the minority, but I actually enjoy tiling – it reminds me of putting a puzzle together. (Yep, in case there was any doubt, I’m a huge nerd and love a good jigsaw puzzle from time to time.)
But I wasn’t completely sure how long my painted countertops would last, and I didn’t want to install a backsplash that would be ruined if we had to replace the countertops later.
So I decided once again to stick with good old paint.
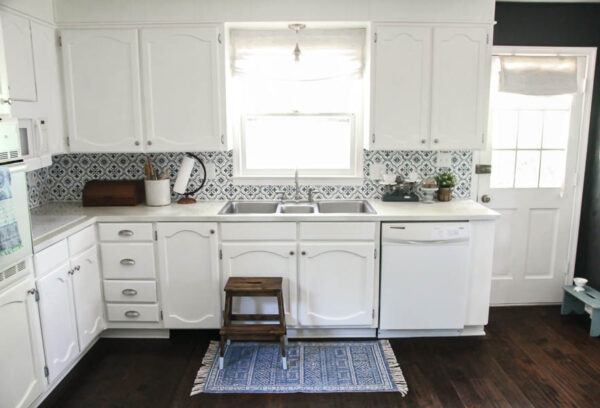
I am loving the patterned concrete tiles that are everywhere right now.
I realize they aren’t exactly timeless and will probably look dated in a few years as well.
But I figured that of all the major components of a kitchen, the backsplash is the easiest to change.
And I was right, because I have already changed it! I originally stenciled the backsplash two years ago using a light aqua paint and a floral tile stencil.
And it was really cute, but the kitchen as a whole was just way too white.
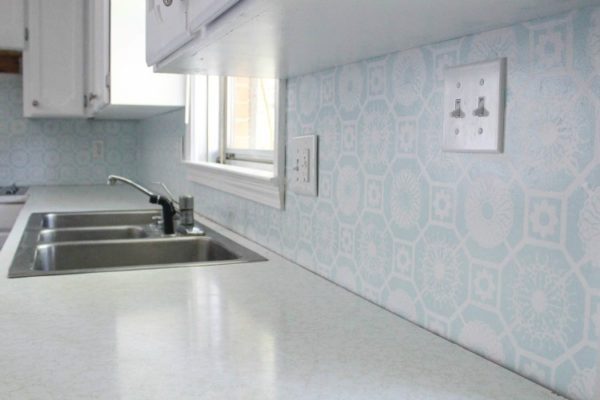
So I decided to repaint it this summer with a new stencil that was a bit more modern and a deeper color to give some contrast to the sea of white.
I used the same deep blue paint color I used for our fireplace and it wasn’t exactly a quick and easy project, but I am so glad I did it.
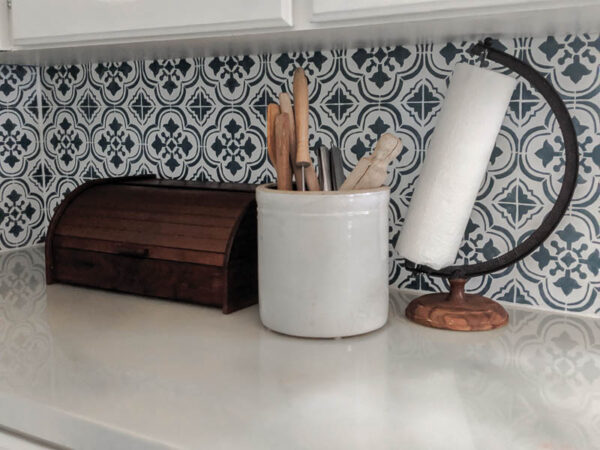
It was just what this room needed to help ground it. You can find my updated post on stenciling a backsplash here.
Simple White Appliances
Our old appliances definitely had to go. They were big black eyesores from the 1970s and 1980s that didn’t have a ton of life left in them.
I know that stainless steel appliances are pretty standard these days and couples on House Hunters have been rejecting homes for not having them for years now.
But honestly, I’m just not a huge fan of most stainless steel. And with the layout of our wall oven, stainless steel would literally be right in your face.
Instead, I chose to go with classic white appliances. They blend right in with our white cabinets so your eye goes to the backsplash and other decorative touches instead of the appliances.
I know white appliances aren’t for everyone, but I love them.
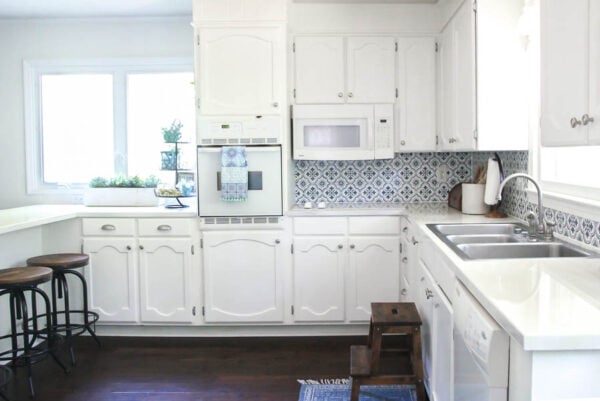
Choosing white appliances also had the added benefit of being much more affordable.
After several weeks of searching for a good deal, I bought our white oven, range, microwave, and dishwasher all from Craigslist for $400 total.
They aren’t all a matched brand-name set, but I really don’t care. I’m not really a brand name kind of girl and I am just thrilled I was able to find a tiny oven the right size to fit in our existing cabinet!
Kitchen Decor and Other Details
To complete the update, I also painted the door and window bright white, replaced the light switches and outlets with fresh white ones, made new window shades, and replaced the old lighting with inexpensive fixtures.
And then I had fun with accessories! I added lots of beautiful wood tones to warm up all of that white.
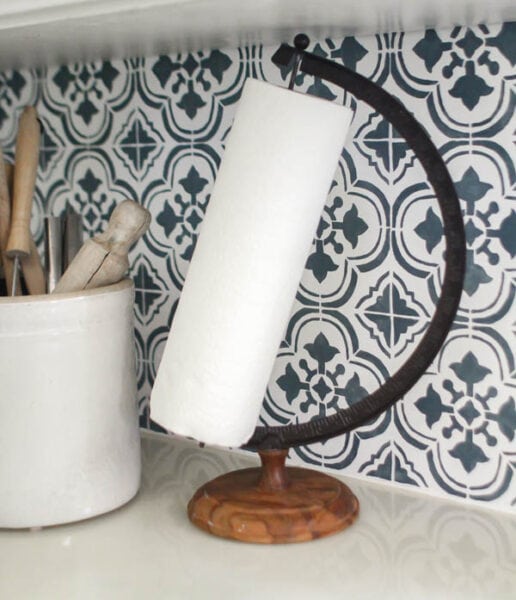
My globe stand paper towel holder has been a favorite for a long time.
And I added a few other favorite vintage finds. An old crock to hold cooking utensils and a bread box.
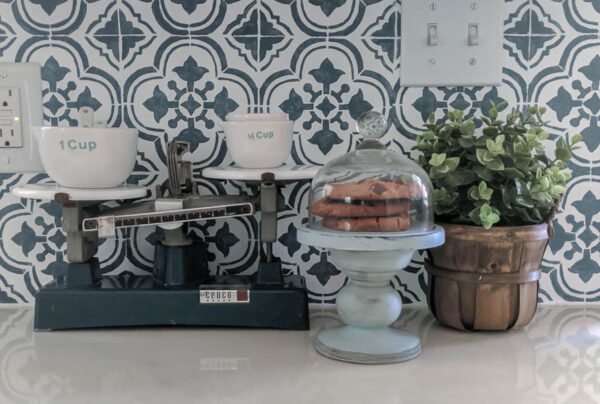
This old scale was one of my favorite thrift finds from this summer and the little cupcake stand was a recent DIY project.
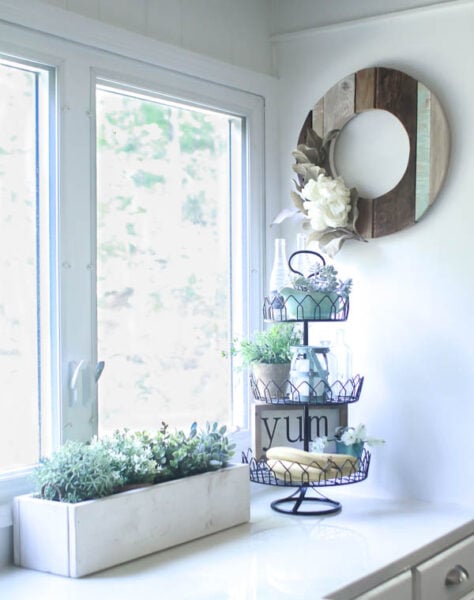
On the other side of the room is a three tiered tray where we keep a lot of our fresh fruit along with some old glassware and small plants.
And next to it is a long planter box I built a few years ago. It used to hold a sweet herb garden, but well, it died.
And in the interest of not harming further plants, I just have some little faux herbs there now. (I’m a plant killer and I’ve come to accept it.)
Hanging on the wall is one of my favorite DIYs ever, my cute little reclaimed wood wreath.
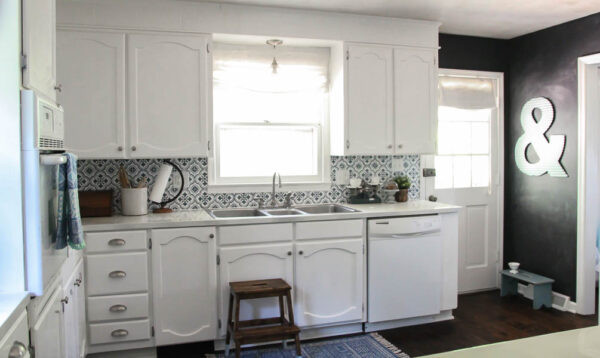
In the corner is a little sliver or a wall that I painted with chalkboard paint a few years ago that my kids adore drawing on.
I used to have our industrial family command center here, but I didn’t love how messy the papers always looked.
So I moved it into a closet and hung this big metal ampersand here instead.
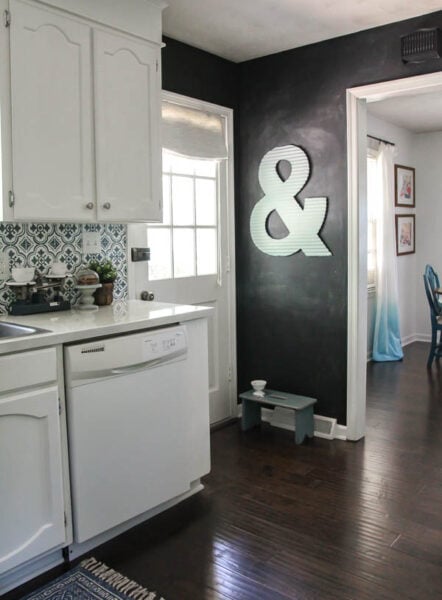
And that’s our Budget Kitchen Makeover! It has completely changed the feel of our entire home and looking at these photos reminds me just how far our home has come over the past few years!
Kitchen Sources and Cost
Cabinets: Painted with DecoArt Satin Enamels paint in Pure White, $40
Cabinet Hardware: I used these Drawer Pulls and Cabinet Knobs bought secondhand, $20
Countertops: sealed with Envirotex Lite pour-on finish, $290
Backsplash: stenciled with Santa Ana Tile Stencil, painted with Valspar Bright White and Sherwin Willaims Blue Mystery (from their line at Lowes), $30
Appliances: bought secondhand, $400
Pendant Light: This basic pendant light kit and this seeded glass globe from Lowes, $32
Stools: These stools from Wayfair, purchased with a gift card, $0
Kitchen Rug: from TJMaxx, $17
Faucet: Delta Standard Faucet with Sprayer, $70
Fabric for window treatments: $20
Stepstool: Bekvam stepstool from IKEA, $20
All accessories: already owned, $0
Total Cost: $939
Since most kitchen remodels cost $10,000 or more, I’m pretty thrilled that I was able to completely transform the room for less than $1000.
And if I had chosen a different counter topcoat and hadn’t needed new appliances, the total would have been closer to $350.
Definitely proof that a beautiful kitchen doesn’t need to cost a lot!
Kitchen DIY Tutorials
- Painting Oak Cabinets White
- My painted cabinets two years later: the good, the bad, the ugly
- Painted countertops: How to paint your countertops to look like marble
- Stenciled kitchen backsplash
- Updating hinges with Rub n Buff
- Where to buy inexpensive cabinet knobs and pulls
- Small pantry makeover full of inexpensive organization
- Reclaimed Wood Wreath
- DIY Rustic Planter Box
- IKEA Stepstool Makeover
If you have a kitchen that you aren’t loving, I hope you feel encouraged that you really can create a beautiful home without spending a lot of money!

Emily says
This is such a beautiful kitchen! Great job with the makeover. If the countertops don’t hold up, I have used Daitch coatings countertop makeover several times for rentals and my own home and it has held up beautifully for years now. I think it’s called mineral select or something like that. I used the lightest colored one. But I love what you did with this!
Carrie says
Thank you! I will have to look into that countertop coating for the future. So far my countertops have held up beautifully, but one section has yellowed a bit for some reason. Probably not enough for anyone else to notice, but I sure do!
Nikki Gwin says
It’s beautiful! I have almost that same kitchen and our house is a ’70’s ranch also. The owners before us updated it so we already have the white appliances and they replaced the countertops with a solid surface material and did a tile blacksplash. It’s all pretty, but as you said BROWN! The tile is beige and brown, the countertops are speckled beige and brown and with the dark wood floors and the brown cabinets its a ton of brown. I’ve got to muster the courage to paint those cabinets.
Love what you did.
:) gwingal
Carrie says
Thank you! Painting the cabinets is a huge job but it will make such a big difference! When I was loading these before pictures, I kept asking myself why I waited so many years to paint the cabinets. I was definitely forgetting how many evenings it took to get the job done – but so worth it in the end.
Templa Wyatt says
I love this! Such great money saving ideas here. And you did a great job. Definitely saving for future referral when i remodel my grandparents house. We have done the bathrooms so far. But this kitchen will be tough.
Carrie says
Thank you! Kitchens are tough but there really is so much you can do on a budget!
Kathi Cooley says
Your kitchen is beautiful, Carrie! And I love the new backsplash color, which really stands out and adds balance to all the white! You’re so brave, painting your counters! I tried a product for that purpose a couple years ago and it didn’t turn out well at all! Your counters look beautiful! I’m not usually a fan of white kitchens, but I love yours, especially with the nice rich brown hardwood floors!! Very beautiful!!
Carrie says
Thank you Kathi! I don’t usually love all white kitchens either, but I love how mine turned out in the end. I think the darker floor and backsplash really help break it up. Our house is so dark, the white really brightens everything up. And I’m sorry your counters didn’t turn out the way you hoped. I feel like counters are tricky. Ours are holding up well but there are a few things I don’t love.
Bliss says
What an excellent update! This transformation shows what elbow grease can do, it looks beautiful.
Carrie says
Thank you Bliss!
Libby Warner says
Wow..reading your post I felt like I had written it! We physically literally built our house 34 years ago and am embarrassed to say have never updated our kitchen!! However that being said I have read extensively about painting my cabinets and countertops. I agree with you, mine are in perfect condition so why add more to a landfill? Seems so wasteful in this day…you have updated exactly how I plan to attack my own! I need bright, the oak cabinets, oak flooring etc feels a like a cave now! I am a pretty simple person and like you not at all into name brand appliances…and am Not a fan either of stainless steel! Will definitely go with white as well!! I am so happy I found this site and can’t wait to binge on more posts!! Thanks for making my day and inspiring me!
Libby
Carrie says
Thanks so much Libby! It sounds like we have a lot in common!
Linda says
In your before pictures I noticed the metal trim in the corners of your countertops. I have the same trim around my laminate. Would you please tell me what you did about the metal trim? Did you remove it and how or did you paint it? I tried putting contact paper on my curved island and the curved parts won’t lay flat, too much bulk. I now want to try painting the countertops but am concerned about the trim. Thanks for any help.
Carrie says
Hi Linda, I did remove the metal trim behind my countertops when I removed the laminate backsplash because it was too thick. But if I hadn’t been removing the backsplash, I would have just painted the metal trim white to blend in with the countertops. Good luck with your kitchen!
Lia says
Wow!! Great work on a beautiful transformation! This has given me so much inspiration on updating our 70’s kitchen. I noticed that above your window there used to be a squiggly piece of wood (excuse me for not knowing proper terms) but in the after picture, the space above the window is open! How did you get rid of that?
Carrie says
Thank you! I’m so glad to help other dated kitchen owners. :) It was actually really easy to remove the curved wood header above the sink. It was a separate board and I believe it was attached with a couple of screws and once I removed them, I was able to easily knock it right out with no damage to the rest of the cabinets. It was so easy, I wish I had done it years ago!
ROSEMARY says
Hi! Nice job on the kitchen remodel. I was wondering if you added another color to your stenciled backsplash as the final ‘after’ picture seems to show more than two colors – maybe an extra beige or grey color? Thanks.
Carrie says
Hi Rosemary, the backsplash is actually just the two colors – white and blue mystery. Maybe the lighting in the photo made it look like there was a bit of something else.
Ingrid says
Carrie, you did a beautiful job! I, as well, love the look of white appliances and am glad there are some of still around! I stopped watching all the home reno shows a while back for a number of reasons but am glad that I have found your blog and a few others that are similar! Keep up with those wonderful ideas–they make me happy!
Carrie says
Thank you so much! I miss the HGTV shows from years ago where they did things on a budget and reused a lot of what the homeowner already had. There was so much creativity in those shows!
Tammy says
Carrie, I totally agree with this comment. I stopped watching HGTV years ago because all the shows seem so unrealistic to me now. I’m so glad I found your blog!
Carrie says
I know – and I think I would like them way better if they were more down to earth!
Deb says
Found you via Pinterest and just have to say, I’m really enjoying perusing all of your posts. So much great stuff! I absolutely adore your kitchen makeover and I love it even more because, like me, you like to work with what you have, rather than getting new everything! I happen to think that counter extension is wonderful, especially with kids, and love your kitchen even more because you kept it. The white looks fresh and clean and I can’t believe the deal you found on the appliances! Amazing! One last thing – it’s very refreshing to see a blogger actually answer their comments. That sure doesn’t happen often these days. Off to read more of your posts!
Carrie says
Thank you so much! I am definitely a big fan of working with what you have – it prevents waste, is better for the planet, and is really just more fun and creative! And I do try my best to always answer comments – I know when I take the time to leave a comment for someone, I love when they respond so I want to do the same!
Deb says
: )
mary says
Really nice!
Carrie says
Thank you!
Lu says
Beautiful! Thanks for the ideas. Did you paint your window frames? Did you paint or replace the doors and doorframes throughout your home? We are trying to decide what to do.
Carrie says
Yes, I painted all of the doors and doorframes in our house. Almost all of the trim in our home was painted a yellowish off-white when we moved in except the window and door in our kitchen which were stained wood and had seen better days. I painted it all with a fresh white bright and I’m so happy I did. It made everything look fresher and cleaner. Just be careful if you are painting doors and windows that have been painted before – if it’s an older home, there’s a good chance they were painted with oil-based paint. You can still easily paint over them; just start with an oil-based primer and then you can paint them with either oil-based paint or regular latex paint.
Renee says
I painted my cupboards with an oil base paint 33 years ago when our kids were toddlers and there are still barely any chops. It held up so well. Are the new acrylics just as strong? I wish I could attach a picture. Thank you
Carrie says
Thanks for sharing your experience – that’s amazing! I know water-based paints have come a long way and a lot of people prefer them because they are low VOC and don’t yellow. But I don’t know if they are as strong and durable as oil based paints.
Tasha Breitbarth says
I’m contemplating painting my oak cabinets white and have been reading about everything I can. One question, did you paint your window trim and if so what did you use?
Carrie says
Yes, I painted my window and window trim. For all my trim I used a Valspar latex paint in semigloss finish. I like to use an off-the-shelf bright white on trim rather than a tinted color because it is a true neutral and looks good with all other colors.
Nori says
I’m totally smiling while reading your descriptive info about how you redid your kitchen for under $1000! That’s my way of doing things too. Your kitchen looks beautiful, and you should be proud that you did so much more than just throw money at it!
Carrie says
Thank you so much!