The Cheapest DIY Backsplash Ever
My budget kitchen makeover continues! Today I’m sharing my new painted backsplash, which is arguably the cheapest backsplash ever.
That’s cheap as in low-cost, save-your-money-for-something-more-important. Not cheap as in inferior.
My freshly painted cabinets completely transformed my kitchen, but I never dreamed a painted backsplash could also make such a huge difference.
Previously, our kitchen still had the laminate backsplash from when the house was built in 1973.
Functionally, it was perfect.
Aesthetically, it was horrendous.
I have absolutely nothing against a laminate backsplash – in fact, I’ve seen some really beautiful ones.
Mine was not one of those. It was that lovely gold and white veined laminate that everyone loved in the 70s. (The better to match our harvest gold appliances, my dear. Evil laugh.)
And not only that, it was super thick in a weirdly noticeable way. As in it dwarfed the window trim, it was so thick.

So it had to go.
There are tons of awesome DIY backsplash options and many of them are pretty budget-friendly, but I decided to go with the least expensive of all.
Paint.
Because as you may have noticed, I am incredibly devoted to painting all the things.
What can I say? I love what paint can do and I understand paint so well. It is cheap and never comes with hidden surprises.
(Plus I just tiled our entire shower a couple of months ago and I may not have mentally recovered from it yet.)
And if painting is my favorite, stenciling is my favorite favorite. As soon as I saw this antique tiles stencil from StencilGirl, I knew it was going to make an amazing backsplash.
StencilGirl is a new to me stencil company that recently came out with a line of home décor stencils. The stencils are all designed by artists and made in the USA.
Plus, StencilGirl is a family-run company, which I love.

I did hesitate briefly at first, wondering if the paint would be durable enough as a backsplash.
But then I remembered that plenty of builder-grade houses come with a painted wall ‘backsplash’. (Theirs just aren’t as cute as mine!)
Just make sure to use semigloss paint. Semigloss paint is great for resisting moisture if water gets splashed on the wall and its easy to clean. Both of which are essential for a backsplash.
*Update: It’s been a couple of years since I first published this tutorial, so I’ve updated the end of the post with info on how the backsplash has held up over the years and how it looks now.*
This post contains affiliate links which means if you make a purchase after clicking a link I will earn a small commission but it won’t cost you a penny more. Click here to see my full disclosure policy
Materials for Creating a Painted Backsplash
- A great Stencil – I used StencilGirl’s antique tiles stencil. If you are looking for more options, I put together a whole list of other great backsplash stencil options.
- Painter’s tape – for protecting the surfaces next to your backsplash
- Foam Paint roller and paint tray– these small foam rollers are great for painting smooth surfaces quickly.
- Primer – if you are painting a laminate or tile backsplash, you definitely need to start with a good primer. This is my favorite primer for slick surfaces because it really helps paint adhere well.
- Semigloss paint in at least two colors
- Foam paint brushes – for painting the edges and corners of the backsplash
- Makeup wedge sponges – these work so much better than a paintbrush for stenciling small areas like corners
- Spackling – optional, you may need this to fill in nail holes if you are stenciling on drywall
- Sandpaper – if you are stenciling a laminate backsplash, 150 grit sandpaper is great for scuffing up the laminate a bit before painting. If you are using spackling to fill holes, you will need high grit (220 grit or higher) to smooth the spackling once it dries.
Tutorial: How to stencil a backsplash
First, you need a flat surface to stencil. It could be drywall, laminate, or even flat tiles.
I chose to remove our previous laminate backsplash before stenciling because of the weird thickness of it, but stenciling the laminate would have worked just as well. (I know because I also painted our laminate countertop and it worked great.)

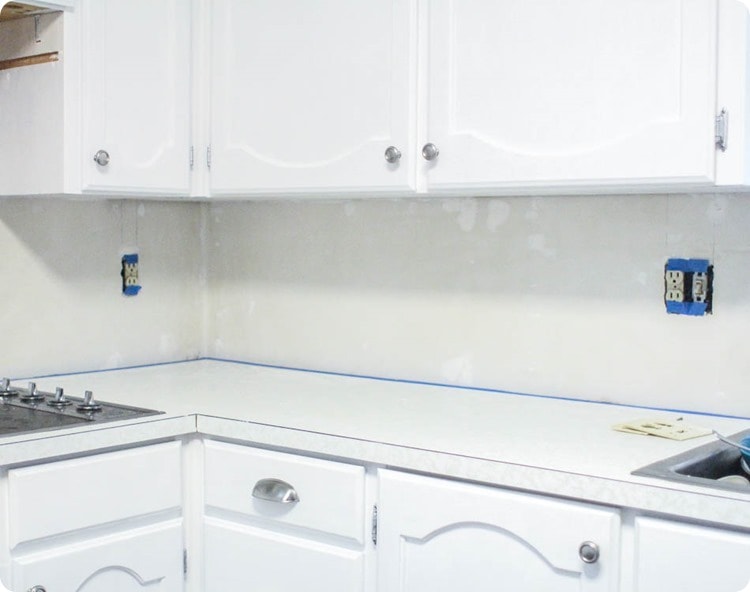
Prep your backsplash
If you are stenciling a tile or laminate backsplash, you’ll start by lightly sanding the entire thing with sandpaper to rough up the surface a bit and cleaning it well with a degreaser (I prefer plain old Dawn dish soap).
If you are stenciling drywall like me, you may need to patch a few holes to ensure your surface is perfectly flat. After removing my old backsplash, I had quite a few nail holes to fill as well as some dents from the removal process.
I used spackling to fill these holes and then once it was dry, sanded it smooth with 320 grit sandpaper.
Once everything was nice and smooth, I wiped the wall down well to make sure it was clean and dust-free.
Primer
Before you start priming or painting, make sure to protect your countertops, outlets, cabinets, and anything else touching the backsplash with painter’s tape.
If you are painting a tile or laminate backsplash, a good primer is a must. Primer sticks to slick surfaces like these much better than paint alone.
(And no, sadly, paint + primer in one isn’t going to cut it in this case. Paint + primer is really just a better paint that covers in less coats. It doesn’t have the superior adhesion you can get from a separate primer.)
I recommend Zinsser oil-based primer for painting slick surfaces. I have used this primer on all kinds of projects including painting my laminate countertops and it never disappoints.
Keep in mind, this is a more fumey primer since it is oil-based, so be sure to open the windows while you work.
Roll the primer onto your backsplash using a foam roller. You may need to use a paintbrush in the corners and around the edges of the backsplash.
I like to use cheap foam paintbrushes for this – oil-based products can be a paint to remove from paintbrushes so it’s much easier just to use a one-time use foam brush.
If you are painting a drywall backsplash, you can probably skip the separate primer step.
Paint
Now you are ready for paint.
You can begin by painting the base coat of paint using a foam roller and paintbrush.
The base color for tile stencils is the ‘grout’ color; I used bright white semigloss paint for my base coat.
One coat of paint will usually be plenty for the base coat.

Stencil
Once that dries, it’s time to stencil.
I prefer to stencil using a foam roller as well because it is much faster than using a brush or sponge.
The trick is to make sure you don’t load too much paint on the roller at a time.
Load your roller with a light layer of paint and then lightly roll it over a few layers of paper towels to remove any excess.

Using painter’s tape, tape your stencil to the wall.
I find it easiest to start stenciling in a corner.
Lightly roll your roller over the stencil until all of the open spaces are evenly painted. As you are rolling on the paint, you don’t want to press down too hard or paint can squish under your stencil.
If this is your first time stenciling, you may want to do a few practice runs on some scraps of cardboard to get a feel for how much paint to use and hard to press.
Once you have stenciled the first section, you can gently pull the stencil off the wall.
To do the next section, simply line the stencil design up with the previous section and keep going.

The thing that is really tricky about stenciling the backsplash is reaching the spots right below the cabinets and right above the counter.
To get into those little areas, you will have to bend your stencil at a 90 degree angle.
Since the foam roller won’t work well in such tight corners, you can use a small foam brush or makeup wedge sponges to gently fill in those parts of the stencil.

If your design starts to look a little messy and not so crisp, that simply means it is time to clean the excess paint off your stencil. I’ve got super helpful tips for the easiest way to clean stencils in this post.
And if you find that there are any areas that don’t look quite as good as you would have liked, you can simply repaint them your base color and then stencil over them again.
That is the marvelous thing about paint – it is so forgiving.

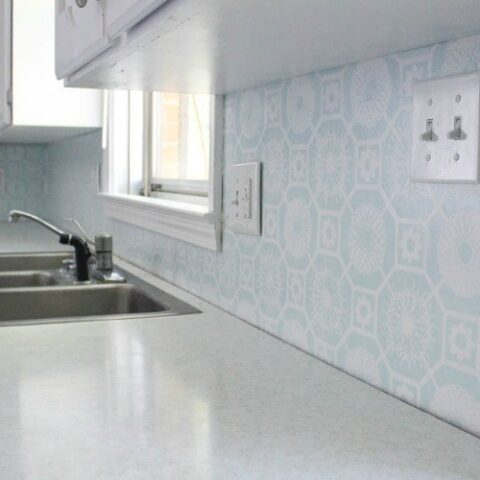
This is such a great stencil for a backsplash. When my family came over, they couldn’t stop talking about how much it looks like real tile and I have to agree.

And even though we still have a long way to go with this budget kitchen makeover (lights, appliances, faucet, etc.), I think it looks pretty darn great.
Just look at the difference a painted backsplash and some fresh outlets made.

Here’s a little sneak peak of the kitchen once the countertops were painted as well. There is still more to do, but this room already looks a million times better.

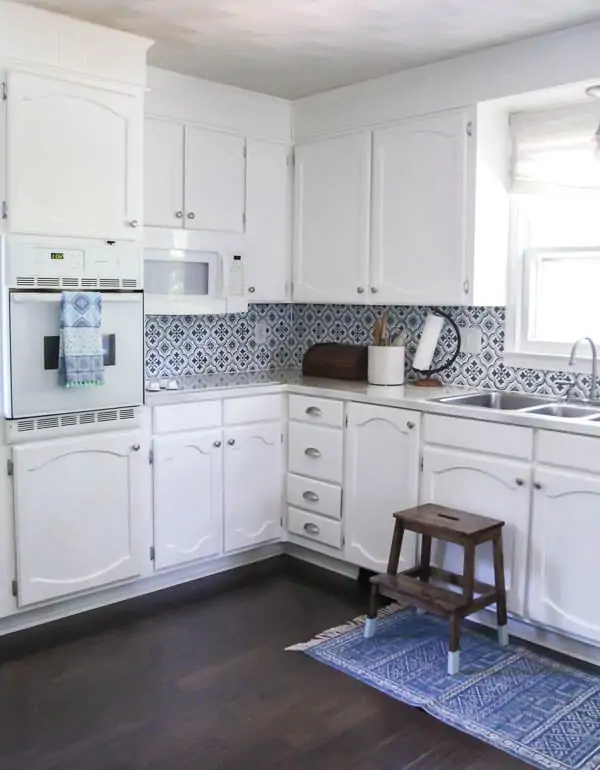
Update: My Painted Backsplash Two Years Later
It’s now been more than two years since I originally painted my backsplash so I thought it would be helpful to share an update on how it has held up and how it looks now.
I actually recently repainted my backsplash, but not because it had any problems.
In fact, I felt very comfortable painting the backsplash a second time because it had help up so well the first time.
As I finished up other projects in our budget kitchen makeover, our kitchen was looking entirely too white.
The white cabinets weren’t going anywhere and I wasn’t about to tackle repainting the countertops, which meant the backsplash needed to change.

I decided to repaint the backsplash in my favorite dark blue shade: Sherwin Williams Blue Mystery. And since I was making changes, I decided to give a new stencil a try as well and used this Santa Ana tile stencil.

And now I love it even more! It adds the perfect contrast to the kitchen.
How has your stenciled backsplash held up?
When I first had the idea to paint our backsplash, I was a little unsure how it would hold up.
Kitchens have backsplashes for a reason – water, food, and grease get splashed onto the wall pretty regularly, especially around the sink and stove.
Luckily, my fears were unfounded. The backsplash has had zero problems. We had our original stenciled backsplash for two years before I repainted it with a darker color.
The day I started repainting, it looked just as bright and fresh as the day I originally stenciled it.
How do you clean your painted backsplash?
Most of the time I simply wipe down the backsplash with a damp paper towel or rag.
Occasionally I do more of a deep clean using the same cleaner I use for our countertops, Method All-Purpose Cleaner.
I have also used Mr. Eraser on a few stubborn stains with no problem. Since I used paint in a semigloss finish, wiping it hasn’t caused any problems.
I hope that helps! I’ve also gathered a bunch of tips for choosing the best backsplash stencil if you are thinking about tackling this project yourself.
And I also have a whole collection of great DIY backsplash ideas if you want more inspiration.
Don’t miss my final Budget Kitchen Makeover Reveal along with these other inexpensive kitchen projects:
- Painting Oak Cabinets White
- Updating hinges with Rub n Buff
- Where to Buy Inexpensive Cabinet Knobs and Pulls
- Painted Countertops: Painting your countertops to look like marble
- 21 of the best budget kitchen makeovers under $1000
I’d love for you to pin this project to Pinterest.


How to Stencil a Backsplash
Create a gorgeous DIY stenciled backsplash that is extremely budget-friendly.
Materials
- Stencil
- Painter’s tape
- Foam paint brush
- Foam Paint roller
- Primer
- Semigloss paint in at least two colors
- Makeup wedge sponges
Tools
- Sandpaper
Instructions
- Lightly sand the entire wall with sandpaper.
- Wipe the wall down to make sure it's clean and dust-free.
- Protect anything touching the backsplash with painter’s tape.
- Paint the base coat using a foam roller.
- Tape your stencil to the wall with painter's tape.
- Load your roller with a light layer of paint. Roll it over some paper towels to remove any excess paint.
- Lightly roll the roller over the stencil until all open spaces are evenly painted.
- Gently pull the stencil off the wall.
- Line up the stencil design with the previous section and repeat.
- Use a small foam brush or makeup wedge sponge to stencil near corners and other hard-to-reach areas.
Recommended Products
As an Amazon Associate and member of other affiliate programs, I earn from qualifying purchases.
-
 Santa Ana Tile Stencil - Cement Tile Stencils - DIY Portuguese Tiles - Reusable Stencils for Home Decor (Small Tile Stencil Size 6x6)
 -
Paint Rollers 4 inch, KUPOO Home Decorator DIY Painting Paint Mini Foam Roller Refill & Woven Roller Covers 1/2" Nap Set of 11 Piece
-
Scotch Painter's Tape 2090-24EVP B006ARJVZM, 0.94" Width, Blue, 6 Pack


This is stunning! I never would have thought to stencil a backsplash, but it’s lovely!
Thank you Linda!
I love this idea! So much easier than tiling!
Thanks Kristin! It definitely is!
That looks fantastic! We’ve been putting off the backsplash because we don’t know how to tile – but this looks awesome and we could do it.
Thanks Stephanie! You could totally do this!
This looks amazing!! I’m in the middle of a backsplash project right now (like seriously, right now. I’m procrastinating by reading your post!), and yours looks a hundred times easier than mine!! Wishing I had gone this route! Shhh… don’t tell my husband I said that!
Haha, thanks Natalie. There were a few tricky spots with the stencil for sure – but it was way quicker than a traditional backsplash!
Oh wow! I never would have thought to stencil a backsplash! Great idea!
Thanks Jenna! A stencil makes a surprisingly great backsplash!
It looks SO GOOD! who needs tile, anyway? :)
Thanks Gretchen – I totally agree!
Good morning Carrie,
What a beautiful turn out. The color is soft and tranquil, the pattern is easy on the eyes, and most of all, the project itself was easy on your bank account… :)
Would you please share, where you found your paper towel holder? It’s the coolest holder I’ve ever seen!!!
Blessings to you,
Rena :)
Thanks so much Rena! I am loving the backsplash too. The paper towel holder is a repurposed globe stand. I found the globe at a yard sale and hung the actual globe part from the ceiling in my son’s nursery. I didn’t need the stand it came with anymore and it just happened to be perfect to hold paper towels. It was a really lucky accident!
OMGosh! You are 1 Gutsy Lady! I would end up with a globby mess under the stencil but you DID explain the process very well. So maybe even I could do something like that – like a border around my craft room.
Thank you Nancy – I definitely think you could do it. Stenciling looks much harder than it is. As long as you don’t overload your brush/roller with paint, you should have great results!
OMG this is so beautiful Carrie. You always bring many creative ideas! I used to visit your site once a day to read only one post (I do the same to other blogs). However, looks like I should spend more time for your blogs since your posts are really inspired!
Thanks Jennifer!
Hi Carrie love your backsplash,it is beautiful.looks like very expensive tiles.
Thank you Mary! I love it too!
I love your site!
Thank you Karen!
Hi! I love the backsplash! I got married 3 years ago and moved into a house with black cabinets. I hate black!! My husband keeps promising that we will work on the kitchen and get new cabinets. (organization is a disaster because no sufficient thought was put into it) But the money is just never there! So I decided that I will paint the cabinets Crisp French Blue and walls an almost white with a hint of pink. I hope it looks good! I am thinking of doing the backsplash like you did yours but with the same blue as the cabinets. I’m think that the backsplash will come out looking like a mosaic tile! Only problem is that I have some texturing on the walls. It’s normal texture that you see on most walls. Do you think that it might work? Also I’m wondering if you did the canning jars that are on your countertop? And how did you do them? I’m in love!
Hi Angela, You sound a lot like me – I get tired of waiting for ‘someday’ and just start doing things myself! Your kitchen colors sound beautiful! The wall texture will make the stenciling more difficult, but wouldn’t be impossible. Our backsplash was smooth drywall so I didn’t have to deal with texture. One possible solution would be to create a backsplash by cutting smooth hardboard to the size of the space between your cabinets and counter and then paint and stencil that. (This is one solution I had considered). You can buy hardboard at Lowes or Home Depot – it’s smooth, thin, and inexpensive. It’s kind of like the old wood paneling from the 70s but without any fake paneling texture.
Oh, and also I did paint the jars. The tutorials are https://www.lovelyetc.com/stamped-mason-jar/ and https://www.lovelyetc.com/aqua-striped-mason-jar/
This really fits my pocket book.I love it.
Thank you!
Carrie, I love the projects you tackle. I have been a believer in painting things other people would not think of for about 25 years. I have painted ceiling fans, sconces, stripes on bathroom walls. stenciled laundry room and bathroom floors. Probably the oddest thing I painted was also my backsplash. I was painting plain beige 3×3 tiles into a multi-colored Spanish tile look when the planes flew into the World Trade Center in 2001. When we sold our house in 2017 it was as fresh and up to date as ever. The new owners were over the moon with the look. It still has not the first scratch or chip in it and probably never will. The key as you know is preparation. First, Grease Relief or Greased Lightning cleaner, followed by an alcohol based cleaner to give it grip and then a good tile paint followed by three coats (with adequate drying time and light sanding between coats) of a clear non-yellowing polyurethane! Thanks for all the inspiration!
Thank you so much for sharing your tips! And it is awesome to hear how well your backsplash lasted for so many years! It sounds like we are definitely kindred spirits when it comes to painting all the things. :)
Can you tell me what size stencils you used? I want to order one, but I don’t know what size to get.
Thanks!
I used a six inch stencil for my backsplash and I think it was the perfect size!
Hello love this doing my kitchen over now and nxt is my backsplash did you seal it after stenciling thanks
Hi! I did not seal it after stenciling. Since it is a backsplash, it really almost never gets touched other than when it needs to be cleaned. And I used semi-gloss paint, so I have been able to wipe it down without any problem. If you use a different paint sheen (like matte or satin), a sealer would probably be a good idea since those paints are not as wipeable. Good luck with your kitchen!
This gives me hope in doing an inexpensive kitchen face lift prior to getting an appraisal! Thank you so much for this! I will take all the pictures and I will send them to you when we are done!
Yes, you definitely can! We had our house appraised a few weeks ago before refinancing and the value had gone up a ton thanks to cheap fixes like this!
Could you show the ends? I’m courious to see how you ended it
Our backsplash ends against a tall cabinet on one side and a doorframe on the other. I know a lot of kitchens don’t have such obvious ending points. I would try to end on a full ’tile’ if possible and if not, end on a half of a ’tile’. That way it will look more similar to a real tile pattern.
I love the stenciling. Going to try on my backsplash. I also love the paper towel holder you have. Could you tell me where you got it? Is so adorable! Thank you!
Thank you! I actually made the paper towel holder from an old globe stand I found at a yard sale. I think it would be a best seller if someone starting making and selling them but so far I haven’t seen any for sale. But you could always look for an old globe on Facebook marketplace to upcycle!
I actually just bought these exact stencils and am so excited to start my project! I was wondering what kind of paint you used? I’m painting over the laminate and keep reading different recommendations- some say to use latex paint, some say you have to use oil based paint, and some say to use acrylic. I’m so lost!
There isn’t necessarily a right and wrong paint to use. I used oil based primer and latex paint. This is my favorite combo for painting anything with a slick surface that paint might not stick to well. Oil based primer will stick to anything and you can use any type of paint over it – oil, latex, or acrylic.
For our kitchen redo will start with painting the factory cupboards and switching out the handles and pulls. Painting walls where needed, vinyl flooring over ceramic tiles and possible replace the counter top. The last issue which may not be one as we change the other pieces is the ceramic tile that is under upper cabinets, blacksplash, behind the fridge and stove. The tiles are grey with dark grout. if we need too how difficult is it to repaint and how durable will these painted tiles will be around high traffic areas like the backsplash. Best steps you would recommend for this project would be great. Love what you do
Thanks! I haven’t painted a tile backsplash before but I know many people have including my parents. Painting the tile shouldn’t be difficult. I would clean the tiles really well and then primer with Zinsser oil-based primer. This is the primer I always use for priming anything slick. Then follow that with paint. If you are working in an area that gets a lot of use, you can follow up with a sealer to help the paint adhere well. I found a blog post from a site I trust if you want more step-by-step instructions – https://designertrapped.com/painting-tile-backsplash/ The only thing I would do differently from their instructions is using the oil-based primer as opposed to a water-based one. Good luck!
I am absolutely so inspired by this stenciled backsplash! Wondering what type of paint or primer should be used if I have a laminate backsplash. The previous owners did the same ugly white with yellow specks laminate counter for the backsplash as well. Should I try to remove the backsplash or can I paint over it?
You can remove the backsplash first, but you can also just paint over it. I was originally going to paint my laminate backsplash but it had other issues so I removed it and painted the wall instead. But I have painted the matching laminate countertops, so painting laminate definitely works. I would start with Zinsser oil-based primer. It sticks to absolutely anything, but it is oil-based so you will need to use mineral spirits or paint thinner to clean your brushes. Once the primer is dried, you can use either oil-based paint or water-based paint over it. I prefer using latex paint (water-based) because it is easier to clean up. It’s also a good idea to use semigloss paint for easy cleaning. Good luck!
I love your kitchen! Okay I have searched EVERYWHERE looking for the answer to this and I’m hoping you can help!
That metal piece that connects the counter to the backsplash, how did you remove it?!
Or what did you do?
It has been a few years since I did this project so it’s hard to remember exact details of how I removed it. I removed the laminate backsplash itself with a crowbar and I remember that was a tough job. From what I remember, once I had the backsplash out, removing the metal wasn’t hard at all. I think some of it even came off with the backsplash. I’m sorry I don’t have more details!
Hi Carrie,
I also have an old kitchen with laminate countertops and laminate backsplash. I noticed you had a metal stripping that went between the countertop and the backsplash. Did you remove that silver stripping when you redid the backsplash and the countertop? I want to remove mine and wasn’t sure if I could or if there would be too much of a gap between the counter and the backsplash if I removed it. If you did, how did you fill the gap? Thanks in advance. It will be very helpful to know.
Hi Leah, I ended up removing our laminate backsplash and painting the drywall underneath. The old laminate was very thick and was causing the outlets and window frame to be too recessed. If it hadn’t been so thick, I would have left it and just painted it. The metal trim came off when I pulled the laminate backsplash off. It’s been a few years, so I can’t remember all the details and I’m not sure if it could be removed easily without removing the backsplash. I did end up with a gap between the counter and wall after removing it and filled it with caulk.
Just saw this!
Thank you!
Wow, Carrie. Wish I had come across this much sooner. I just purchased expensive tiles:( And still need to purchase all the other necessary items to go with it. Sadly, the tiles are not returnable. Will love to use this idea on the bathroom walls though. Thanks for sharing! Gorgeous color on your backsplash.
I’m so glad you found it helpful!
Love this tutorial! We literally have this exact countertop and backsplash, even the metal trim. Do you recall how you removed the backsplash?
Thank you! I removed the backsplash using a crowbar. From what I remember, it took quite a bit of effort, but I was able to do it on my own. I removed the smaller side first and then the long back piece.
Love your idea of painting with stencils but how did you keep from smudging the previous tile when doing the next one? Did you have to wait and let in dry between each application?
Good question. I did wait a minute or two before stenciling immediately next to a spot I had just stenciled so it wouldn’t smudge. But I started in a corner and worked over and up from there so I was able to get a couple of rows going at once. Then I could stencil the next tile on the second row while the first row was drying and visa versa.
Your makeovers are extremely impressive! I’ve read this one several times and you’ve just about convinced me that I could tackle this project. I have a couple questions about the paint. Would a high gloss paint work? I only ask because The area behind the stove gets greasy and I would sure hate to wash off any of my stenciling. What if I used something like chalk paint, is there something I could put over it to protect it? I don’t have a lot of experience with painting. I discovered this cool product and think I will paint the stencils on it and then stick them to the wall. https://www.royaldesignstudio.com/products/paint-peel-stick-canvas
That peel and stick canvas looks very cool and would be perfect for this! I used a semigloss paint for my stencil and recommend that over high gloss. Semigloss is still very wipeable and I have cleaned my backsplash many times without wiping off any of the paint. And it is also more resistant to smudging as you are painting which is important for stenciling. If you use a chalk paint, you could seal it with a water based sealer like Minwax polycrylic or General finishes high performance top coat. I wouldn’t use wax on a backsplash. Good luck!
This turned out so good! I really like the look of the backsplash. I am going to attempt this after we do some kitchen cabinet painting. Thanks for sharing!!!
Thank you! Good luck with your kitchen!