How to Update Hinges With Rub n Buff
When your cabinet hinges need an update, rub n buff is a quick and easy way to get a totally new look.
Last week I shared my freshly painted kitchen cabinets. They’ve been nice and white for a few weeks now and I am still blown away with how much brighter and more up-to-date the whole room looks.
Today I’m back to share the second (much faster and easier) phase of updating the cabinets: updating the hinges.
At one point I considered trying to revamp the cabinets with more modern hidden hinges, but after some research, I realized that can get pretty expensive and it isn’t even possible for all cabinet styles.
So instead, I started making a plan to update the older-style hinges we already had in our kitchen.
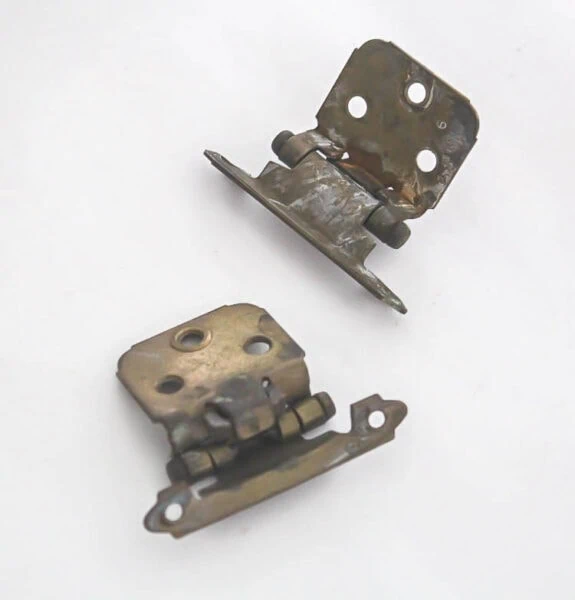
My hinges started out with an aged brass finish. And not a beautiful antique brass, but more like brass that had been soaking up kitchen grease for 40 years.
Not exactly what I wanted to use on my freshly painted white cabinets.
This post contains affiliate links which means if you make a purchase after clicking a link I will earn a small commission but it won’t cost you a penny more. Click here to see my full disclosure policy.
How to Update Hinges with Rub n Buff
I had already chosen polished nickel hardware for my cabinets, so my hinges needed to coordinate. I decided to use Rub n Buff to give them a much-needed update.
If you don’t know, Rub n Buff is a fantastic metallic paste you can use to give almost anything a metal finish. I chose it because it is so easy to use and gives a lasting finish.

The first step was cleaning all of the greasy build-ups off of those hinges.
I soaked the hinges and screws in a mixture of hot water and Dawn dish soap and then used an old toothbrush to scrub them.

Then I put a small amount of silver leaf Rub n Buff on my finger and rubbed it all over the hinge. I used a q-tip to help get into all the little crevices.
I found that it worked best to start with the hinge open, covering all of the surfaces, and then once that was dry, close the hinge and finish the parts that weren’t originally showing.
Once the Rub n Buff had dried thoroughly, I used an old t-shirt to gently buff the finish. This is what gives it a shine like real metal.
My hinges have visible screws, so I made sure to also give this same treatment to all of the tops of the screws.


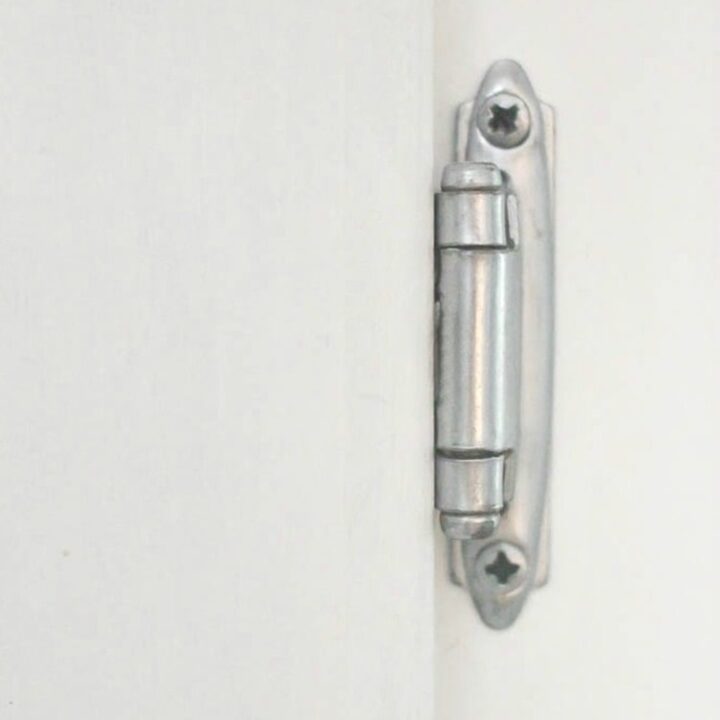
They look great on the cabinets. The hinges fade into the background instead of standing out, which is exactly what I wanted.

If you look very closely, you can see that the hinges are not exactly the same color as the pulls and knobs.
But they aren’t right next to each other and it isn’t something anyone would notice unless they were specifically looking for something to criticize. (And I don’t want that kind of person at my house anyway!)
Such a difference!
Hinges are such a tiny detail but it really is the details that make a room. (And there are more details in a kitchen than I ever realized before!)
I’d love for you to pin this post on Pinterest!

More Budget Kitchen Makeover Inspiration
Be sure to head over and see our final kitchen makeover reveal. We transformed our entire kitchen on a tiny budget with painted cabinets, painted countertops, a stenciled backsplash, and lots of other budget DIYs.
More budget kitchen DIY projects to check out:
- 15 Amazing ways to redo kitchen cabinets
- 21 of the Best Budget Kitchen Makeovers under $1000
- Stenciled Kitchen Backsplash
- Painted Countertops: How to paint your countertops to look like marble
- Where to buy inexpensive cabinet knobs and pulls
Updating Hinges With Rub n Buff
See how easy it is to update old cabinet hinges using rub n buff.
Materials
- Rub n Buff
- Dawn Dish Soap
- Old Toothbrush
- Old T-Shirt
Instructions
- Soak the hinges and screws in a mixture of hot water and Dawn dish soap.
- Use an old toothbrush to scrub them.
- Put a small amount of silver leaf Rub n Buff on your finger and rub it all over the hinges and screws.
- Use a q-tip to help get in the little crevices.
- Use an old t-shirt to gently buff the finish.
Recommended Products
As an Amazon Associate and member of other affiliate programs, I earn from qualifying purchases.


What a fantastic result,I live in Europe and was wondering if you have a name of a product similar to rub and buff.Thank you
Thanks Mary. That is a good question. There is another similar product from DecoArt called Metallic Lustre but I am not sure if it is available in Europe either. (Also, I haven’t used it so I can’t say for sure if I would recommend it.) Also, it isn’t exactly the same but silver spray paint can also work. After cleaning the hinges, spray them with spray primer and then follow up with a spray paint in the metallic finish you want.
Love the budget re-do’s! Can you tell me whether or not the Rub ‘n Buff has lasted – I was looking at it on Amazon and several say they cannot buff it to a shine, and that it comes off easily.
What has been your experience as time passes and how did you get it to shine (does that come with the amount of the product you put on?)
Thanks for all your ideas!
Linda, great questions! I have only had my rub n buffed hinges in use for a few weeks so far so I can’t say much for long term use yet. I can say that I haven’t had a problem with it rubbing off, but I did have to be really careful hanging my cabinet doors because I noticed that it did rub off on the white paint if I wasn’t careful. (The few spots where that happened, I just touched up the white paint.) I also didn’t have a problem getting it to shine – but I was going for a brushed nickel look which isn’t super shiny. I don’t know that you could get it shiny enough to be a chrome looking finish. Overall I have been really happy with it but I will be sure to share an update after more time passes.
Did you do the rub n buff on the screws before or after mounting?
Great question. I did my screws before attaching them but then I needed to touch them up again afterwards. It might be easier to just do them before, but then again, once they are already installed, I think it would be difficult to keep from getting the rub n buff on the actual cabinets.
Hi Carrie. On my cupboards I have a “plate” that is attached to the handle that has a decorative design on them. I am not redoing the cabinets, so if I try to get new handles I’m afraid there will be an outline of where the plate was. What is your opinion on how the rub n buff would hold up on handles?
Hi Angie, I think that over time the rub n buff would rub off of the hardware from repeated touching. My hinges still look good two years later, but I can still see places where the finish is starting to rub off and the hinges are almost never touched. I do think that you could update your hardware with a good spray paint though. Just be sure to clean them thoroughly and use a spray primer followed by spray paint. I have update furniture hardware this way that is still going strong almost 10 years later. Good luck!
How have they held up?
They have held up okay, but not perfectly. It has been almost four years since I originally updated these and there is definitely some wear showing and spots where the original hinge color is showing through a bit. If I were doing this project again, I would use a metallic spray paint rather than the rub n buff. I think a spray paint would give a more durable finish in the long run.
I’m so glad I stumbled upon this article! I was about to stick with black on my kitchen hardware because gold hinges were too expensive!
Then I found this! Thank you for sharing! :) Looks great!
I’m so glad it helped!