How to Make a Stunning DIY Plank Wall
Well, friends, our ugly foyer is well on its way to being gorgeous! And it’s all thanks to our DIY plank wall.
I know white shiplap is all the rage these days thanks to Fixer Upper.
I love the look of a fresh white wall too, but what I really wanted was the look of a gorgeous reclaimed wood wall – without the stress of finding and dealing with actual reclaimed wood!
And this painted plank wall definitely fits the bill.

Even better I was able to complete this painted plank wall for less than $50!
To keep costs down, I used 1/4″ plywood to make my planks.
I read a lot of tips about saving money by using masonite, but I knew I wanted to incorporate some wood grain into my plank wall so masonite wasn’t a good choice for me.
This post contains affiliate links – you get to buy cool stuff you want and support Lovely Etc. at the same time. See my full disclosure here.
Materials
- 1/4 inch plywood
- finishing nails
- General Finishes paint in snow white
, seagull gray
, driftwood
, and patina green
- Minwax golden oak stain
- Paint brush (chip brushes work great for this project)
How to Make a Wood Plank Wall
For my entry wall, I needed two 4’x8’ sheets of 1/4 inch plywood. I had my plywood cut into strips at Lowes – 8 six-inch strips, 4 eight-inch strips, and 4 four-inch strips.
I am so glad I had my planks cut in the store – even with their huge cutting machine, it took a while to make all of those long cuts. (Plus, even better, they did the cuts for free.)
Once your planks are cut, the next step is to paint. For a unique look like this, it is so much easier to paint each plank before installing them.
My plank wall is a fairly small entry wall – it is only eight feet wide from the closet door to the corner.
Since the plywood is eight feet long, I simply did one plank per row.
If you are planking a longer wall, you will need more than one strip of wood in each row.
You can either paint all the wood in each row the same for a striped look like my wall or mix up the finishes for a more eclectic look.
I knew I wanted a textured, weathered finish to give the feel of reclaimed wood and my go-to technique for this is dry-brushing.
Dry-brushing is incredibly simple. Chip brushes are ideal for this, but you can use any paintbrush.
Put a very small amount of paint on your brush and then wipe as much off on the lip of the paint can as possible.
To remove even more paint, you can wipe your brush on a paper towel several times.
Basically, you want your brush as dry as possible while still having some paint on it.
Then lightly brush your paint across your board.
I’ve gotten a ton of questions about how exactly to do this so I put together a quick video that makes it easy to understand.
Video Tutorial for Weathered Wood Paint Finish
General Finishes provided me some of their milk paint to try out for this project and I ended up using four of their colors: snow white, seagull gray
, driftwood
, and patina green.
I love General Finishes paint (and that patina green is amazing), but you can also get this look with almost any paint.
A paint with a matte finish will work best, so you could use chalk paint or even acrylic craft paints from a craft store.
In the video, I used Americana Decor Chalky Finish paint in everlasting (white), yesteryear (light gray), relic (dark gray), and treasure (turquoise).
I also used a bit of stain on some of my boards before painting to highlight the wood grain.
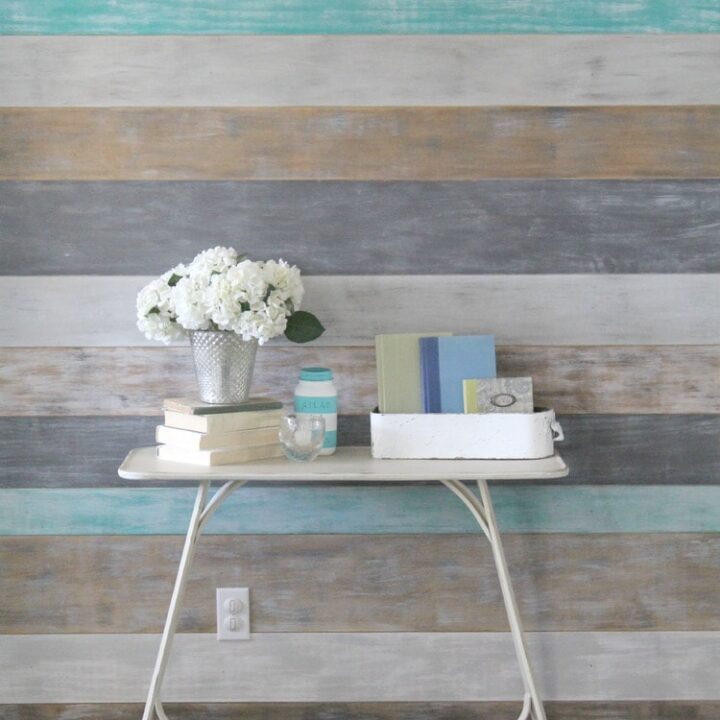
Check out all the different finishes I was able to get using only four colors of paint!

Once everything was painted, it was time to install the wall.
Let me say right now, that I do not have a nail gun. You can totally install a plank wall using an old-fashioned hammer and nails.
My husband and I worked together and we were able to get the whole thing installed in just a couple of hours.
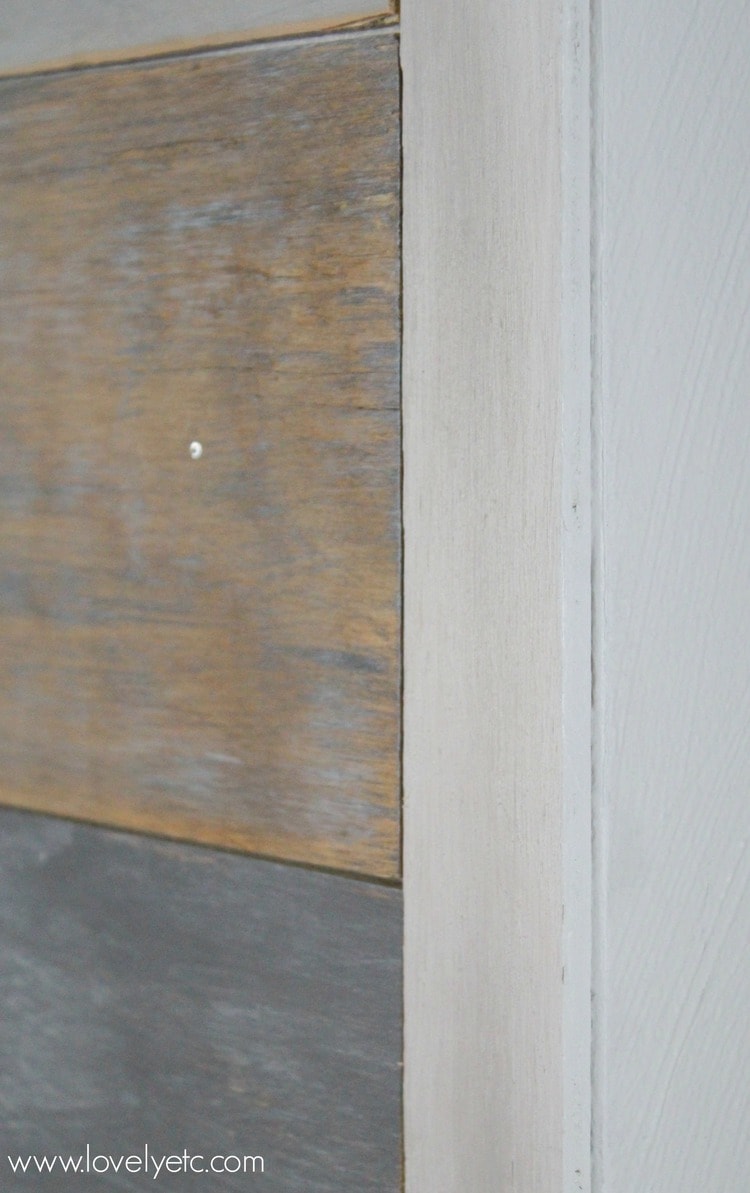
I started out by cutting one of my four-inch strips in half to make 2 two-inch strips.
I used these as a sort of molding along the edges of the plank wall.
Then I used a stud finder to mark where the studs are in the wall.
I used a jigsaw to trim my boards to the right length while Mitch hung the boards.
You can use pretty much any kind of saw for these short straight cuts, or if you plan ahead well, you can have them cut to the correct length when you are at the store.
Because the plywood is so light, the planks were quite easy to hang.
We simply nailed them up with a finishing nail in each stud. (This worked out to three nails per board.)
This way, it is possible for us to remove the planks if we decide to change things up or put the house on the market in the future.
As we were hanging the planks, we used a few pennies between each board to keep the spacing between boards even.
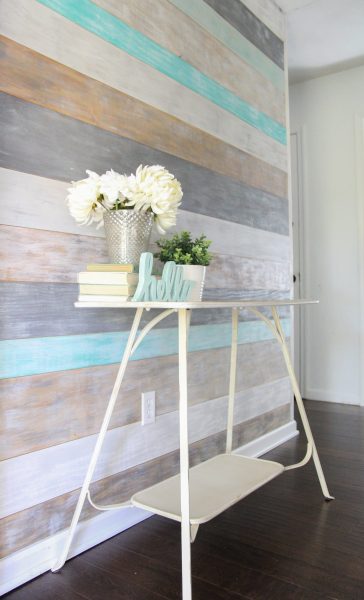
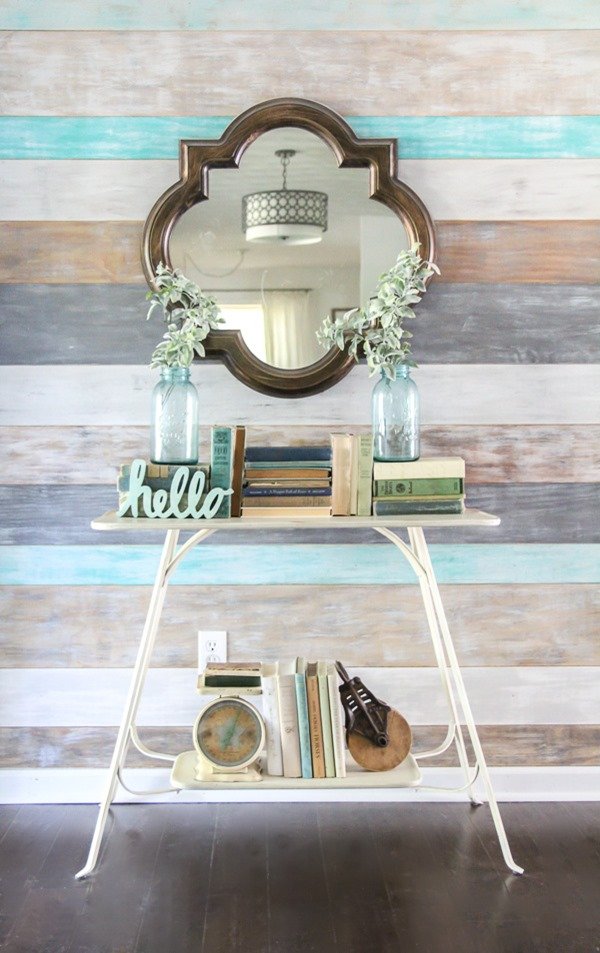
This wall seriously looks gorgeous no matter how you decorate it. Below is a picture of how it currently looks – swoon!
This is such a doable project for any DIYer, even if you are a beginner. It is inexpensive.
You don’t need fancy tools. You don’t need to find special reclaimed wood. And you don’t really need any special skills.
How to Make a Stunning DIY Plank Wall
Create the look of a gorgeous reclaimed wood wall – without the stress of finding and dealing with actual reclaimed wood!
Materials
- 2 1/4 inch plywood cut in 8 6" strips, 4 8" strips and 4 4" strips.
- General Finishes paint - snow white, seagull gray, driftwood, and patina green
- Minwax golden oak stain
Tools
- Chip brushes
- Hammer
- Finishing nails
- Jigsaw
- Stud Finder
Instructions
- Use a chip brush to paint each strip the color you want using a dry brush technique.
- I used 4 colors: Snow White, Seagull Gray, Driftwood, Patina Green
- Cut one of the four inch strips in half to make 2 two inch strips to use as molding.
- Use a stud finder to mark where the studs are.
- Hang each board using a hammer and finishing nails in each stud.
- Use a jigsaw to trim any boards as needed.
Want to see more inexpensive wood projects? Here are a few of my favorites:
- 23 Stunning DIY Wood Accent Walls for your Home
- How to DIY a Herringbone Wood Wall on a Budget
- Beachy Sunburst Mirror (This one is made from scraps of wood left over from my plank wall!)

gorgeous! i love the colors, love the finishes! pinning!
Thanks Cassie!
Hi. I am very interested in doing this plank wall in my den. What paint finish did you use? Would a satin finish be okay for this? How did you place your boards by inches, in what order?
Hi Krystal, I used General Finishes milk paints which all come in one finish but any paints will work. I think satin would work great – just nothing with too high a sheen since this is a more weathered look. As far as the size and order, I just had my plywood cut into planks ranging from four to eight inches wide and then once they were painted, laid them out on the floor varying the widths and colors until I liked the layout. Then we nailed them up. We had to trim down the very last piece to make it fit perfectly but that was no big deal.
Could you also stain some of the wood?
Yes, definitely! I stained a few pieces and dry brushed some paint over the stain, but you could also mix together stained pieces and painted pieces.
Hi there. Absolutely love this and doing it for my nursery. However the milk paint you suggested is not available in canada.
I found this brand. In your expert opinion is it the same?
http://www.oneartsymama.com/2016/05/childs-rocking-chair-with-folkart-milk-paint.html
It is from Michaels
It isn’t the same but it should work just fine for this. This will work beautifully in a nursery!
Wow . . . you rocked this one! It looks amazing and you should feel great about going bold!
Thanks Dee! I am so glad I went for it.
I want this is in our beach themed guest room! This is gorgeous! Thanks so much for sharing. I enjoy your blog so very much.
Thanks so much Debbie! This definitely turned out beachy – which is great for me. The beach is definitely my happy place.
This looks amazing! Love it!
Thanks Ashley!
This turned out fantastic. Congrats on being BOLD. I hope to be bold in my new house.
Thanks Kathleen! So far being bold is really paying off. Here’s to keeping it up!
Carrie, it is AMAZING. Wow! I need to find a wall where I can do this in my house. Your foyer may now be one of my favorite rooms in your house. Well done!!!!
Thanks Tasha! I am so happy with how it turned out. :)
Carrie,
It looks AWESOME! You might have just convinced me to finally do one in our house. I’ve been wanting to do one for a while but the task seemed so great…now it sounds totally doable! :-)
thanks!
~Sarah
Thanks Sarah! You can definitely do it! It isn’t nearly so hard or complicated as I thought it would be.
Well done, Carrie!! Wow, it looks fabulous! No more boring entryway for you!
Thanks Chaney! It is definitely well on its way to awesomeness.
Whoa!!!! Sooo pretty, Carrie! That wall is fabulous, and the colors all look awesome together! Well done!!!
Thanks so much April!
Gorgeous! I LOVE your new wall! I want one of these so badly :) Thanks so much for the detailed tutorial with the finishes you used. Pinned!
Thanks Angela! Doing the different finishes was definitely my favorite part!
LOVE LOVE LOVE it Carrie! The drybrushing and colors are perfect- it has so much character and texture and I bet you are giving yourself a thousand high-fives right now for stepping out of the box and DOING it – it looks so amazing!!
Thanks Krista – you are right, I am so happy I went for it. I love how it turned out!
Wow! This is truly beautiful! I love that you also included the colors you went with the create the wall. I’m with Tasha, I want to find a wall in my house to do this, too. I would love it if you linked this up to the Thursday S.T.Y.L.E. link party I cohost. It starts at 6:00 p.m. MST Thursday night!
Thanks Katie!
WOW!!! That’s all I can say. You and hubby totally “nailed” it :). If and when you put your house on the market, LEAVE THE WALL. Someone will thank you.
Thanks Barbara!
Girl, you totally hit it out of the park with this one! SO gorgeous! I love how you painted each of the boards differently, and like you, I especially LOVE the aqua ones! Thank you so much for inspiring us all to be BOLD, Carrie! I need more of that in my life! Have a wonderful weekend!
~Abby =)
Thanks Abby! I am so happy I decided to go for it and not settle for the same old thing. I definitely want to keep up the boldness after this challenge.
This is fantastic! My husband and I were just daydreaming about doing something similar in our home. You have inspired me.
Thanks Carmody! I hope you go for it!
I am in LOVE! You are so awesome!
:) Linda
Thanks Linda. :)
This is amazing! I love the variety of colors. We are planning to add a few barn wood walls to our barn renovation and I’d love to add a little color now. Amazing job.
Thanks Kim! I wasn’t sure about some of the brighter colored pieces but I am so glad I included them.
How awesome! This looks absolutely amazing!
Thanks Heather!
Looks fantastic!!
Thanks Michelle!
I’m so glad you went bold! It is incredible, like a designer beach house!
And Carrie, when I found your blog the other day I did a bunch of reading on your money saving posts and have been thinking about them ever since!
Thanks Jen! I hope they help – I am all about saving money these days.
OMG, I love this so much. The colors, the finishes, oh my. AND, :), your blog logo is the coolest thing EVER. That’s all. I’m your newest fan. :)
Thanks Kimm! I am pretty in love with it myself! And my awesomely talented brother designed my blog logo – lucky for me to have a graphic designer in the family!
Amazing!! You DID go bold!
Thanks!
Adore your plank wall!! I’ve been wanting to do one in our barstool area. Love that you added bold colors. You’re making me rethink my plans ;) I’m featuring your wall in this week’s PoPP Spotlight.
Thanks so much!
Beautiful! You should be very proud of your bold project!
Thank you Korrie! I am so happy I went bold with it – definitely need to do that more often!
GORGEOUS!! I want a plank wall :)
Thanks! I think everyone deserves a plank wall!
Beautiful project. You did a wonderful job. I found you via Pinterest and am glad I did. I’ll re-pin it as more people need to check out your beautiful wall. I can do everything you listed except for a jigsaw. I’m thinking even if I got most of it up myself, I could get someone else to help me with the finishing touches.
Love it!
Thank you so much Dana! And you can definitely get this up without a jigsaw. Any saw would work since you are just cutting straight lines. And if you are really organized you can get your planks cut to the right length at the store when you buy your plywood.
This is so amazing! I love all the colors you used! What a great impact!
Thank you Kathy! I love how the colors turned out too.
WOW Carrie, this is really striking! The colors are just beautiful. Well done!! I’m super excited to take a peek around your blog :)
Thanks Chelsea! I am glad you stopped by!
This is so cute and creative! I really love the colors. I am pinning to my Future Home board so that I can remember to do this when I get a new house.
Thanks Jenna!
Stopping in to pin, surely you know how beautiful that plank wall is!!!
Thanks!
Wow, I love this and just pinned it! Incredibly beautiful… I really want to try it now. We are competing in the contest together lol…but your work is seriously amazing, I wouldn’t doubt if you were picked. Just had to let you know that I love your style. New follower! Thanks for sharing, Christina at Dear Beautiful You
Thanks Christina! I have to say there are so many gorgeous projects linked to the contest, I already feel like I don’t have a chance! But I can’t wait to check out everyone’s fantastic blogs! Will definitely come by and visit!
Wow! This is great !Love the colors.Well done!Pinning:-)
Thanks!
This turned out just plain awesome!! Way to go big!
Thanks Dacia! It makes me itch to go big and bold more often!
How freaking amazing! I so love how you allowed yourself the opportunity to step out and BE BOLD!
Thanks Gwen! I am so happy I went bold – definitely need to make it a regular thing!
This is beautiful!! I love the bits of turquoise – my favorite colour :)
I just moved to a lakehouse with a cute little guesthouse that is in serious need of a makeover. I’d love to do something like this to the dated oaky planks that are currently there. Thanks for the inspiration! Your website truly is lovely.
Thanks Tanya, that sounds like an amazing idea! How fun to have a little guesthouse to make over!
Wow, LOVE this! Pinning! The colors are just so pretty!
Thanks! I am so happy with how this wall turned out – it makes me feel happier everytime I walk in the front door.
Love, Love, Love this! Pinned! Love the colors that you chose. absolutely amazing!
Thanks Tara!
Carrie, I am inspired…have been since you first posted this, way back when you completed it.
I was cheating on you (…:\ ..).
My daughter showed me another plank board/pallet board idea, and I’m going to do one of my kitchen walls.
All of you girls have such inventive and creative ideas.
Thanx….
Lezlie
Thanks! Don’t worry about cheating – we don’t have to be exclusive. ;) I’m glad you are inspired and hope your plank wall turns out wonderfully!
Hi Great Wall. How high and long was your wall. I think my wall may be bigger and I want to know if I should still attempt the DIY. Thanks~Heather
It me again…where did you get the paint?
Heather
You can buy general finishes paint from various retailers. You can find one near you with this link: http://generalfinishes.com/where-buy
My wall was roughly 8 feet high and 10 feet long. Hope that helps!
Love how this turned out! The colors you chose are absolutely perfect.
-Shonee
http://www.hawthorneandmain.com
Thanks so much Shonee! I think this wall might be my favorite project in our whole house – it is just so happy!
I love how this looks, I want to use the same colors you did! One question…on each board you used two colors, did you use the first color and completely paint the board, then dry brush with the second color? I’m trying to get an idea how thick the first coat of paint was.
Pam, thanks so much! Yes, I painted one coat of the base color – not especially thick, just a normal coat of paint. Then I lightly dry brushed over that first coat. I would definitely recommend practicing your dry brushing on a scrap piece of wood to get a feel for how thick you want to paint it on.
This is so beautiful! I want to do it for an accent wall. Could those paints be bought at my local Lowe’s or are they a special company? Thanks for the help!
Tia, You can’t buy these paints at Lowes but you can find a local retailer at this website: http://generalfinishes.com/where-buy#.VCtMRRZMiSo or you can buy them online. Good luck with your wall!
I know you said you used 1/4 plywood, but what type, there seems to be many choices and different grades when I go to the store. Love the colors!! Going to attempt this on one wall in my dinning room. I have used the general finishes gel stain in java color, and so far love it, I re did my kitchen cabinets with it. So can’t wait to try the milk paint.
oh did you sand the plywood at all before you painted?
Nope, I left it rustic!
Thanks Julia! I just used very basic 1/4 inch plywood. I don’t remember exactly what it was called but it was not super, super rough. It was around $20 for one large sheet. Sorry I can’t be more specific – I basically just chose one that was somewhat smooth and still affordable!
Did you use more than one pint of each color?
No, I only used one pint of each color and had tons and tons left over.
Oh wow, that turned out gorgeous! Such a great way to spice up a small space. :)
How do you dry brush the two colors to get your end result? Do you dry brush one color, let it completely dry, and then dry brush the second color?
Pretty much. Brush on one color and let it dry – it will dry very quickly. I just painted this first coat on regularly but not super thick. When you brush on the second color, wipe most of the paint off your brush and then wipe any excess on a paper towel. When your brush has just a hint of paint left, brush it over the board.
Carrie,
This is amazing!! My mom is helping me do this in our entry way this weekend! Quick question, how did you lay the pennies in for spacing? If you lay them flat between the boards wouldn’t they stick out past the thickness of the board?
Thanks–I’m so excited for the finished project!!
Bailey – how exiting! Good luck with your wall! We just slid the pennies between the boards as we were nailing them up. They did stick out but that was fine because once the next board was nailed up, we removed them.
Great job! Was wondering what brand of paint you used?
I used General Finishes paint and loved it. https://generalfinishes.com/
Love! What color was the wall behind the planks? Did the color show through? I read on a few other blogs and they mentioned having to paint the inside of boards. Would that be eliminated by using pennies instead of some other spacer? Thanks so much!!
Thanks Cori! The wall was white behind the planks and I haven’t examined it closely but I’ve never noticed it showing through at all. Though if it was a bold color, it might. I didn’t paint the inside of the boards and they really are close enough together that it really doesn’t matter. It might also help that I used pretty thin wood – I believe it is 1/4 inch thick – so there isn’t a whole lot of ‘inside’ to show through.
wait… so just paint the tops? leaving the edges is fine?
Yes, the edges won’t show, so leaving them bare is fine!
This looks wonderful!! I love it. How did you do the sides or trim area leading to the next wall? Can you post a picture of this? Thanks!
Thanks Mindi. I used one thin strip of the plywood – about two inches wide. I painted it one of the more neutral colors from the wall and used it like a piece of trim along the edge. I will add a picture to the post above to help make that part more clear.
We are copying your wall in our entry and have a technical question…when you say you used “a bit of stain” first–what do you mean?
Olivia, I used a rag (an old tshirt) to rub on stain onto the wood. I rubbed a thin layer of stain across the whole board but did not worry about getting great coverage the way I would if I were staining a piece of furniture. So if the stain was lighter in some areas or if I missed a few areas, I didn’t worry about it. I hope that helps and good luck with your wall!
did you add the stain BEFORE painting? to all the boards?
Yes, I stained the boards before painting, but only the ones where stain is indicated in the picture. A lot of the boards are just two colors of paint. Hope that helps!