How to make a personalized photo map
This personalized photo map is my absolute favorite kind of project. It’s beautiful, fun to make, and it celebrates one of my family’s favorite things: a good old-fashioned road trip!
I shared once before that my husband and I have a goal to visit every national park in the US; I would also really love to eventually visit every state.
I’m not big on collecting souvenirs on vacation – usually, they just end up adding to the clutter.
But I absolutely love to take photos to remember our trips and I am always looking for new ways to display vacation photos and celebrate our favorite memories once we are home.
A few years ago I came across this photo map at Cut, Craft, Create blog and I immediately knew I wanted to create my own version.
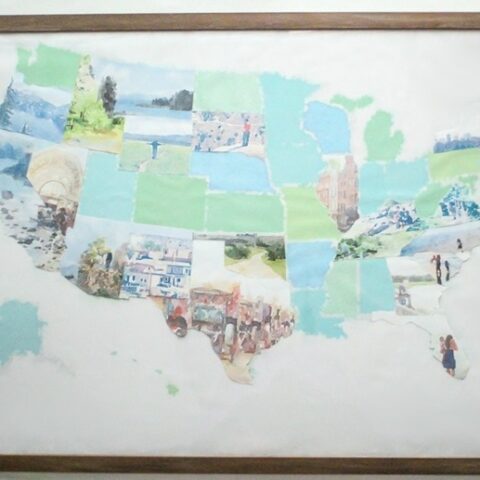
The basic idea is to make a map using photos of yourself in every state.
As you continue to travel to more places, you can add more photos until the whole map is filled.
I tried to make my own photo map last summer but I really didn’t like how it was coming together.
As soon as I put more than one or two photos near each other on the map, it started to look cluttered and chaotic.
So I started thinking of ways to make a travel photo map that would look more like an actual piece of art.
I wanted it to look good when it was only half-filled with photos and I also wanted it to look just as good once it was completely filled.
I finally came up with a plan and it worked beautifully!

Materials for Photo Map
- photos from your travels
- Waterlogue app
- large color printout of U.S. map
- large black and white printout of U.S. map
- scissors, tape, pencil
- frame
How to Make a Personalized Photo Map
Making your own photo map is pretty simple; it only requires a few supplies and is very inexpensive.
First, is the map itself. After a bit of experimenting, I decided I wanted my map to look a bit more artsy than your typical classroom wall map.
So I designed my own U.S. map in blues and greens with a painted feel to it.
I printed it as a 24” x 36” engineer print from Staples. (Did you know you can engineer prints in color too? My 24” x 36” color print was less than $6. The downside of this printing method is the paper is very thin so it does wrinkle much more easily than I would like.)
I also printed a plain outline of the United States in the same size to help with tracing the state shapes for my photo cut outs.
And in case you want to make your own versions, I am sharing both maps.
Download your copy of the blue and green painted map here.
Download your copy of the black and white outline map here.

Then it was time for my favorite part: choosing the photos. I love looking through old photos so this part was really fun.
I kept a few things in mind when choosing photos. I want my map to display our favorite family memories in each state, but I also want it to show the beauty of our country.
So instead of choosing close-up photos of us, I chose photos that show the beauty of the places we have visited – gorgeous lakes, city skylines, pretty beaches.
And whenever possible, I chose photos that showed us in the scene as well – my husband walking through a meadow or me and my sons dancing on the beach.

I found that putting a lot of photos right next to each other looked really chaotic and made it hard to know where to rest your eyes.
So I decided to soften the whole thing and turn it into more of a piece of art.
I did this by using the Waterlogue app to give each photo the look of a watercolor painting. (The waterlogue app is an app for iPhones and iPads. All you do is upload a photo and the app transforms it into a watercolor.)
This is so easy to do and is a bit addicting. Not every photo turned out great, but most of them looked amazing.
I printed all of my watercolor photos and then cut them into the shapes of the states they’re meant to represent.
The blank U.S. outline map I printed made this really easy. If your photos are light enough, you can simply trace the state shape onto your photo and then cut it out.

I found that some photos with darker colors were too hard to see through and I wasn’t able to trace them.
In those cases, I used this simple pencil transfer trick. Color the area on the back of the map outline with a pencil.
Place your photo behind the map and then trace around the edges of the state with a pencil or other sharp object.
The outline will be transferred to the photo beneath and you can then cut along the lines.

Then all that’s left is attaching your photos to the map. I chose to use tape to attach mine because I want to be able to switch photos out later as we travel more.


A simple poster frame finished it off.


I absolutely love this map. I’m really not sure my pictures do it justice, in person, it is just so pretty.
I love looking at it and seeing where we’ve been and dreaming about all the places we have yet to go.
And I’m so excited to fill the entire map up one day and have a gorgeous watercolor map of the United States.
And for those of you who’d rather buy than DIY, here are a few other personalized map options that are pretty cool
In case you missed them, here are some other posts I think you’re going to love:
- 7 Beautiful and Creative Ways to Display Vacation Photos
- DIY Photo Canvas that Looks Exactly Like the Real Thing
- Beautiful and Meaningful DIY Map Art

How to make a personalized photo map
Make your own DIY personalized photo map using your favorite photos from family trips. It's a great way to display vacation photos and celebrate your favorite memories.
Materials
- photos from your travels
- Waterlogue app
- large color printout of U.S. map
- large black and white printout of U.S. map
- scissors, tape, pencil
- frame
Tools
- Printer or go to Staples
Instructions
- Print your downloaded photo map as a 24” x 36” engineer print from Staples.
- Choose your photos and use the waterlogue app to give them the appearane of watercolors (optional).
- Print all of your photos. You will need to experiment to find the best size to print each photo so it corresponds with the size of the state it represents.
- Cut the photos into the shapes of the states they’re meant to represent.
- Tape the photos to the map.
- Frame your map to protect it.
Recommended Products
As an Amazon Associate and member of other affiliate programs, I earn from qualifying purchases.
-
 My Travels Personalized USA Map, 24 x 18 Wall Art Print Poster, Bohemian Boho Nordic Style for Children Kids Toddlers Baby Newborn with Stickers for States and Capitals
 -
Scratch Off Map of The United States - Fun 'Learn The 50 States' Maps for Kids - USA Oversized Watercolor Pastel Travel Tracker Map - Gift - Where I Have Been Maps - Great at Home Learning Tool
-
Jetsettermaps Scratch Your Travels United States of America (USA US) Watercolor Art Map 12x18in Poster


Oh my word. This is so awesome and gorgeous. Thanks for sharing with all of us so we can copy your geniusness. Love love love.
Thanks Charlotte! I really love this one too!
Wow–this is SUCH a great idea and so beautifully executed! love it!
Thanks Gretchen!
Hi Carrie,
I just found your website and just LOVE it. I originally started looking for how to make a camera lamp and boy, I found SO much more. I can once again feel the creative juices in me. Thank you for sharing all your work. It is amazing.
Linda, I am so happy to hear that! I love those days where you suddenly have ideas and inspiration flowing in your brain. Here’s to lots of fun projects!
I have wanted to create a similar map. Yours is the very best rendition out there. Gorgeous! Thanks for taking the time to share your tutorial! Can’t wait to try this!
Thank you! Good luck with yours!
Great idea! Just made one and love it.
I’m so glad to hear that! This was such a fun project!