How To Make Gorgeous Farmhouse Window Awnings
These beautiful DIY farmhouse window awnings are inexpensive to make and look great in any room. I’m sharing everything you need to know to make your own.
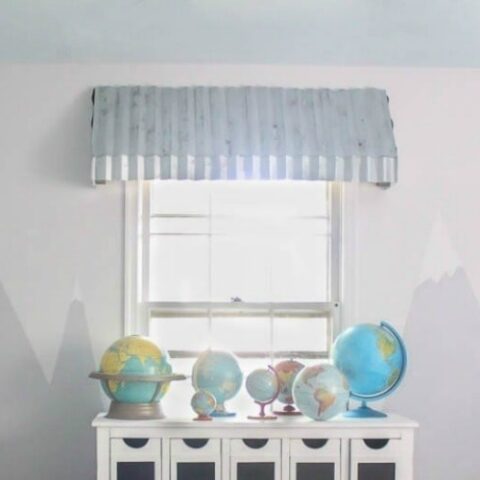
One of my absolute favorite parts of my sons’ bedroom makeover is the rustic farmhouse window awnings. I love the farmhouse vibe they add and I think they would look pretty amazing in just about any room in the house.
Generally I’m a huge fan of long curtains in every room, but I wanted something a bit different in this room. I went searching for inspiration and found the perfect thing.
When I saw this photo of similar farmhouse style window awnings in Joanna Gaines’ farmhouse, I knew I’d found a winner. The only problem was figuring out how to make them for myself!
Luckily, I don’t give up easily so I got to work figuring out exactly how to design and build my own version.
Now I have two gorgeous farmhouse window awnings and of course I have a full tutorial to share with you guys.
These rustic window awnings really aren’t difficult to make and they are incredibly cheap at only $40 per awning. But fair warning, there are quite a few steps involved so this one may take a few days from start to finish.

This post contains affiliate links which means if you make a purchase after clicking a link I will earn a small commission but it won’t cost you a penny more. Click here to see my full disclosure policy.
Supplies
- 1″x4″ pine board – for building the inner frame of the awning
- 2 1″x2″ pine boards – at least 6’ long
- 2’x10’ piece of corrugated metal roofing – I shared a tutorial for getting that perfect vintage farmhouse patina on your brand new corrugated metal right here. Aging the metal makes a huge difference in the final look of your awnings.
- wood screws – for building the wood frame
- drill
- jigsaw or miter saw – for cutting the wood for the frame at the correct angle. A miter saw works best, but if you don’t have one, a jigsaw can also work.
- dark stain and a clean rag or foam brush to apply it
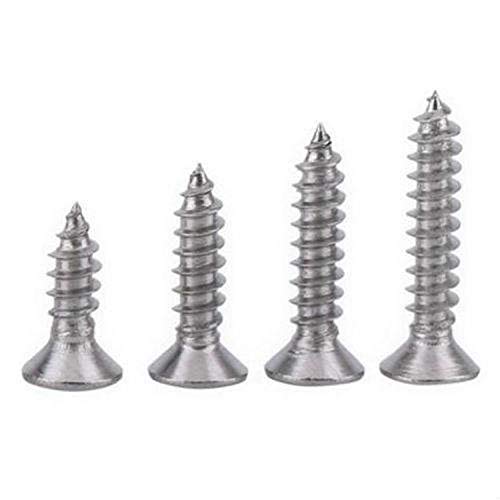
- 1” metal screws – for attaching the corrugated metal to the wood frame
- gloves – you really need to wear gloves to protect your hands when cutting metal
- tin snips – for cutting the metal to size
- tape measure
- level
- 2” screws – for attaching the awnings to the wall
How to build rustic metal window awnings
Okay, so now that your corrugated meal is all weathered and aged to perfection, it’s time to build some awnings!
The basic structure of these awnings is a simple wood frame that is then covered by the aged metal.
To figure out exactly how big my awnings should be, I used painter’s tape to mark off where the awnings will go around the windows in my room.

I made a few adjustments and then simply measured my painter’s tape to get the measurements for my wood.
My windows are pretty standard size, but if yours are larger or smaller, you can easily adjust my measurements to fit your own windows. My awnings go 5 inches past the window frame on each side, so simply add 10 inches to the width of your window.
You can also make your awnings taller if you would like; but keep in mind that the more of your actual window you cover, the more light you will block.
I chose to make my awnings cover just enough of the window to hide the blinds underneath when they are raised.
The wood frame for the window awnings is made from inexpensive pine boards. The frame won’t show much in the end so you really don’t need to use fancy wood.
For each of my window awnings, I used one 1″x4″ pine board and two six foot long 1″x2″ boards.
The diagram below shows what cuts of wood you need for each awning. Just remember to adjust your measurements if your window is a different size than mine.
Also, notice the final two angled pieces have approximate measurements. I recommend you do these tricky angle cuts last to avoid mistakes.

Once you have all of your straight cuts done, you are ready to begin to assemble your window awning frames. Putting these together is pretty straight forward.
I predrilled my holes and used simple 1 1/4″ wood screws to attach everything.
First attach the 7 inch pieces to the ends of the 1×4 as shown.

Attach the16.5” inch pieces to the backs of the 7 inch pieces.

At this point, you can cut your angled pieces. I’m sure there is a mathematical method of figuring out exactly what angles your board edges need to be, but that isn’t really my strength.
Instead, I simply held each board up next to the frame and used a pencil to mark where they needed to be cut. (My husband helped me with this because you do need more than two hands.)
I used a jigsaw to cut the lines I marked. )A miter saw would work even better, but I didn’t have one when I did this project). Then you can simply attach your angled boards to the frame as shown in the photo below.

The last step is to attach the final 47” support board across the back.

And that completes the wood frame for your awning.

Once the frame is built, you can stain it with your favorite wood stain; I used Minwax dark walnut stain.
Even though the wood frame will be completely covered by metal, you will still be able to see it if you are standing directly below the window. The dark stain gives it a great rustic look that compliments the aged metal.

Time to add that beautiful metal! The tutorial for aging your metal is right here.
You can definitely skip the aging process if you prefer, but it adds so much character to the finished awnings.
Cutting your big sheet of metal roofing is really simple. All you really need is a pair of tin snips – basically scissors that are sharp enough to cut metal.

Use a straight edge to draw your cut lines onto the metal. (Measurements for cutting your metal are below.)
You can draw your lines with a permanent marker, but I prefer to use a chalk marker. That way you can easily wipe away any stray marks that are left on your final piece.
Once your lines are drawn, carefully cut them with the tin snips. (Be sure to wear gloves because the cut metal will be very sharp!)

Before you start cutting, remember that you want all of the grooves or lines to be oriented vertically like a real window awning.
You’ll need to use two pieces to cover the wide front face of your awnings, but that is no big deal. When you overlap the two pieces, you won’t even be able to tell. This is why the metal pieces add up to more than the width of the awnings – to allow extra to overlap.
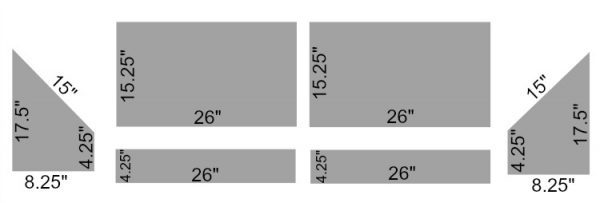
These are the measurements I used. Of course, if your awning is a different size, yours will be slightly different.
For the two sides, I simply traced my wood frame onto the metal so I could be sure to get the angles right.
Once your pieces are cut, hold them up to your frame to make sure everything looks correct.
You can always trim a little more off with your tin snips if needed.
Use metal screws to attach the metal to the wood frame. It is easiest to go ahead and screw all of the metal to the awning frame before installing the awnings above the windows.
To install them, you will have to remove the largest front metal panels, but the extra step is worth it. It is so much easier to reattach those two metal panels at the end with all of the holes for the screws already in place.
You can leave the sides and the lower edge of metal on the frame for installing.
And finally, we can hang those bad boys! Use a stud finder and mark where the studs are above your window.
You might want to have a helper to help hold these in place while you install them. (Hubby helped me with this part.)
Make sure that they are centered over the window and level before attaching them.
Then you just need to screw the wood frame into the studs.
We also added a screw in each side of the awning to make sure everything was extra secure.

Then I reattached the other two metal panels and gave a little cheer because they were finally finished!


These window awnings took more time to make than most of my DIY endeavors, but they were so worth it. I absolutely love them.
They are perfect in my boys’ room and I know they would look just as fabulous in almost any other room in our house. Love, love, love them!


What do you think? Do you have the perfect spot for some rustic window awnings in your home?
And if you missed it, you are definitely going to want to see all of the details of my budget Modern Farmhouse Boys’ Bedroom Makeover.
More DIY home ideas I think you’ll love:
- How to Age Galvanized Metal: from shiny new to vintage perfection
- How to turn a lantern into a farmhouse lamp
- How to Build a Beautiful Farmhouse Table with X Legs
I’d love for you to pin this post on Pinterest.

How To Make Gorgeous Farmhouse Window Awnings
Learn how to make rustic farmhouse diy window awnings with a beautiful farmhouse vibe.
Materials
- 2 1″x2″ pine boards (at least 6’ long)
- 2’x10’ piece of corrugated metal roofing
- wood screws
- dark stain and clean rag to apply it
- 1” metal screws
- gloves
- 1 1×4 pine board
- 2 six foot long 1×2 boards
Tools
- tape measure
- level
- Drill
- Tin Snips
- Jig saw or miter saw
Instructions
- Cut the 1x4 board to 50" long.
- Cut the 1x2 board to 47" long.
- Cut the 2 1x2's to 7" long.
- Predrill holes in the boards and used simple 1 1/4 inch wood screws to attach.
- Attach the 7 inch pieces to the ends of the 1×4.
- Attach the 16.5” inch pieces to the backs of the 7 inch pieces.
- Use a pencil to mark where they need to be cut.
- Use a jigsaw to cut the marked lines.
- Attach your angled boards to the frame.
- Attach the final 47” support board across the back.
- Stain it with your favorite wood stain.
- Use a straight edge to draw your cut lines onto the metal. You'll need two pieces to cover the wide front face of your awnings. For the two sides, trace the wood frame onto the metal to get the angles right.
- Carefully cut them with tin snips.
- Use metal screws to attach the metal to the wood frame.
- To install them, remove the largest front metal panels.
- Use a stud finder to mark where the studs are above your window.
- Screw the wood frame into the studs.
- Reattach the other two metal panels.
Recommended Products
As an Amazon Associate and member of other affiliate programs, I earn from qualifying purchases.
-
 Hard-to-Find Fastener 014973291563 Phillips Flat TwinFast Wood Screws, 8 x 2-Inch, 100-Piece
 -
Hilitchi 410 Stainless Steel #8 Hex Washer Head Self Drilling Sheet Metal Tek Screws Assortment Kit Set with Drill Point, Self Driller, 200 Pieces
-
BLACK+DECKER Jig Saw, Smart Select, 5.0-Amp (BDEJS600C)
-
SNUG Fasteners (SNG5) 400 Qty Assorted #6 Flat Zinc Coated Phillips Head Wood Screws


Wow! The windows look so beautiful and it is so easy to make. Will surely try this out soon. Thanks for sharing.
Thanks!
These really are my favorite element of the room! Wow! Thanks for the tutorial! Did you do anything to the edges to smooth them? I always seem to end up with sharp uneven edges when cutting tin.
Thanks Cecilia! They are my favorite too. I’ve had trouble with sharp edges when I cut metal in the past before too. This time I just trimmed any uneven parts and left it at that. The edges are smooth but still sharp. I figured they are high enough nobody should be coming in contact with them anyway. (Hopefully!)
Can you tell me how heavy you think these are? I have a triple window and would like to do one that covers all three. I woory about the weight on my walls though ….what are your ideas?
Jenn, because the wood frame is very thin, they aren’t very heavy, maybe 5-10 pounds each? I have definitely hung mirrors on our walls that are significantly heavier than these awnings. I’m not a professional, so this isn’t professional advice ;) but I think they would probably be fine as long as you secure them to several studs.
I love how this turned out! It’s beautiful! I would love to make one for my double window in my craft room but I wish there was an easier way to cut the tin. It took me forever to cut out my small Christmas tree. LOL
Thank you Linda! This would be awesome for your craft room but you’re right, cutting tin isn’t impossible, but it definitely isn’t easy!
This is one of my most favorite projects. I’m putting a burlap shade under the awning . Looks so cool.
The burlap shade sounds like an awesome idea!
I made one and love it. Thanks for posting the instructions. I didn’t age mine. Wish I knew how to post my pic.
That makes me so happy! If you want to email me a pic at [email protected], I would love to see it and share it on my Facebook page!
Do you think these could be used outside?
Yes, I definitely think these could be used outside. If you weather them the way I did (by stripping the weatherproof coating), they will continue to weather more quickly. If you left the weatherproof coating in place, they would continue to look new (particularly since they are made using metal roofing). If you do use them outside, be sure to use a good exterior sealer on the wood frame to keep it in good condition.